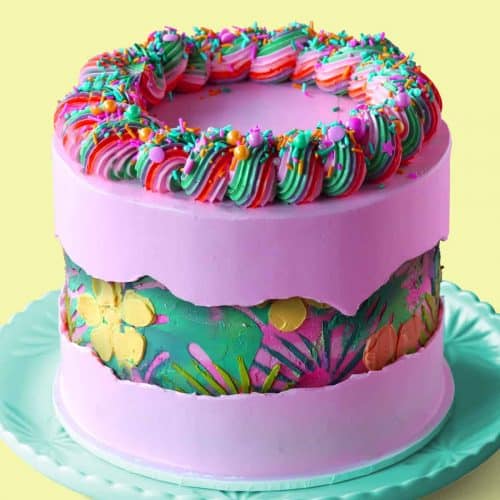
Tropical Fault Line Cake
This tropical cake is vanilla and lime flavoured and features a gorgeous tropical pattern with a fun buttercream and stenciltechnique!
Ingredients
Cake
- 3 1/2 cups (430 g) all-purpose flour
- 1 1/4 cups (265 g) caster sugar
- 3 tsp baking powder
- 1/2 tsp salt
- 1/2 cup (125 g) unsalted butter
- 2 large eggs
- 1 1/2 cups (375 ml) milk
- 1/2 cup (125 ml) vegetable oil
- 2 tbsp greek yogurt
- 1 tsp vanilla extract
Cake Extras
- 2 tsp lime flavoring
- 4 drops green and yellow food gel
Frosting
- 2 1/2 batches American buttercream frosting
- 2 tsp raspberry flavoring
- 5 drops pink food gel LIGHT PINK FROSTING
- 10 drops pink food gel PINK FROSTING
- 4 drops green food gel + 4 drops yellow food gel LIME FROSTING
- 4 drops green food gel GREEK FROSTING
- 5 drops yellow food gel YELLOW FROSTING
- 4 drops orange food gel ORANGE FROSTING
- 5 drops purple food gel + 5 drops pink food gel PURPLE FROSTING
Decorations
- 1/2 cup (100 g) sprinkles of your choice
Instructions
Frosting
- Flavor all of the frosting with raspberry flavoring and mix until well combined.
- Split the frosting in half. Color one half light pink using food gel. Mix using a spatula until evenly colored. Set aside.
- Split the remaining frosting in half. Then split one half into half again. Color one pink, color the other one dark pink.
- Split the remaining frosting into 5 small bowls. Color each the remaining colors: lime green, green, dark green, yellow, orange and purple.
- For this recipe you’re going to need leaf stencils. I bought mine from my local craft shop, but you can make your own using plastic sheets and a craft knife.
Cake
- Please note: To make the 6 layered cake you see pictured; you’ll need to double the cake recipe only. All other measurements are enough to fill, crumb coat and finish decorating the cake.Preheat a fan-forced oven to 140C (280F) or 160C (320F) for a conventional oven. Spray three 7” cake tins with oil spray and line the bottom with baking paper. Set aside
- Add the flour, sugar, baking powder and salt to a large mixing bowl and mix together using a hand mixer until well combined.
- Next add the softened butter and mix on low speed until mixture reaches a crumbly sandlike texture.
- Add the eggs, milk, oil, Greek yogurt, lime extract and vanilla extract. Mix on low speed until no dry ingredients are showing. Scrape down the bowl and mix for another 20 seconds.
- Split the batter into two and color one half green.
- Fill three7” cake tins with batter by spooning or scooping it in (about 2 tbsp at a time) alternating between the two.
- Bake for50-60 min or until a toothpick inserted comes out clean. If the pick comes out with wet batter, bake for a further 10 min at a time until fully baked. Allow the cakes to cool to room temperature inside the cake tins and then chill them in the fridge overnight. Chilling your cakes overnight makes them easier to trim and decorate. So I bake my cakes the day before I decorate them.
- To trim your chilled cakes, use a cake leveler or large serrated knife to carefully trim the crust off the top of each cake before you trim each cake in half.You’ll end up with 6 layers of cake.
- To crumb coat your cake, add a dab of pink frosting onto an 8” cake board or flat serving plate. Use a small offset spatula to spread the frosting around before adding the first cake layer. Gently press down the center of the cake layer to make sure it’s stuck to the frosting underneath.
- Add frosting the pink and green frosting to a piping bag and frost a ring of pink frosting around the top of the cake. Then pipe a ring of dark pink frosting inside that and alternate between the two until you fill the layer. Add the next layer of cake. Repeat with the remaining layers.
- Add more frosting around the top and sides of the cake. I alternated between the light and dark pink frosting.
- Use a cake scraper (otherwise known as a bench scraper) to smoothen out the frosting on the sides and top. Get it as neat as you can. This should just be a neat, thin layer of frosting which is aimed at trapping any cake crumbs so that random bits of cake crumbs don’t show up on the final layer of frosting. Chill for 2hours or overnight.
- Ok so the next bit is the fun bit! It’s really easy, but it’s a little time consuming.
- You’re going to gently place one of the stencils on the chilled cake. Press it against the cold frosting with your fingers to help it stick. Then use a small offset spatula to spread different shades of green onto the stencil. Get it as flat as you can and then gently peel the stencil away to revel the leaf pattern. Wash the stencil in hot water each time you use it and pat it dry with a paper towel.
- Continue making leaf patterns around the cake. Once you have one layer of frosted patterns around the cake, pop the cake back in the fridge for an hour. Then layer more leaf patterns over the first layer of patterns. The stencils I had included a flower stencil so I used the yellow and orange buttercream to make the flowers. Once you’re happy with the leaf pattern and how it looks, pop it back in the fridge for an hour before piping light pink frosting on the very bottom and top of the sides of the cake. Don’t put too much frosting but make it jagged. It shouldn’t be perfect.
- Add more frosting on top of the cake and use a small offset spatula to smoothen out the top. It doesn’t have to be perfect because we’re going to come back and clean it up.
- Use a bench scraper to carefully go around the cake and smoothen out the top and bottom of the light pink frosting until it’s nice and smooth. Keep in mind that as you go around the cake, you’ll be encouraging more frosting to hide your beautiful pattern.
- Once you’ve done that, place your frosted cake in the fridge.
- Lay out a large piece of plastic wrap on your bench top and pipe lines of the purple, orange, pink and green frosting, alternating between each one.
- Roll it up and twist both ends of the log. Snip one end off with scissors and then place in a large piping bag fitted with a Wilton 8B piping tip.
- Pipe swirls of frosting on top of your cake and finish with sprinkles.
Video
Notes
Storage
Cake can be stored in an airtight container for up to three days.
Nutrition
Calories:178kcal | Carbohydrates:20g | Protein:4g | Fat:6g | Saturated Fat:3g | Polyunsaturated Fat:1g | Monounsaturated Fat:2g | Trans Fat:1g | Cholesterol:30mg | Sodium:139mg | Potassium:77mg | Fiber:1g | Sugar:3g | Vitamin A:195IU | Calcium:66mg | Iron:1mg
Have you tried this recipe?Tag me on instagram @thescranline!