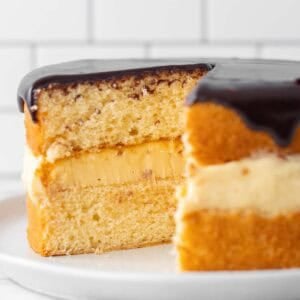
Boston Cream Pie Cake Recipe
My Boston Cream Pie Cake has soft vanilla sponge, silky custard, and glossy chocolate ganache for a simple, classic crowd-pleaser.
Ingredients
Custard Filling
- 500 g whole milk not skim, warmed
- 1 tsp vanilla bean paste or Pure Vanilla Extract
- 40 g corn starch corn flour
- 60 g caster sugar superfine sugar
- Pinch of fine salt
- 4 egg yolks
- 80 g unsalted butter cubed and cold
Soft Vanilla Sponge
- Soft Vanilla Cake
- 330 g all-purpose flour plain flour
- 3 tsp baking powder
- 3/4 tsp salt
- 4 large eggs 55g each, room temperature
- 310 g caster sugar / superfine sugar see notes
- 245 g milk full fat
- 90 g unsalted butter cubed
- 50 g vegetable oil can use canola oil
- 14 g vanilla extract
Chocolate Topping
- 135 g dark cooking chocolate see notes
- 20 g unsalted butter
- 10 g brown sugar see notes
- 10 g glucose syrup see notes
- 85 g heavy cream see notes
Instructions
Custard Filling
- How to prepare a vanilla bean (if using) - Use a sharp knife to cut the bean in half lengthwise. Then, use the sharp end of the knife to scrape out the vanilla pods from inside the bean. Add the milk, bean halves and scraped out seeds into a medium sized heavy bottomed stainless-steel pot. Heat on medium heat until warm, not hot. When you’re ready to use it, run it through a sieve as you pour it into the rest of the ingredients.
- Combine dry ingredients and eggs - To a medium sized heavy bottomed stainless-steel pot, add the corn starch, sugar and salt and use a whisk to combine. Add the egg yolks and whisk until smooth.
- Add the milk - Slowly add the warmed milk, about 1/4 cup at a time, and whisk each time until all of the milk has been added. It’s at this point you can add the vanilla extract or vanilla bean paste if using.
- Cook custard - Cook in the pot on medium heat. Use a whisk to mix continuously. Do not stop mixing or the custard will become grainy. After about 3-4 minutes the mixture will begin to thicken. Continue whisking until the mixture begins to bubble. When it bubbles, stir for 3 minutes, then take off the heat.
- Add butter - Add 1/4 of the butter and whisk until it’s melted and well combined. Repeat until all the butter has been added. You want to do this slowly, so the custard doesn’t split.
- Run through a sieve - Run the thickened custard through a fine mesh sieve into a medium sized mixing bowl to get rid of any lumps.
- Chill to set - Cover the surface of the custard with plastic wrap and chill in the fridge for at least 5 hours. Overnight is best.
- Once set - Give the custard a whisk before using to smoothen right before you’re ready to use it in the cake
Soft Vanilla Sponge
- Preparing your oven - Preheat your oven to 170C / 340F (fan off), 150C / 300F (fan on). I like baking with the fan on for an even rise. Position your rack in the middle of the oven.
- Preparing your cake tins - Spray the bottom (not sides) of two 20cm / 8-inch cake tins with oil spray and line the bottom with baking paper. I prefer just rubbing cold butter on the cake tins for better flavor.
- Combine dry ingredients - In a medium sized bowl, whisk together the flour, baking powder and salt. Set aside.
- Beat the eggs and sugar - Add the eggs to a large mixing bowl (glass or metal), and use an electric hand mixer to beat until frothy, about 1 minute. A stand mixer with a whisk attachment also works. With the mixer on medium-high speed, add the sugar a spoonful at a time. It’ll take about a minute. Once all the sugar is added, keep beating on medium-high speed for 6 minutes until the mixture is pale, thickened, and tripled in size.
- Add dry ingredients to egg mixture - Add half the dry ingredients to the egg mixture and mix on low speed until just combined. Repeat with the rest. The batter will be thick. Avoid overmixing the batter, small lumps are fine, they’ll disappear in the next step.
- Heat milk and butter - Heat the milk and butter in a saucepan over medium heat, stirring continuously, until it reaches about 60C/140F or small bubbles form around the edges. Do not let it boil. Alternatively, you can also do this in a heatproof jug in the microwave. Mine takes about 90 seconds for the butter to melt.
- Add hot milk - Add half the hot milk mixture, along with the oil and vanilla. Mix on low speed until combined. Add the rest of the milk mixture and mix again until smooth. The batter will be thin and pour in a steady ribbon.
- Divide the batter - Divide the batter evenly between the two cake tins. It works out to about 600g in each tin. Tap each tin on the counter a couple times to release any air bubbles.
- Bake - Bake on the middle rack for 30–32 minutes, or until a toothpick inserted in the center comes out clean. The cakes should be golden and spring back when lightly touched. If they sink and don’t spring back, bake for a couple more minutes.
- Cool the cakes - Let them cool in the tins for 10 minutes, then run a knife around the edges to loosen. Transfer to a cooling rack, placing them baking paper side down, and let them cool completely.
- To level off the cake (optional) - Use a large, serrated knife or cake leveler to very top of each cake to level it off. This is completely optional. The cakes bake pretty flat anyway.
Chocolate Topping (Microwave Method)
- Add the dark chocolate, butter, brown sugar, glucose syrup and heavy cream to a large, microwave-safe bowl and microwave on high, for 20 seconds at a time, mixing well between each interval until smooth. Allow to cool slightly, about 15-20 minutes, before pouring on top of the cake.
Chocolate Topping (Double Boiler Method)
- To make the chocolate topping over a double boiler, simply add the dark chocolate, butter, brown sugar and heavy cream to a large heatproof bowl. Place the bowl on top of a pot of gently simmering water making sure the bottom of the bowl is not touching the water. Stir until melted. Take off the heat and allow to cool for 20 minutes before pouting on the cake.
- Consistency - Let the chocolate topping cool for 20 minutes until it’s thick enough to spread but still soft enough to slowly drizzle over the sides. If it runs too quickly, let it cool for another 5–10 minutes before using.
Layering the cake
- To layer the cake - Add the first cake layer on your serving plate. Add the chilled custard filling and spread around using a spatula. Add the next layer of cake and gently press down. Use a spatula to neaten up any custard that might be spilling out the sides to make it flush with the cake. Pop this back in the fridge to set for an hour before pouring the chocolate topping on top of the cake. Use a spatula to gently spread it and let some drizzle over the sides.
- Chill cake - chill the finished cake for an hour to let everything set before slicing.
Notes
Caster sugar - also known as superfine sugar is ideal for this cake as it dissolves into the eggs quickly which will prevent overmixing. Alternatively, you can use granulated sugar or even pulse granulated sugar in a food processor until it’s finer.
Mixing the batter - it’s important to follow the speeds given in the recipe when it comes to mixing. Especially after the flour is added as it prevents overmixing which can cause your cake to be tough. Make sure you scrape down the bowl after each mix to ensure any ingredients that are hiding at the bottom are properly mixed in. It’ll ensure a nice uniform batter that rises in the oven properly.
Mixers You Can Use - Using an electric mixer to make the cake batter is going to make it an easier process and also gives you the best results, especially when whipping the eggs and sugar. You can use a stand mixer with the paddle attachment or a hand held electric mixer.
Storage - Wrap the cooled cakes in plastic wrap and store at room temp for 3 days. The fully frosted cake can be stored in an airtight container, in the fridge for up to three days. Thaw to room temperature before serving.
How to freeze - Wrap the undecorated cake tightly in plastic, then place it in a freezer bag. Freeze for up to 3 months. Thaw completely at room temperature before unwrapping and using as normal.
Nutrition - is an approximate and is based on per slice. This recipe makes 12 generous sized slices.
A note on measurements – This recipe uses weight measurements for the most accurate results. Cup measurements can vary depending on where you are, which affects the precision needed for a recipe like this. Here is where you can learn more about how to measure ingredients using digital kitchen scales.
Nutrition
Calories:781kcal | Carbohydrates:48g | Protein:13g | Fat:46g | Saturated Fat:27g | Polyunsaturated Fat:2g | Monounsaturated Fat:13g | Trans Fat:1g | Cholesterol:312mg | Sodium:454mg | Potassium:408mg | Fiber:2g | Sugar:17g | Vitamin A:1451IU | Vitamin C:0.1mg | Calcium:217mg | Iron:4mg
Have you tried this recipe?Tag me on instagram @thescranline!