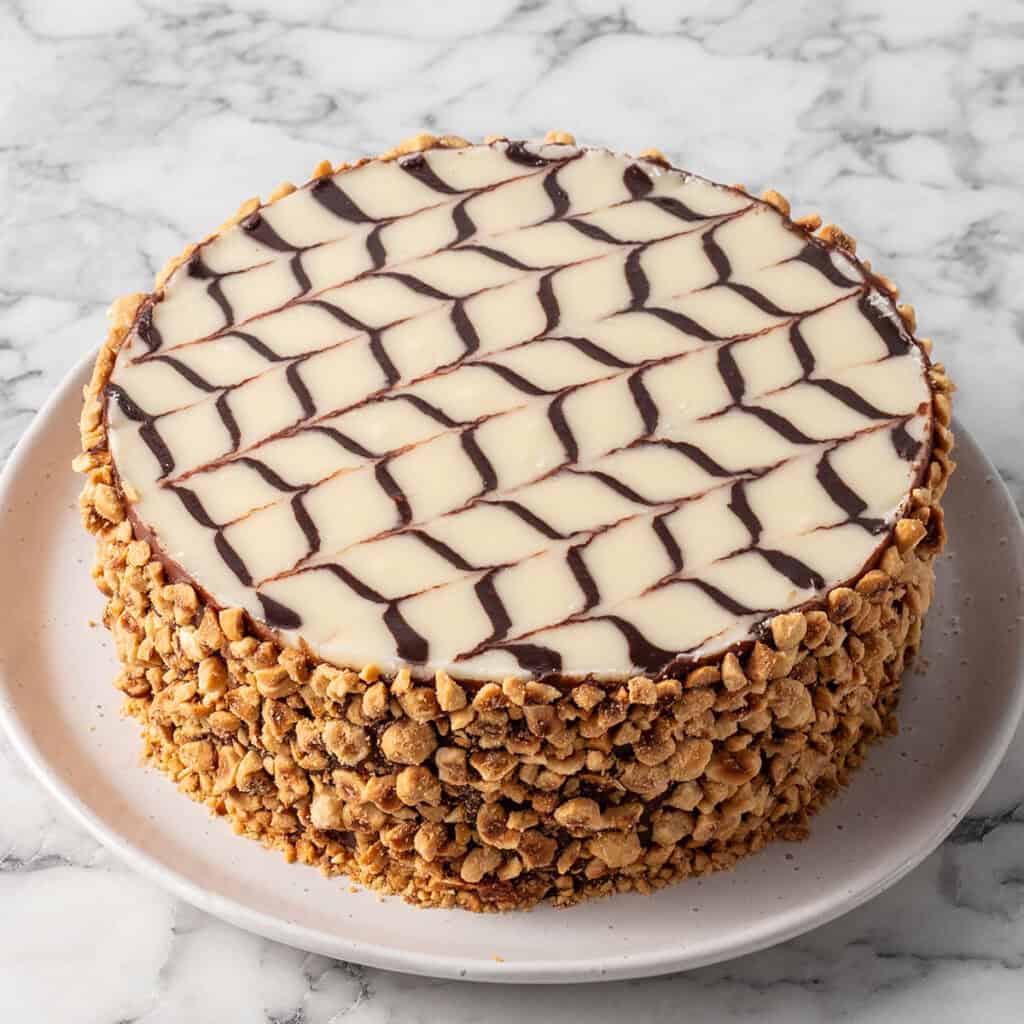
Hazelnut And Chocolate Layer Cake (Hungarian Esterhazy Torte)
This Hungarian and Chocolate Layer Cake is soft and melt in your mouth with layers of nutty, rich hazelnut dacquoise and deeply chocolatey pastry cream. It’s coated in toasted hazelnuts and finished with a smooth chocolate and vanilla glaze. It’s an ultra-indulgent cake that leans more project than quick dessert, but the payoff is worth the effort!
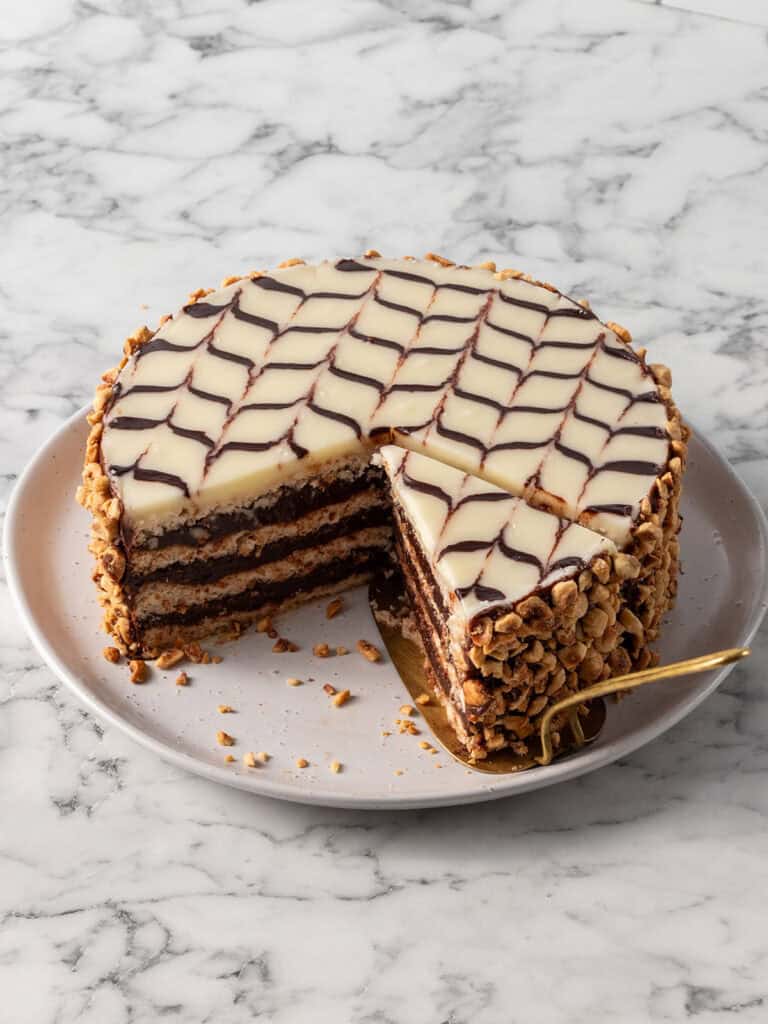
Hey team, Nick here! If there’s one thing I go weak at the knees at, it’s a classic looking European cake like this. You just know you’re in for a treat when there’s a feathered glaze on top of a dessert. This is my take on an Esterhazy Torte which is a classic Hungarian cake typically made using walnuts. I decided to add my own twist and use hazelnuts.
Just like my Chocolate Hazelnut Ferrero Rocher Cake, this cake is a project.There are a couple different elements that make up this chocolate hazelnut dessert. Silky chocolate pastry cream, toasted hazelnuts, a hazelnut sponge, a glaze and a hazelnut praline paste. The good news is, you can make most of those things in advance which helps make things manageable. I broke it down in the
One thing that sticks out to me with this cake is how after the cake has set in the fridge overnight, each element gets to know each other and you get this ultra soft, melt in your mouth layer cake that honestly, feels like it was made by seasoned pastry chefs. Instead, this one was made right in your kitchen.
And because it’s such a special cake, it’s great for special occasions. I’ve made it for birthdays and fed a crowd with it. It’s rich in chocolate and hazelnut flavor, so a small slice goes a long way. I’m a fan of hazelnut desserts so I go in for two slices.
My workflow for making an Esterhazy Torte.
This cake might look a little over the top, but it’s totally manageable if you spread the steps out over a couple days. I’ve written out which day to make each element in the step by step section below so you won’t need to jump back and forth to figure it out.
Some parts need time to set or cool, so giving yourself the space to work through it makes the cake easier to make. It also means you’ll enjoy it more instead of rushing through or feeling overwelmed.
You’ll want to toast your hazelnuts (Day 1)
I love toasting the hazelnuts for this recipe. It brings out their natural oils which gives them a richer flavor and makes them crunchy. Goes so well with the soft silky cake textures.
You’ll need 450g total for this recipe. Some of it used for the praline, some for the dacquoise and then some to coat the cake when decorating.
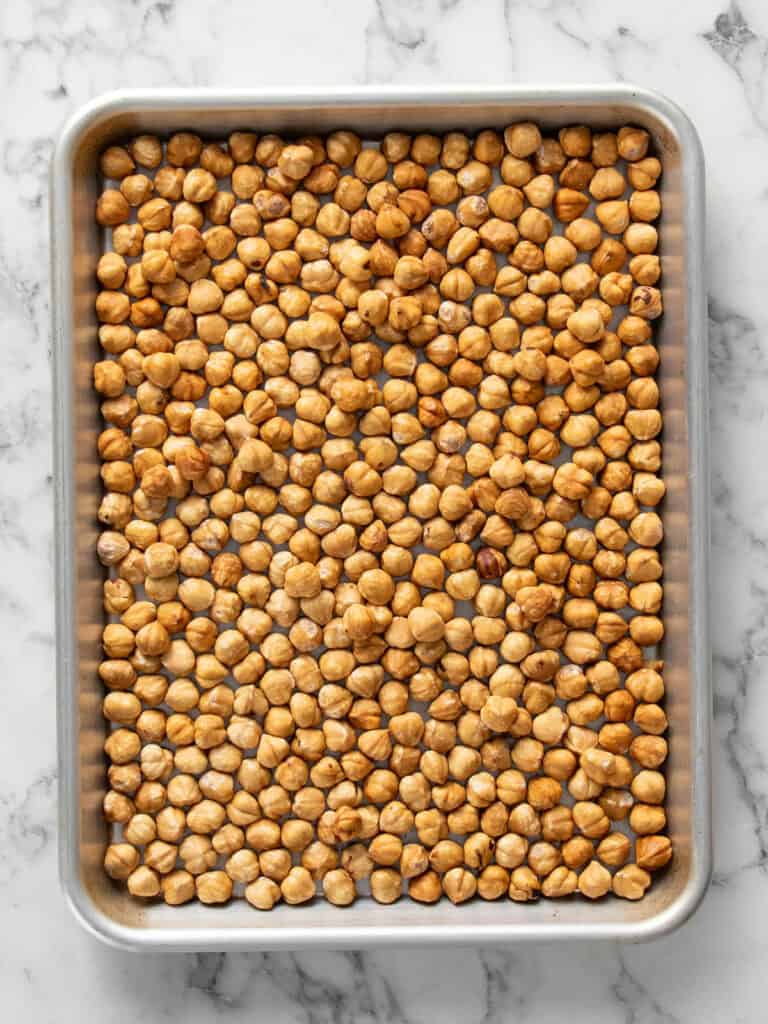
I spread them on a tray and bake at 180C / 355F (fan off), 160C / 325F (fan on) for 20 minutes, stirring halfway. Let them cool completely.
Tip: I make these days in advance sometimes and pop them into a zip lock bag until I’m ready to use them.
How to remove the skins from your hazelnuts
I buy mine already skinned but you can easily remove the skins from yours at home if they’re still on. Just roast them at 160C / 325F for 20 minutes. Then wrap them in a calean tea towel and rub them together until the skins come off. Don’t stress if a few stubborn bits stay on. They’re fine to use.
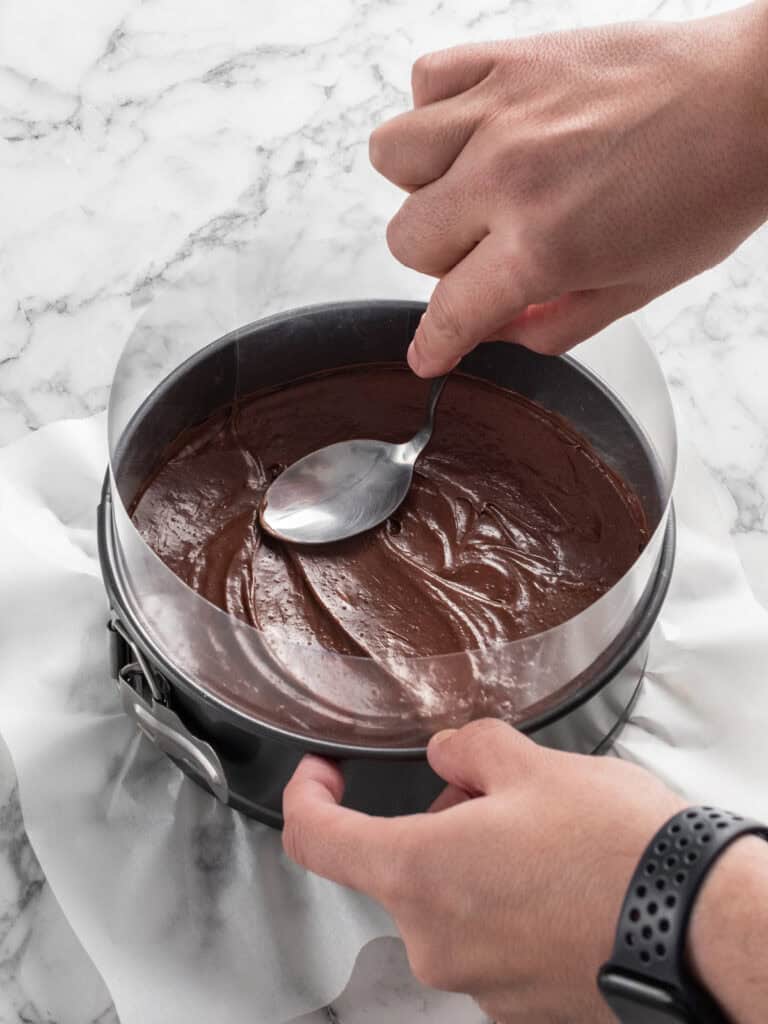
The chocolate pastry cream comes together in one pot! (Day 1)


I swear by my chocolate pastry cream. It’s deeply rich in chocolatey and silky. Plus, it holds its shape between cake layers which makes it perfect for this cake!

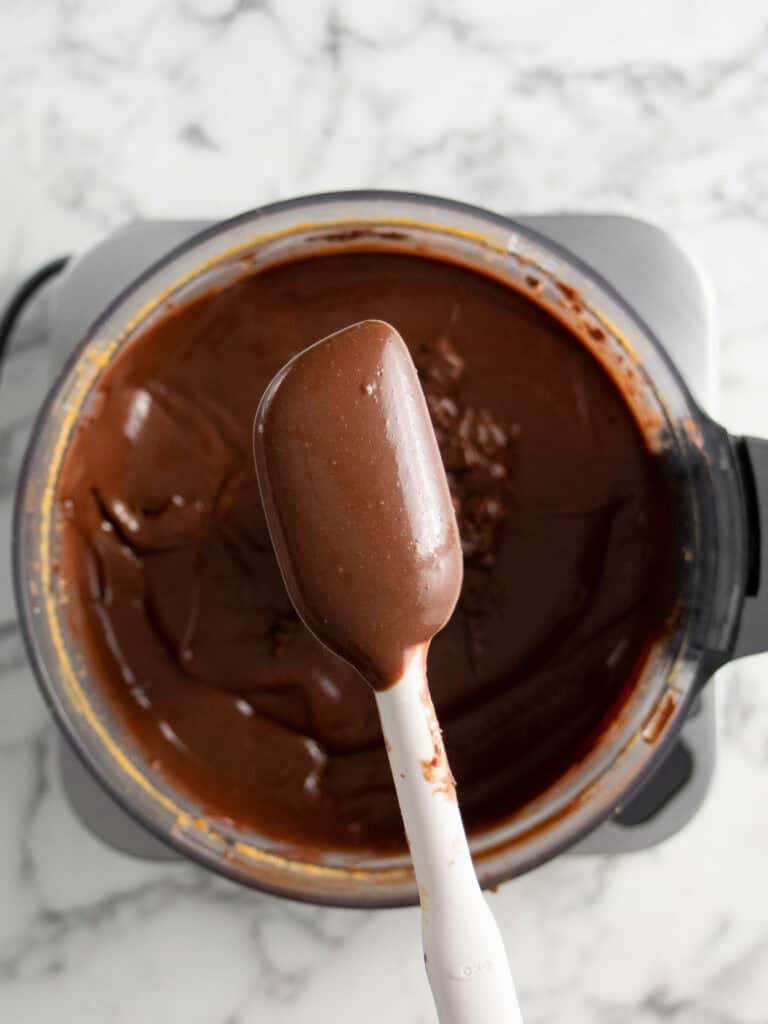
It comes together in one pot, and it uses simple ingredients like eggs, milk and butter. I like using both cocoa powder and cooking chocolate to take that chocolate flavor over the edge. Plus, the chocolate is what helps is set nice and thick.
Tip: I’d recommend making it the day before you put the cake together, so it has plenty of time to chill and set properly.
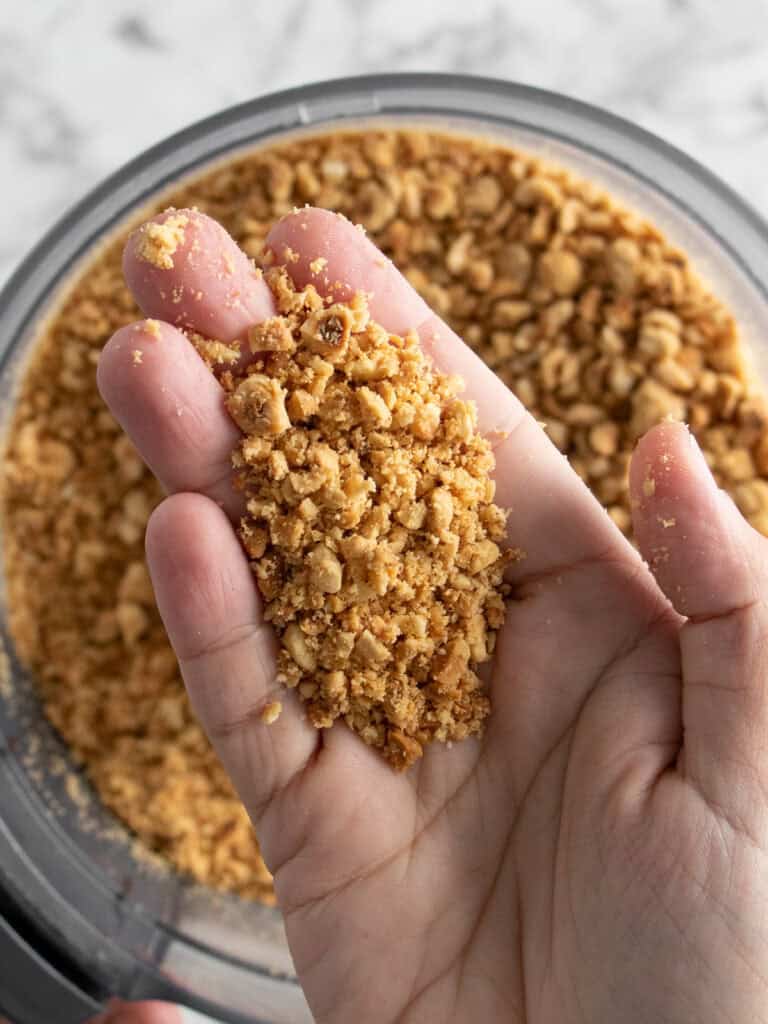
Making the hazelnut praline (Day 1 or 2)
One of the best things about this cake is the hazelnut praline. It adds an intense nutty and subtle caramel flavor which makes it irresistible. It’s absolutely incredible!
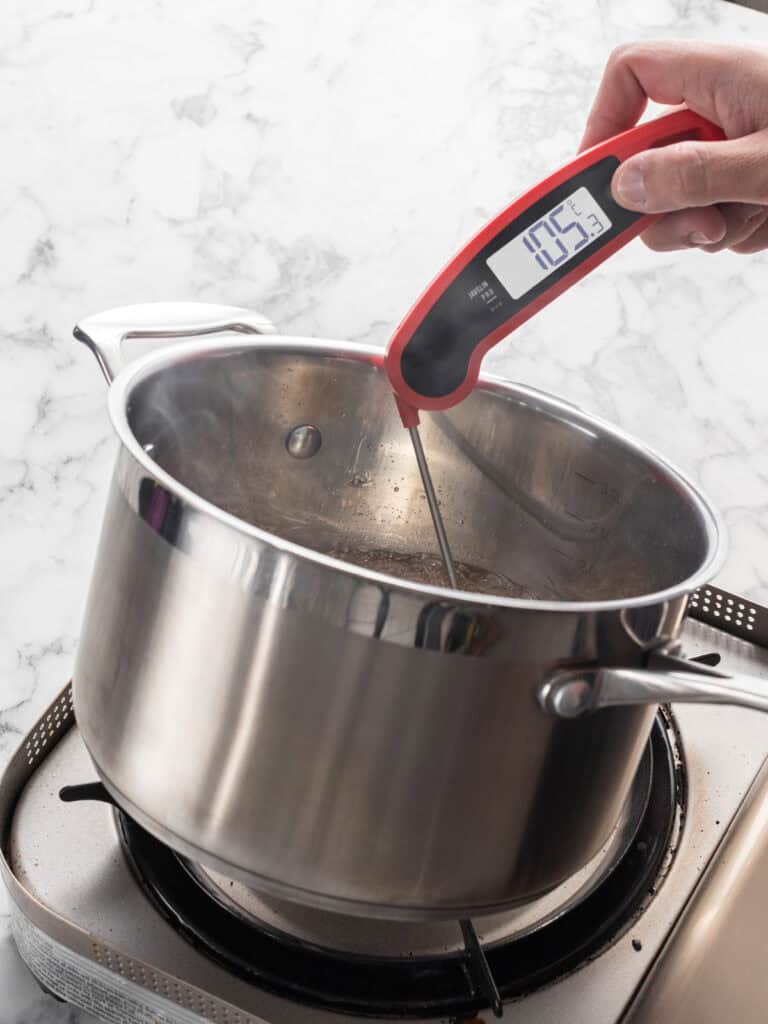
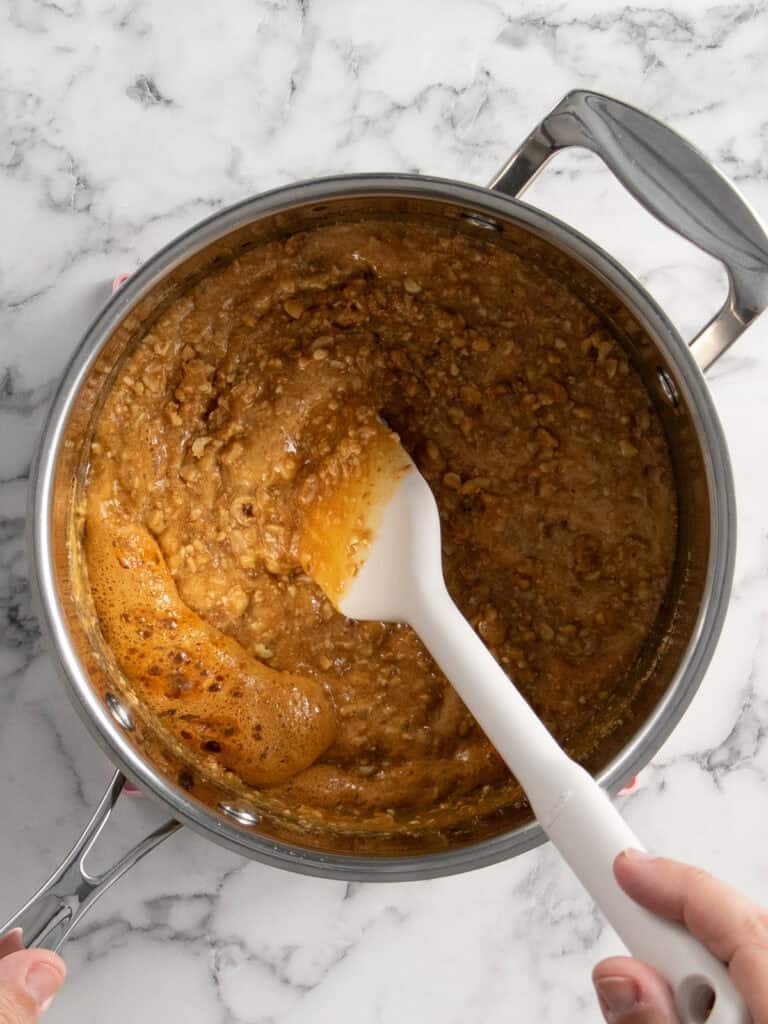
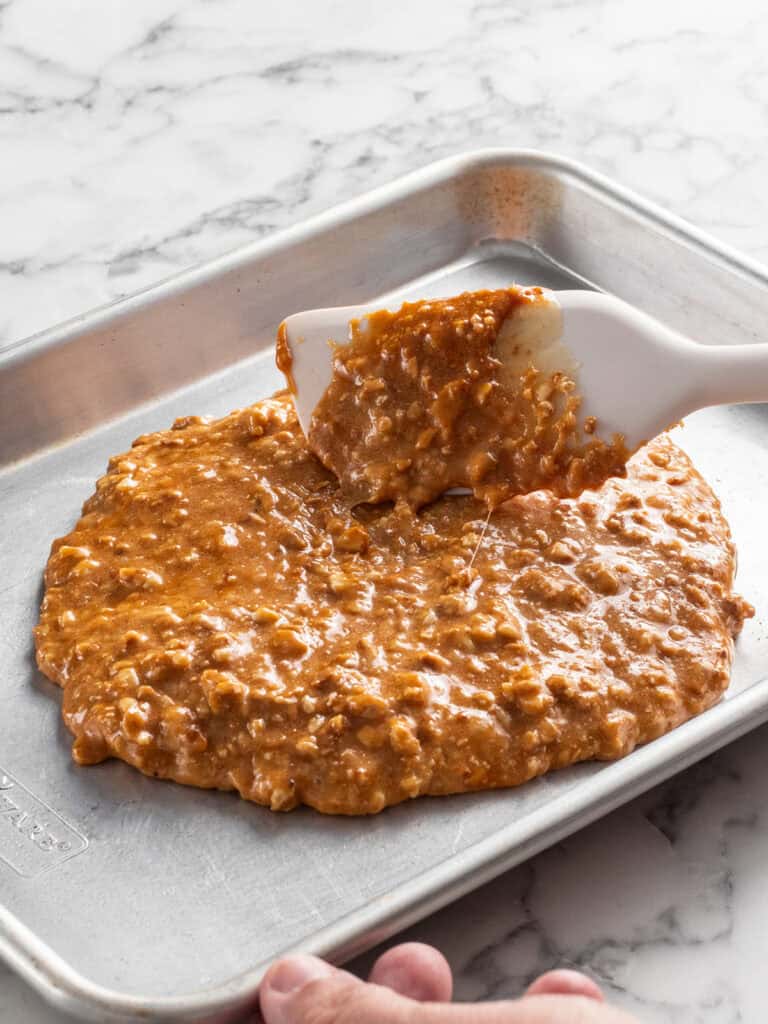
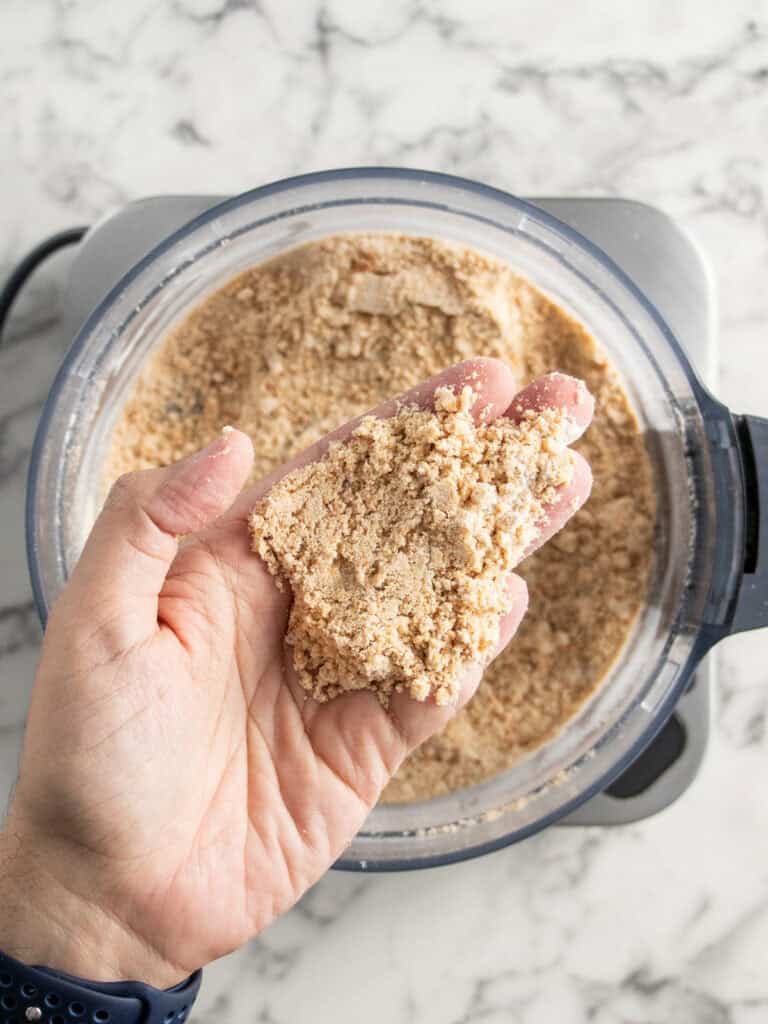
It starts by cooking the sugar, water and glucose syrup until golden and bubbling. Once it hits 160C, I stir in the salt and 150g of the toasted hazelnuts. Then add the bicarb soda and quickly stir.Pour it out to a baking tray that’s lightly oiled and let it cool and harden at room temperature
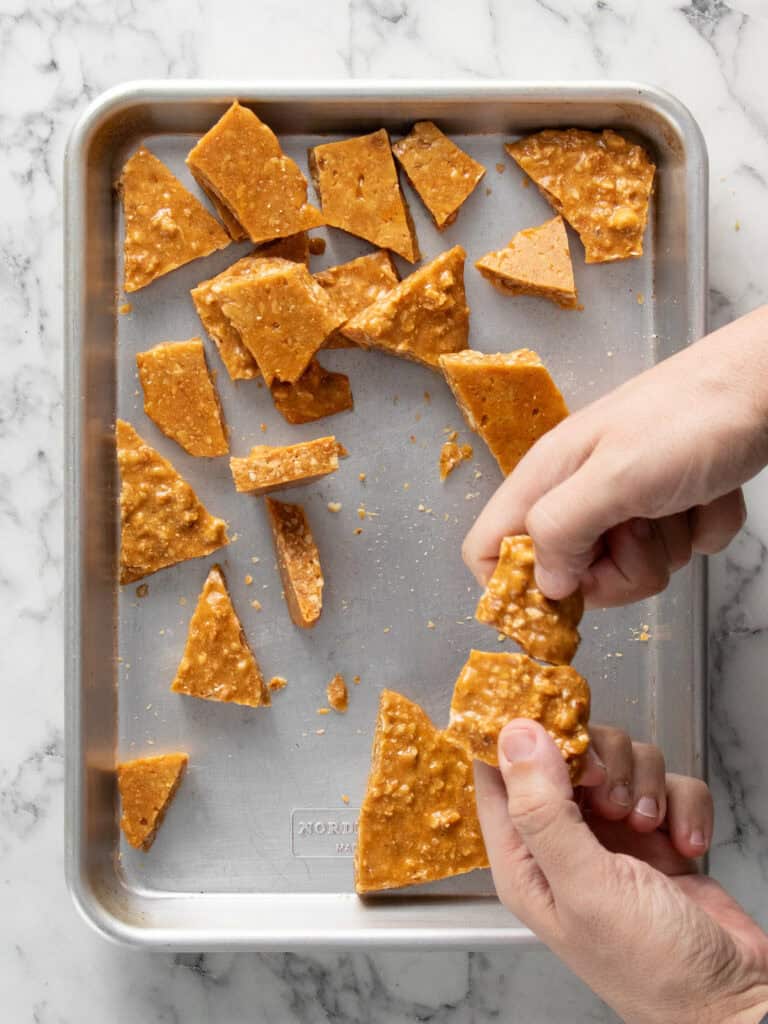
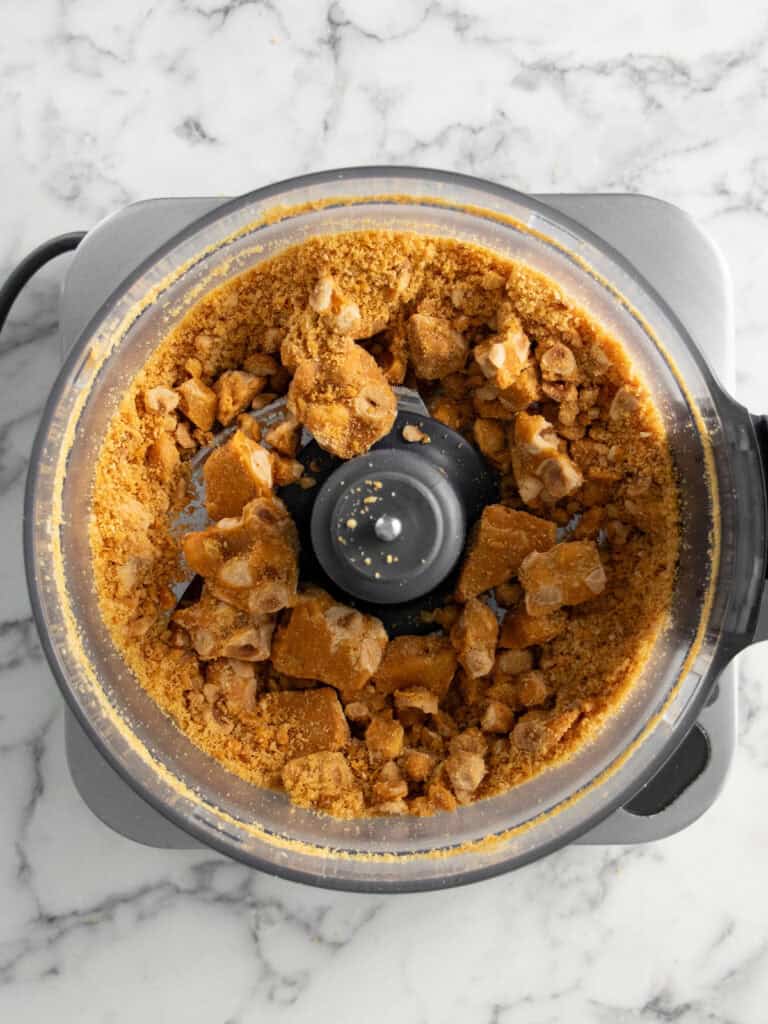
Once set, I break it into small pieces and blend it in a food processor. It’s loud and it can cause the machine to wobble around, so hold the processor down until it turns to powder. The goal here it to go slow and keep scraping the bowl down to make sure everything mixes evenly. Keep blending and scraping down the sides until it becomes a smooth paste.
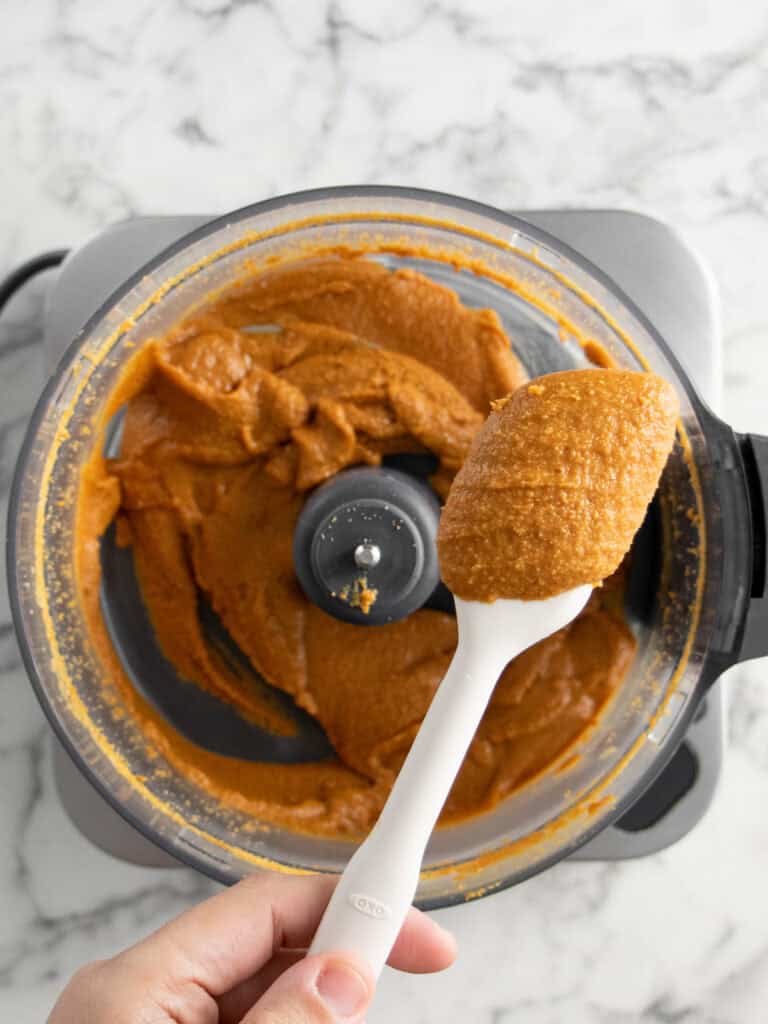
To finish, blend the chilled chocolate pastry cream with all the praline. It takes a minute to come together, but what you get is a rich, silky cream packed with hazelnut flavor. Once it’s done, pop it in the fridge until you’re ready to layer the cake.
TIP: You can make the praline days in advance and just store it in a jar or container and use it when you’re ready. It’s great in other things too. I haven’t tried it in frosting but if you do, let me know what you thought of it!
Hazelnut dacquoise sponge cake (Day 2)
I think the hazelnut dacquoise is where all that toasted hazelnut flavor really shines. It’s a soft sponge made mostly of meringue and toasted hazelnuts with a little bit of flour to hold everything together.
I start by pulsing the remaining 300g of hazelnuts until they’re small pieces, not powder. Set some of those aside to decorate the cake and then add the flour to the machine and pulse to a fine crumb
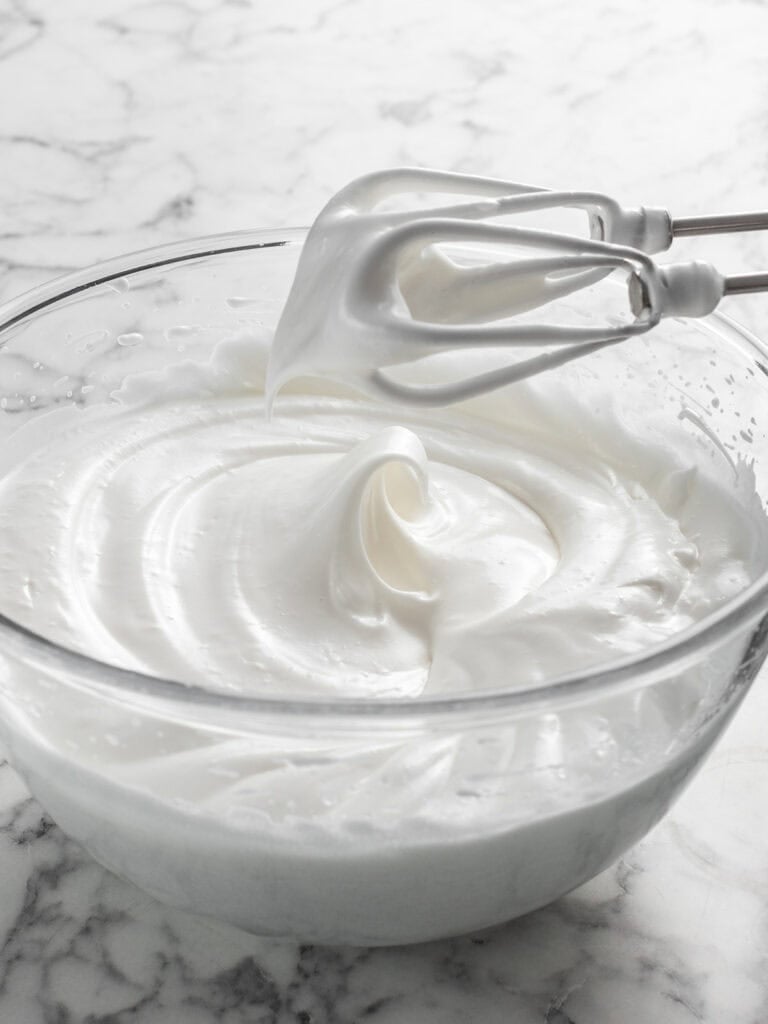
Then you want to move over to the meringue which is easy to make. Mix the eggs and cream of tartar in a bowl until they’re frothy and then slowly add the sugar while you mix. It’ll eventually turn into a thick and glossy meringue. This is what’s going to give your cake volume and fluff!
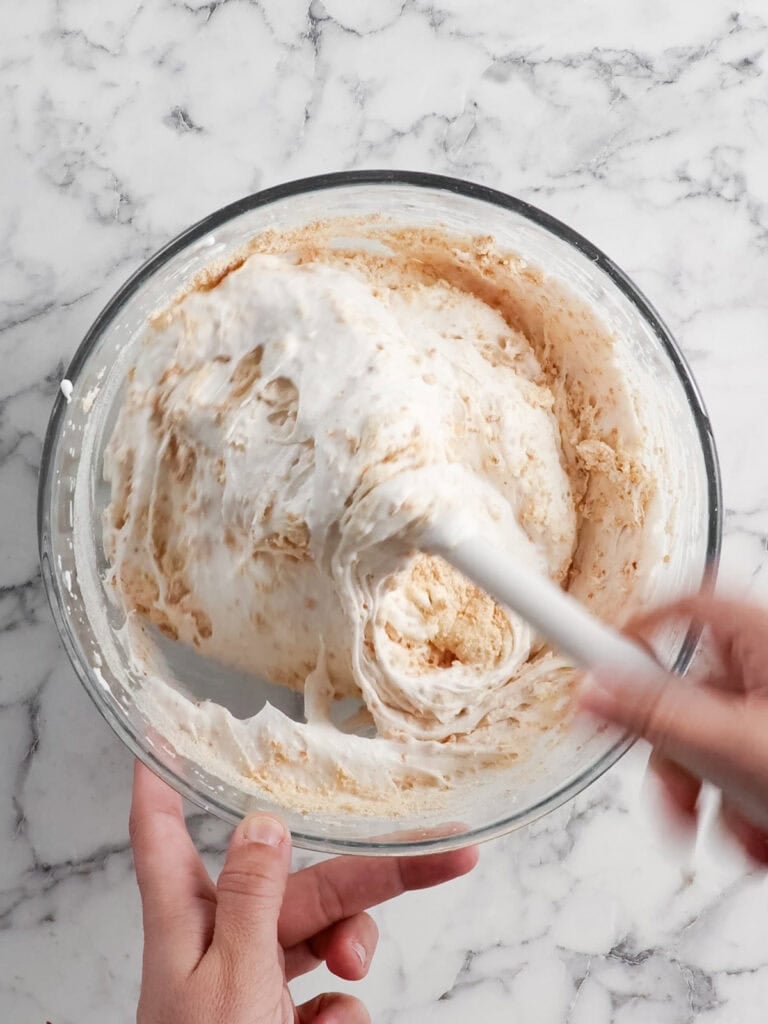
Finish the batter by adding the hazelnut mixture and fold through until well combined. Just be gentle when folding to make sure you don’t deflate the mixture. Then pipe it into the cake tins and spread evenly. You’ll need 4 of those but if you don’t have that many, just bake them in batches.
Once baked, let them cool and you’re ready to layer!
Tip: make sure you’re gentle when folding the dry ingredients through the meringue! We want to keep that air and not deflate it.
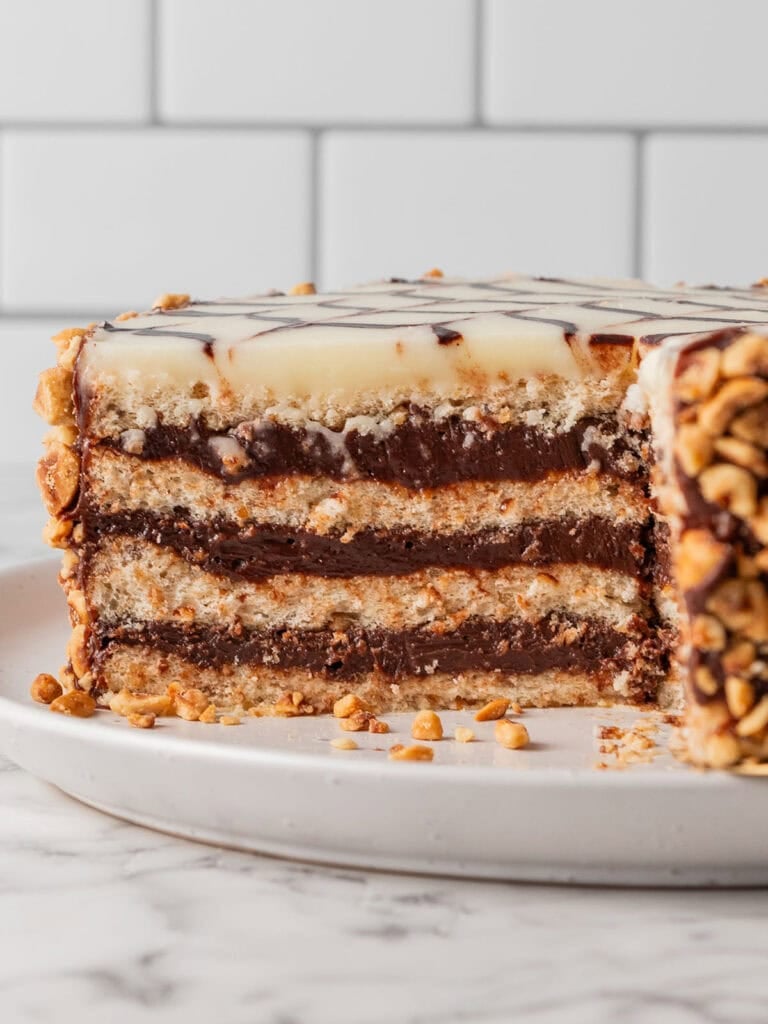
Layering the cake (Day 2)
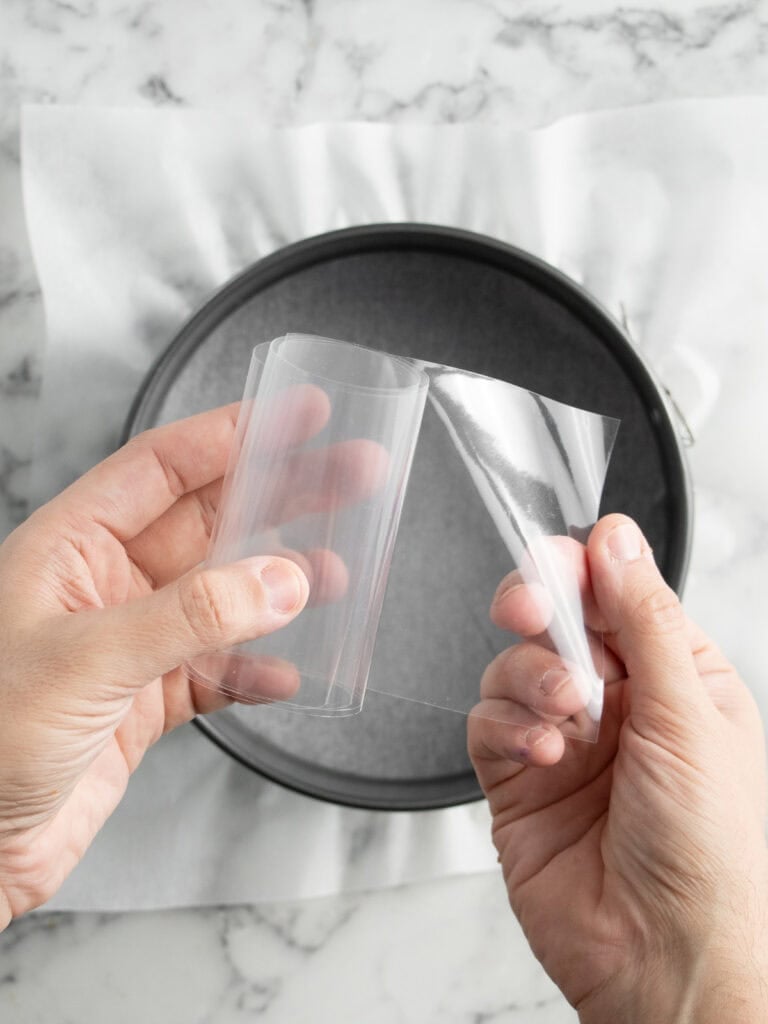
Layering is easy but the biggest piece of advice here is to use acetate and a spring-form pan that’s lined with baking paper at the bottom. The acetate is going to allow you to cleanly remove the cake from the cake tin when it’s set and the springform pan unclips so you can easily take it away from the cake.
Layer the cake by alternating between cake layers and 1/4 of the pastry cream in each layer. You’ll use 3/4 of the pastry cream all up and then use the remaining cream to decorate the outside of the cake.
Tip: I bought my acetate online. I’ve got the exact measurements of how big it needs to be in the recipe card at the bottom of the post. If you don’t have acetate you can use plastic cling wrap.
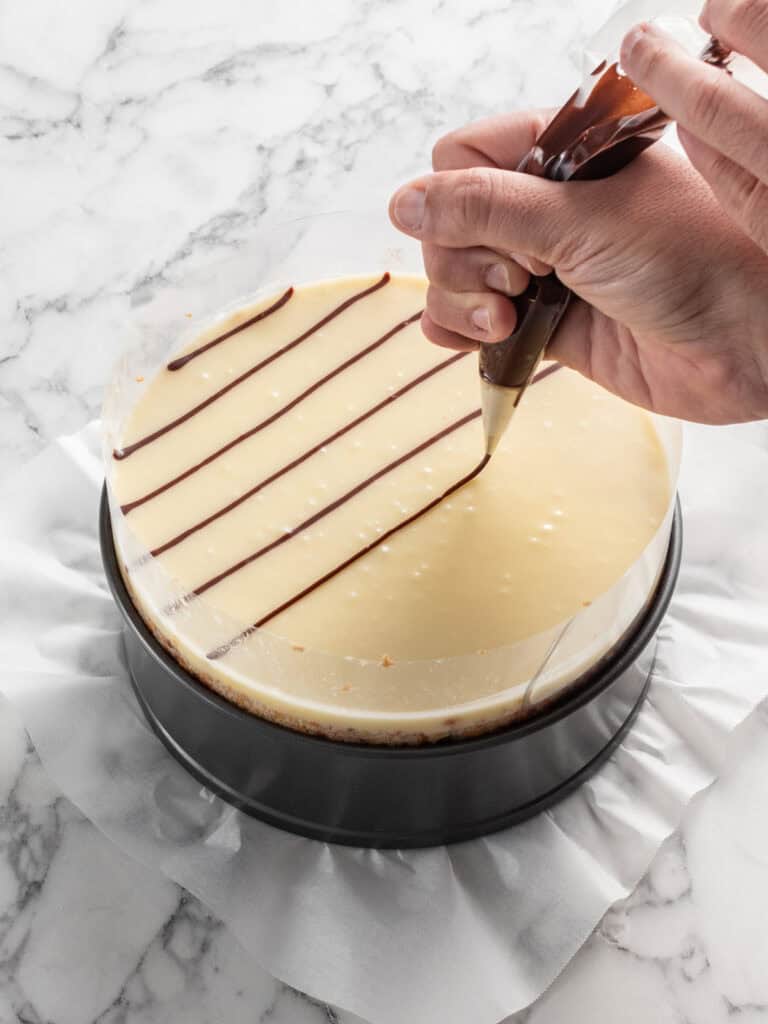
Making the glaze (Day 2)
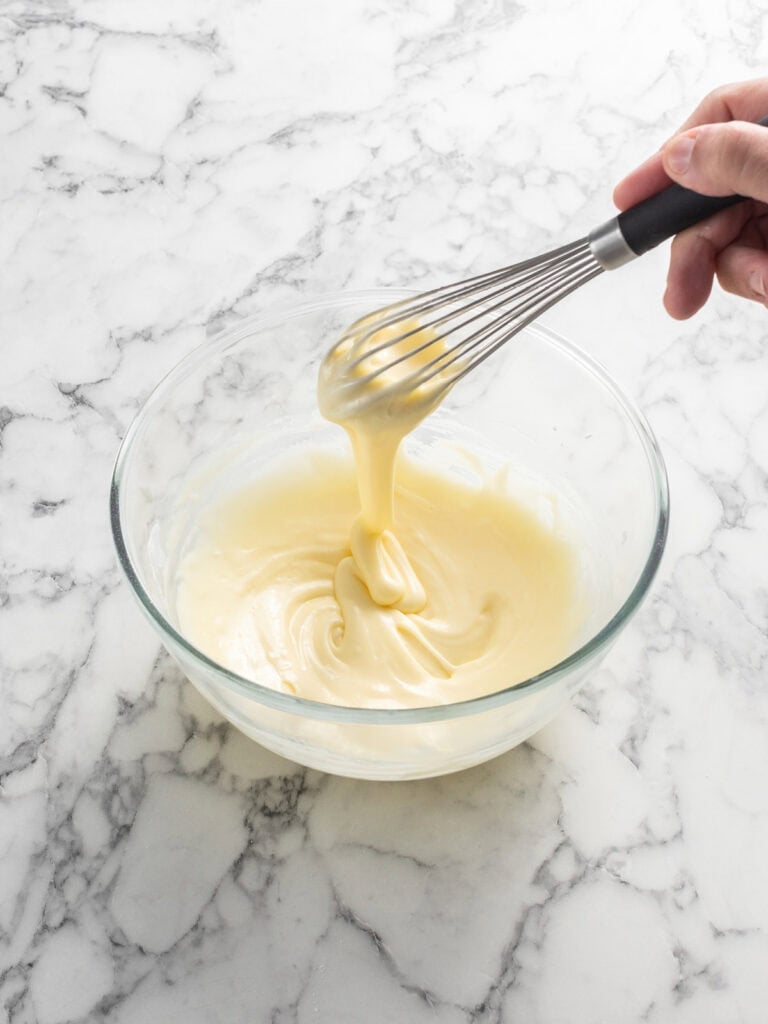
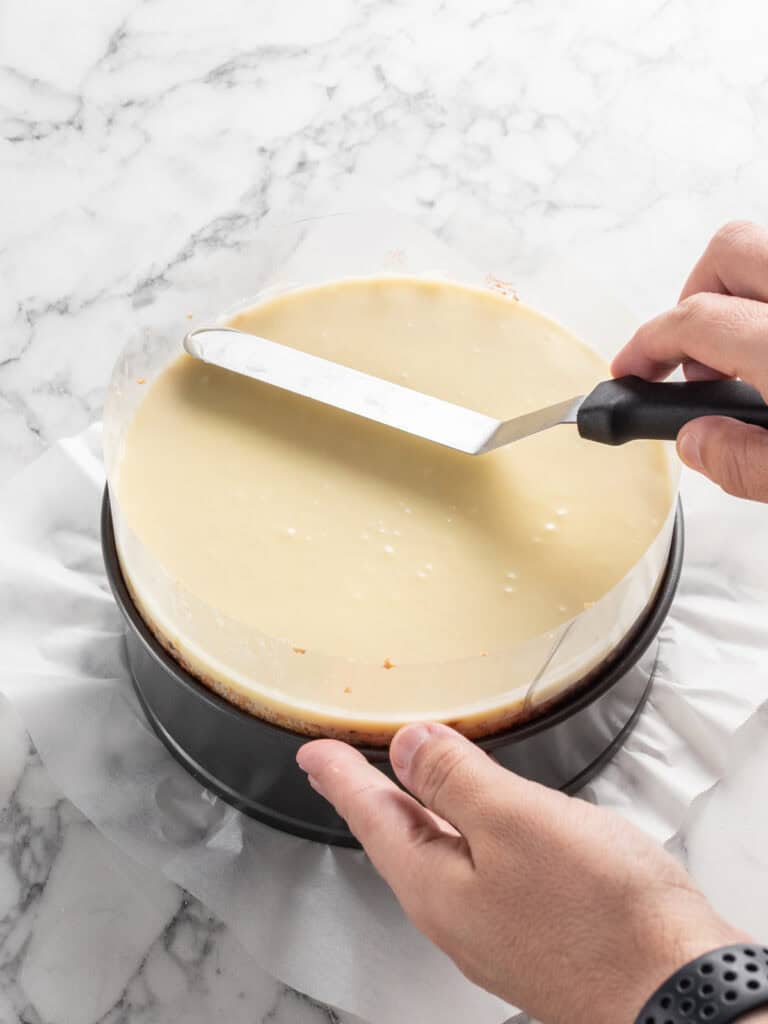
The glaze comes together really easily. Once you make the vanilla glaze pour most of it on the cake and then mix the remaining amount with a touch of cocoa powder.
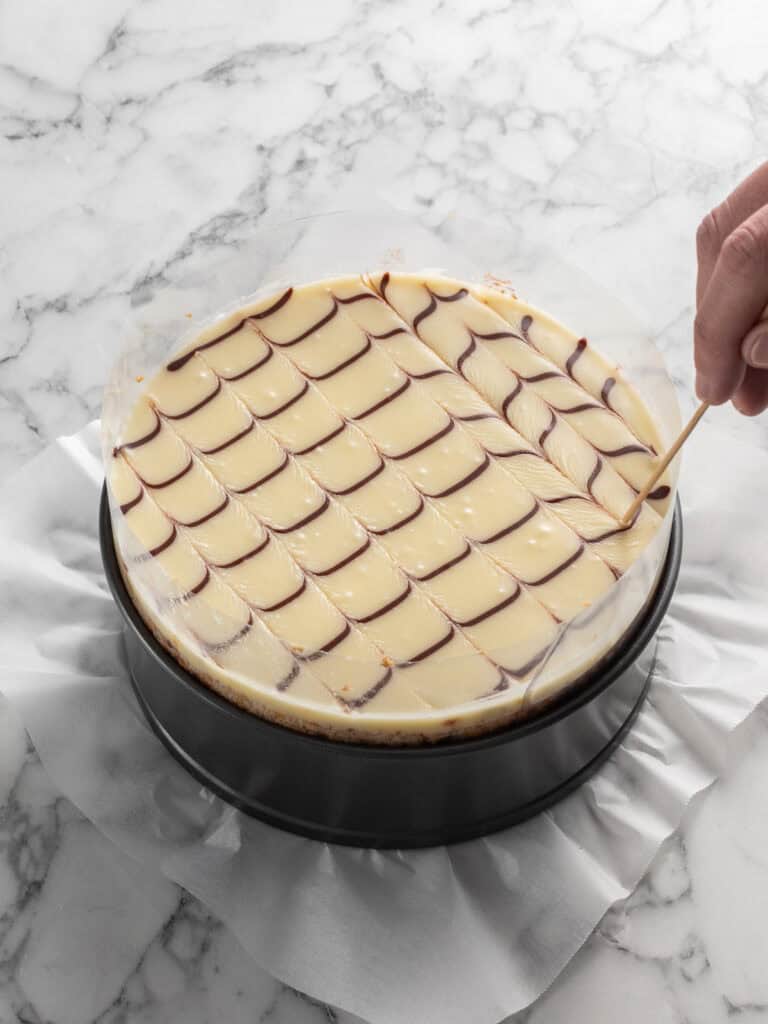
I like piping it in lines on the cake using a piping bag fitted with a small round tip. Go slow here and get it as neat as you can. Then feather it with a toothpick. I love this look because its so classic!
Now that the cake is layered and has the glaze, it needs several hours to set. Overnight is best.
Finishing touches (Day 3)
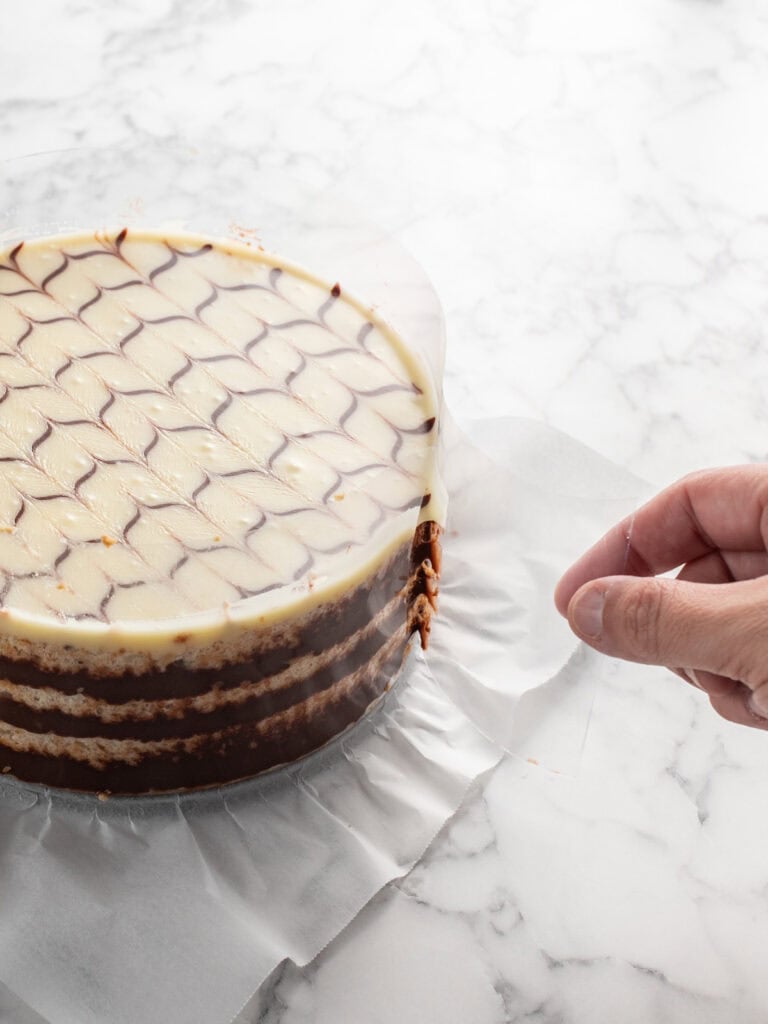
You want to unclasp the springform pan and take it away the acetate. Then transfer to your serving plate.
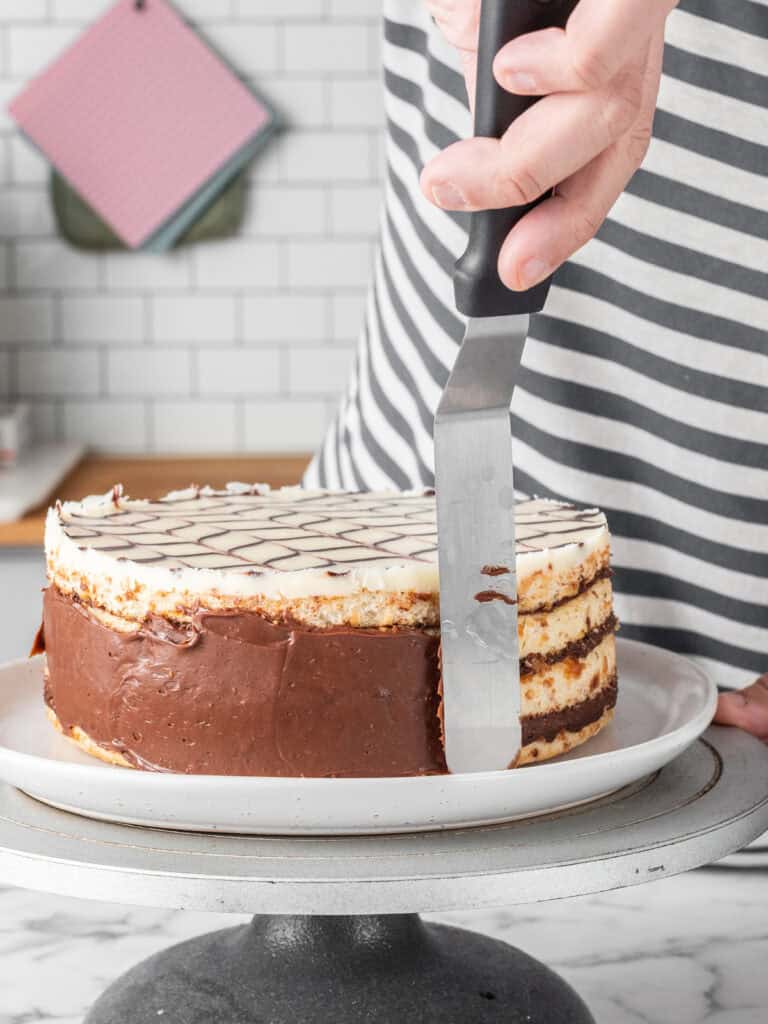
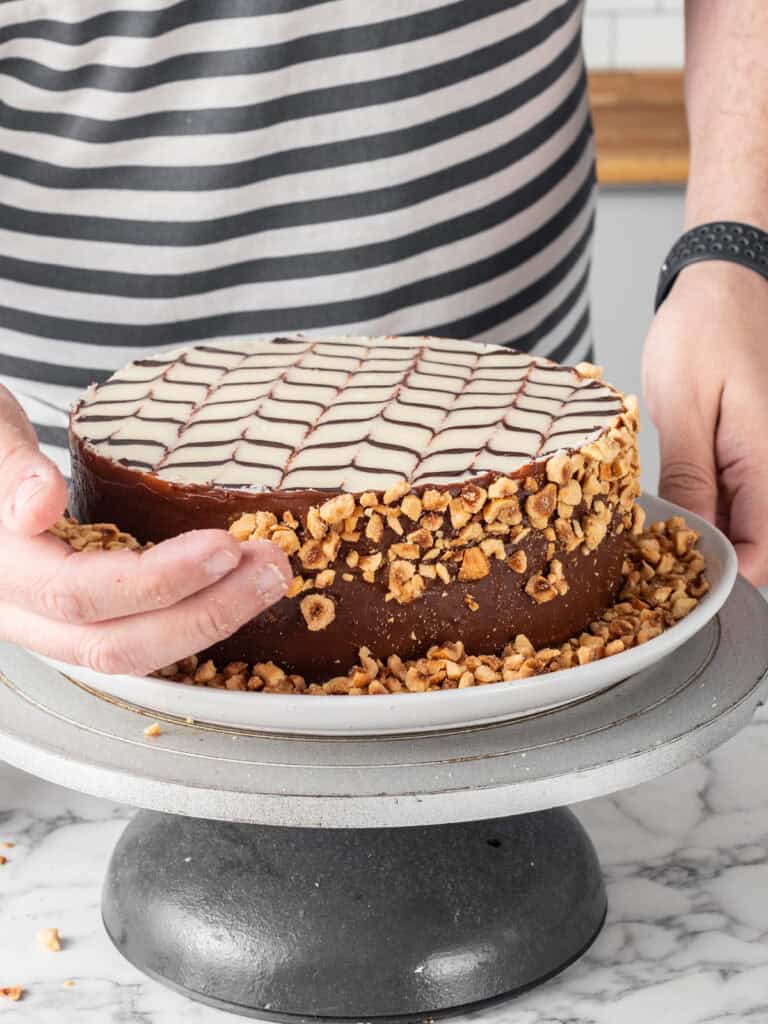
Cover the outside with the remaining pastry cream and spread using an offset spatula or spoon. Get it neat, but it doesn’t have to be perfect. Then cover in the remaining hazelnuts. Slice and serve!
Tip: To transfer your cake from the springform pan, slowly and carefully lift it from the excess baking paper over to your serving plate. Slowly lift one side of the cake away from the plate to peel the baking paper away.
Store your cake in an airtight container and leave in the fridge. It’s good for three days!
A Quick Baking Guide
If you’re new to baking or just want to brush up on the basics, these guides are a great place to start!
Loved the recipe? Let me know!
If you enjoyed this recipe, leave a star rating and comment below. It helps others find the recipe and keeps the baking community growing. Tag me on Instagram so I can see your version too!

Hazelnut And Chocolate Layer Cake (Hungarian Esterhazy Torte)
This Hazelnut Chocolate Layer Cake has soft dacquoise, creamy pastry cream, and smooth praline for perfect texture. Every bite is rich and melts in your mouth.
Serves 8
Ingredients
Chocolate Pastry Cream
- 500 g whole milk, not skim
- 7 g vanilla bean paste or Pure Vanilla Extract
- 50 g corn starch, corn flour
- 20 g caster sugar, superfine sugar
- 10 g Dutch processed cocoa powder, see notes
- Pinch of fine salt
- 4 egg yolks
- 80 g unsalted butter, cubed and cold
- 180 g dark cooking chocolate, finely chopped (see notes)
Hazelnut Praline
- 150 g toasted hazelnuts, see notes
- 210 g granulated sugar
- 125 g water
- 55 g glucose syrup
- 1/2 tsp salt
- 1/2 tsp bicarbonate of soda, bicarb soda
Hazelnut Dacquoise
- 150 g toasted hazelnuts, for dacquoise
- 100 g all-purpose flour, plain flour
- 9 egg whites, room temperature
- Pinch of cream of tartar, see notes
- 200 g caster sugar
- 7 g vanilla extract
- 1/2 tsp salt
- 150 g toasted hazelnuts, for coating the cake
Vanilla Glaze
- 55 g unsalted butter, melted and cooled
- 30 g whole milk
- 220 g powdered sugar
- 15 g glucose syrup
- 7 g vanilla extract
- 5 g Dutch processed cocoa powder, for chocolate glaze
Instructions
How To Toast The Hazelnuts
- Preheat your oven to 180C / 355F (fan off), 160C / 325F (fan on). Position your oven rack on the middle shelf.
- Toast all the hazelnuts – You’ll need 450g hazelnuts total for this recipe. They’re used in the praline, dacquoise, and to coat the finished cake. I’ll break down how much to use at each step as you go. To toast them, spread them on a baking tray and bake for 20 minutes or until golden. Stir halfway through. Let them cool completely.
Chocolate Pastry Cream
- Combine dry ingredients and eggs – Add the corn starch, sugar, cocoa powder and salt to a medium heavy-bottomed, stainless-steel pot. Use a hand whisk to combine, then add the egg yolks and whisk until smooth.
- Add the milk – Slowly pour in the warm milk, about 1/4 cup at a time, whisking well after each addition. Once all the milk is added, whisk in the vanilla.
- Cook pastry cream – Cook over medium heat while whisking constantly. After 3 to 4 minutes the mixture will thicken. Keep whisking until it starts to bubble, then cook for 90 seconds. For a firmer set, cook for up to 3 minutes before taking it off the heat.
- Add butter – Add 1/4 of the butter and whisk until it’s melted and well combined. Repeat until all the butter has been added. You want to do this slowly, so the pastry cream doesn’t split.
- Add the chocolate – Add the cooking chocolate and whisk until well combined.
- Run through a sieve – Run the thickened pastry cream through a sieve into a medium sized mixing bowl to get rid of any lumps.
- Chill to set – Cover the surface of the pastry cream with plastic wrap and chill in the fridge for 5 hours. Overnight is best.
Hazelnut Praline
- Combine water, sugar and glucose – Place sugar, water and glucose syrup in a large sized saucepan (stainless steel, not non-stick). Turn on medium high heat. Stir until sugar is dissolved.
- Caramelize the mixture – Lower the heat to medium and let it slowly bubble, stirring occasionally, until it turns deep golden color. You’ll know it’s done when it reaches 160C / 320F on a candy thermometer. Watch closely as it can burn quickly. If it smells burned, start again.
- Add bicarb soda and set – Once the syrup is golden in color, take it off the heat and add 150g of the toasted hazelnuts and salt and stir. Then add the bicarb soda and stir straight away until fully combined. It will puff up, so make sure you’re using a large saucepan. Pour onto a baking tray and let it cool for 20 minutes until set and hard.
- Process into paste – Break the cooled praline into smaller chunks. Be careful, the pieces can be sharp. Add to a food processor and blend on high. It will be loud at first and the processor might wobble, so hold it down until the pieces turn to powder. Keep blending, scraping down the bowl as needed, until a smooth paste forms. Transfer to a bowl and cover with plastic wrap.
- Adding the praline – once the chocolate pastry cream has chilled and set, add it to a food processor with all of the praline paste. Blend until completely smooth and well combined. Transfer back to the bowl, cover, and place in the fridge until ready to use.
Hazelnut Dacquoise
- Preheat your oven to 170C / 340F (fan off), 150C / 300F (fan on). Spray the bottom (not the sides) of four 22cm / 8-inch cake tins and line the bottom with baking paper. If you don’t have four cake tins, just use what you have and bake them one at a time. Set aside.
- Process hazelnuts – Add the remaining 300g of toasted hazelnuts to a food processor. Blitz until they reach a fine crumb texture. Scoop out 150g and set aside to coat the cake later.
- Add flour to hazelnuts – Add the flour to the food processor and blitz until fully combined. The hazelnuts should be evenly coated in the flour. Set aside.
- Whip meringue – Add the egg whites, cream of tartar and sugar to a stand mixer fitted with a whisk attachment. Whip on medium high speed for 4 minutes until thick and glossy. Add the vanilla and salt, then whip for another 30 seconds. You can use a hand mixer if you prefer.
- Add dry ingredients – Stop the mixer and add the hazelnut flour mixture. Use a spatula to gently fold through until well combined and no dry spots remain. Scrape the bottom of the bowl as you fold, as dry bits like to hide there. The batter will be thick. Transfer to a piping bag.
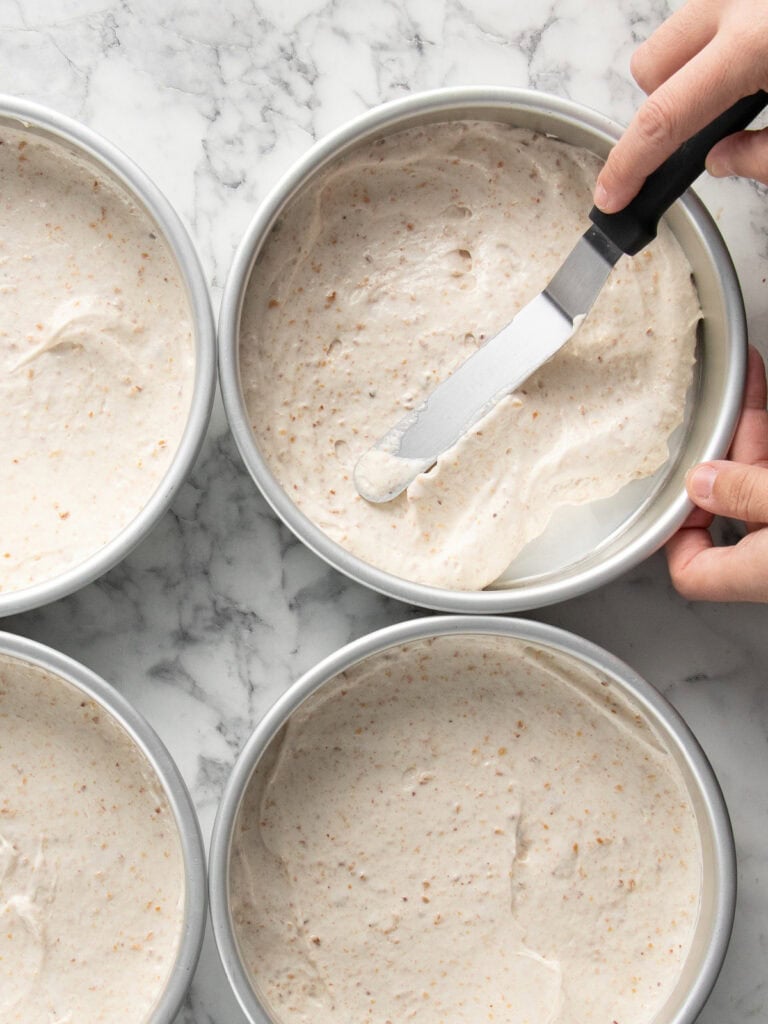
- Add batter to cake tins – Pipe the batter into the tins in a spiral, starting from the centre. You can also scoop it in using an ice cream scoop and spread it out evenly with a spoon or offset spatula.
- Bake – Gently tap each tin on your bench three times to release air bubbles. Bake for 15 minutes. Let the cakes cool completely. Run a knife around the edge, then turn each one out by placing your hand flat over the top and flipping it. Stack with baking paper between each layer until ready to use.
Putting it together
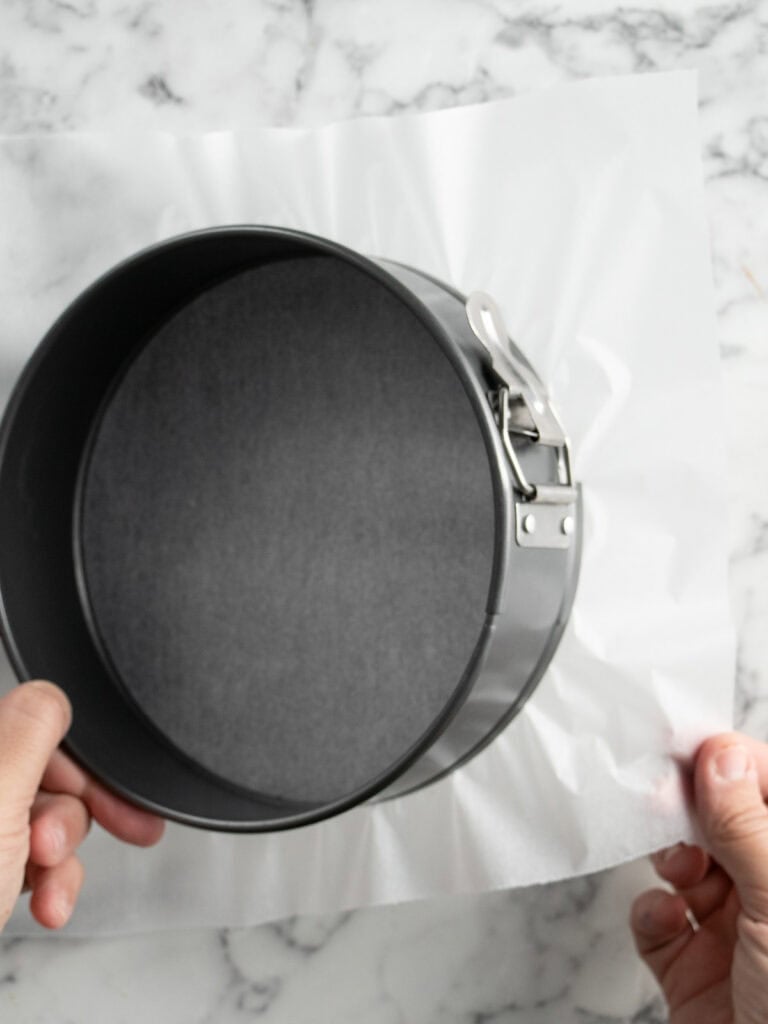
- Line the bottom of a 22cm / 8-inch springform pan with baking paper.
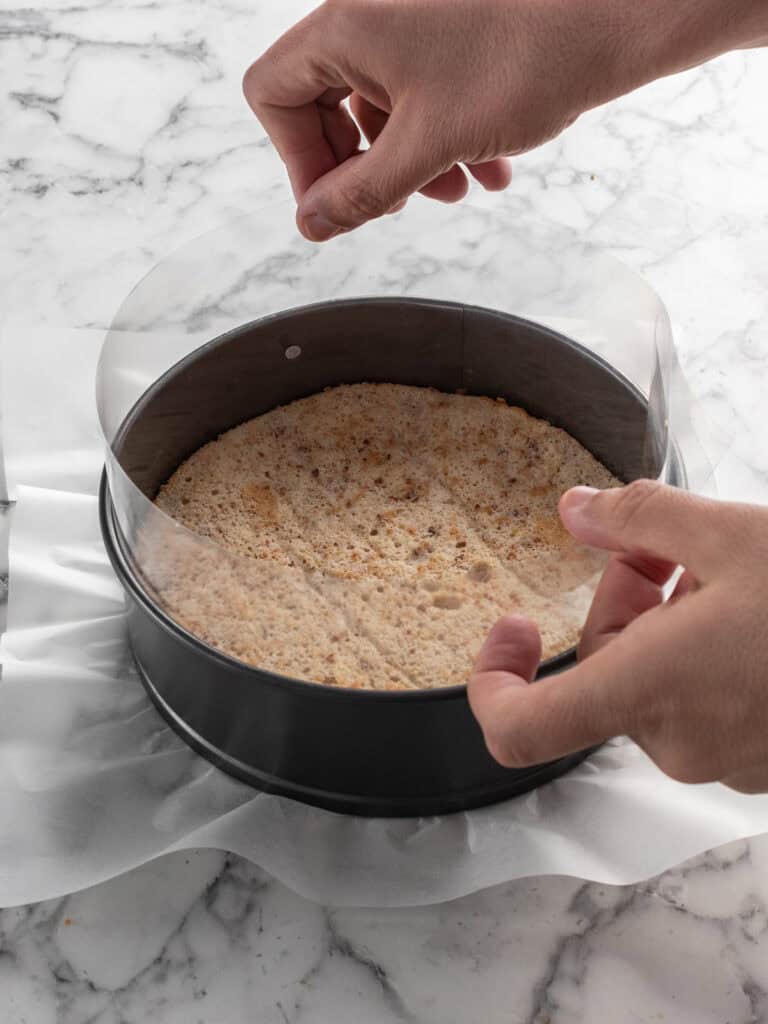
- To layer the cake – Place one cake layer into a springform pan. Cut a strip of food-safe acetate 8cm / 3-inch high and 65cm / 25.5-inches long. Line the pan with the acetate, wedging the bottom between the cake and tin to hold it in place. Add one quarter of the chocolate pastry cream and spread it out evenly using an offset spatula or bent spoon.
- Continue layering – Add the second cake layer and spread over another quarter of the chocolate pastry cream. Repeat with the remaining layers. You should have used 3/4 of the pastry cream, saving the rest to coat the sides of the cake.
Glaze
- Vanilla glaze – To make the vanilla glaze add the glucose syrup and milk to the melted butter before whisking in the icing sugar and vanilla.
- Chocolate glaze – To make the chocolate glaze, transfer about 1/4 of the vanilla glaze to a small, add the sifted cocoa powder and mix until smooth.
- How to add the glaze – Pour the vanilla glaze on top of the cake and gently spread it using a spoon or offset spatula. Add the chocolate glaze to a piping bag and snip the tip off. Pipe lines across the vanilla glaze, then drag a toothpick or skewer across the lines to create a feathered pattern.
- Chill the decorated cake – Place back in the fridge for 4 hours to set, overnight is best.
Let’s decorate!
- Take the chilled and set cake out of the springform and transfer to a serving plate using the baking paper at the bottom to help you.
- Coating the sides of the cake – Carefully unwrap the acetate from the chilled cake. Use the remaining chocolate pastry cream to coat the sides. An offset spatula gives you the smoothest finish, but a spoon works too. It doesn’t need to be perfect. Finish by pressing the reserved 150g of toasted hazelnut crumb onto the sides. A turntable will make this step easier.
Notes
Dutch processed cocoa powder – is an unsweetened cocoa powder which has been treated with alkaline and potassium carbonate to neutralize the acidity that is naturally found in cocoa powder. It’s darker in color and strong in chocolate flavor.
Dark cooking chocolate – I used dark cooking chocolate for this recipe. Specifically, the Nestle cooking buttons which are designed to be easily melted and used for baking and desserts, but any cooking chocolate that can be found in the baking isle of your supermarket will work. Just make sure it’s good quality.
Storage – The assembled cake can be stored in an airtight container for up to three days.
Freezing Cake Layers – You can make the dacquoise cake layers ahead of time and freeze them. Once cooled, wrap each layer tightly in plastic wrap and place them in an airtight container or freezer-safe bag. They can be frozen for up to 1 month. When you’re ready to use them, thaw overnight in the fridge before assembling. This will help save time when preparing the cake!
Acetate – Acetate helps create smooth sides and can be found at baking supply stores. For this cake you’ll need to use a piece of acetate measuring 8cm / 3-inches in height and 65cm / 25.5-inches wide. If you can’t find a pre-cut acetate strip of this height, you can just do what I did and trim it to size.
How to skin hazelnuts – For this recipe you’ll need skinless hazelnuts. If you cannot find store bought hazelnuts you can skin them by placing them on a baking tray and baking them on 160C / 325F for 20 minutes. Once baked, take out of the oven, and pour into a clean tea towel. Bunch up the towel, encasing the hazelnuts inside and rub the heel of your hand on top. This will help the already loose and oily hazelnut skin to rub on the towel and against the other hazelnuts in the towel. Undo the towel and pick out the skinned hazelnuts. Continue this process until all the hazelnuts are skinned. Some hazelnut skins are stubborn and won’t come off. They’re ok to use.
Toasting the hazelnuts – To toast the hazelnuts, simply place them on a baking tray and bake for 20 minutes on 160C / 325F or until golden in color. Keep an eye on them because they can burn easily. Alternatively, you can place them in a deep skillet and toast them on medium high heat until golden. Again, don’t take your eyes off them or they will burn!
Eggs – You’ll be using the egg whites in this recipe to make the hazelnut dacquoise and the egg yolks to make the pastry cream.
Warm milk – You want the milk to be warmed to about 50C / 100F.
Video – This blog post reflects the latest version of the recipe, which may differ slightly from the original YouTube video.
A note on measurements – this recipe is offered in weight measurements. This is in an effort to offer the most accurate way to get the best results. Cup measurements simply aren’t accurate enough for a recipe that needs precise measurements and cup sizes differ depending on where you are in the world. Here is where you can learn more about how to measure ingredients using digital kitchen scales
Nutrition
Calories : 1088kcal
Carbonhydrates: 93g
Protein: 19g
Fat: 69g
Saturated Fat: 24g
Polyunsaturated Fat: 6g
Monounsaturated Fat : 36g
Trans Fat : 1g
Cholesterol: 158mg
Sodium: 462mg
Potassium : 674mg
Fiber: 10g
Sugar : 61g
Vitamin A: 867IU
Vitamin C: 4mg
Calcium: 173mg
Iron: 4mg
Nutrition Disclosure
Gave this recipe a go?Mention @thescranline or tag #thescranline!
previous post
56 comments
Hi – I made this cake for a dinner party and it looks like a winner (I won’t know for certain until tomorrow, when I finish it – but all indications point to this being worth the effort!
Just a couple of questions about the method: (1) under the dacquoise ingredient list, the 2nd item is “100 g all-purpose flour plain flour, divided” but there is no mention in the method about dividing the flour (step 3 simply reads “add the flour to the food processor …”- so I simply added the full 100 g to the ground hazelnuts; (2) the ingredient list for your Vanilla Glaze does not actually list vanilla – so I added 1 t.
Saying “thanks” from Canada, and have a great day, eh!
Hi Collette, thank you again for pointing that out and I’m sorry for the confusion back then. You were absolutely right about both things. The flour shouldn’t have said divided and the vanilla was missing from the glaze ingredients. I’ve since fixed both of those and added the vanilla extract properly so everything now matches and makes sense. I really appreciate you taking the time to flag it because it helps me make the recipe better for everyone. I hope the cake turned out beautifully for your dinner party and that it was a hit. N x
delicious… perfect for a sweet treat anytime
Thanks Omayra! I’m glad you enjoyed it! N x