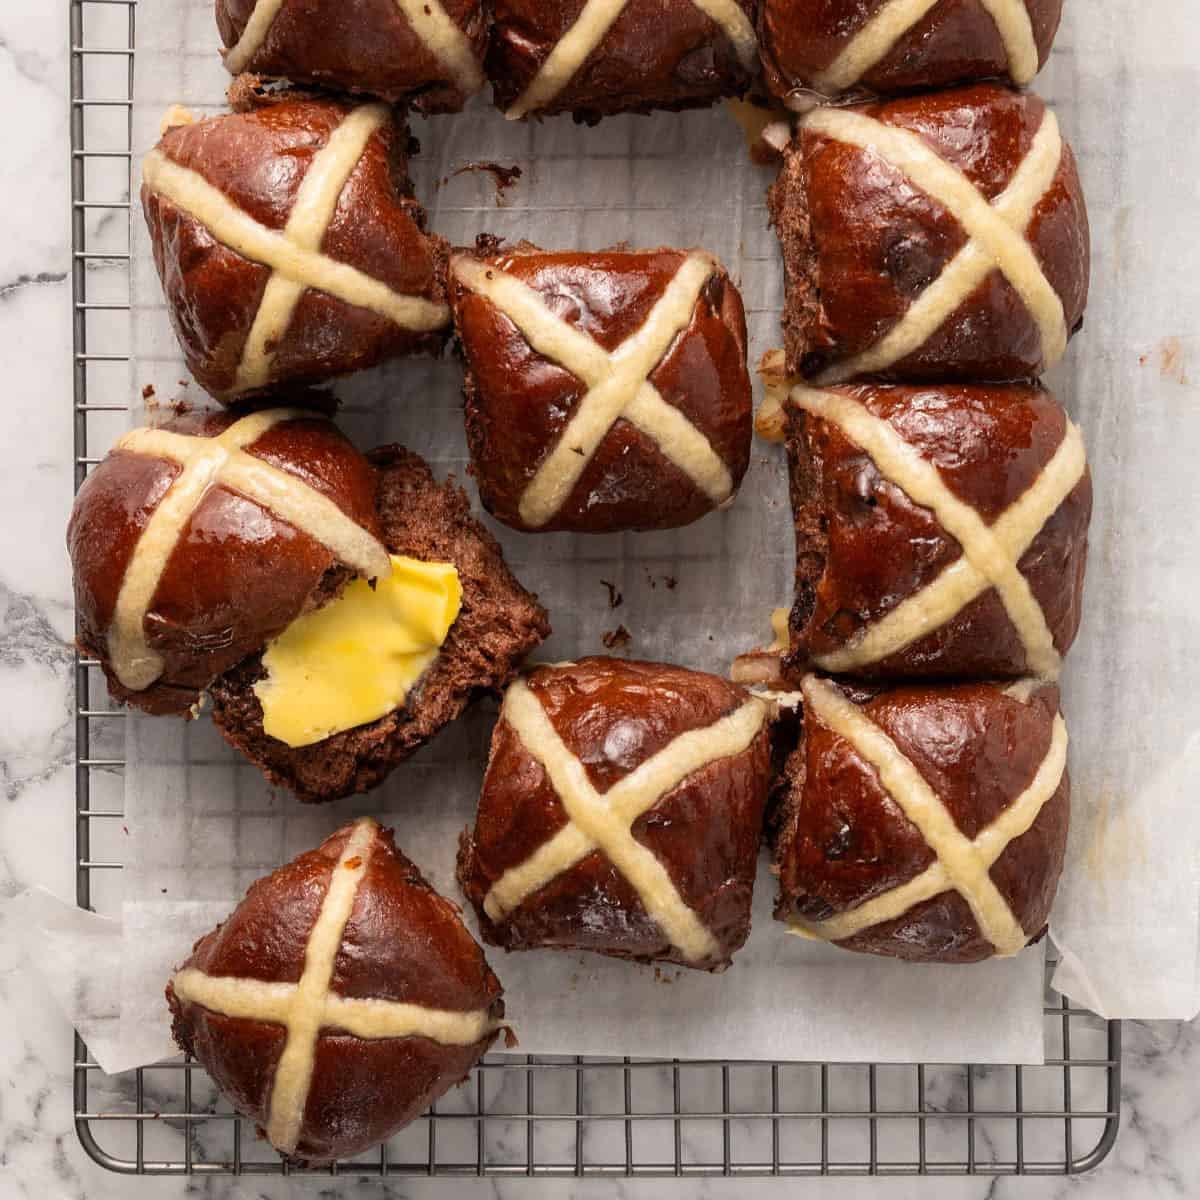
Soft Chocolate Hot Cross Buns
These soft chocolate hot cross buns are deeply rich in chocolate flavor paired with warm spices, orange zest and all the chocolate chips you could want. They have an incredibly soft and fluffy texture you’d expect to get from your favorite bakery and I’ll show you how to make this famous easter bun in my step-by-step guide (with photos!)z
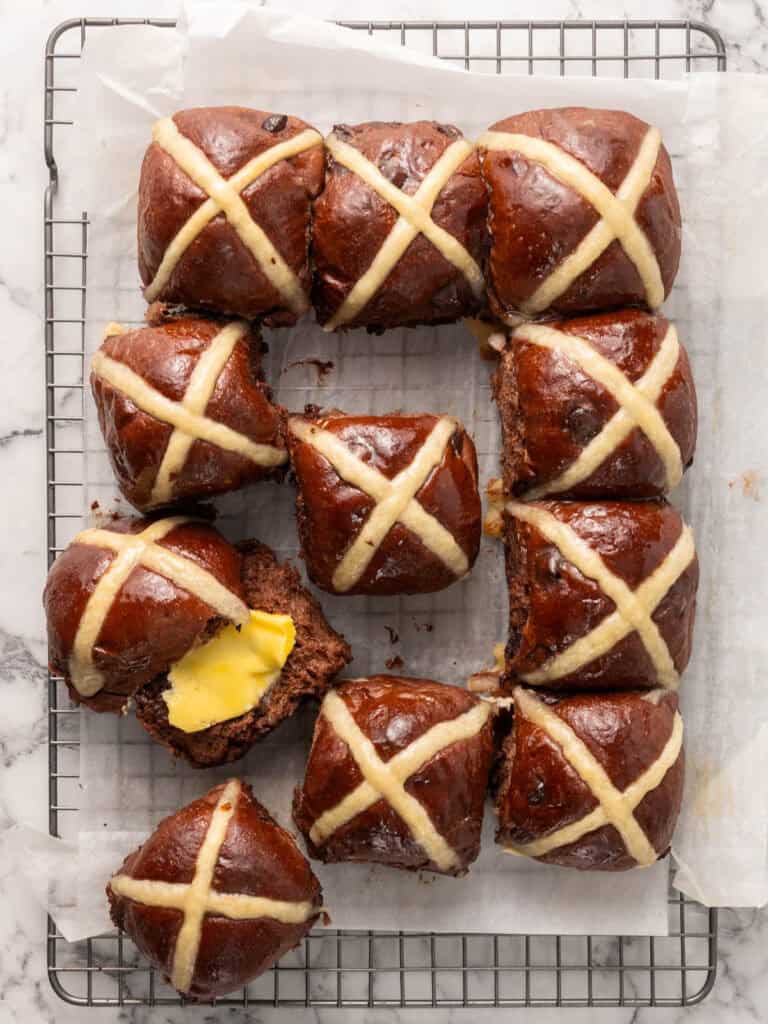
Hey team, Nick here! Is there seriously anything better than tearing open a warm freshly baked chocolate hot cross bun, steam coming out, adding a thick layer of salted butter and just digging in? This enriched little bun isn’t overly sweet which means those chocolate chips give it a welcome boost of rich chocolate flavor.
By the way, the butter isn’t a serving suggestion. It’s the law.


Related – I have a classic hot cross bun recipe on the blog if you’re after a more traditional version. It uses the same base dough and that post goes deeper into the science behind this enriched dough bun!
Hot cross buns are made of an enriched dough with egg and butter and packed with warm spices. But my recipe has a trick right at the beginning which helps make these bakery level soft. And they stay that way for days! It’s called the Tangzhong method. Let’s start with that!
Why these come out so bakery soft
Your favorite bakery is likely using a method called Tangzhong to make their hot cross buns.

- You take a portion of the water and flour and cook it into a paste. It gelatinizes the flour and helps lock in moisture.
- Once you’ve made the paste, you let it cool completely before using it to make the dough. Warm Tangzhong will overheat your dough and can lead to over kneading.
The Tangzhong method gelatinizes the flour which helps lock in moisture and keep these nice and soft.
How to make the dough

- Add the dry ingredients and orange zest into the bowl of your stand mixer and give them a mix to combine.
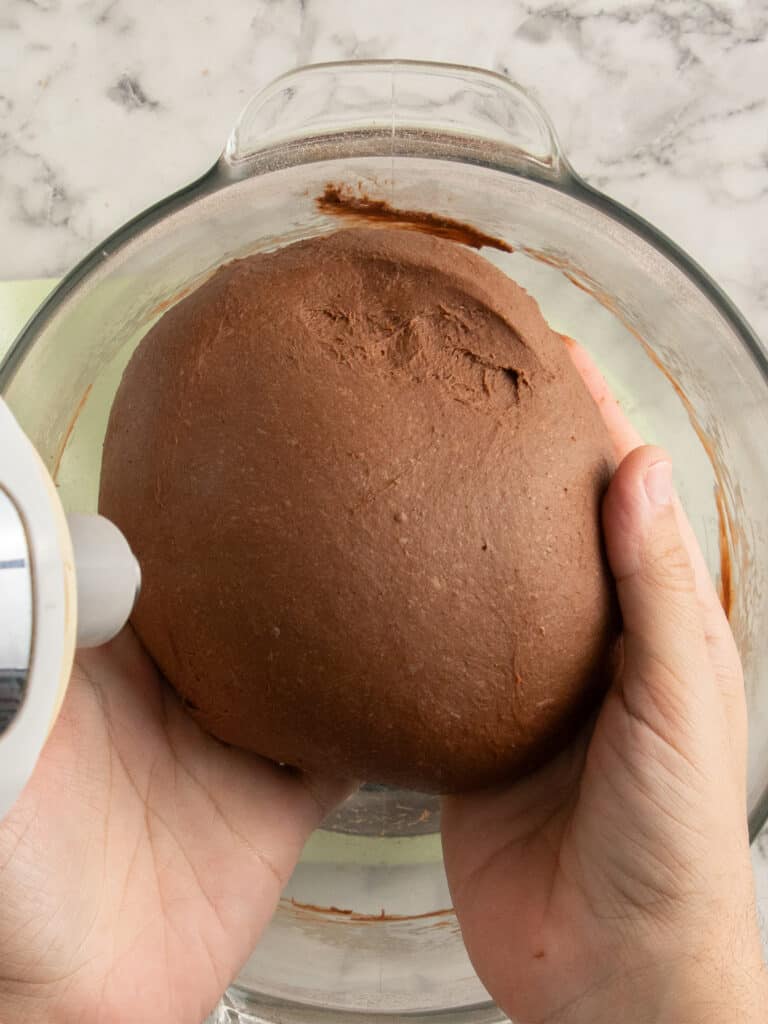
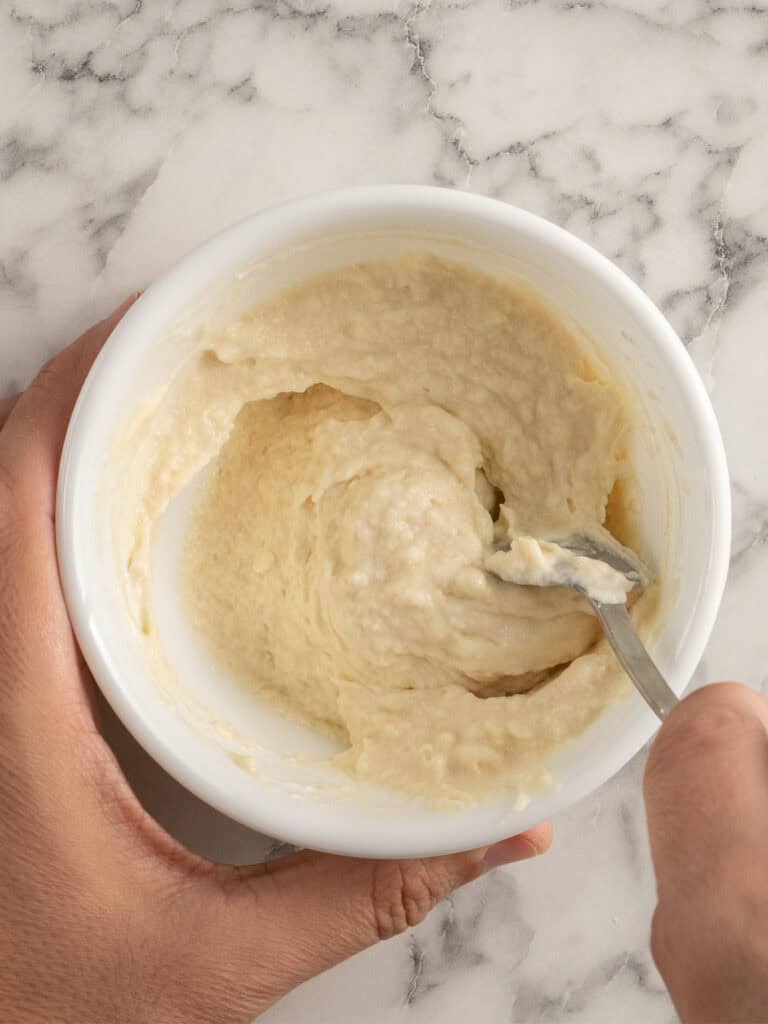
- Whisk the eggs and milk together and add to the dry ingredients along with the cooled Tangzhong. Knead for 15 minutes or until the dough is smooth, tacky (not sticky) and comes away from the sides of the bowl.
How to tell when the dough is finished kneading

The windowpane test. You stretch some of the dough between four fingers. If it doesn’t easily tear, then you’ve properly developed the gluten structure. It’s important to develop the structure at this point because once the butter goes in it slows that development down. The dough will be a little sticky and tacky but shouldn’t stick to your hands.
If it tears, gives it a couple more minutes of kneading. You’ll see a drastic change in elasticity!
Adding the butter


- Let your dough rest for 10 minutes before adding the butter. It helps the gluten rest and gives you a smooth dough that’s easier to work with.
- Knead for 2-3 minutes before adding your softened butter one cube at a time, letting it mostly knead in before adding the next cube of butter. Once it’s all in there, knead for 2-3 more minutes. The dough will be smooth and shouldn’t be sticky at all.

- Add the chocolate chips in the final 90 seconds of kneading.
Proofing the dough

As soon as the dough is done, cover the bowl with plastic wrap and let it rest at room temperature for an hour or until the dough doubles in size. Then place in the fridge to chill for 4 hours.
That rest time in the fridge gives the dough time to develop flavor and lots of tiny little gas pockets that expand to give you a really fluffy bun. I like leaving mine in the fridge overnight and then baking the morning of.
How to shape and bake your buns


- Divide your chilled dough into 12 even sized pieces. I like weighing all the dough using scales and then diving by 12. For this recipe it works out to be about 96g per bun.
- Flatten the bun down slightly, then pinch it together on one end. This pinched side will be the bottom of your buns.


- Then use the heel of your hands to seal the bottoms and shape into a round ball, OR
- Cup your hand over the bun and roll around to shape into a ball.

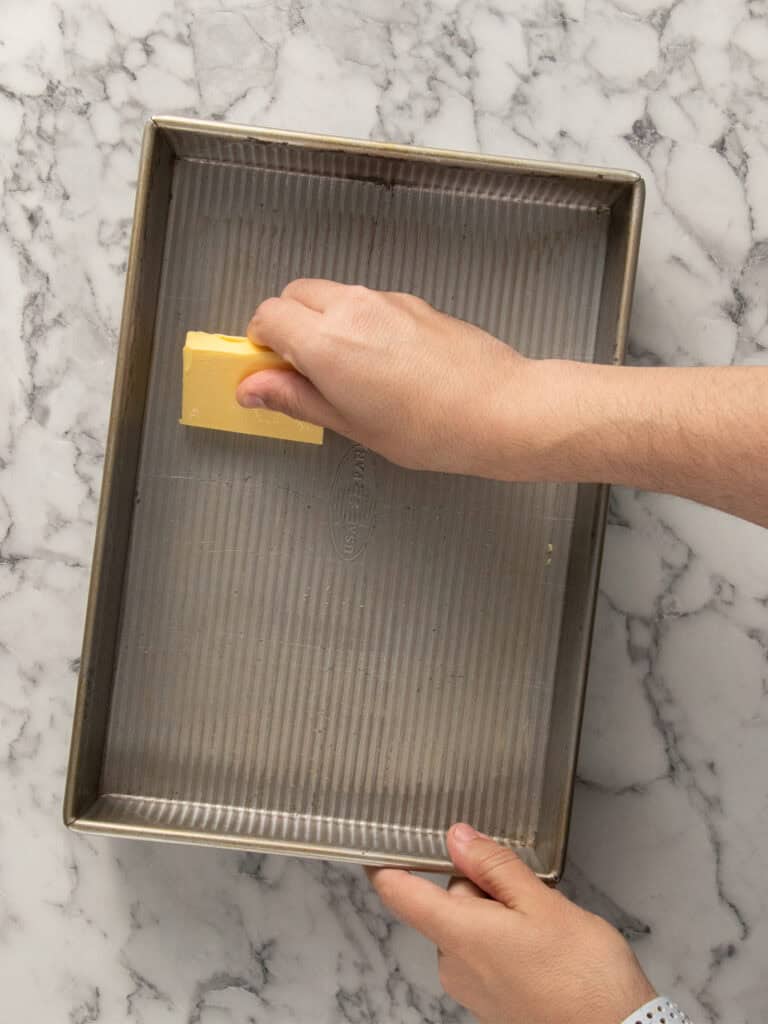
- Rub your baking tin with cold butter and line the bottom and sides with baking paper. Makes taking out the baked buns much easier.
- Add the buns in spacing them out as evenly as you can.


- Cover loosely with plastic wrap and let them rise at room temp until they’ve more than doubled in size. It could take an hour in a proofing box, it could take up to 3-4 hours at room temp on a cold day. They’ll be puffy and touching each other when properly risen.
- To make the white paste – Add the flour, water and melted butter to a small mixing bowl and mix only until there’s no flour showing. You don’t want to overmix. Pop it into a piping bag with a round tip or zip lock bag with the end snipped off and pipe crosses on top of the buns.
- Bake for 30-32 minutes.
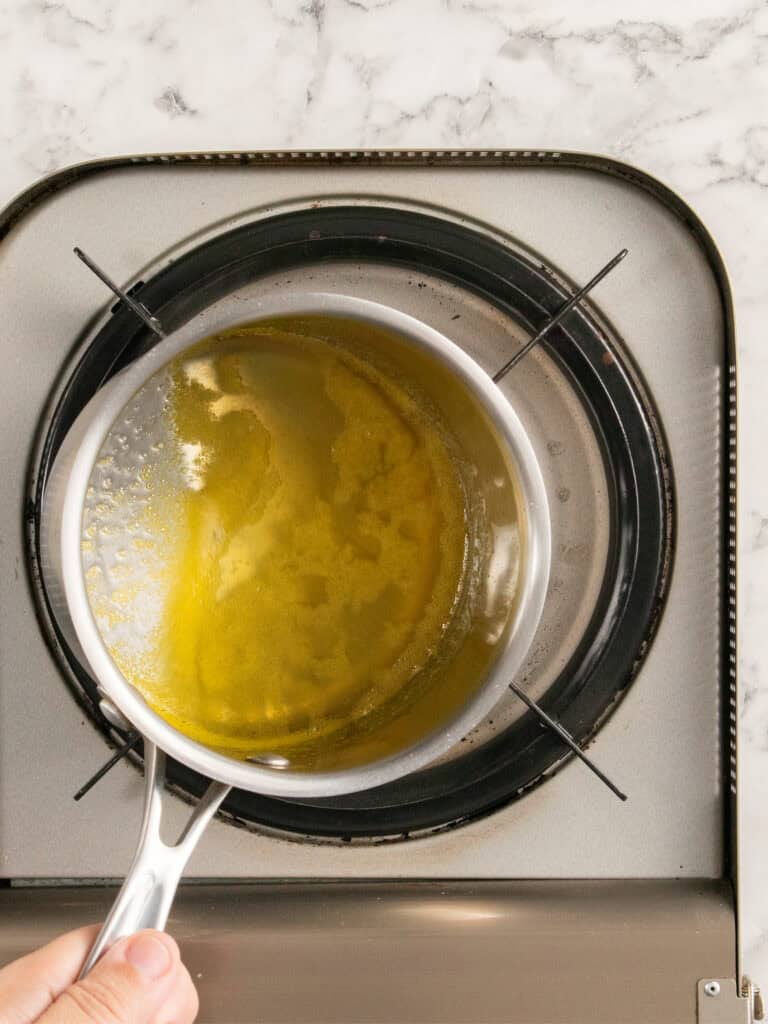
- While the buns are baking make the syrup. Add the orange juice to a small saucepan and top up with enough water to bring the liquid to 100g. Then add the sugar and cinnamon stick and bring to a boil on high heat. Then turn down to medium heat and simmer for 5 minutes to thicken slightly.
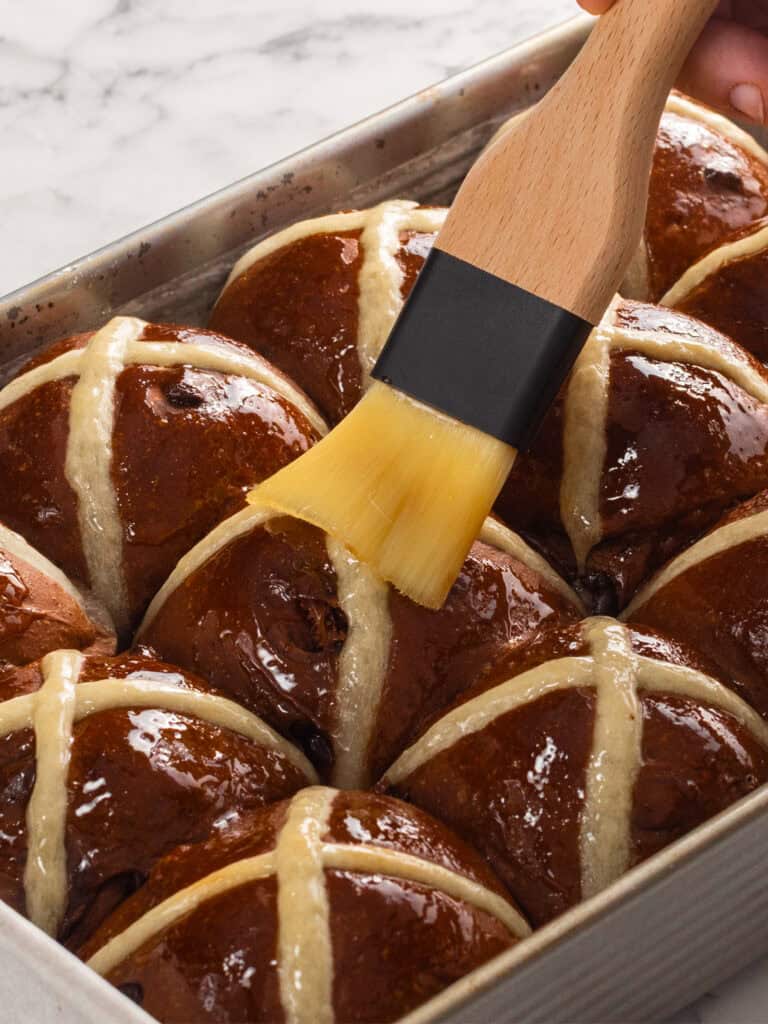
- Once the buns are finished baking brush with the syrup. I like doing this as soon as the buns come out of the oven because it slightly dries the syrup which makes them less sticky.


Kneading times and textures
I tested this recipe using my Ooni Halo Pro (a spiral mixer) and my Kenwood. Both differ in kneading times. The Ooni has more friction and kneads much quicker, so in this post I’ll give you kneading times but also the texture to look out for to know when each step is finished. I knead on 30% on my Ooni and speed 2 on my Kenwood.
I have strong opinions on how you should serve these.
If you’ve read my classic soft hot cross buns, you’ll have seen that second paragraph where I lay down hot cross bun law. Tear them with your hands, add a generous amount of salted butter and gig in. If you’re not doing it this way, you’re just not living life to its greatest potential. That’s my opinion.
A Quick Baking Guide
If you’re new to baking or just want to brush up on the basics, these guides are a great place to start!
Loved the recipe? Let me know!
If you enjoyed this recipe, leave a star rating and comment below. It helps others find the recipe and keeps the baking community growing. Tag me on Instagram so I can see your version too!
Soft Chocolate Hot Cross Buns
These rich and fluffy chocolate hot cross buns are soft like bakery style buns and stay soft for days!
Serves 12
Ingredients
Tangzhong
- 30 g all-purpose flour
- 125 g water
Dough
- 445 g bread flour, see notes
- 10 g instant dry yeast, see notes
- 60 g brown sugar
- 30 g Dutch processed cocoa powder, sifted (see notes)
- 2 tsp cinnamon
- 1 tsp allspice
- 1/4 tsp nutmeg
- 5 g milk powder, see notes
- 8 g salt
- 1 tsp orange zest
- 180 g whole milk, cold (see notes)
- 1 large egg, 55g
- 8 g pure vanilla extract
- 60 g unsalted butter, softened and cut into cubes (see notes)
- 200 g dark chocolate chips
Flour Paste
- 60 g flour
- 60 g water
- 10 g melted butter
Syrup
- 1 large orange, juiced (about 60g of juice)
- 40 g water, you need 100g liquid all up
- 100 g granulated sugar
- 1 cinnamon stick, optional
Learn How To Make it! [VIDEO]
Instructions
Tangzhong
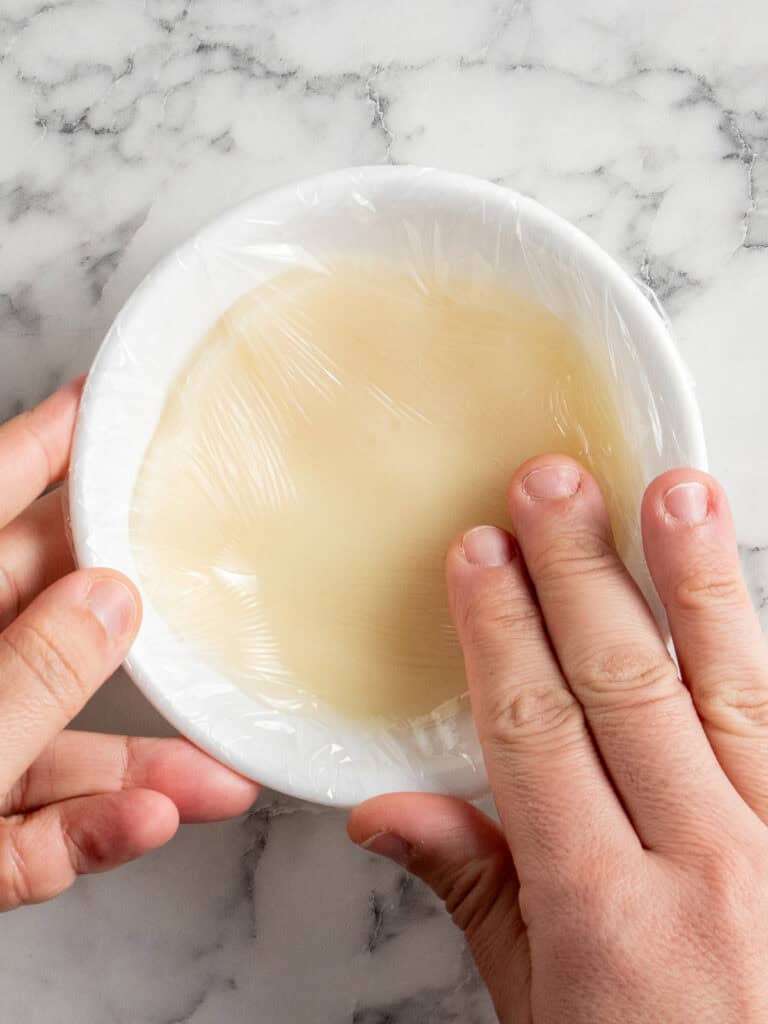
- Cook paste – Add the flour and water to a small saucepan and use a whisk to combine. Place over medium heat and whisk continuously for about 2-3 minutes until the mixture thickens to a smooth, pudding-like consistency.
- Cool down – Transfer the mixture to a small bowl and press plastic wrap directly onto the surface. Let it cool down to room temperature before using. This can be made a few hours before using. Do not place in the fridge.
Dough
- Combine dry ingredients – Add the bread flour, yeast, brown sugar, cocoa powder, cinnamon, allspice, nutmeg, milk powder, salt and orange zest to the bowl of a stand mixer fitted with a dough hook. Use the dough hook to mix everything until well combined.
- Mix wet ingredients – In a large jug whisk together the eggs, milk and vanilla extract.
- First knead (12-15 min) – Add the milk mixture and cooled Tangzhong to the dry ingredients. Use the dough hook to mix the ingredients. Turn the mixer on 30% (that’s speed two on my Kenwood) and knead for 12-15 minutes. The dough will look smooth and come away from the sides of the bowl.
- To test if dough is kneaded enough – Test by stretching a small piece between your fingers. It should form a thin, see-through sheet without tearing. Kneading time can vary depending on your mixer so focus on the dough’s feel rather than just time.
- Rest dough (10 minutes) – Turn the mixer off and cover the bowl with plastic wrap. Rest the dough for 10 minutes. This will help relax the gluten in the dough and gives you an even smoother more elastic dough that is less sticky to work with later.
- Add the butter and finish kneading (9-10 minutes) – Begin kneading the dough on 30% / speed 2 again for about 3 minutes then add the softened butter a little at a time, letting each piece mostly mix in before adding the next. This will take about 2-3 minutes all up. Once all the butter is added, knead on medium low speed for a final 2-3 minutes until the dough is smooth, elastic and comes away cleanly from the bowl. A slight stickiness at this stage is normal. If the dough begins looking overly shiny as the first bit of butter is added, it’s too warm. Cool the dough down in the fridge for 10 minutes before adding the remaining butter.
- Add sultanas (90 seconds) – Add the chocolate chips and mix on low speed for about 90 seconds until evenly distributed. You can also knead these in by hand.
- Room temp rise (Proof #1) – Lift the dough out of the bowl and shape into a smooth ball. Then place back in the bowl (you can transfer it to a large mixing bowl if the stand mixer bowl doesn’t fit in your fridge). Cover the plastic wrap and let it rest at room temp for 1 hour. It will more than double in size.
- Cold rise (Proof #2) – Place in the fridge for at least 3-4 hours (overnight gives you better flavor!). The dough will continue to expand as it chills and develop lots of great flavor! The goal here is to chill the dough so that its easier to shape.
- Prepare baking tin – Rub a cold stick of butter on the bottom and sides of a 9×13-inch / 23x33cm baking tin and line with baking paper.
- Weigh out buns – Dust your workbench with flour and pour the risen dough onto the bench. Knead a little to form a large ball. Divide the dough into 12 even sized portions by weighing them using a kitchen scale. Each portion should weigh about 96g. This will ensure even sized buns.
- To form dough balls – Place a cupped hand over one dough piece and swirl around on the bench top until it forms a ball. The slight stickiness of the dough will grip onto the work bench and help shape it under your hand forming a tight ball. Place the dough piece in your baking tin with the smooth side up. Repeat this until you’ve shaped all your buns.
- Final rise (Proof #3) – Cover loosely with plastic wrap and let them rise for 2-3 hours. It could take more if it’s cold! They will have more than doubled in size before they’re ready to do in the oven and will be slightly jiggly when the tin is shuffled a little. I can tell they’re done when they’ve expanded so much they’re touching each other in the sized tin I use.
- Preheat oven- 15 minutes before you’re ready to bake, preheat your oven to 195C / 380F (fan off), 175C / 350F (fan on).
- Flour paste – Add the flour, water and melted butter to a small bowl to form a paste. Transfer to a piping bag and snip the end off. Pipe X’s onto the buns. Get them nice and thick so they don’t bake up chewy in the oven.
- Bake – Bake in the middle rack of your oven for 30-32 minutes.
- While the buns are baking make the syrup – You’ll need 100g of liquid all up for the syrup. Add the freshly squeezed orange juice into the pot first, then add water to get it to 100g. Add the sugar and cinnamon stick in as well. Bring to a boil and then turn the heat down to low and simmer for 5 minutes. Allow to cool.
- Brush syrup on buns – When the buns come out of the oven, use a pastry brush to brush with the syrup. Allow to cool until warm before serving.
- To reheat – These can easily be reheated in the oven for about 5 minutes or until warm and soft again but they stay soft for days if stored in an airtight container.
Notes
Bread flour – Bread flour is a high gluten flour that results in a fluffier bun. Alternatively, you can use regular all-purpose flour but these won’t come out as fluffy.
Yeast
- Instant Dry Yeast (I used this) – This type of yeast is added straight to the dry ingredients and doesn’t need to be activated in warm milk first. Just make sure it hasn’t expired and always keep your yeast in the fridge, so it lasts longer.
- If using active dry yeast – Dissolve this in the warm milk with a pinch of sugar from the recipe. Let it sit for 10-15 minutes in a warm spot until foamy before using. Then add it in with the wet ingredients
Nutrition
Calories : 378kcal
Carbonhydrates: 60g
Protein: 9g
Fat: 12g
Saturated Fat: 9g
Polyunsaturated Fat: 1g
Monounsaturated Fat : 2g
Trans Fat : 0.2g
Cholesterol: 29mg
Sodium: 299mg
Potassium : 264mg
Fiber: 4g
Sugar : 21g
Vitamin A: 224IU
Vitamin C: 6mg
Calcium: 103mg
Iron: 1mg
Nutrition Disclosure
Gave this recipe a go?Mention @thescranline or tag #thescranline!
previous post
6 comments
These are so easy to make and by far the best chocolate hot cross bun I have made. Very popular with family and friends and they are an absolute Easter favourite.
My only wish is that you had a recipe for ‘normal’ hot cross buns as I am yet to fins a recipe that I like and I’m sure yours would be as delicious as these
Hi Sharon! So lovely to hear. By normal, do you mean with raisins? I could make them again next year! N x
Love the recipe!! Turned out great and am making again!
Did notice a typo in step 2 (says to dust workbench with extra dough)
Thanks for letting me know Ellen! Have gone in and fixed it x
Amazing made your chocolate hot cross buns lovely, not overbearingly chocolate, just delicios. YUMMY
Thanks so much Solanda! N x Love that you loved them! N x