Sponge Kisses
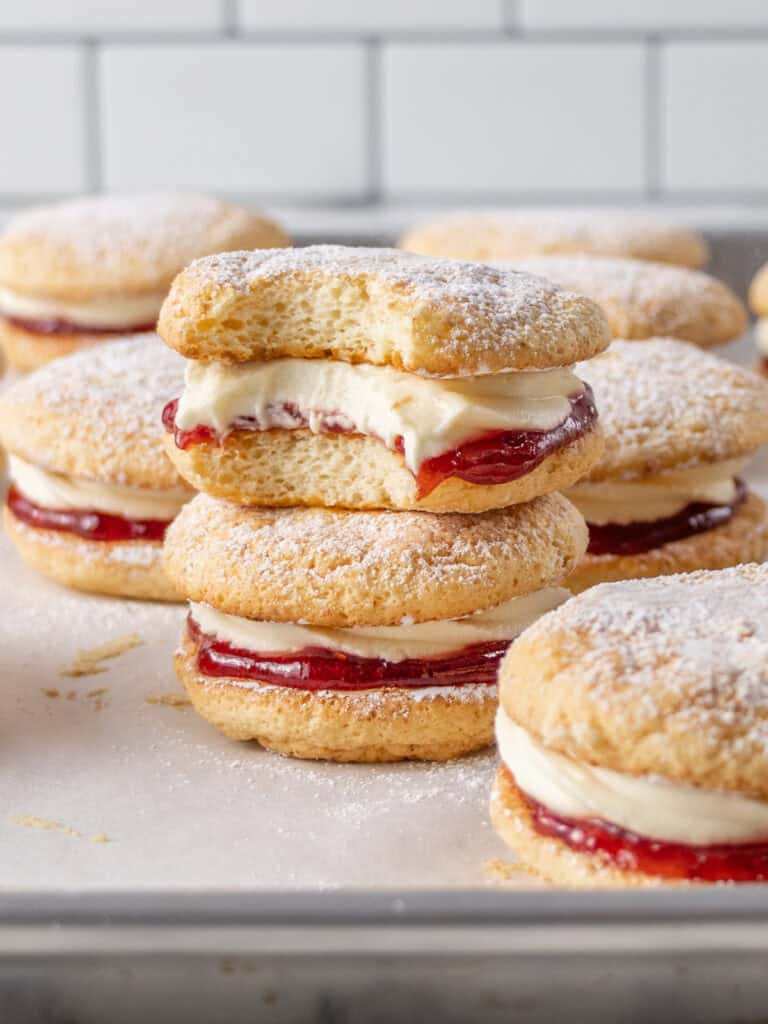
Sponge Kisses are a little cream-filled sponge cake that I grew up eating, made with soft, airy sponge, sandwiched with tart raspberry jam and Chantilly cream then lightly dusted with powdered sugar. The sponge melts in your mouth, the filling is rich and creamy, and everything comes together easily.
Hey team, Nick here. As a kid, I can remember my mum making these whenever someone told us they were visiting. It’s because they’re so easy to put together and they take minutes to bake. So for me, they’re a special little piece of my childhood.

The sponge is soft and fluffy, and that’s because of the way the eggs are whipped. Once they’re baked and cooled, they’re filled with raspberry jam and cream, which frankly is a flavor combo I have a special spot for in my heart.
Related – I have a bunch of recipes that are filled with cream and jam like my sponge cake, Vanilla Swiss Roll and my new favorite, my Soft Cream Buns which are so worth trying!
I love making these for morning teas, they’re a great crowd pleaser for Christmas and you can make them ahead of time too. Because frankly, I reckon they’re better the next day when the cream and sponge have gotten to know each other in the fridge and the entire thing becomes melt in your mouth with each bite.
Let’s talk fillings
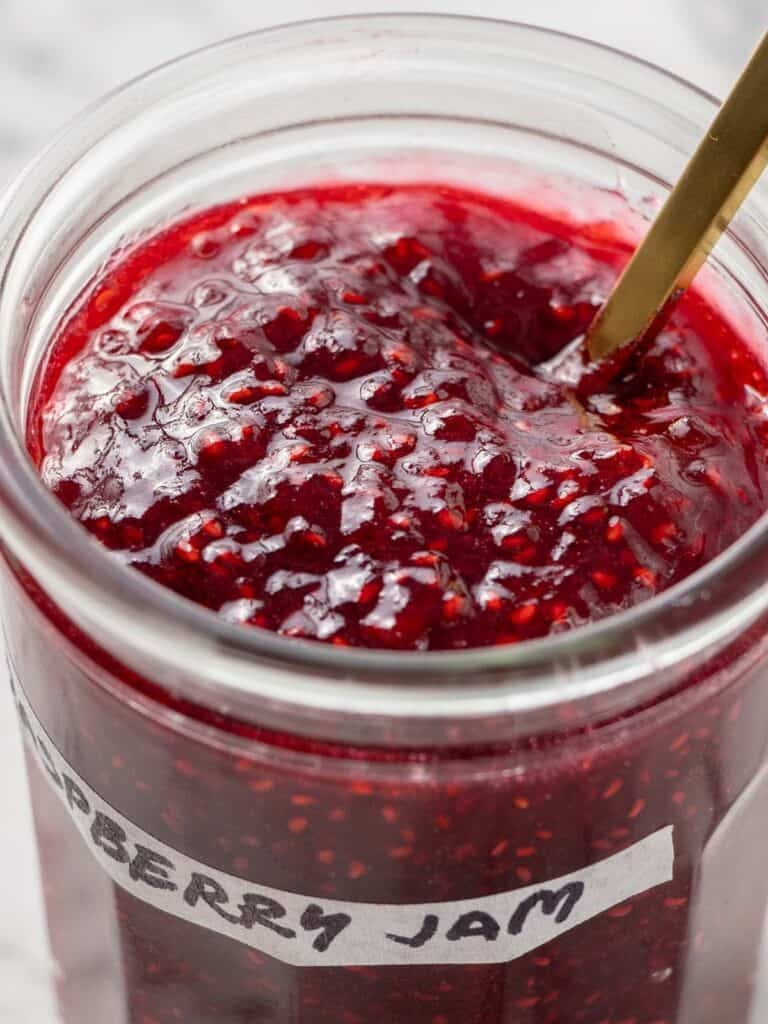
Like I said, I reckon cream and jam is such a classic flavor option with sponge cake. But you could fill these with your favorite fillings. In this recipe I use my Chantilly cream which is really easy to whip together. I have a homemade raspberry jam recipe which is thick and not overly sweet, but if you want to speed things up store bought will totally work too.

But you could use your own favorite fillings too, things like Nutella, lemon curd, strawberry jam or even just keep it simple with only a swirl or cream.
Making your Sponge Kisses
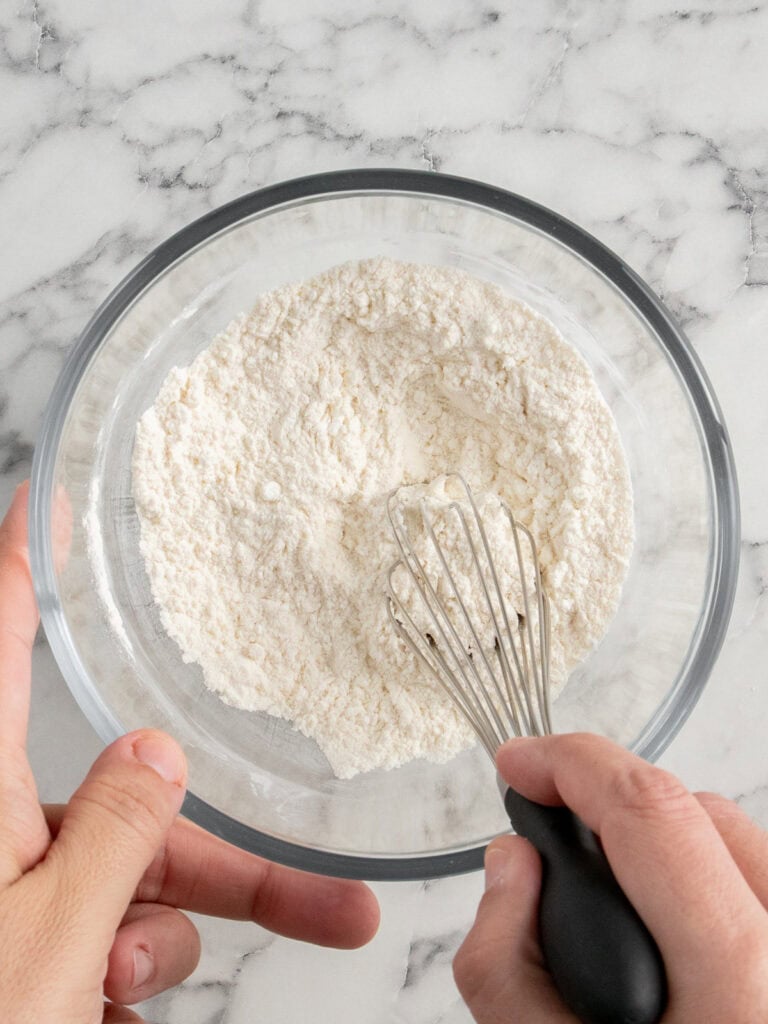
- Combine the dry ingredients in a small bowl. I like running them through a sieve because it aerates them a little and gets rid of lumps.
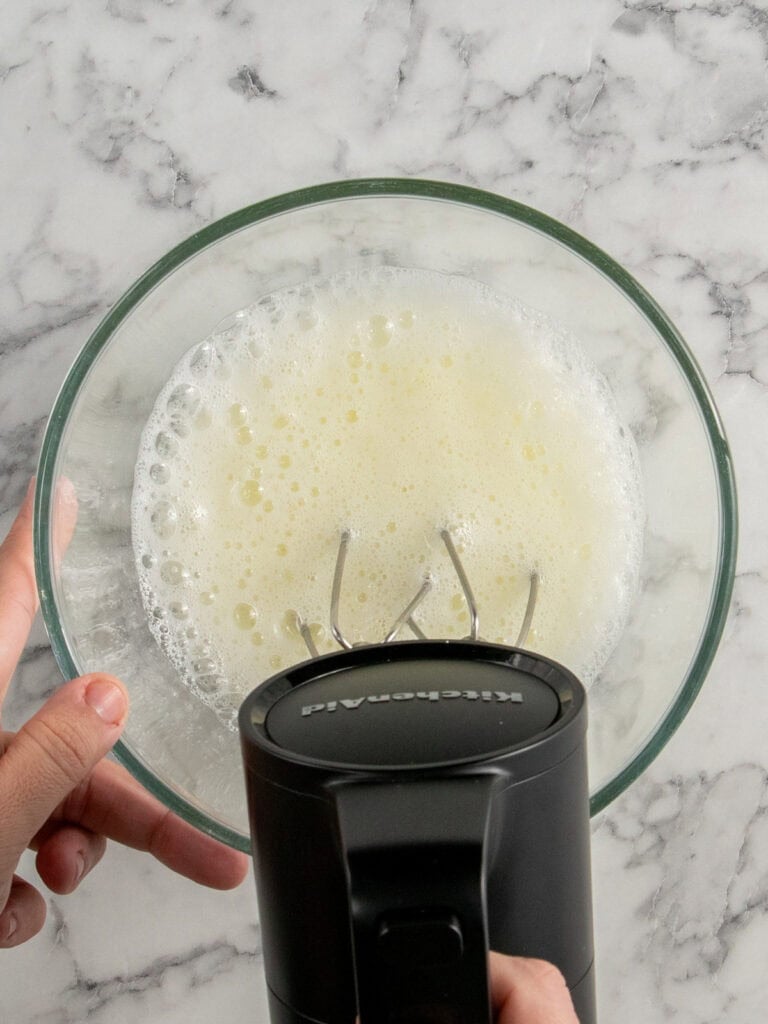
- Whip the egg whites and cream of tartar in a large bowl.
Tip – Cream of tartar is an acidic powder found in the baking isle that helps stabilize the meringue in the recipe. If you don’t have it use a couple drops of fresh lemon juice.
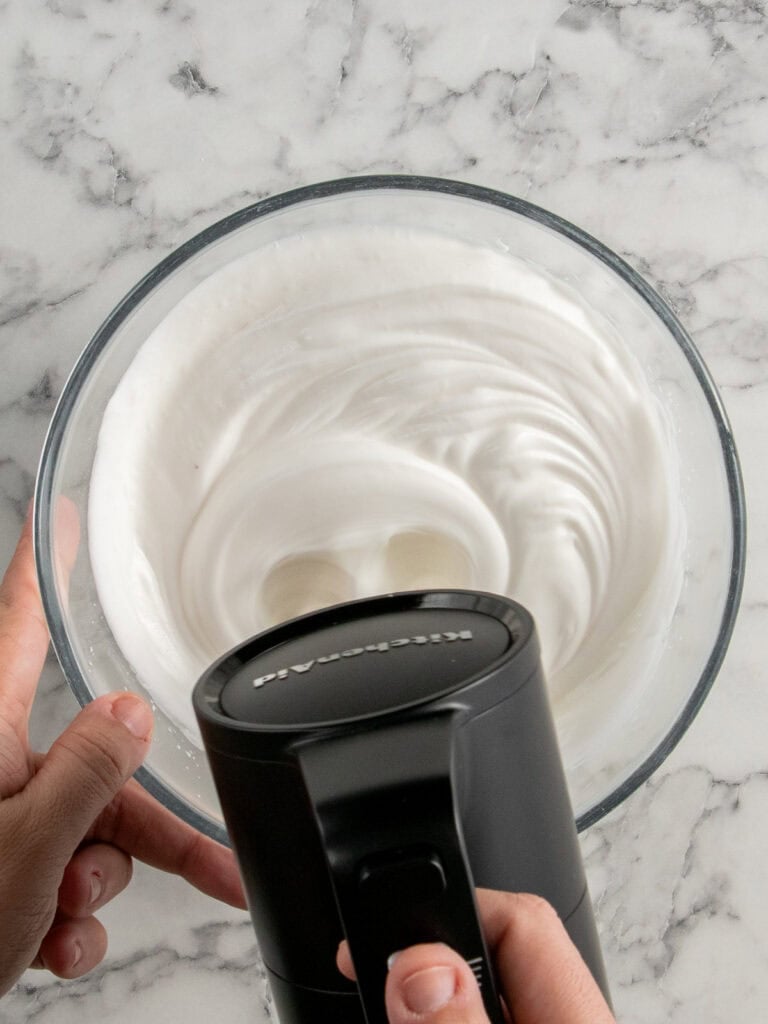
- Slowly add the sugar while you beat on medium high speed. About 1 tbsp at a time until its all been added and the meringue is thick and glossy.
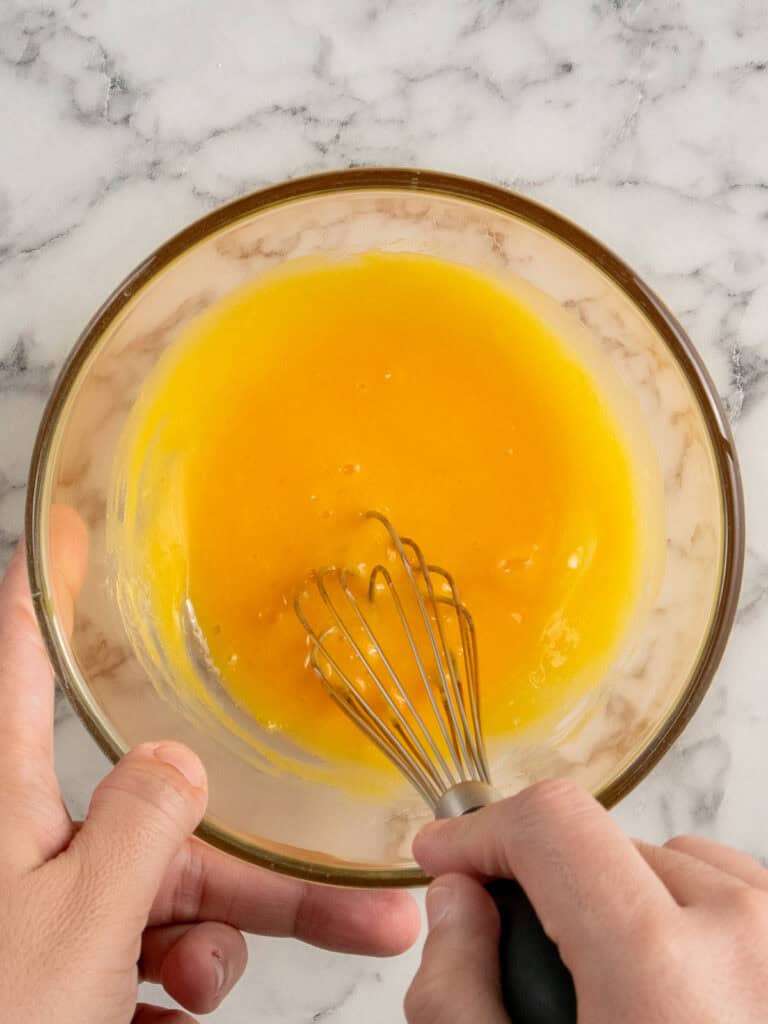
- Mix the egg yolks and melted butter (slightly cooled) in a little bowl using a whisk.

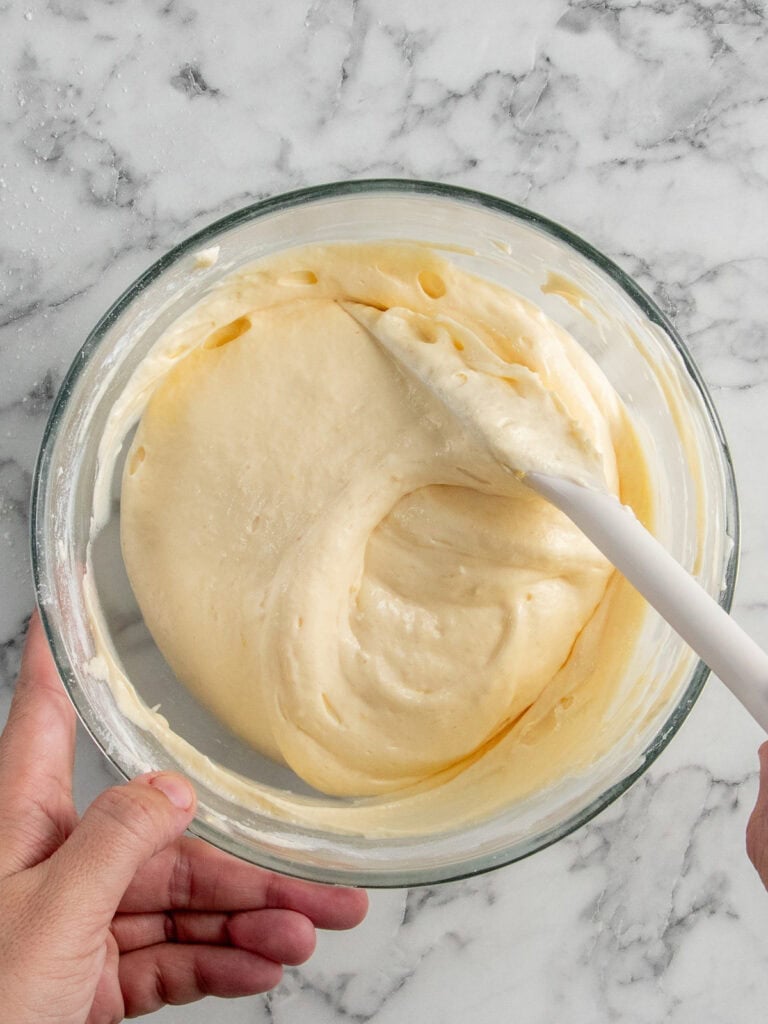
- Then add that to the meringue mixture and fold through using a spatula.
- Run the dry ingredients through a sieve into the egg mixture and fold through until there are no lumps.
Tip – These cakes get all their fluff from the way the eggs are whipped. So when you fold ingredients together, be gentle so you don’t deflate the egg mixture.
How to bake the sponge kisses
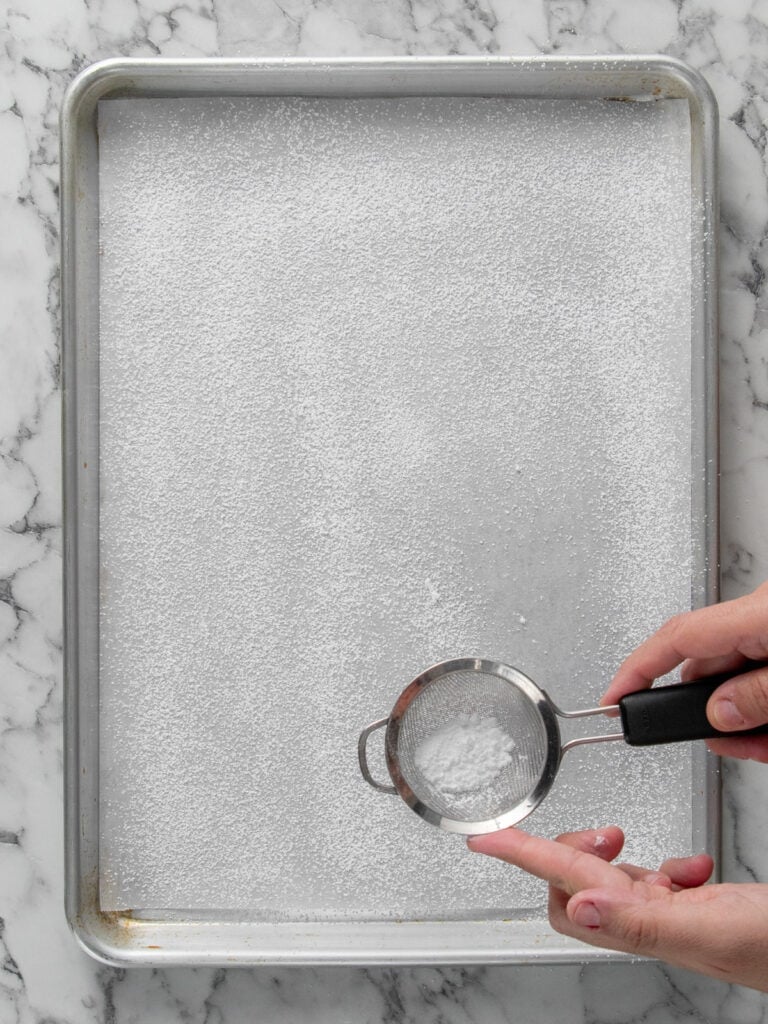

- Generously dust your lined baking tray with powdered sugar (icing sugar). This is going to stop the sponges from sticking to the baking paper.
- I used an ice cream scoop to gently scoop rounds of batter onto the baking tray. Space them out because they will spread as they bake.
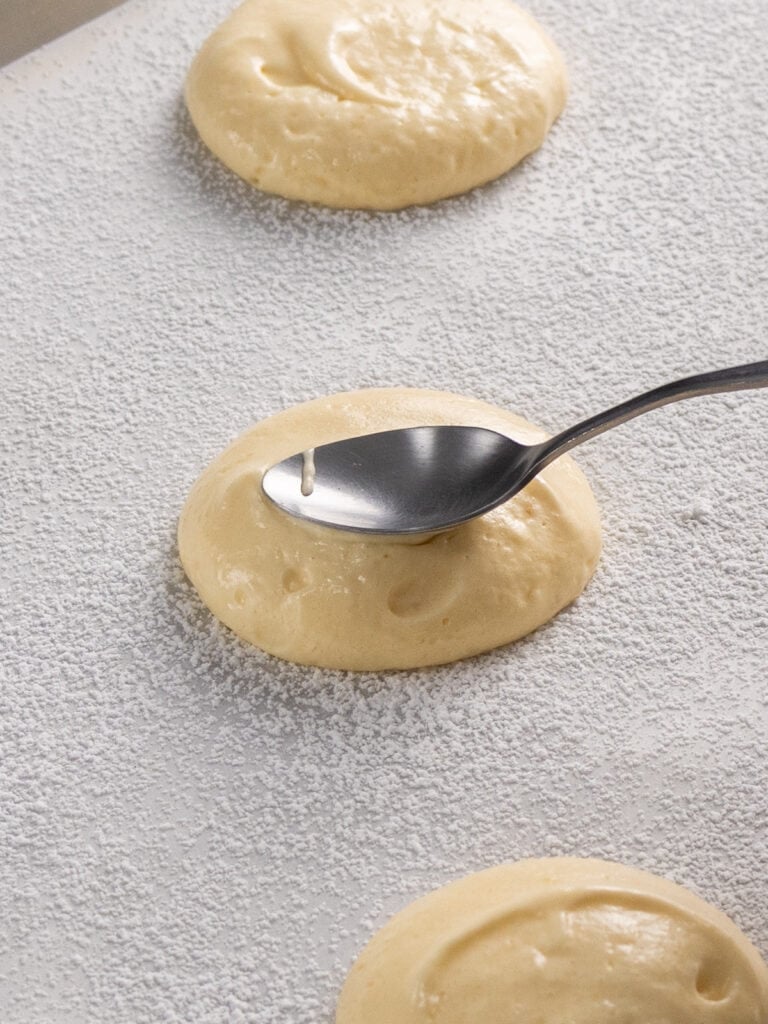
- Then use a spoon to gently shape into rounder shapes but don’t spread them out too much! You’ll end up with about 24 sponges spread across 3 large trays.
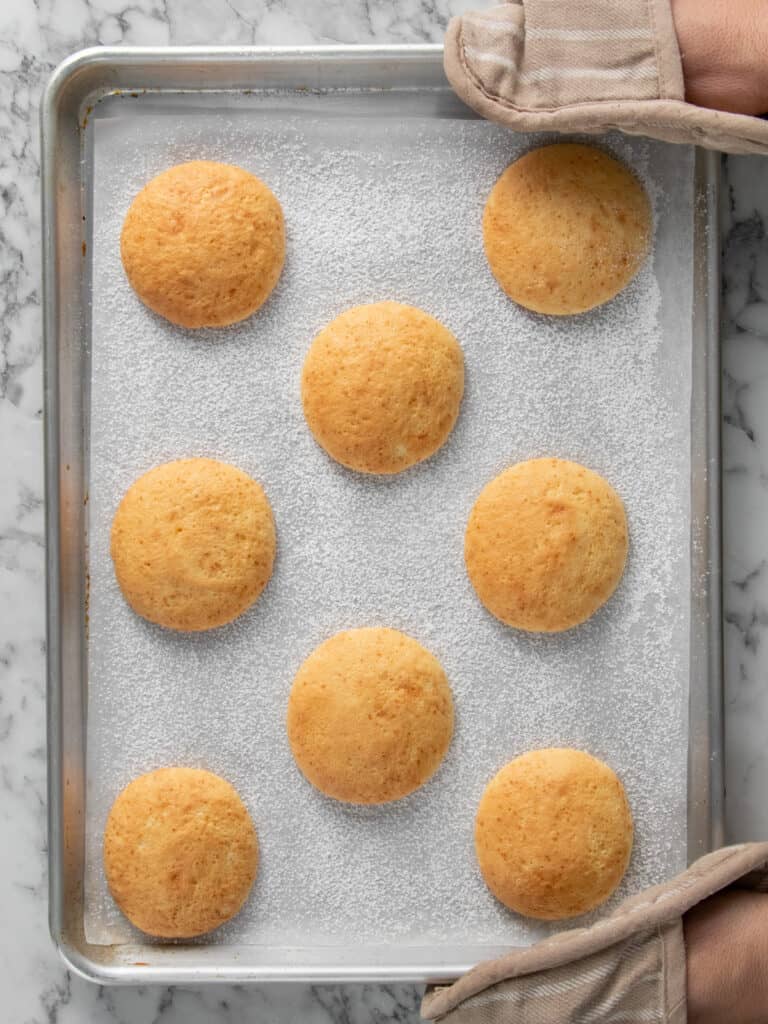
- Bake them until golden and let them cool before carefully peeling off the baking paper.
Tip – Once you’ve peeled the baked sponges off the baking paper, place them upside down on a clean piece of baking paper.
Filling them is easy

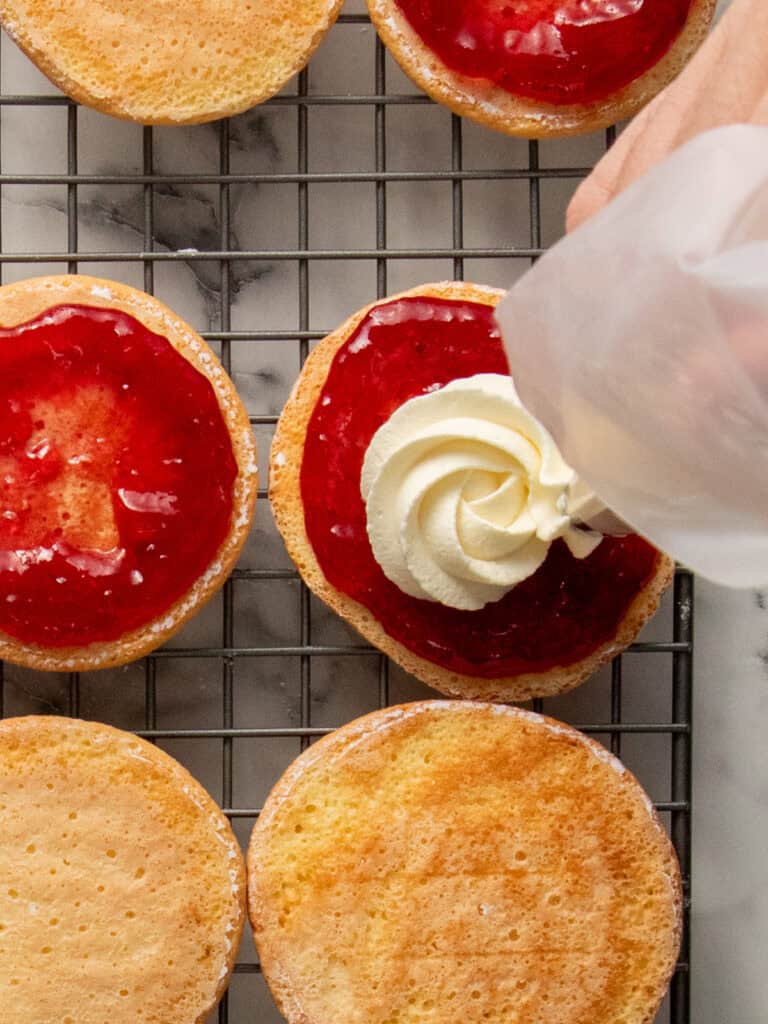
- Spread raspberry jam on half the sponges. If you’re using store bought, give that jam a good mix in a bowl until it’s smooth before adding to the sponge kisses so it goes on neatly and smooth.
- Pipe the Chantilly cream on top. I used an open star tip. Sometimes I like using a 1M tip.
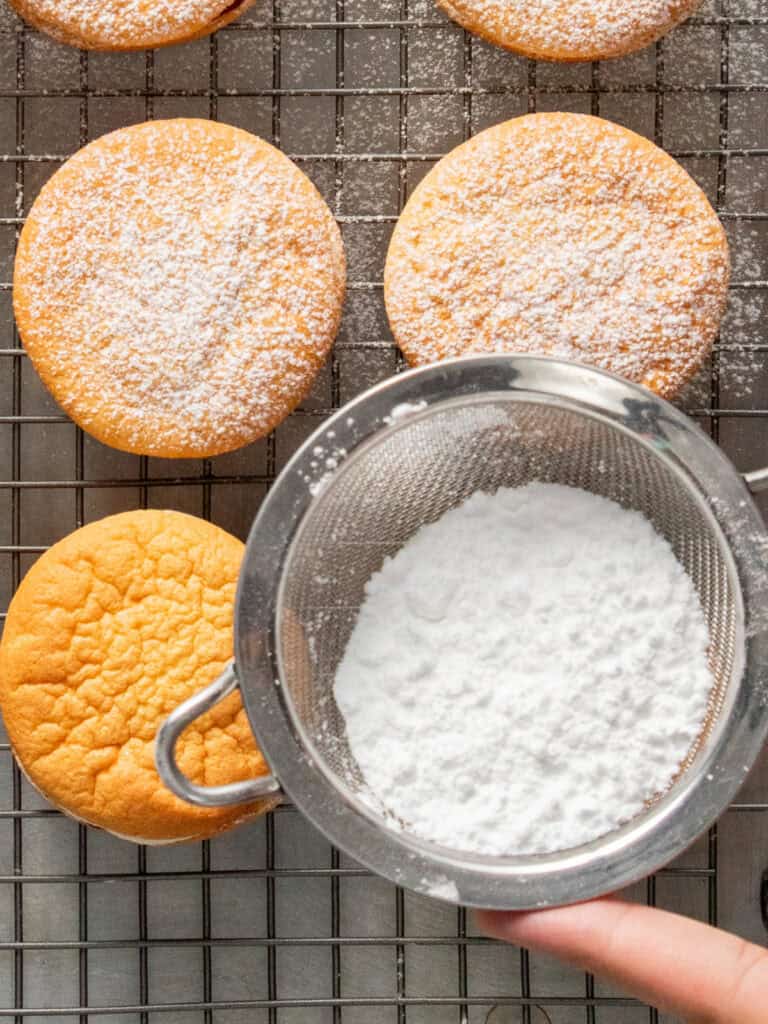
- Sandwich the sponges together. Then lightly dust with powdered sugar (icing sugar) right before serving.

Non negotiables for serving your sponge kisses
I like eating my sponge kisses cold so I pop them in the fridge to chill and to give the cream time to set a little for a couple hours. If you’re making these ahead of time, (like a day in advance), place the sponges in an airtight container and chill. Dust them with powdered sugar right before you serve them otherwise the sugar will just melt.
A Quick Baking Guide
If you’re new to baking or just want to brush up on the basics, these guides are a great place to start!
Loved the recipe? Let me know!
If you enjoyed this recipe, leave a star rating and comment below. It helps others find the recipe and keeps the baking community growing. Tag me on Instagram so I can see your version too!

Sponge Kisses
These delightful Sponge Kisses are a delicate sponge cake sandwich filled with fluffy Chantilly Cream and raspberry Jam. Perfectly sweet and super easy to whip up!
Serves 12
Ingredients
Sponge Kisses
- 80 g all-purpose flour, plain flour
- 1/4 tsp baking powder
- 1 pinch salt
- 12 g corn flour, corn starch
- 5 eggs, divided (50-55g each)
- 1/8 tsp cream of tartar
- 14 g vanilla extract
- 90 g caster sugar, superfine sugar
- 25 g unsalted butter, melted and cooled
- 250 g raspberry jam
- Powdered sugar to dust
Chantilly Cream
- 200 g mascarpone, cold (see notes)
- 200 g heavy cream, cold (see notes)
- 14 g vanilla bean paste or vanilla extract, see notes
Instructions
Sponge Kisses
- Preheat your oven to 180C / 355F (fan off), 160C / 320F (fan on). Line two large baking sheets with baking paper and dust generously with powdered sugar. Set aside.
- Combine dry ingredients – Add the flour, baking powder, salt and corn flour in a small mixing bowl. Use a whisk to combine. Set aside.
- Make meringue – To a separate, and very clean bow (see notes) add your egg whites, cream of tartar and vanilla extract and whip on medium speed using an electric hand mixer. Once you reach soft peaks, add the sugar 1 tsp at a time, while the mix is on high speed. Once all the sugar has been added continue whipping for 1-2 minutes until you reach stiff glossy peaks.
- Add remaining ingredients – Mix the egg yolks and butter together in a small bowl, then gently fold through using a spatula. Once combined, sift in the dry ingredients and use a spatula to gently fold through so you don’t deflate your mixture. Fold gently and take care to scrape from the bottom which is where all the dry ingredients like to hide. Once you can see no dry ingredients the batter is ready!
- Scoop out rounds of batter – Use two large spoons or an ice cream scoop about 2 tbsp in capacity to scoop rounds of batter onto your baking tray spacing them out about 2 inches apart as they will spread. Use a spoon to gently spread into a round shape if you need to. Don’t spread too much, they’ll spread and flatten slightly in the oven!
- Bake – Bake in the middle rack for 3 1/2 minutes, then turn around and bake for another 3 1/2 minutes. They’ll be done when they’re lightly golden in color and spring back when lightly touched. Allow to cool on the baking trays before taking off.
Chantilly Cream
- Prepare mascarpone cheese – Add the mascarpone to a large mixing bowl (glass or metal) and use a spatula to stir and break up as some brands can be firmer than others.
- Whip remaining ingredients – Add the remaining ingredients to the bowl and use an electric hand mixer fitted with beaters or a stand mixer fitted with a whisk attachment to whip on medium high speed until you reach stiff peaks. This usually takes about 3 – 4 minutes to achieve. What you’re looking for is a smooth but stiff whipped cream, not one that looks split. If it looks split or separated, congratulations, you’re on your way to making butter!
To Assemble!
- Assemble your cakes by spreading jam on one or both sides, then add a dollop of cream, sandwich it with another cake and dust with icing sugar.
Notes
How to clean your mixing bowl for meringue – add 1 tsp of white vinegar to your bowl and wipe using a paper towel until the bowl is dry.
Cream – make sure you use cream labelled heavy cream for this recipe. Whipping cream will work but won’t be as stiff as heavy cream. Low fat cream will not work.
Powdered sugar – I don’t like my cream too sweet, but if you like yours on the sweeter side you can use up to 1/2 cup. Make sure you sift it!
Mascarpone – is an Italian cheese that is similar in flavor to sour cream, but more creamy and less sour. Opt in for a better brand one as they tend to be thicker and make sure it’s cold straight out of the fridge! Make sure you give your mascarpone cheese a mix before using. Some brands are soft, some are firm and can cause your Chantilly cream to go lumpy. If you don’t have mascarpone, you can substitute with a simple whipped cream mixed with a tablespoon of sour cream for a delicious alternative.
Vanilla – I have a great recipe for Vanilla extract here on the blog which is alcohol based. It can be used for most recipes. However, I would advise against using it for whipped creams (yes, even stabilized ones like this one) or meringues as it can muck around with the air whipped in the mixtures. Instead use a syrup based vanilla extract. I find vanilla bean paste is best.
Storage – sponge kisses can be stored in an airtight container, in the fridge for up to three days. They’re even better the next day when the cream has soaked intot he sponge!
Nutrition – is an approximate and is based on per sponge kiss. This recipe makes 10 sponge kisses
A note on measurements – This recipe uses weight measurements for the most accurate results. Cup measurements can vary depending on where you are, which affects the precision needed for a recipe like this. Here is where you can learn more about how to measure ingredients using digital kitchen scales.
Nutrition
Calories : 295kcal
Carbonhydrates: 25g
Protein: 5g
Fat: 17g
Saturated Fat: 10g
Polyunsaturated Fat: 1g
Monounsaturated Fat : 3g
Trans Fat : 0.1g
Cholesterol: 108mg
Sodium: 60mg
Potassium : 81mg
Fiber: 0.4g
Sugar : 15g
Vitamin A: 629IU
Vitamin C: 2mg
Calcium: 56mg
Iron: 1mg
Nutrition Disclosure
Gave this recipe a go?Mention @thescranline or tag #thescranline!
previous post
31 comments
mouth waveringly delicious and light! N x
Is the timing off on the baking time? I kept it in the oven much much longer than 4 mins and it wasn’t browning at all. Also they came out extremely sticky? Or did I do something wrong? Otherwise, they are extremely delicious!! Especially with the cream!
Check your oven! It might not be the proper temp. Also, did you use a fan-forced oven? If not, then they need to be baked at a higher temp than listed.
As I am making this, I cannot find where to add the melted butter? Am I overlooking this?
Hi Becky! It’s in step 4. You add it in last. Hope that helps! N x
Very fun and delish! Love the mascarpone and raspberry combo
Thanks! N x
Had the same issue with cooking times – took way longer to bake and hardly browned. Using a fan forced oven at the correct temp. Also noticed the butter is not included in the method of the recipe – had to find that by scrolling up in the recipe in the blog post.
Hi Elise, have gone in and added the butter to the method. Sorry about that. However, baking times are correct. I’ve made this multiple times. If i was having the issue you had, I would check your oven temperature is accurate 🙂
I also let mine stay in the oven for an extra ~6 minutes longer and they were done but still quite blonde (using non-fan-forced at correct temp). I also think I dusted the tray too liberally with icing sugar – the bottoms had a crackly sugar base.
Hi Em! How were they in the centre?
Hope you guys love these! N x
Hope you guys love these! They melt in your mouth! N x
Hi Nick , can I use oil instead of butter? My doctor said I shouldn’t eat butter
Hi Jimmy! Hmm, I haven’t tested the recipe with just oil. The butter adds a richness to the flavor of the cakes but it also helps provide a bit of stability. Ad room temperature butter firms up which helps give these cakes structural integrity. Oil doesn’t do that. That doesn’t mean the recipe wouldn’t work. I would give it a go and see how it goes. If you do try it with oil, come back and let me know how it went! N x
These are a super fun, quaint, and delicious treat! Mine came together just fine, baked in the correct amount of time, etc. I would say to spread out the batter on your pans a bit, as mine were very up-tight and tall instead of spread out and slightly flattened. I just used a spoon to spread them into a thinner round shape before baking. I did make a mistake in that I made these the night before and stored them on the counter in a covered airtight container. In the morning they were super sticky and soggy and gross! I ended up salvaging them by giving them a big dusting of powdered sugar, but they definitely were not as good as they were the night before. I also realized I didn’t have marscapone, so I just whipped up cream with a bit of powdered sugar and 1 tbsp of sour cream – it was delish! I’ll probably be making these again… but always the day of!
Hi Adelaide! Glad you enjoyed making the Sponge Kisses! Great tip on spreading the batter out a bit—helps with that perfect shape! Sorry to hear about the next-day sogginess. These are definitely best eaten fresh. Love your improvisation with the whipped cream and sour cream combo—it sounds delicious! And yes, always make them the day of for the best texture. Thanks for sharing your experience! N x
Thanks Nick! Merry Christmas.
Hope you had a wonderful Christmas Valerie! N x
I cannot wait to try these!
They’re like if Jammy Dodgers and Victoria Sponge had some wee babies!! 😋
hat’s so funny haha. I think you might be right! And I hope you get to try them soon cos they’re so yum! N x
Hi. I want to make these. I’m just confused about corn starch? And corn flour. Are they the same. ??
Hi Hajrije! Hmm, essentially yes. In some recipes using one or the other makes a difference but for this recipe both would help to lighten it. 🙂 N x
I used whipped cream instead and it was still delicious.
Glad to hear you loved them Jane! Whipped cream definitely works too N x 🙂
Hi. These look delicious. Just wondering – Do these not go hard in the fridge because of the butter? Do they stay soft? Thanks.
HI Aneesa! No, they don’t go hard, but that’s a great question. These are better served the day you make them. If you pop them in fridge, just let them thaw a little to room temp before serving 🙂 N x
Very good
Thanks Christina! N x
Hi sound delicious can you freeze them once made
Thanks! For this recipe, unfortunately you can’t freeze them.