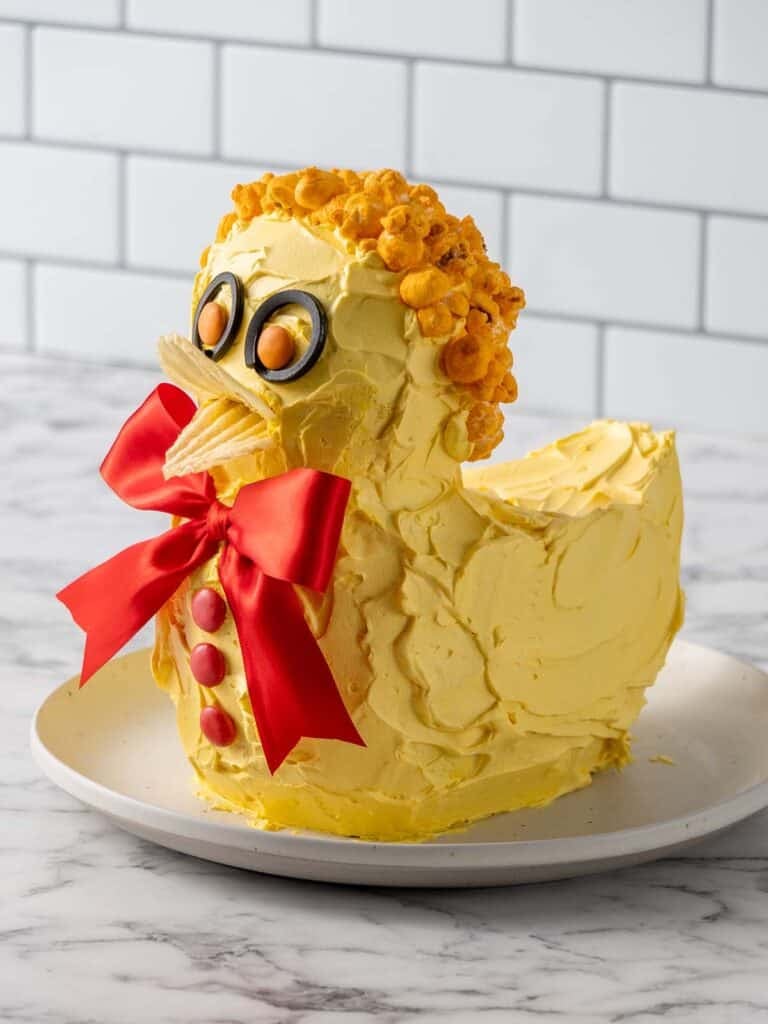
Duck Cake Recipe From Bluey (Step-By-Step Photos)
So your kid loves Bluey and now you’ve been asked to make the Duck Cake. Maybe you know what you’re doing, maybe you don’t, but either way you’re here and ready to give it a crack. I’m here to make your life easier. I’ve put together a step-by-step guide to help you make this iconic duck-shaped cake, first created by Agnes Lee for the Australian Women’s Weekly Children’s Birthday Cake Book.
Erica
I just made this cake for my toddler’s Bluey themed birthday party, and it turned out fantastic! I was very intimidated by making this infamous duck cake so I followed your recipe and video religiously. I’m so so pleased with how it turned out. It was delicious and adorable! Thank you for making this recipe and tutorial! I’ll have to come back for future birthday cake recipes because I’ve definitely set the bar high 😆
Hey team, Nick here! I grew up with this cake, and when it showed up on an episode of Bluey (my all-time favorite cartoon with or without watching it with our daughter in the room) I knew I had to re-create it. I’ve broken the whole thing down into step-by-step photos and a video so you can easily follow along from start to finish. Even if you’re not a cake person! The key is to plan ahead!
This recipe uses my soft and tender vanilla cake recipe. Although you can make it with store-bought cake mix if you want to simplify things. I covered it in my creamy Ermine Frosting recipe which I think is perfect for this cake. Trust me, people will actually love eating frosting for once.
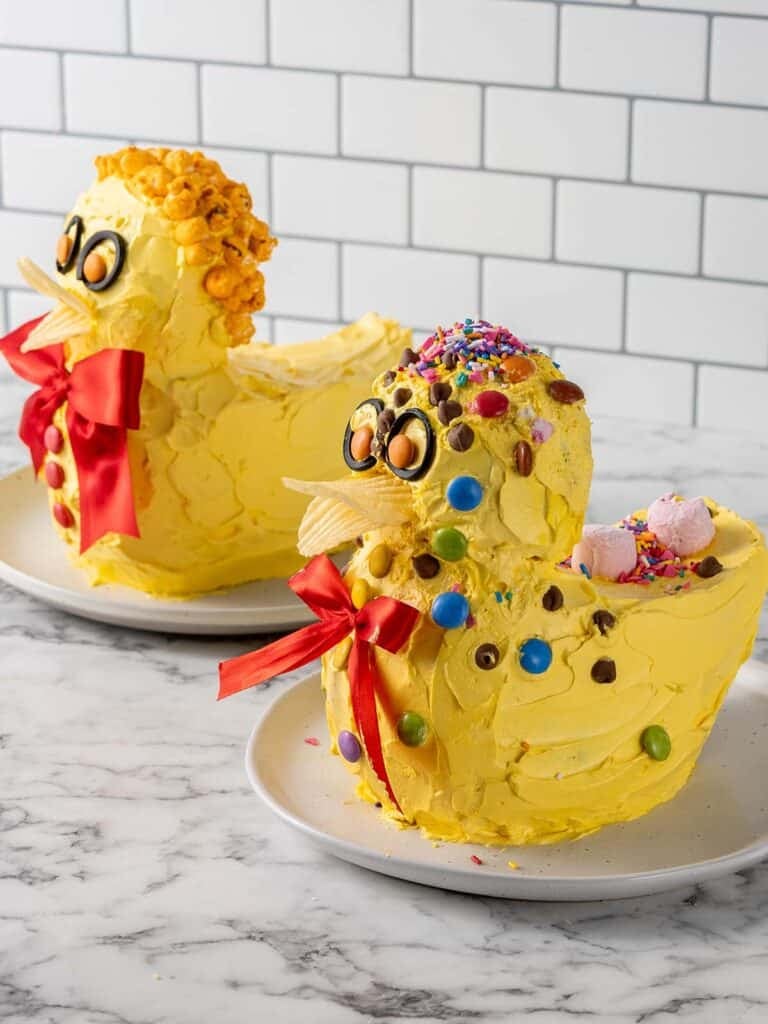
REMEMBER! If your duck doesn’t look exactly like mine, don’t forget that half of Bandits cake fell on the floor. He ended up picking it up and finishing it (kind of) and Bingo still loved it!
Planning ahead to make this stress free
This cake isn’t difficult to bake and put together. Just plan ahead of time. Here’s how I fo it:
Day 1
- Bake the cake – Cool to room temp and then wrap in plastic before chilling in the fridge overnight. This’ll make carving much more manageable.
Day 2
- Make the frosting
- Trim the cakes
- Put the cake together
- Frost the cake
- Chill for an hour or overnight
- Finish by adding the final decorations.
Making the cake
This cake uses my updated moist vanilla cake recipe. It’s soft and tender but sturdy enough for a cake like this which needs to be able to hold it’s own weight. I’ve included the full list of ingredients and measurements in the recipe card at the bottom of this post if you want to use my recipe. I’ve also got info on how to make this cake using store bought cake mix if you want to do that instead.


- Whip the eggs and sugar until pale, fluffy, and tripled in volume.
- Sift in dry ingredients and gently fold in to keep the batter airy.

- Heat the milk and butter just before adding, then pour it in slowly while mixing to emulsify.
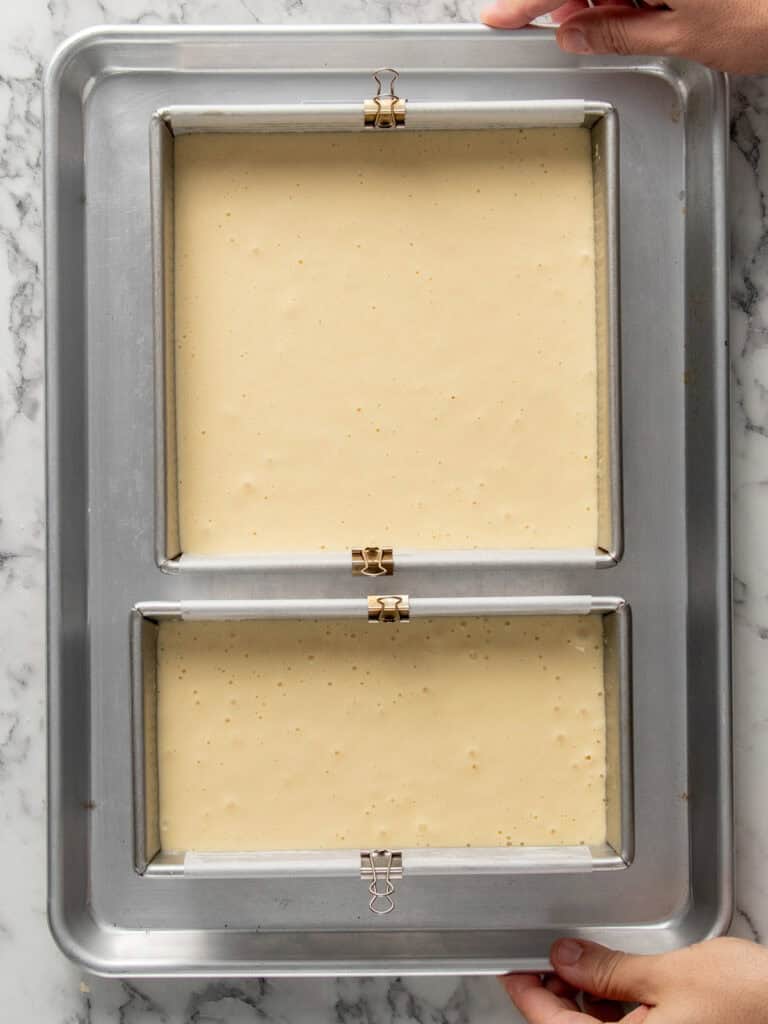
- Bake until golden and springy – 600g of batter in the loaf tin, 930g (approx.) in the square tin.
Tip – Bake the cakes the night before you put the cake together. Let it cool at room temperature before wrapping in plastic and chilling in the fridge. It’ll firm up the sponges which will make trimming them much more manageable.
Trimming the Loaf Cake (Head and neck)
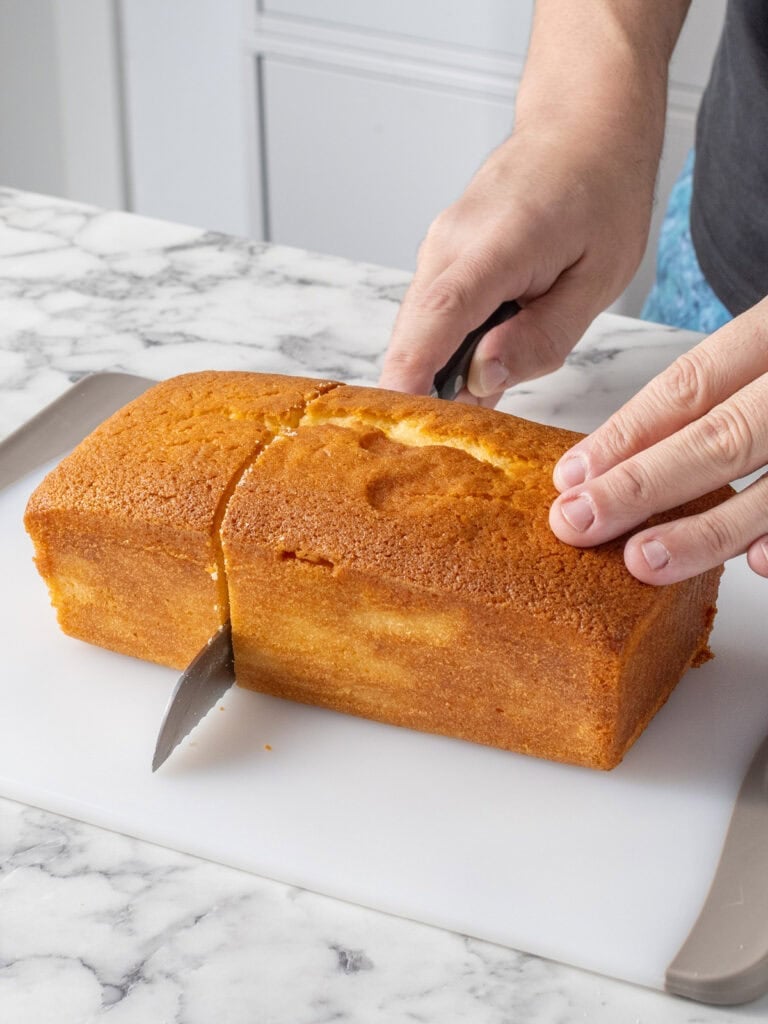
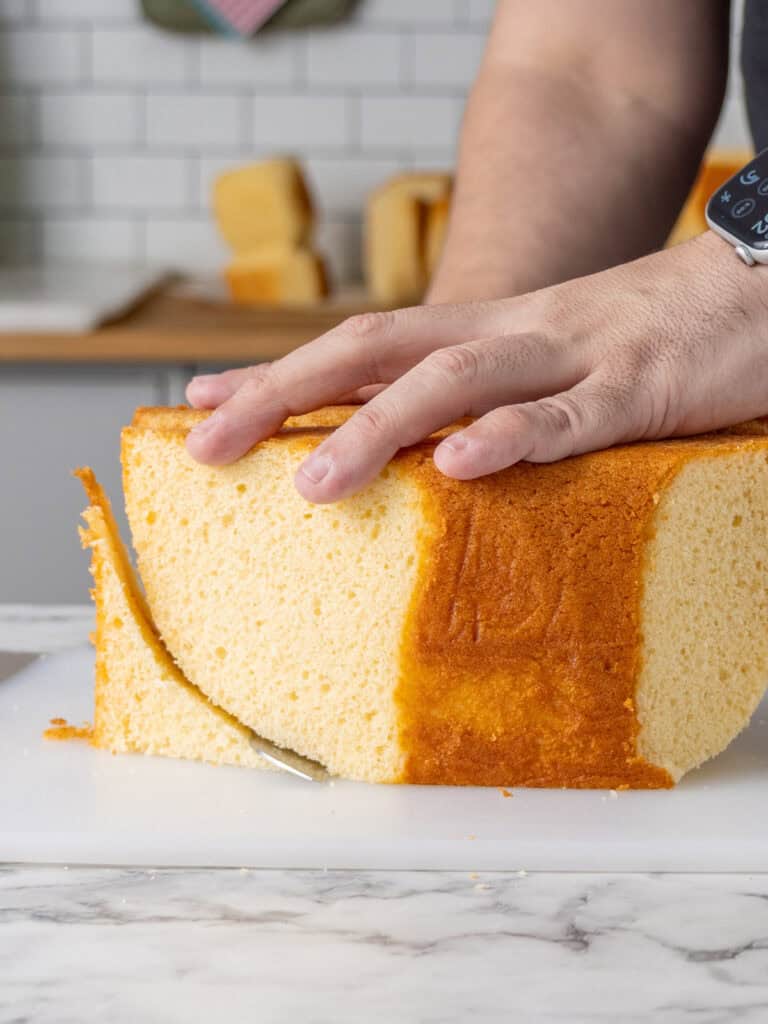
- Slice 1/3 of the loaf away using a serrated knife. In fact, you’ll be using a serrated knife for all of the trimming.
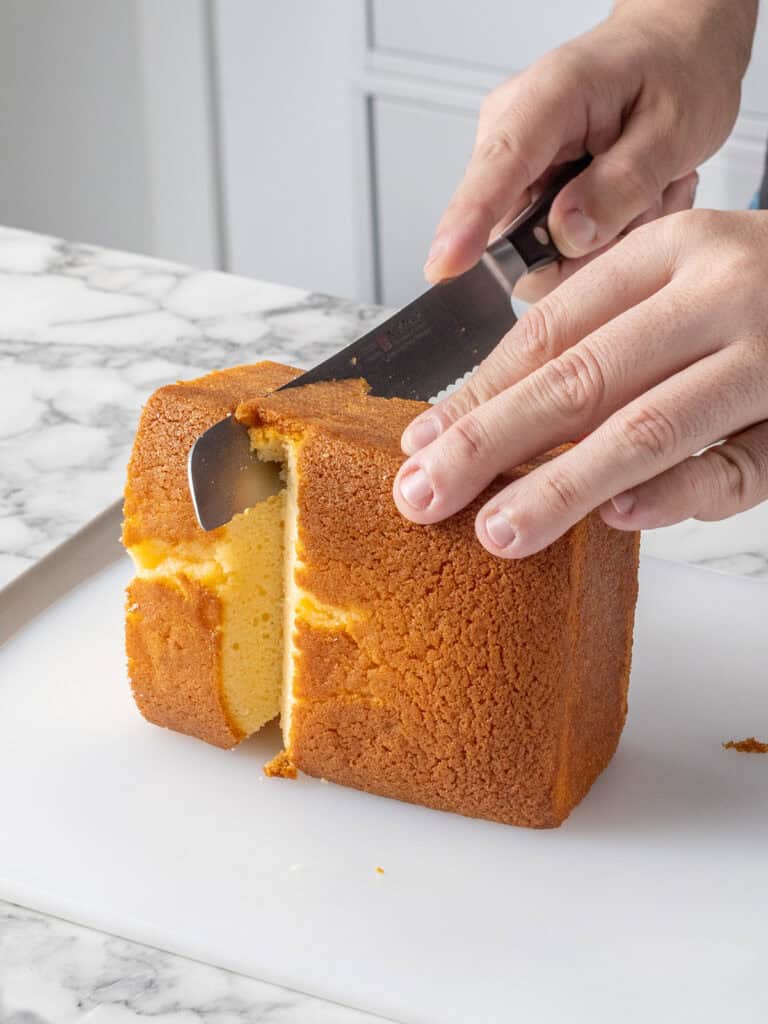
- Cut small v shapes about 2cm deep all around the top 1/3 of the cake.

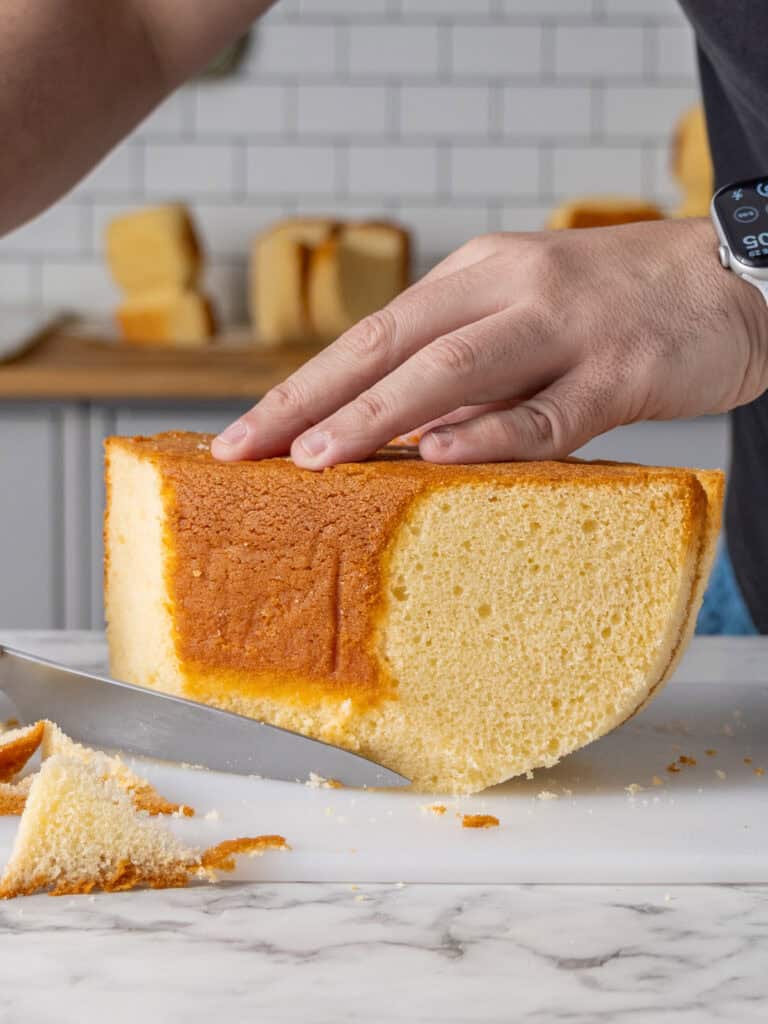
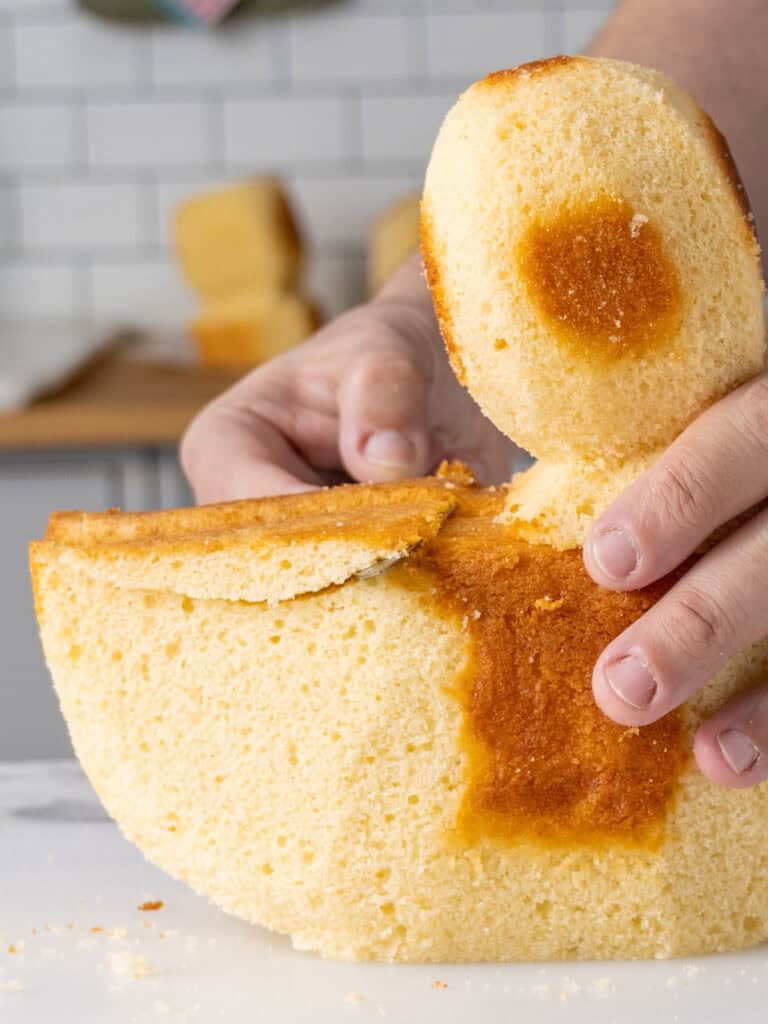
- Trim the base of the cake on an angle. Start at the bottom of one end and cut upwards toward where the chest and head meet.
- Use the knife to shape the head into a rounder shape.
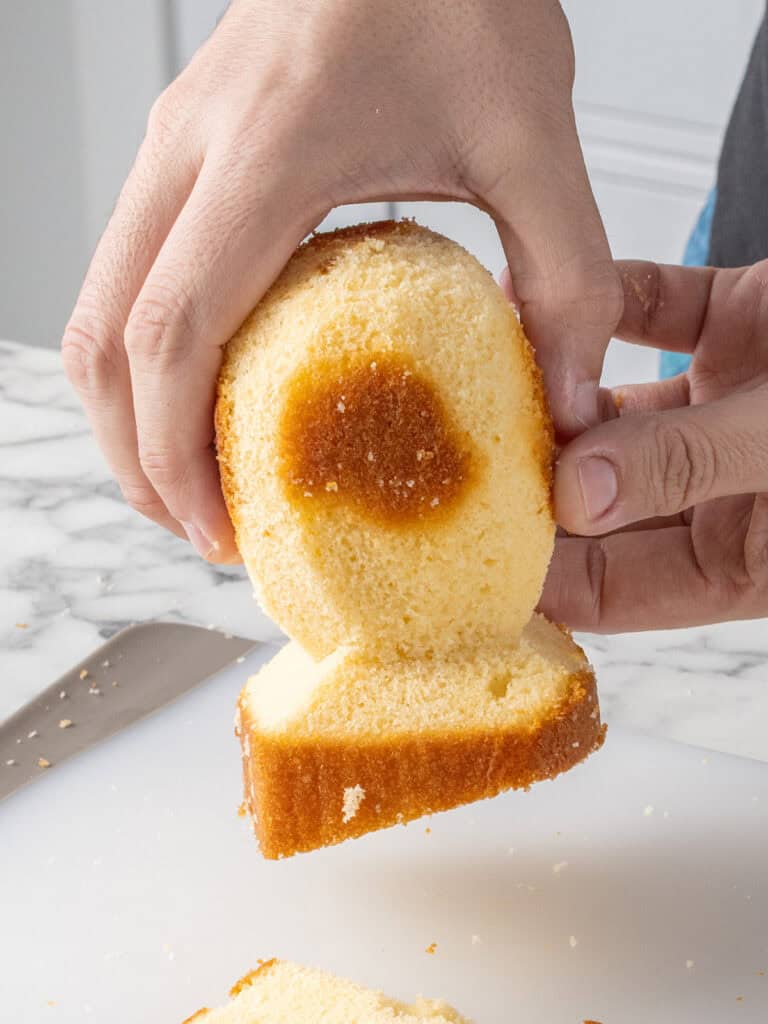
- Here’s what it will look like once you’re done!
Shaping the Ducks Body
Tip – You can trim the top of your cake if you want to make putting it together easier. I used a cake leveler to do this but a serrated knife will work too. Just get down on eye level with the cake to make sure it’s nice and even.
- Slice the square cake in half. Each half will make up one side of your ducks body and will be glued together with frosting once you’ve finished trimming it.
- Shape the front and back by slicing angles on both sides of the cake. The front of the duck side will have a shorter angle. The back of the duck will have long angled trim that will almost go to the middle of the ducks body.
- On the back of the duck, trim a curved wedge from about halfway up the top, down toward the center. Not all the way to the center. About 1/3 of the way should do it. Then trim a smaller curved wedge at the front of the duck.
- Trim curved wedges down the sides of the duck.
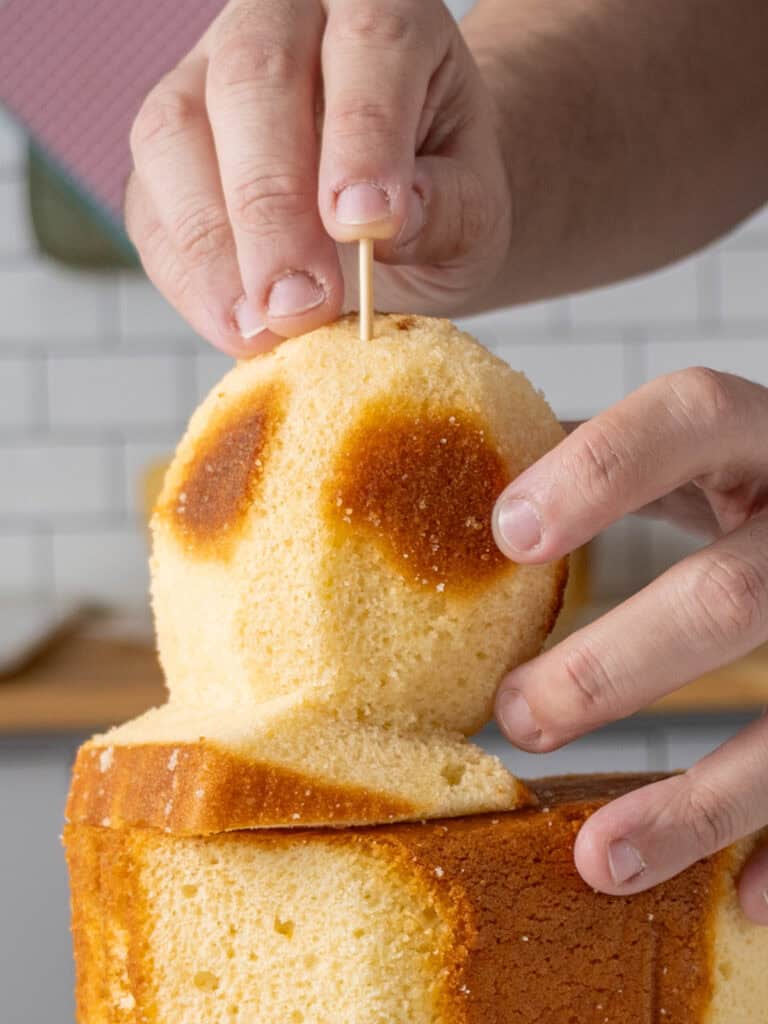
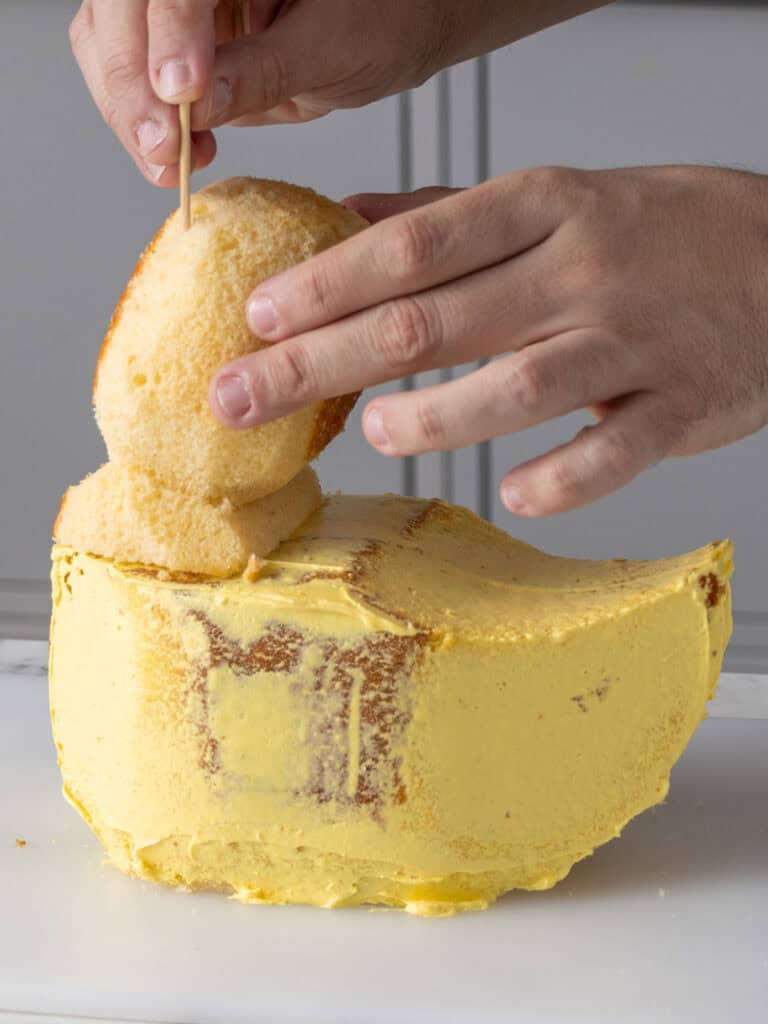
- Add the ducks head to the duck and hold it in place using skewers. About 3 should do it. It’ll help keep it in place for the next bit of the trimming.
- Begin trimming the front of the duck including any excess from the ducks’ neck so everything looks flush. Do it on the sides of the neck too.
Tip – Make sure your guests/cake slicer knows the skewers are in the cake so they can make sure no bits of skewers are served to your guests!
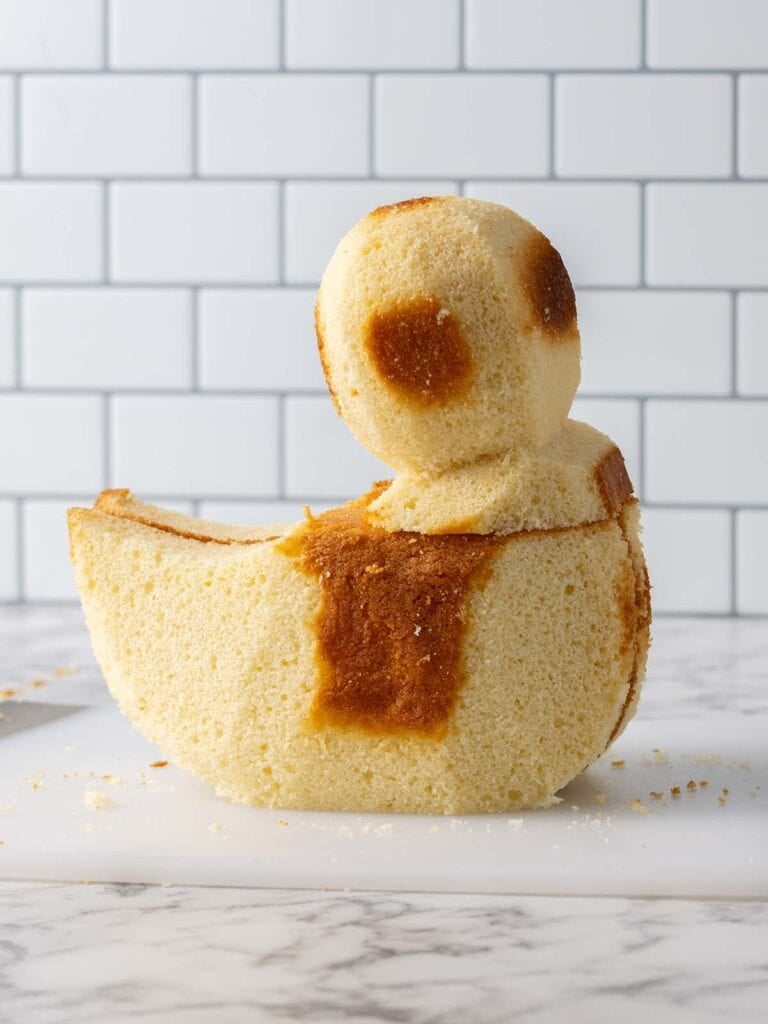
- To finish trimming, slice an inward curve at the top back of the duck. Now stand back. Your duck looks like a duck!
How to make the ermine frosting
I have a simple and basic American buttercream frosting that would work for this recipe, but my fluffy ermine frosting is smooth and tastes amazing. It’s my new favorite frosting.

- Cook the paste by whisking sugar and flour with milk until thick like pudding
- Let the paste cool completely to room temperature before using
- Whip the softened butter until it becomes pale and fluffy
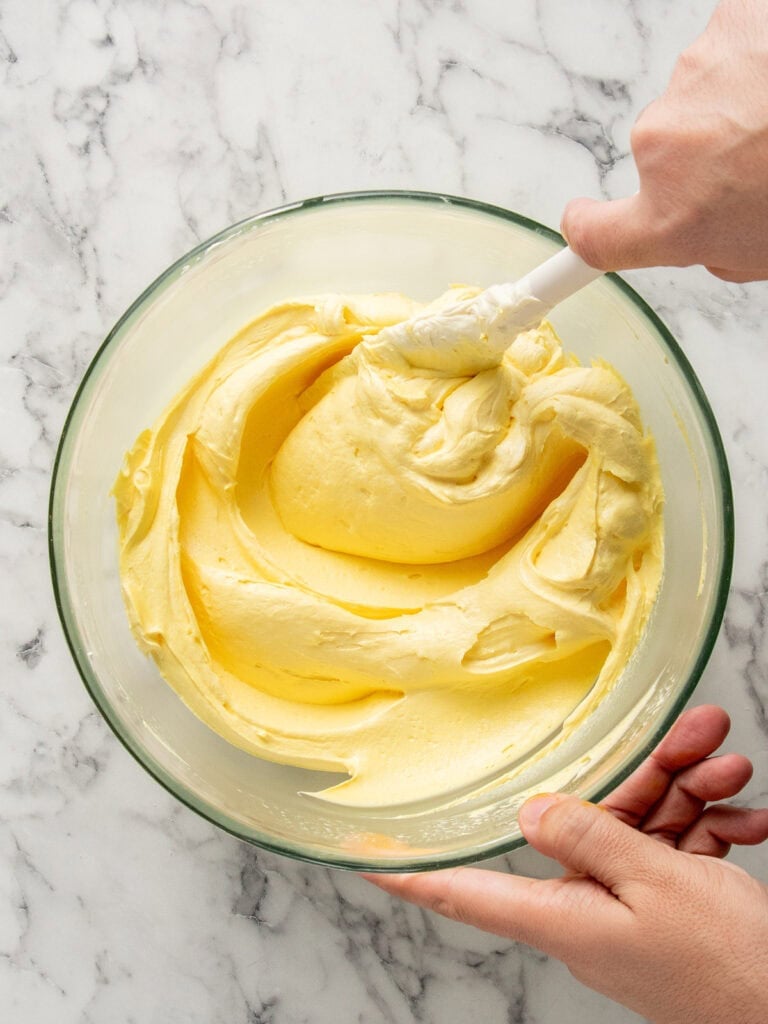
- Add the cooled paste to the butter gradually with vanilla and salt and whip until smooth, pale and fluffy!
- Color your frosting yellow using yellow food gel.
Tip – If the frosting isn’t yellow enough, add more yellow gel and a tiny drop of pink to deepen the color.
To frost your cake
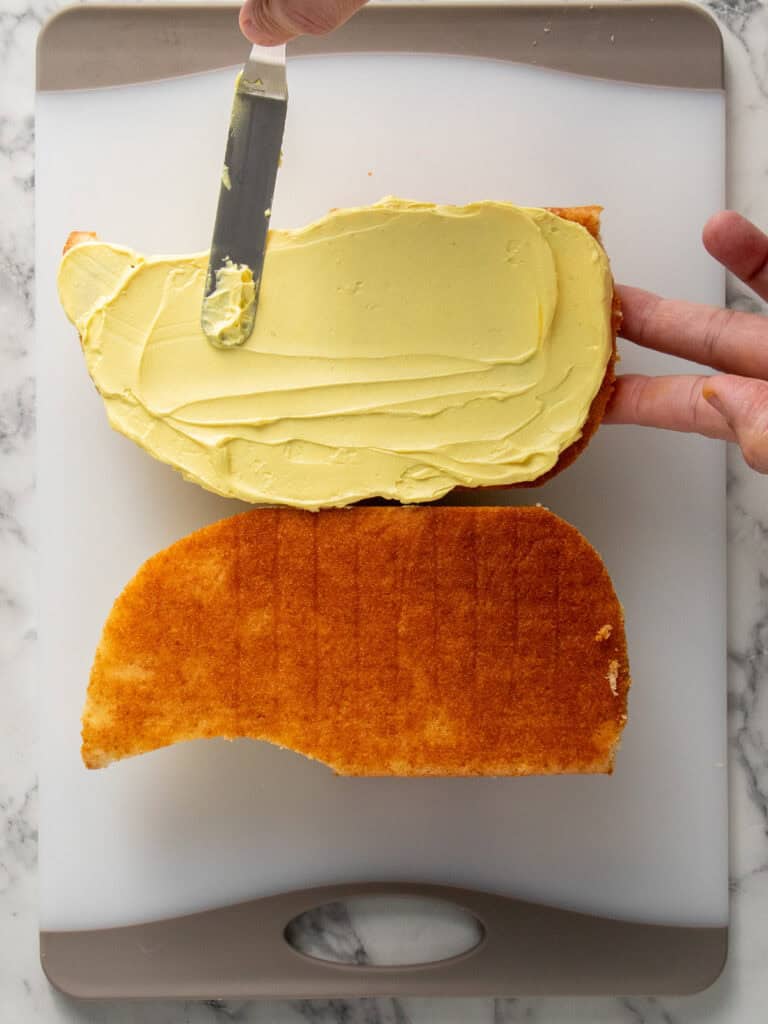
- Spread some frosting on one side of your ducks body. Carefully take the skewers out and the head off. Then sandwich back together.
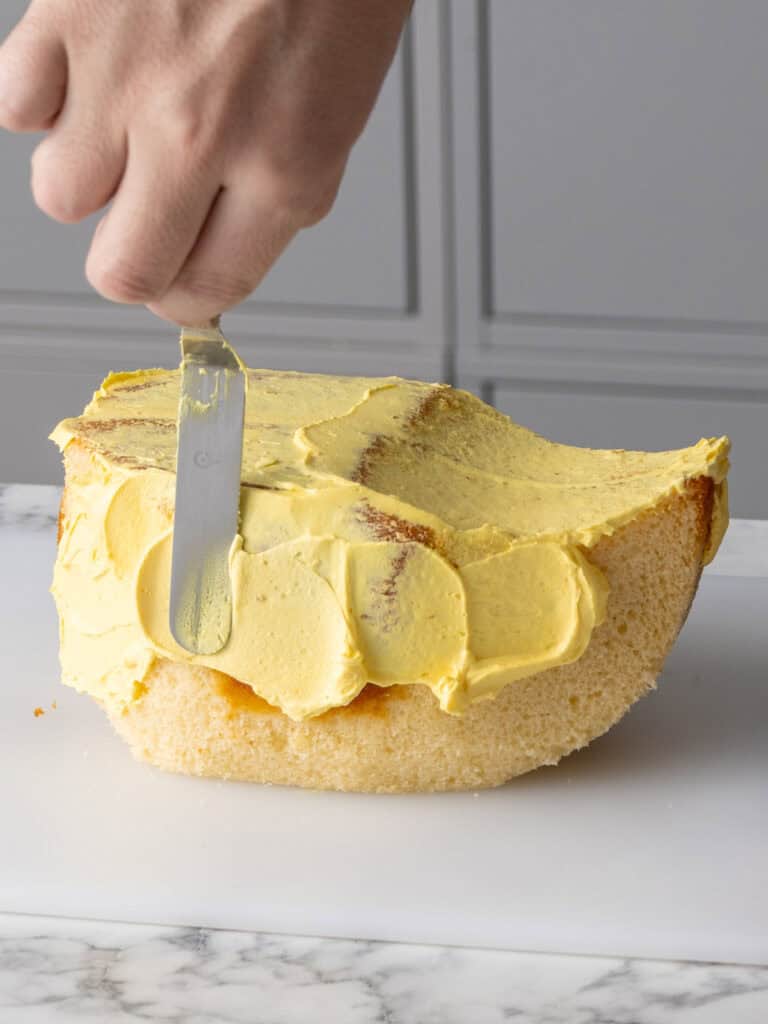
- Spread a thin layer of frosting around your cake using a spatula
- Then add the head back on with the skewers to hold it in place.
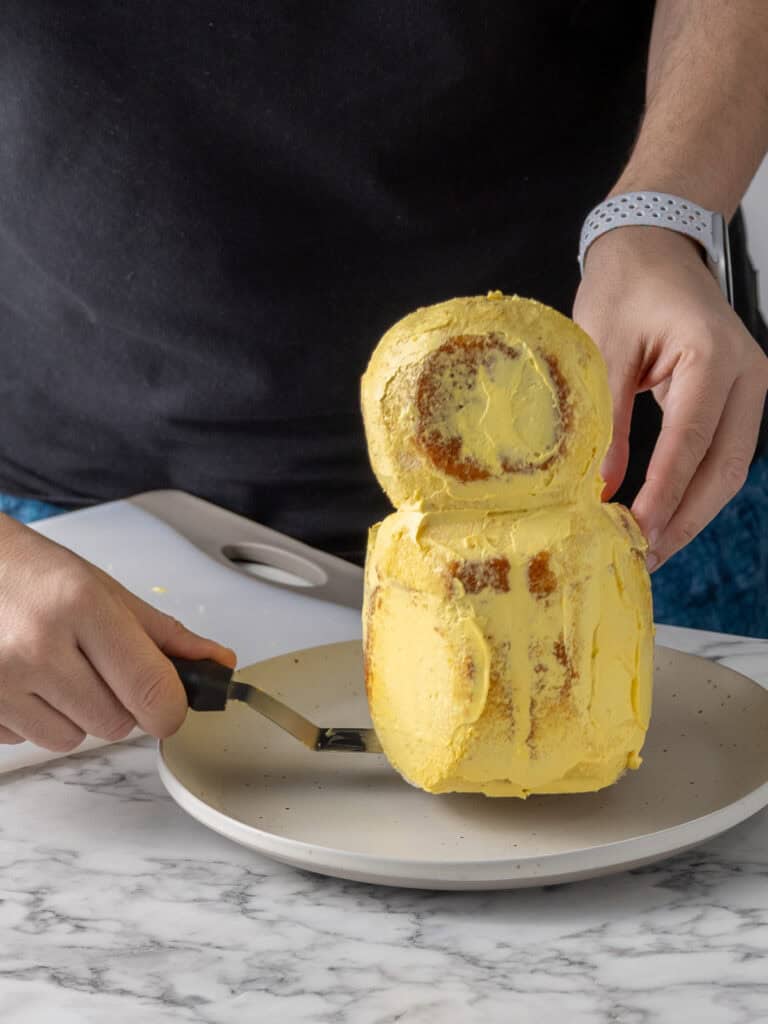
- Transfer to your final serving plate.
- Add the final layer of frosting.
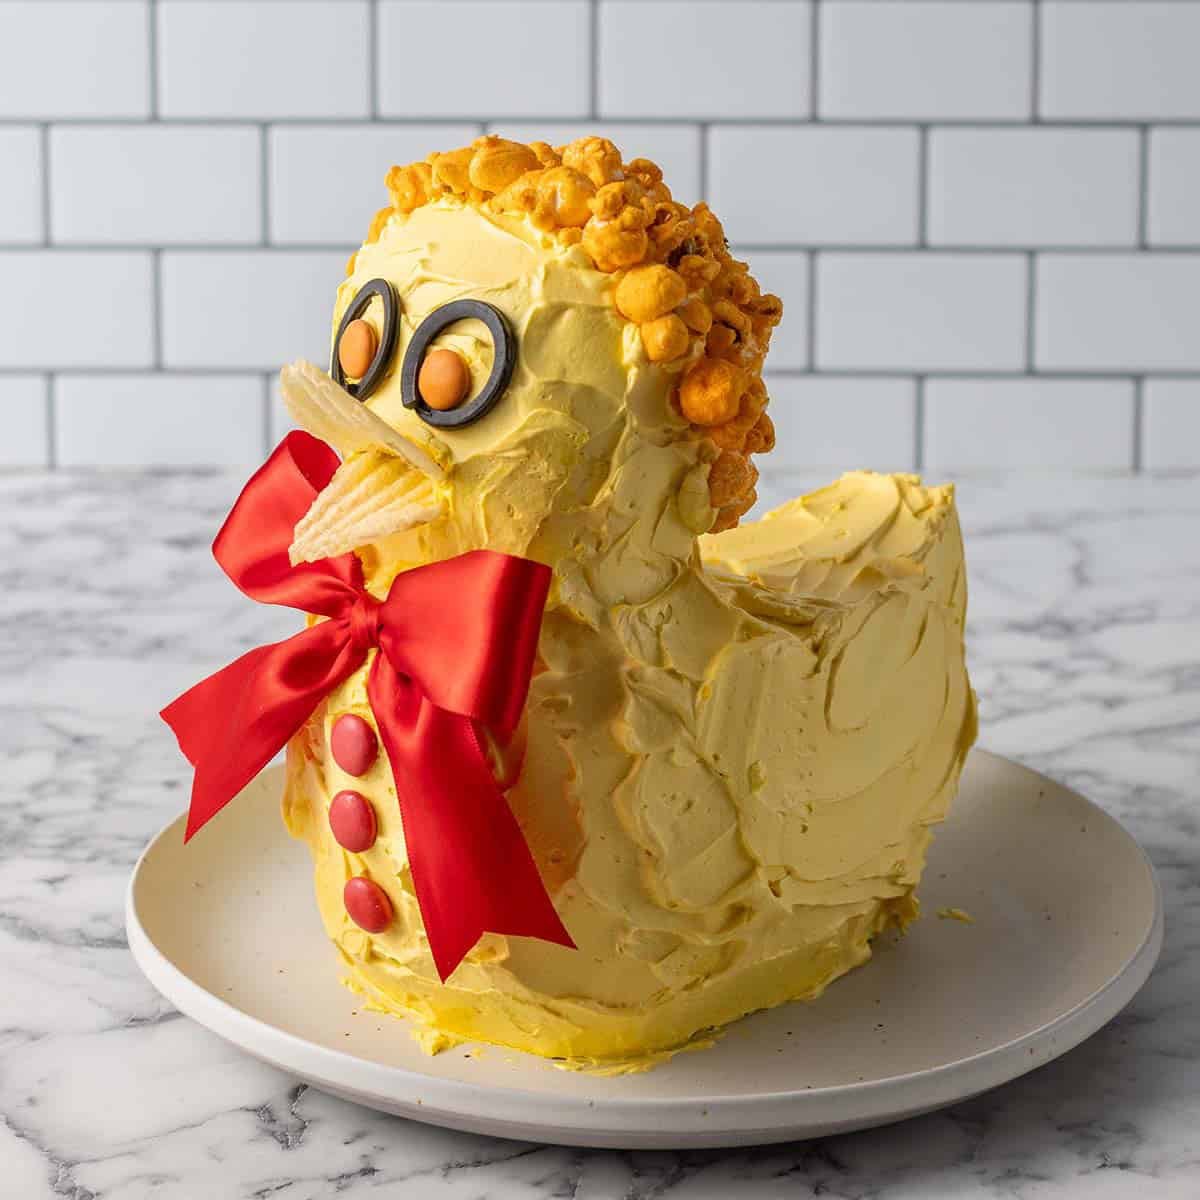
The Decorations
I like to decorate the duck one to two hours before serving.
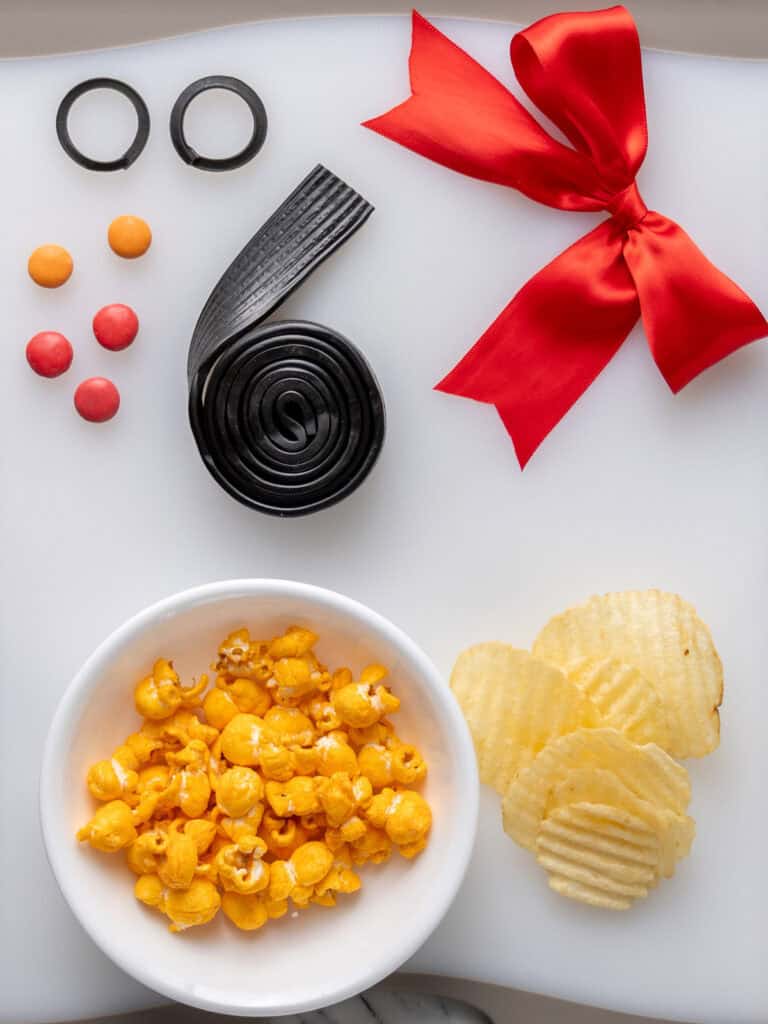
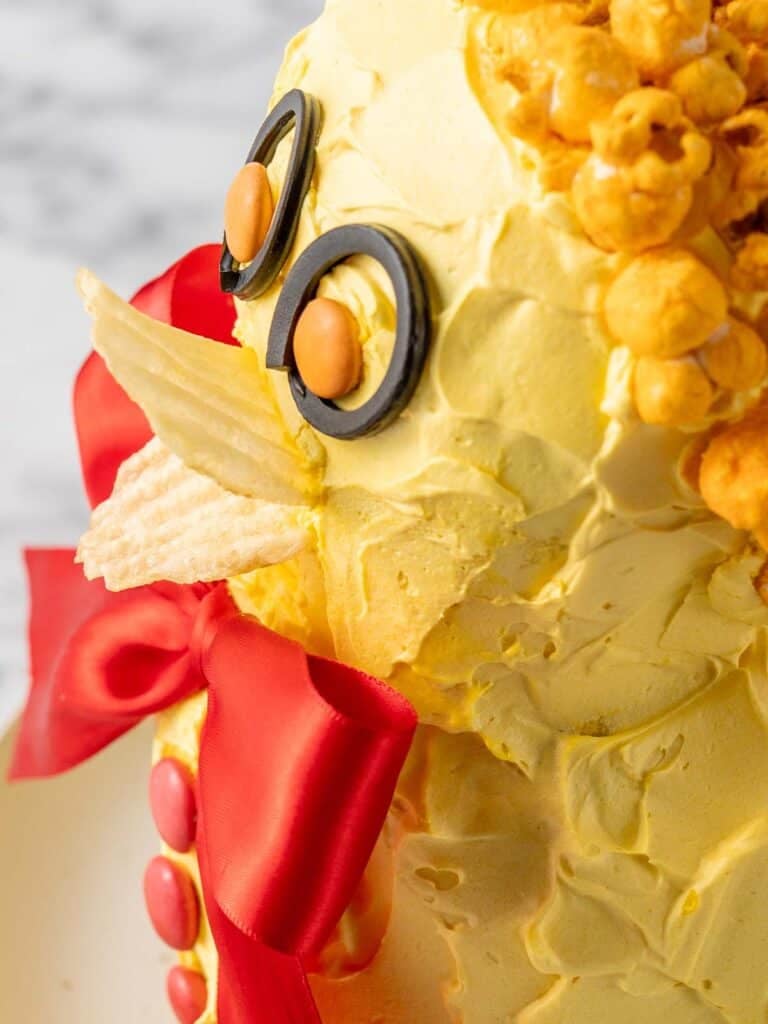
- Cut liquorice into 6cm strips and pinch the ends together to form rings. Make two of those and then stick them on the head where the eyes go.
- Press an orange smartie into the center of each ring to finish the eyes.
- Add three red smarties down the front of the body for buttons.
- Press two ruffled chips into the face where the beak would go. If the ducks beak doesn’t look right it’s likely they need to be turned around. And pick the best-looking chips! Preferably the same size too.
- Tie a red ribbon under the head to make a bow tie. I used a regular ribbon from a craft shop.
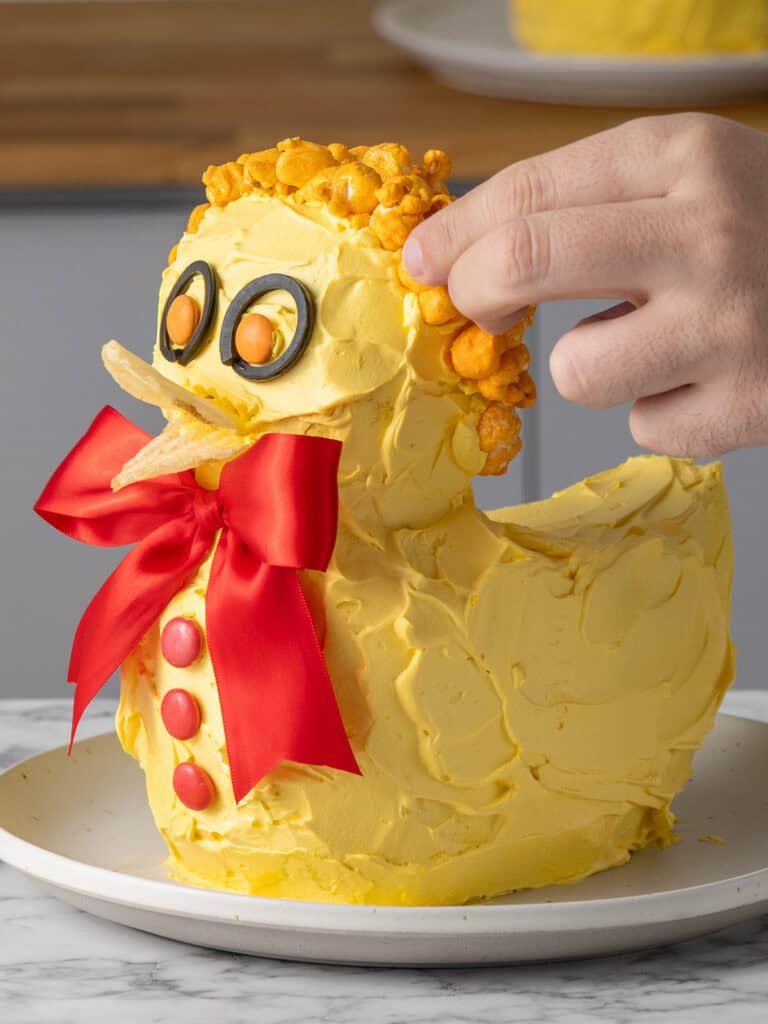
- Place a small handful of cheese-flavored popcorn on top for hair. Or the yellowest looking popcorn you can find!
Tip – Remove the popcorn before serving unless someone wants to eat it. It’s cheese flavored so… each to their own!
Can I make it using store bought cake mix?
Short answer: yes! I haven’t personally tested it but based on my recipes batter volume, you’ll need 2-3 boxes of standard vanilla or chocolate cake mix to get a similar result.
How many boxes you need exactly depends on the brand and how much cake batter it makes.
My recipe makes 1500g of batter. 600g of it goes in the loaf tin and 930g (approx.) of it goes in the square cake tin. If you’re using cake mix, I’d recommend using scales to distribute the correct amounts in the tins. Just note, using cake mix will results in a different flavor and texture to my recipe which is in the recipe card at the bottom of the post.
Who designed this cake?
All credit for this iconic duck cake goes to Agnes Lee who originally created this for The Australian Women’s Weekly Children’s Birthday Cake Book.
A Quick Baking Guide
If you’re new to baking or just want to brush up on the basics, these guides are a great place to start!
Loved the recipe? Let me know!
If you enjoyed this recipe, leave a star rating and comment below. It helps others find the recipe and keeps the baking community growing. Tag me on Instagram so I can see your version too!
Duck Cake Recipe From Bluey (Step-By-Step Photos)
My duck cake is made with soft vanilla sponge and creamy buttercream. It’s a fun showstopper that’s perfect for Bluey fans and birthday parties.
Serves 20
Ingredients
Soft Vanilla Cake
- 412 g all-purpose flour, plain flour
- 3 3/4 tsp baking powder
- 1 tsp salt
- 5 large eggs, 55g each, room temperature
- 390 g caster sugar / superfine sugar, see notes
- 305 g milk, full fat
- 112 g unsalted butter, cubed
- 60 g vegetable oil, can use canola oil
- 14 g vanilla extract
Vanilla Buttercream Frosting
- 500 g unsalted butter, softened (see notes)
- 1 tsp salt
- 14 g vanilla extract
- 20 g heavy cream, cold (see notes)
- 400 g powdered sugar
- 5 drops yellow food gel
- 2 drops pink food gel
Decorations
- Licorice strips, eyes
- 2 orange smarties, eyes
- 3 red smarties, buttons
- Red ribbon, bow tie
- Cheese flavored popcorn, hair
- 2 ruffled plain chips, mouth
Learn How To Make it! [VIDEO]
Instructions
Soft Vanilla Cake
- Preparing your oven – Preheat your oven to 170C / 340F (fan off), 150C / 300F (fan on). Or an even rise, bake with no fan. Position your rack in the middle of the oven. Make sure your oven is fully preheated before making the batter.
- Preparing your cake tins – Spray a loaf tin 25 x 10cm / 10 x 4-inch and a square baking tin 20 x 20cm / 8 x 8-inch with oil spray and line the bottom and sides with baking paper. Set aside.
- Combine dry ingredients – Whisk the flour, baking powder and salt in a medium sized bowl until combined. Set aside.
- Beat the eggs and sugar – Add the eggs to a large mixing bowl (glass or metal) and use an electric mixer to beat until frothy, about 1 minute. A stand mixer with a whisk attachment also works. With the mixer on medium-high speed, add the sugar a spoonful at a time, taking about 1 minute to add it all. Once all the sugar is added, keep beating on medium-high speed for 6 minutes until the mixture is pale, thick, and tripled in size.
- Add dry ingredients to egg mixture – Add half the dry ingredients to the egg mixture and mix on low speed until just combined. Repeat with the rest. The batter will be thick. Avoid overmixing the batter, small lumps are fine, they’ll disappear in the next step.
- Heat milk and butter – Heat the milk and butter in a saucepan over medium heat, stirring continuously, until it reaches 60°C/140°F or small bubbles form around the edges. Do not let it boil.
- Add hot milk – Add half the hot milk mixture, along with the oil and vanilla. Mix on low speed until combined. Add the rest of the milk mixture and mix again until smooth. The batter will be thin and pour in a steady ribbon.
- Divide the batter – Add 600g of batter into the loaf tin and the rest of the batter (about 930g) into the square baking tin. Tap each tin on the counter three times to release air bubbles.
- Bake – Bake both on the middle rack of your oven. The square cake will take about 30 minutes to bake. The loaf cake will take an extra 5-10 minutes to finish baking. You’ll know they’re baked when a toothpick inserted in the center comes out clean. The cakes should be deep golden and spring back when lightly touched. If they sink and don’t spring back, bake for a couple more minutes until ready.
- Cool the cakes – Let them cool in the tins for 10 minutes, then run a knife around the edges to loosen. Transfer to a cooling rack, placing them baking paper side down, and let them cool completely.
Vanilla Buttercream Frosting (make while cake is cooling)
- Cream butter – Add your softened butter, salt and vanilla extract to a large bowl. If using a stand mixer fit it with the paddle attachment. Beat on medium high speed for 5 minutes until pale and fluffy. You will want to scrape down the bowl halfway through with a spatula to ensure everything beats together evenly!
- Add sugar – Scrape the bowl down using a spatula and add all of the sifted powdered sugar. Begin beating on low speed at first. When no dry ingredients are showing, turn the speed up to medium high speed again and beat for 5 minutes.
- Add cream and gel color – finish by adding the heavy cream, pink food gel and yellow food gel Beat in on medium high speed for 2 minutes. Stop the mixer, scrape down the bowl, and beat for an additional 2 minutes.
Loaf Tin – How To Trim the Duck Head & Chest
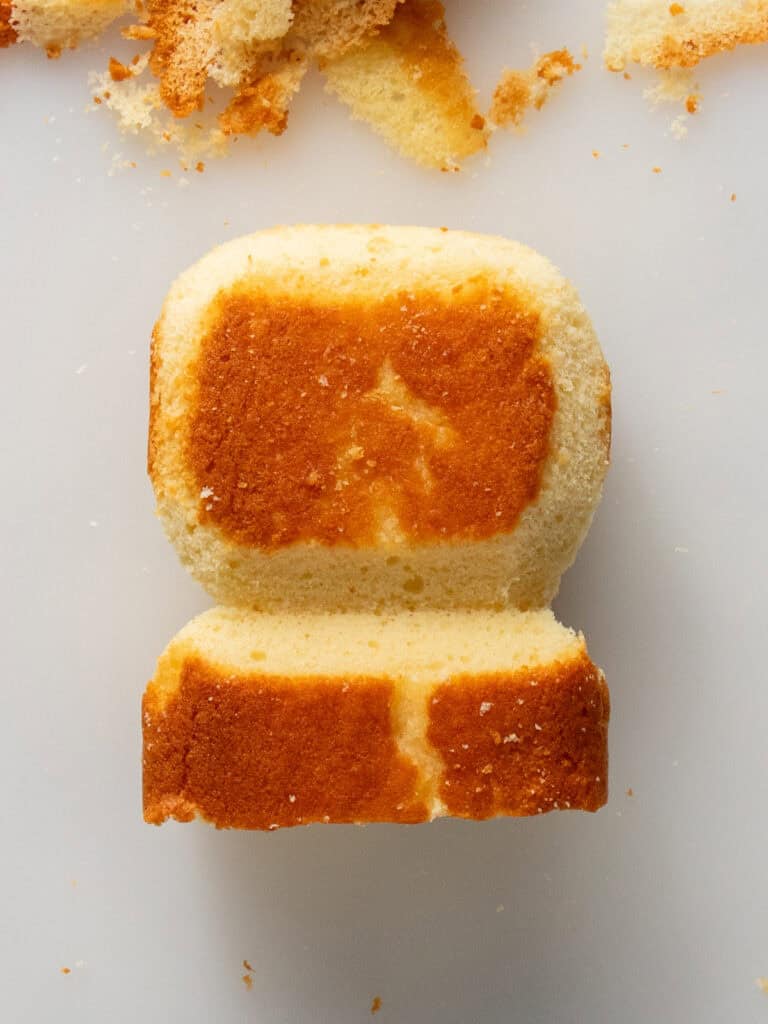
- Slice the loaf – Take the loaf cake out of the tin and discard the paper. Lay it on its side and slice off one third from one end using a serrated knife. You won’t need the smaller piece. Think of the remaining piece as the head and chest. The head is the top one third of the cake and the chest is the remaining bottom
- Shape the head – To shape the head, cut small V shapes about 2 cm deep around the top third of the cake. These cuts should go all the way around the cake, about one third of the way down from the top. This creates a dip where the neck would be. After that, use your knife to gently round the head shape by trimming the corners and top of the head. This just helps smooth out the head shape. It doesn’t need to be perfectly round.
- Creating the bottom of the chest – The lower part of the cake will become the chest and will sit on the duck’s body. To help it lean back slightly when assembled, trim the base on an angle. Start at the bottom of one end and cut upwards toward where the chest and head meet.
Square Tin – How To Trim The Ducks Body
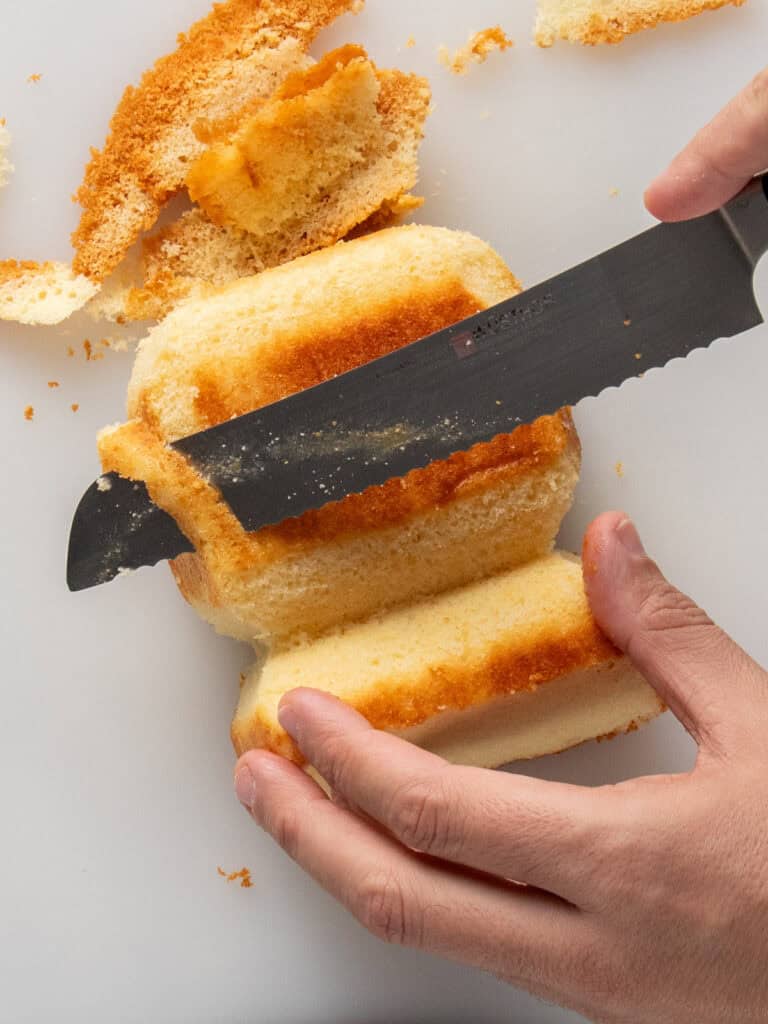
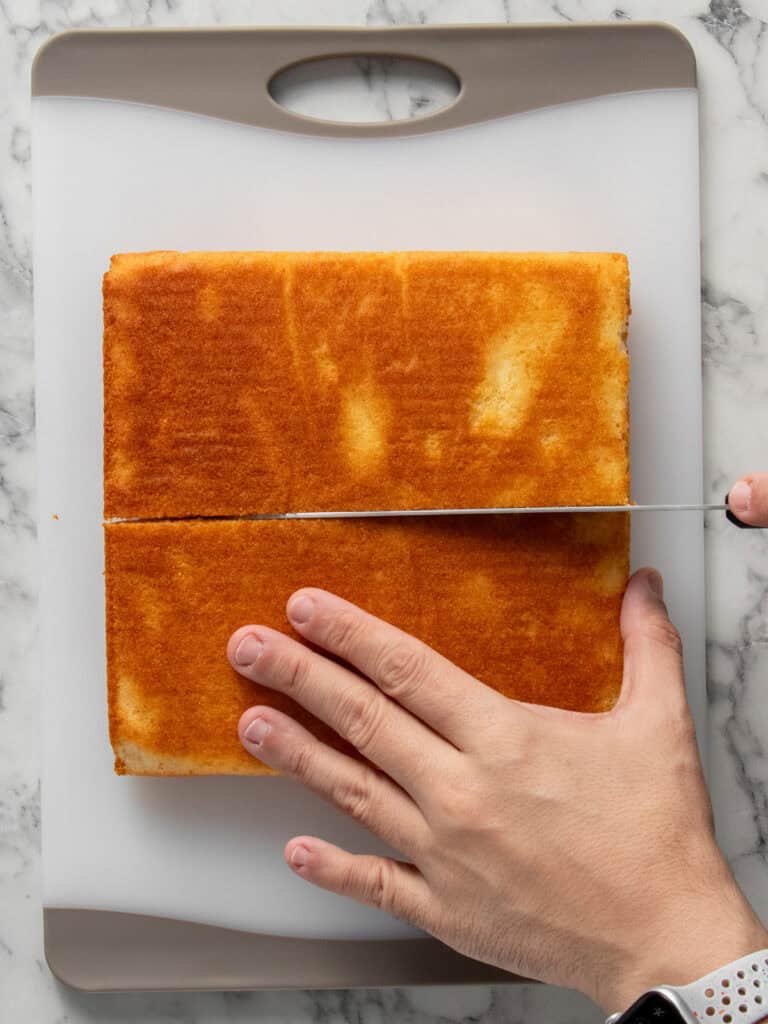
- Flatten out the top – Use a serrated knife to gently trim and level the top of the cake. You just want to remove any dome so the surface is flat.
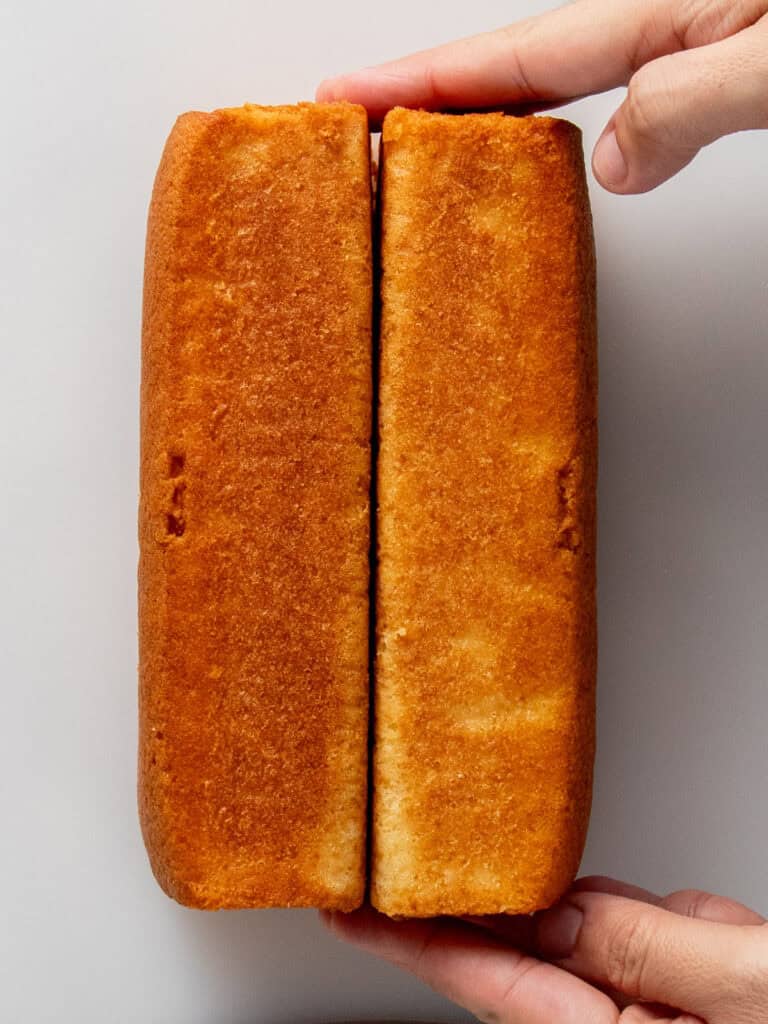
- Trim in half and join together – Cut the cake in half straight down the middle so you have two equal rectangles. Place the pieces side by side with the trimmed tops facing out. These pieces will form the left and right sides of the duck’s body. The two long inner sides will be joined together with frosting later.
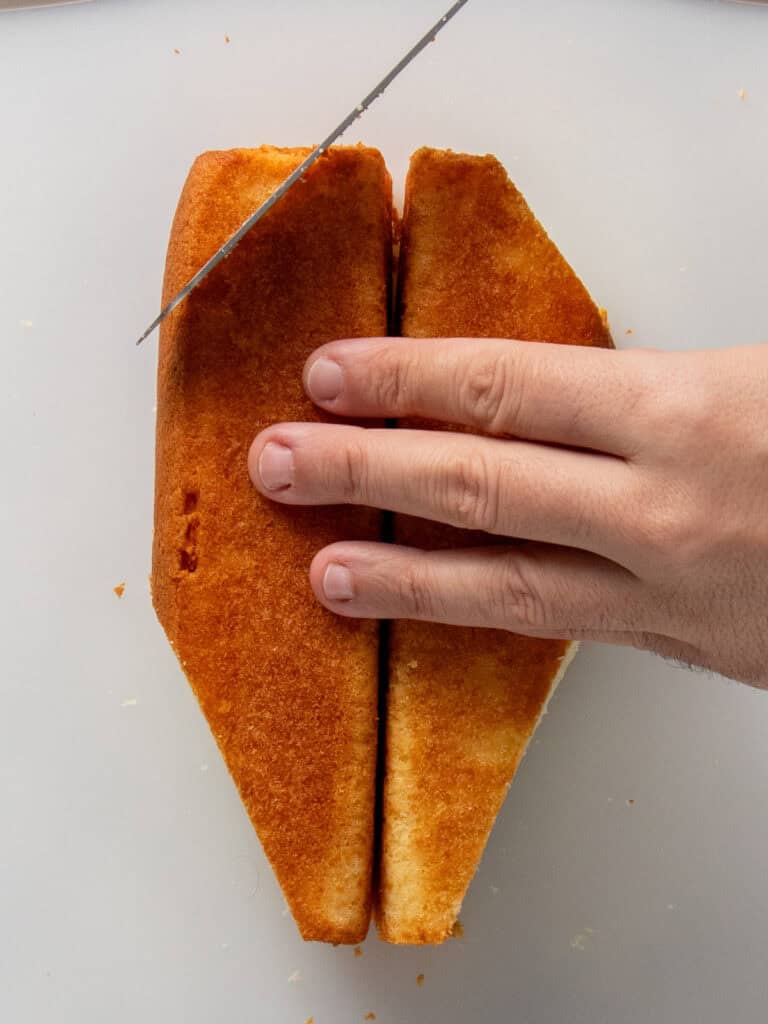
- Shaping the front and back – Think of a boat shape when viewed from above. The front curves more than the back. Trim one short end of the cake with a deeper angle. This is the front of the duck. Trim the opposite end with a softer angle. This is the back of the duck. These angled cuts help define the overall duck shape.
- Shape the bottom front and back – Trim a wedge from both ends to help the body sit naturally. At the front, cut a short wedge starting about a quarter of the way up the side and angle it down toward the middle of the base. Cut in only a quarter of the way toward the middle. At the back, start about three quarters of the way up and trim a longer wedge, cutting a little deeper than one third of the way in. This creates a gentle curve from front to back.
- Shape the top back of the duck – Move to the back of the cake. Trim a slight curve off the top back edge. This creates a soft, tail-like curve at the back of the duck.
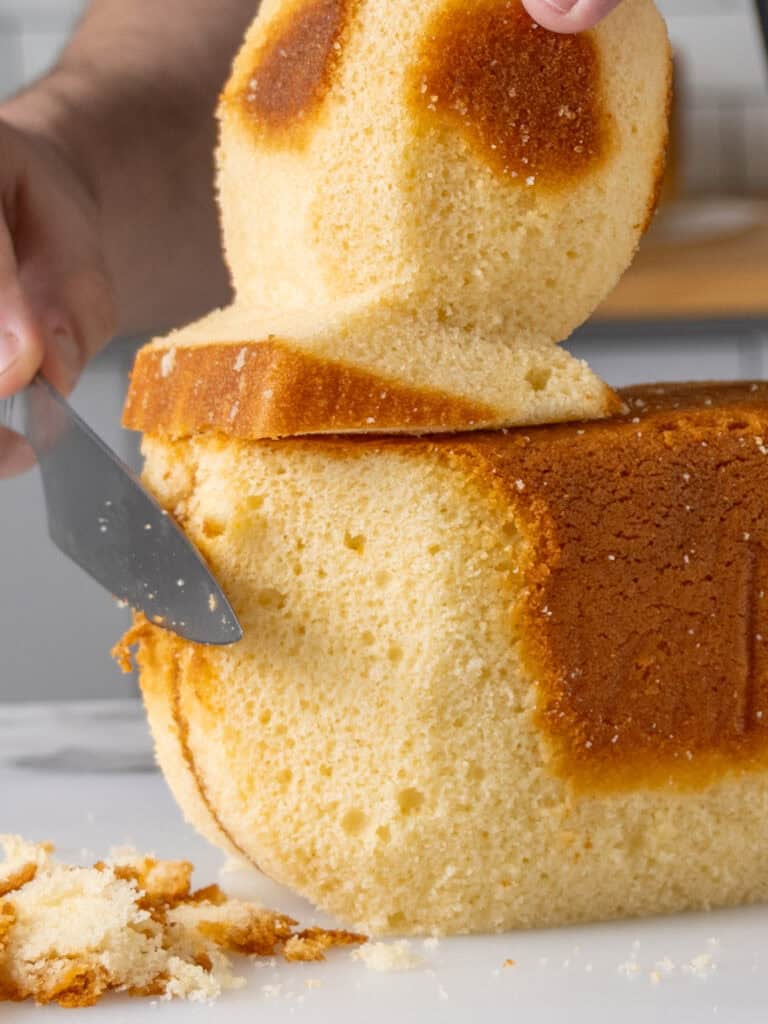
- Cut and angle at the front – At the top front edge of the cake, cut a chunk out on an angle. This will make space for the chest and head piece to sit. Place the chest piece on top to test the fit. It should sit at a slight backward angle. If needed, trim a little more from the body so the chest leans comfortably without wobbling.
Putting it together and decorating!
- Join the body pieces – Use an offset spatula to spread a layer of frosting on the long inner sides of the two cake rectangles. These are the sides that will touch. Gently press them together so they form the full body. This frosting acts as glue to hold them in place.
- Attach the head and chest – Add a bit of frosting to the top of the body where the chest piece will sit. Carefully place the chest and head piece on top. Once it’s in position, insert two long skewers to help keep it steady. Cut the sharp ends off the skewers before using them and push them straight down through the chest into the body. Use scissors or a knife to trim any part of the skewers that stick out. IMPORTANT! Make sure to remove both skewers before slicing and serving the cake!
- Crumb coat the cake – Spread a thin layer of frosting all over the duck to trap crumbs and hold everything together. This is called a crumb coat. It ensures the crumbs are trapped in the first layer of frosting, so they don’t show on the final layer of frosting. Place the cake in the fridge for one hour so the frosting can firm up.
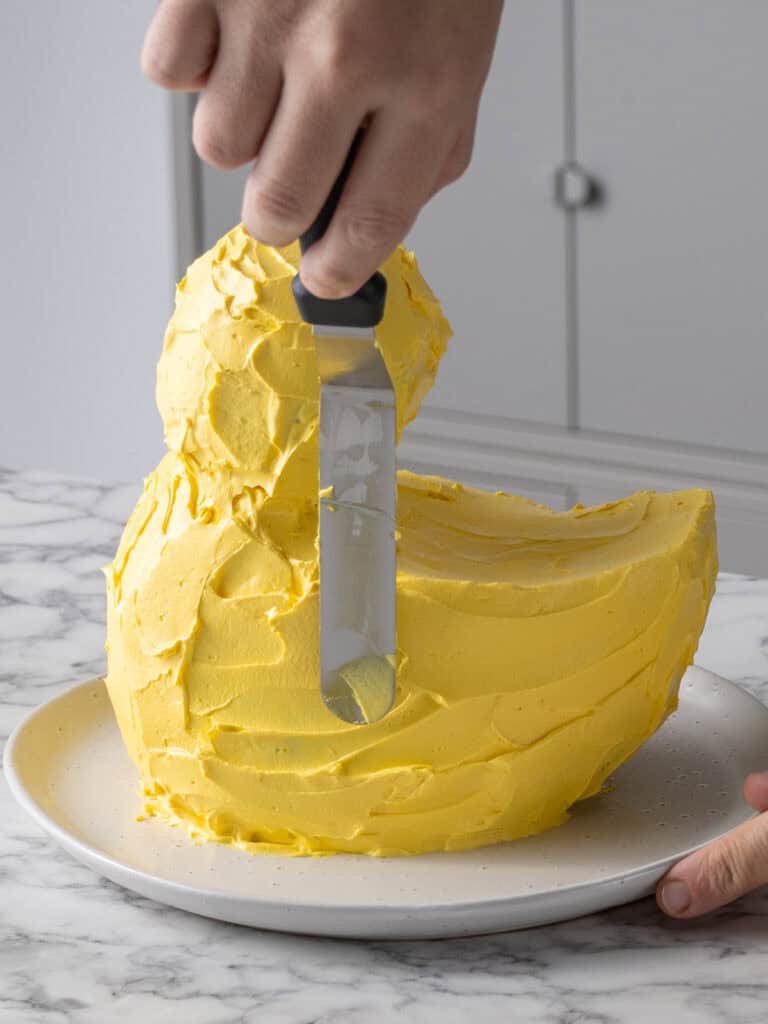
- Frost the cake – Once chilled, cover the duck in a thicker layer of frosting. It does not need to be smooth. A rougher texture gives the duck a soft, feathered look.
- Decorate the duck (right before serving) – Add decorations one to two hours before serving so they hold their shape. For the eyes, cut liquorice strips about six centimeters long and pinch the ends together to make rings. Stick two onto the duck’s head and press an orange Smartie into the center of each. Add three red Smarties down the front for buttons. Press two ruffled chips into the face for the beak. Finish with a red bow tie at the front and a handful of cheese-flavored popcorn on top for hair. The popcorn is just for decoration and should be removed before serving, unless someone wants to eat it.
Notes
Caster sugar – also known as superfine sugar is ideal for this cake as it dissolves into the eggs quickly which will prevent overmixing. Alternatively, you can use granulated sugar or even pulse granulated sugar in a food processor until it’s finer.
Mixing the batter – it’s important to follow the speeds given in the recipe when it comes to mixing. Especially after the flour is added as it prevents overmixing which can cause your cake to be tough. Make sure you scrape down the bowl after each mix to ensure any ingredients that are hiding at the bottom are properly mixed in. It’ll ensure a nice uniform batter that rises in the oven properly.
Mixers You Can Use – Using an electric mixer to make the cake batter is going to make it an easier process and also gives you the best results, especially when whipping the eggs and sugar. You can use a stand mixer with the paddle attachment or a hand held electric mixer.
How to soften your butter for the frosting
Make sure your butter is softened for this recipe. It’ll help with the structural integrity of the frosting. I have a full guide on how to properly soften butter on the blog, but for reference, softened butter is 18C / 65F on a thermometer. Cut it into cubes and let it sit at room temperature for 1-2 hours until it reaches this temperature to until it’s soft enough that when you press on it with your finger, it leaves an indent with some resistance.
Heavy cream – I originally used milk for this recipe, but I’ve made the switch to cold cream instead. I find that milk makes your frosting too soft, and cold cream keeps it’s structure, and using cold cream helps stiffen your frosting while making it smoother. It’s a win win! For this recipe I’d recommend using heavy whipping cream which has about 36% butterfat in it. Check how much fat it has per 100g on the back and that number will give you a percentage.
Storage – This cake can be stored in an airtight container, in the fridge for up to three days. Thaw to room temperature before serving.
Nutrition – is an approximate and is based on per slice. This cake serves 20 little bluey fans.
A note on measurements – This recipe uses weight measurements for the most accurate results. Cup measurements can vary depending on where you are, which affects the precision needed for a recipe like this. Here is where you can learn more about how to measure ingredients using digital kitchen scales.
Nutrition
Calories : 484kcal
Carbonhydrates: 56g
Protein: 4g
Fat: 27g
Saturated Fat: 17g
Polyunsaturated Fat: 1g
Monounsaturated Fat : 7g
Trans Fat : 1g
Cholesterol: 115mg
Sodium: 339mg
Potassium : 73mg
Fiber: 1g
Sugar : 40g
Vitamin A: 869IU
Vitamin C: 0.03mg
Calcium: 81mg
Iron: 1mg
Nutrition Disclosure
Gave this recipe a go?Mention @thescranline or tag #thescranline!
previous post
65 comments
I was reading instructions on how to shape the cake and could not figure it out but your video made it super clear, thanks!
Hey Sara! So glad the video helped make things clearer for you—that’s exactly why I made it! Hope the cake turned out amazing, and thanks for letting me know! N x
I just made this cake for my toddler’s Bluey themed birthday party, and it turned out fantastic! I was very intimidated by making this infamous duck cake so I followed your recipe and video religiously. I’m so so pleased with how it turned out. It was delicious and adorable! Thank you for making this recipe and tutorial! I’ll have to come back for future birthday cake recipes because I’ve definitely set the bar high 😆
Awww Erica, that’s honestly made my day! I’m so glad to hear you loved the recipe. I hope your little one loved it! And how good is Bluey? I think I might love it more than our 4 year old haha. Thanks so much for letting me know that you enjoyed making it! N x
This is organised very poorly. I found I had to jump all over the place to try and piece it all together.. What the hell does “Cook the paste by whisking sugar and flour with milk until thick like pudding” mean? How do you cook it? How much milk? The recipe for the buttercream stuff doesn’t even have milk in it! The cutting instructions were ok though.
Cool story Dominatrix. I love the beard. Keep it forever.