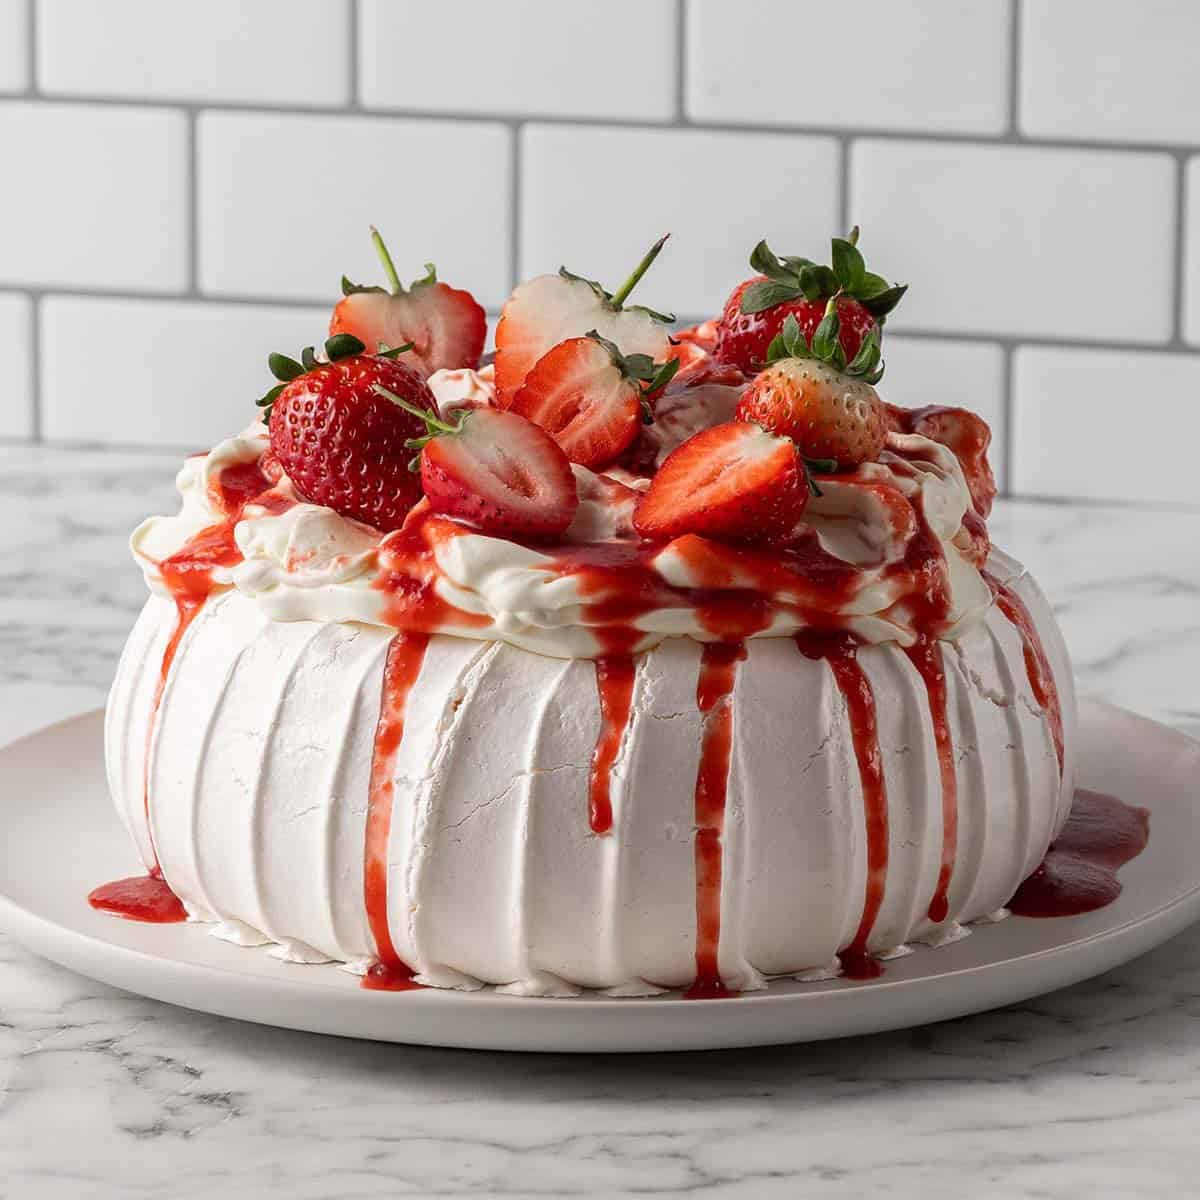
Fresh Strawberry Pavlova With Strawberry Coulis
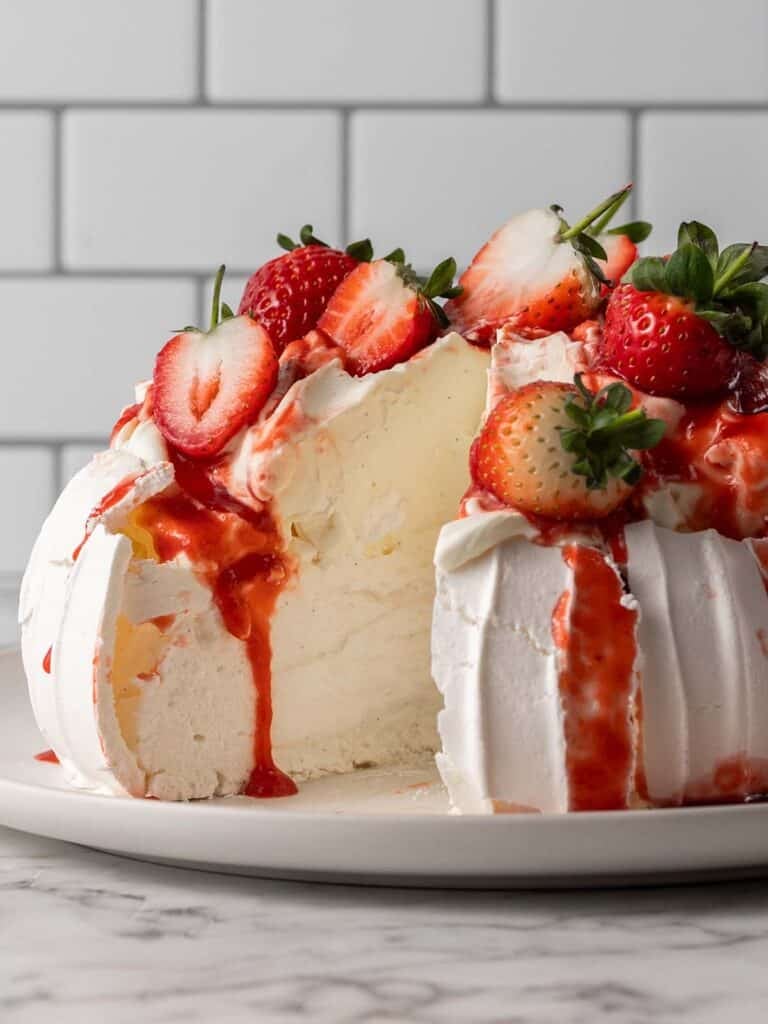
This strawberry pavlova is all about fresh strawberries. It’s topped with a tangy strawberry coulis and unsweetened Chantilly cream for balance. It’s got that crisp shell and soft marshmallow center pavlovas are famous for. And that tart sauce perfectly cuts through the sweetness of the pavlova. It’s rich, light and makes a pretty amazing summer dessert option.
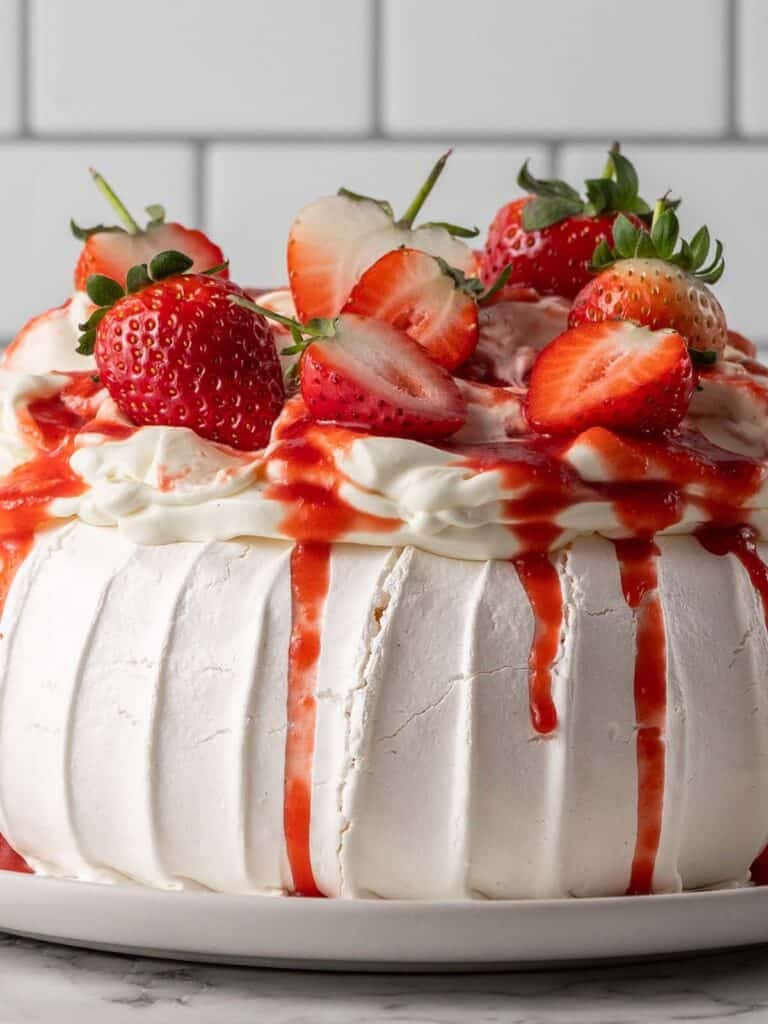
Hey team, Nick here. If you’ve ever had a pavlova before, then you know how unapologetically sweet they are. I can handle sweet, but what I love most about this version is the strawberry coulis on top which balances out the sweet.

The silky smooth sauce uses loads of fresh strawberries with just a touch of sugar so what you’re left with is a burst of tart strawberry that cuts through the sweetness.
Then there’s the vanilla bean infused Chantilly cream, which is light and fluffy. It’s not sweetened at all, so it adds a rich creaminess without overpowering anything. I think it goes perfectly with the soft marshmallow center, which is honestly my favorite part of a pav, and it contrasts so well with the crisp shell.
I went through 30 rounds of testing to get this pavlova right and I wrote all about it in my troubleshooting post. Check it out if you want to go on a deep dive. I was aiming for a pavlova that wouldn’t sink or collapse when the toppings are added. Cracks are ok in by my books.
Related → If you’re after more strawberry desserts, my Strawberry Cheesecake Bars are creamy, easy to make, and packed with fresh strawberries too.
This is my go-to pavlova recipe
My pavlova recipe uses the simple French meringue method. I like it for its simplicity because it’s just egg whites whipped with sugar until it’s thick and glossy. The meringue has a little cream of tartar for stability, a good hit of vanilla bean paste and corn starch to give you that marshmallow meringue in the centre.


That texture is what makes it special. Using the exact right amount of sugar (no you can reduce it, I tried!) gives you that crispy crust that holds everything together. That, and the way that the meringue is shaped before baking. Like I said, I tested it 30 times, and part of that was finding the right shape. Turns out those ridges aren’t just for looks. They act as columns that help hold everything up to prevent it from collapsing.


Related → This recipe is based on my Classic Pavlova recipe, and I’ve included all the step-by-step photos in that post if you want to follow along.
Why I Love This Strawberry Sauce


The whole recipe is about using fresh strawberries because it’s the best way to get that fresh tart flavor. One of the ways I infuse this dessert with that berry flavor is with my Smooth Strawberry Sauce. It comes together with just 3 simple ingredients, one of them being just a hint of sugar. I didn’t want it to be too sweet. And its super smooth too!
TIP: Make the coulis ahead of time. I like chilling it in the fridge because it thickens it slightly so it doesn’t just pool at the bottom of your pav.
Bringing It All Together
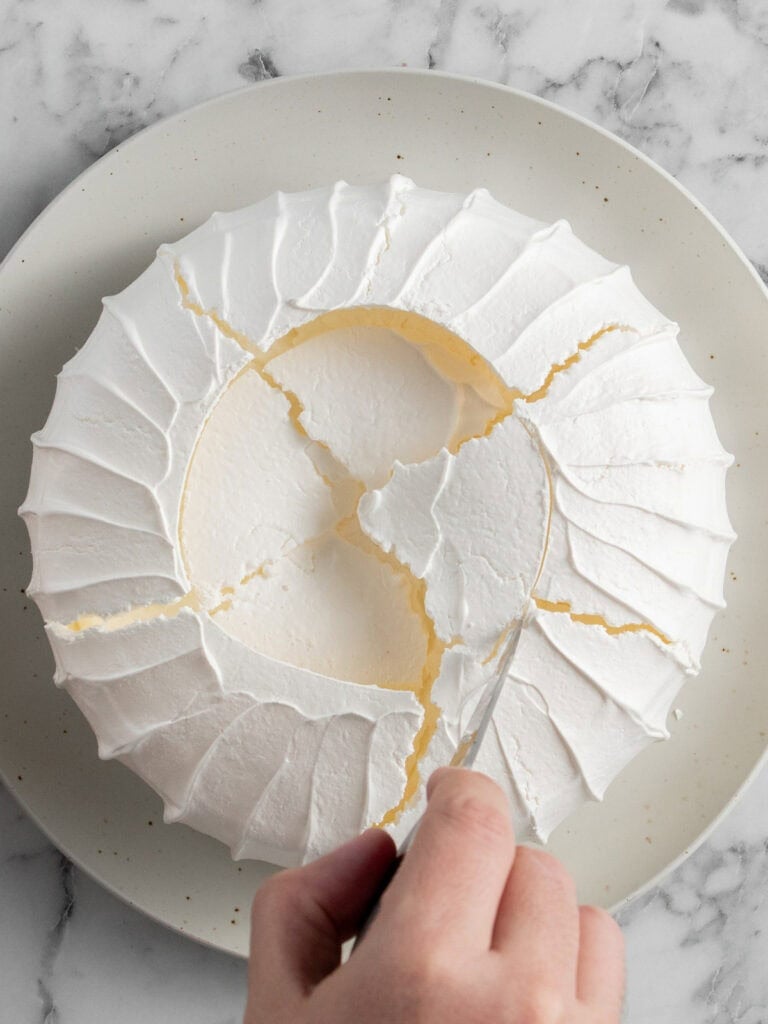
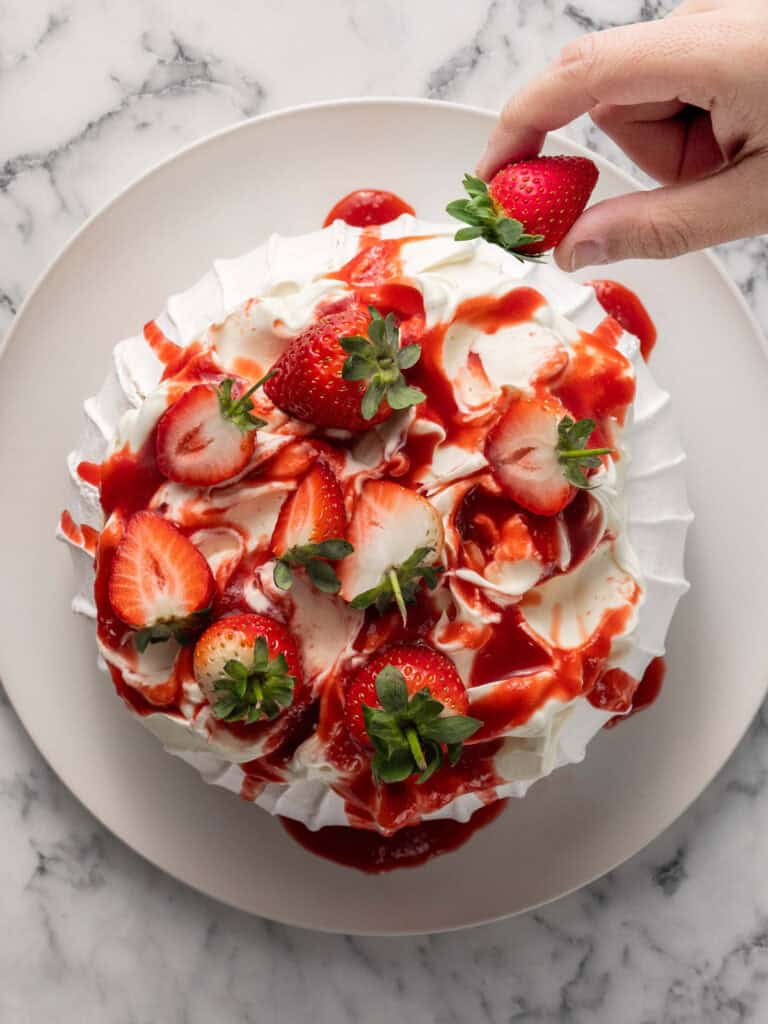
One of my favorite parts is what happens right before decorating. I trim a little hole in the top of the pav to help the toppings sit lower. It stops the cream and strawberries from weighing down the crust too much and keeps it from collapsing. From there, it all comes together easily. I spoon in the cream, drizzle over the sauce, and finish with fresh strawberries.
TIP: Try to decorate your strawberry pavlova no more than an hour before serving. The acidity in the sauce will start to break down the meringue shell if it sits too long.
These tips will give you the perfect pavlova
- Use cold eggs – It’s easier to separate your eggs when they’re fridge cold. Just let them rest a little so they can come to room temperature before you whip them.
- Weigh your egg whites – Even in the same carton of eggs, egg sizes vary, so I like to weigh my egg whites to make sure I get the same result every time
- In fact, weigh all your ingredients – That will take the guess work out of making sure your meringue is going to do the job it needs to do which is to whip up perfectly!
- Don’t rush adding the sugar – Add the sugar slowly while whipping on medium speed. It gives the sugar a chance to dissolve properly so you get a nice thick glossy meringue.
- Add cream of tartar for stability – My recipe uses cream of tartar to help stabilize the meringue, so it whips up better. It also helps break through the egg flavor.
- Shaping your meringue matters – I like using an offset spatula to help give the meringue ridges before it bakes and a wider base at the bottom than on the top to help it bake up nice and strong. That will prevent it from collapsing.
- Create a dip before baking – Pavlovas want to bake up with a dome on top. If you create a shallow dip in the center before baking, you’ll end up with a nice even top.
A Quick Baking Guide
If you’re new to baking or just want to brush up on the basics, these guides are a great place to start!
Loved the recipe? Let me know!
If you enjoyed this recipe, leave a star rating and comment below. It helps others find the recipe and keeps the baking community growing. Tag me on Instagram so I can see your version too!
Fresh Strawberry Pavlova With Strawberry Coulis
This Pavlova is crispy outside, soft and marshmallow-like inside, topped with silky cream and fresh fruit for the perfect sweet bite.
Serves 12
Ingredients
Pavlova
- 5 g white vinegar, to clean bowl
- 180 g egg whites, room temperature (see notes)
- 300 g caster sugar, superfine sugar
- 3/4 tsp cream of tartare, (or 1 tsp / 5ml white vinegar)
- 15 g corn flour/cornstarch, sifted
- 1 tsp vanilla bean paste or pure vanilla extract
Chantilly Cream
- 250 g heavy cream, cold (see notes)
- 40 g powdered sugar, sifted (see notes)
- 1 tbsp vanilla bean paste or vanilla extract, see notes
- 250 g mascarpone, cold (see notes)
Decorations
- Fresh strawberries, sliced in half
- Strawberry sauce, see notes
Instructions
Pavlova
Prep work (super important before you begin!)
- Read this recipe first – Take a minute to read the full recipe before starting. It’ll help you plan your prep, understand what each step should look like, and avoid surprises once you get going. It’s especially important with recipes like this where timing, texture and technique matter.
- Preparing your oven – Preheat your oven to 130C / 265F (fan off). Place the rack in the middle of the oven. I only tested this recipe with the oven fan switched off. Fan off is best for a bright white pavlova.
- Prepare your baking tray – Line a large baking tray with baking paper. Use a 20cm / 8-inch plate or bowl to trace a circle onto the paper with a pen. Flip the paper over so the ink side faces down. Set aside.
- Clean your mixing bowl – Pour 1/2 tsp of white vinegar or lemon juice into a large heatproof glass or metal bowl. Use a paper towel to wipe the entire inside. This removes any fat or residue that could stop your meringue from whipping properly.
- To separate your eggs – Separate the eggs one by one in a small bowl, adding them to the large mixing bowl as you crack each one. The key here is to not get any egg yolks in the whites, even a speck can prevent your egg whites from whipping up.
Making the meringue
- Froth up your egg whites (3 min) – Add 180g egg whites to your mixing bowl. Whip on low speed for 5 minutes. I use speed 3 on a 7-speed hand mixer. You’re aiming for soft peaks and small, tight bubbles.
- Adding the sugar (5 min aprox) – Turn your mixer to speed 3. Add the sugar 1 tsp at a time, waiting 8-10 seconds between each spoonful. It’ll take about 5 minutes to add all the sugar.
- Continue whisking (8-10 min aprox) – Once all the sugar is in, stop the mixer and use a spatula to scrape down the bowl to catch any unmixed sugar on the sides of the bowl. This slow mix gives the sugar time to dissolve and helps build a stable meringue. Put the mixer back up to speed 3 and beat for 8 minutes. Stop the mixer and rub a bit of meringue between your fingers. If it feels gritty (sugar granules haven’t dissolved), beat for 2 more minutes. The meringue will be thick, glossy and smooth.
- To finish your meringue (1 min) – Sift in the corn starch and cream of tartar (I like mixing them in a little bowl first), then add the vanilla bean paste or extract. Mix on low speed, then increase to speed 2 and mix for 30 seconds until fully combined. The meringue should be glossy and thick with stiff peaks that curve slightly at the tip when you lift the beaters upside down.
- To finish prepping your baking tray – Dab a little meringue in each corner of the tray and press the baking paper down (marker side facing down) so it stays in place while shaping.
Shaping your pavlova to give it structure and strength.
- To shape your pavlova – Spoon your meringue into the center of your circle and spread it into a neat cake shape using a rubber spatula or offset spatula. Keep the top flat, the sides slightly sloped, and the base just a little wider than the top with smooth, defined edges. TIP: Avoid overworking it so it stays light and doesn’t dry out.
- Create a center dip – Use the same tool to press a shallow bowl shape into the center of the pavlova, leaving about a 3cm gap between the edge of the dip and the pavlova's outer edge. Smooth any excess meringue back around the sides to keep it even, or scrape it off and return it to the bowl.
- Create ridges (structure) – Starting at the base, sweep your spatula upward in a straight line. As you reach the top edge, gently round it out before smoothing onto the flat top, stopping at the edge of the center dip. Do this all around the pavlova. This curved motion helps create ridges which helps build a strong outer shell that supports the pavlova while it bakes and reduces the chance of sinking. Some cracking will happen. That will be covered up with cream. If it sinks a little right at the top, that’s ok.
Baking your pavlova
- To Bake – Place the meringue on the middle rack of your oven and immediately lower the oven to 95C / 200F (fan off). Bake for 90 min.
Chantilly cream
- Prepare mascarpone cheese – Add the mascarpone to a large mixing bowl (glass or metal) and use a spatula to stir and break up as some brands can be firmer than others. This helps break it up a little to prevent lumps in your whipped cream.
- Whip remaining ingredients – Add the cold heavy cream, powdered sugar and vanilla to the mascarpone. You can use an electric hand mixer or a stand mixer with a whisk attachment, but I actually find it easier to get the right texture with a hand whisk. You’re aiming for a smooth, stiff whipped cream that holds its shape but still looks silky. If it looks split or grainy, it’s been overwhipped.
To finish decorating
- Cut out circle – use a small sharp knife to slowly and carefully score a circle on top of the pavlova on the outer edges of where the dip was. Keep gently scoring until the meringue shall collapses and falls down. This will stop the top from collapsing when you fill the pav!
- Add toppings – You want to decorate and finish your pavlova no longer than an hour before serving. The cream needs to be kept cold right up until serving. Very gently spoon your cream on top of the pavlova and spread evenly on top. Drizzle with strawberry sauce and top with freshly sliced strawberries.
Notes
For a full list of tips and tricks check out my classic pavlova recipe. It’s got all the step-by-step photos in it.
Eggs – egg sizes vary depending on country or brand marketing so it’s important to weigh out your egg whites using kitchen scales for the very best, consistent results. For this recipe you want to buy freshly bought eggs, meaning eggs you just bought from the store. Not eggs that have been resting in your fridge for weeks. You also don’t want to use freshly laid eggs for this recipe as they take longer to whip up.
Cream – make sure you use cream labelled heavy cream for this recipe. Whipping cream will work but won’t be as stiff as heavy cream. Low fat cream will not work.
Powdered sugar – I don’t like my cream too sweet, but if you like yours on the sweeter side you can use up to 1/2 cup. Make sure you sift it!
Mascarpone – is an Italian cheese that is similar in flavor to sour cream, but more creamy and less sour. Opt in for a better brand one as they tend to be thicker and make sure it’s cold straight out of the fridge! Make sure you give your mascarpone cheese a mix before using. Some brands are soft, some are firm and can cause your Chantilly cream to go lumpy.
Vanilla – I have a great recipe for Vanilla extract here on the blog which is alcohol based. It can be used for most recipes. However, I would advise against using it for whipped creams (yes, even stabilized ones like this one) or meringues as it can muck around with the air whipped in the mixtures. Instead use a syrup based vanilla extract. I find vanilla bean paste is best.
Chantilly Cream Storage – My Chantilly cream can be made up to three days in advance and can be stored in an airtight container, in the fridge. Do not stir before using if you’re making it ahead of time!
Pavlova Storage – Store the undecorated pavlova in an airtight container at room temperature for up to 1 day. Top with cream and fruit just before serving.
Humidity – Pavlova is sensitive to humidity which can make the meringue weep. Avoid making pavlova on very humid days or store in a dry, airtight container.
Strawberry Sauce – I have a great strawberry sauce recipe that uses fresh strawberries. It isn’t overly sweet which makes it a perfect pairing for a sweet pavlova like this.
Strawberries – make sure you wash and dry your strawberries well before adding on top of your pavlova.
Nutrition – is an approximate and is based on per slice. This recipe serves about 12 people.
A note on measurements – This recipe uses weight measurements for the most accurate results. Cup measurements can vary depending on where you are, which affects the precision needed for a recipe like this. Here is where you can learn more about how to measure ingredients using digital kitchen scales.
Nutrition
Calories : 256kcal
Carbonhydrates: 24g
Protein: 3g
Fat: 7g
Saturated Fat: 5g
Polyunsaturated Fat: 1g
Monounsaturated Fat : 2g
Cholesterol: 27mg
Sodium: 44mg
Potassium : 137mg
Fiber: 1g
Sugar : 23g
Vitamin A: 295IU
Vitamin C: 15mg
Calcium: 22mg
Iron: 1mg
Nutrition Disclosure
Gave this recipe a go?Mention @thescranline or tag #thescranline!
previous post
24 comments
You haven’t got baking instructions
Just added them, sorry for them being missing! N x
Hello there. I was wondering how long to cook the pavlova for in the oven? I can’t seem to find the baking instructions.
Thank you!
Hi Zoe! Just added these to the recipe. Sorry about the missing steps! N x
Thank you so much! Can’t wait to bake it for my family!
Yay! N x
It looks amazing Nick. I couldn’t find in your instructions how long to cook the pav for!
Thanks Rhonda! Just added them to the recipe. Sorry about the missing steps! N x
The baking instructions are incomplete. What do we do with the mixture after the cornflour is added? How long do we cook it for?
Sorry about that Andrea! Just fixed it! N x
Thank you for sharing this one with us! I recently tried an individual Pavlova at a favorite bakery here in the US and I’ve been thinking about it since! After speaking with the owner, (who is originally from the UK) she said it’s not something she makes often (and only in the summer! 🙁 I immediately remembered you posted this beautiful STRAWBERRY pavlova! Yay! I was super excited to try your recipe, super easy to follow and I got to share with my hubby this time too! The first pavlova I tried never made it home.. oops! Haha! Big thanks for sharing your talent with us- you make me look like super mom! We appreciate you! Xo, Leah
Aww, Leah I’m so glad to hear that you tried my recipe and enjoyed it! Isn’t it so yum?! N x
Well Nick, thank you for your dedication because I made this pavlova yesterday and it was amazing. The texture in particular, kind of moussy and extremely light. My husband who’s not the fondest of dessert really liked it ! Every other guest as well. It was my first time eating pav, and I’ll be doing it again now. The strawberry sauce was really apreciated too !
This has honestly made my day Elsa. Little bit teary. I worked so hard on this recipe so your comment and feedback is a huge payoff for me. Thanks so much for taking the time to write it and let me know how much you loved it. Especially your husband! N x
18 years ago I traveled to England and ate a Pavlova. I have dreamt of that dessert for years. I was so happy to discover not only your recipe but your very detailed instructions. I read Pavlova Troubleshooting: Everything I Learned After 30 Test Batches, Pavlova recipe a beginners guide, and Fresh Strawberry Pavlova With Strawberry Coulis. The information, all of your tips after baking 30 of them, will surely help me be successful too. As I looked at the beginners Pavlova recipe versus the Strawberry one, I’m troubled.
The strawberry one, July 2025, uses 180 g egg whites, 1/4 tsp cream of tartar, 210 g sugar, & 8 g cornstarch. The beginners one, June 2025, uses 180 g egg whites, 3/4 tsp cream of tartar, 300 g sugar, & 15 g cornstarch. In your troubleshooting guide you stated, “Things started to change when I came back to the French meringue method with more sugar. I went from 210g of sugar to 300g. Once I did that I started seeing some pretty big fixes. I honestly could’ve cried.” I WANT to be successful, but am planning on using strawberry or raspberry sauce and fruits. In the more recent one, the strawberry pavlova, why did you go back to the 210 g of sugar and alter the cornstarch if the higher amount made you more successful? Did you learn something new? Which pavlova is better? How are they different?
Holy moly! That was an excellent catch! How did I not see that! The pavlova recipe I re-worked was the correct recipe. The one used for the strawberry pavlova looks like one of my tests. The old one with less sugar no less! I’ve gone in and fixed that. Thanks for letting me know M! N x
After 90 mins at 200F do you leave the pavlova in the turned off oven to cool completely or take it out after the 90mins?
Did I miss reading it in your instructions?
Hey Ann, yes—after the 90 minutes at 200F, you want to leave the pavlova in the turned off oven to cool completely. Do not open the door at any point. Letting it cool slowly helps prevent cracks and keeps the structure stable. I probably should have made that clearer in the instructions, so thank you for pointing it out. – N
Magnifique la meilleure recette que j aie faite merci a vous
So glad to hear it Vissers! N x
Thank you ! Incredible
Happy Holidays.
Thanks so much Jill! Glad you enjoyed the recipe and I hope you had a great holiday break! N x
Perfect! Great recipe and detailed instructions! Thank you for sharing!
Thanks so much Ioanna! N x