Fudgy Caramel Layered Brownies
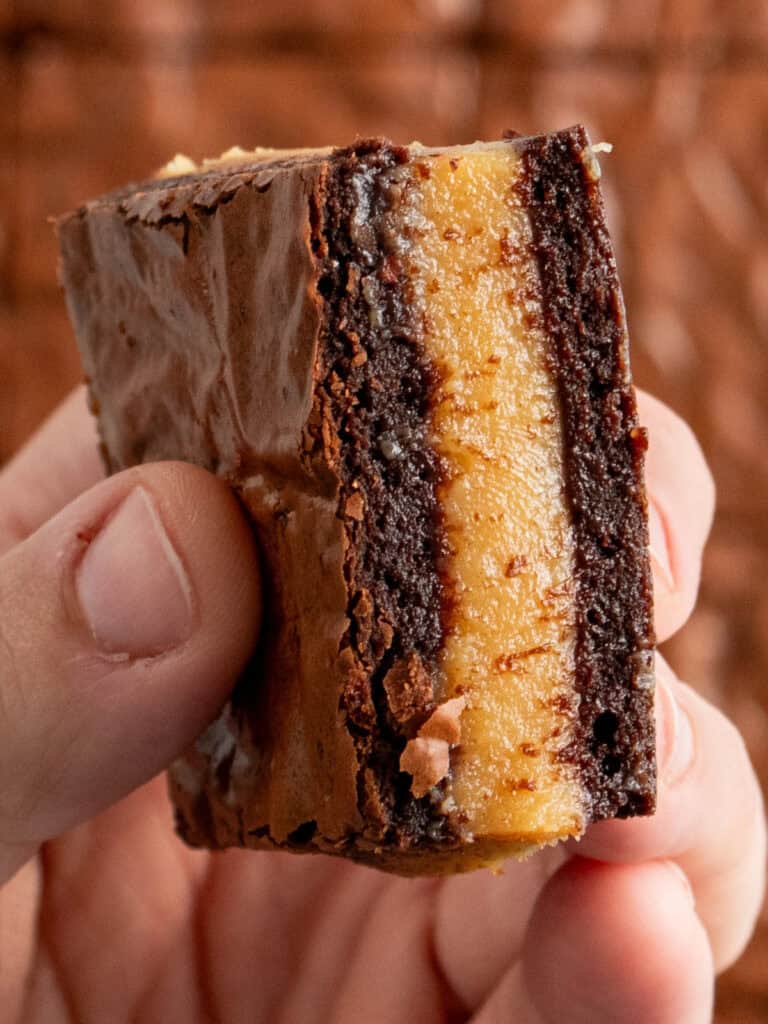
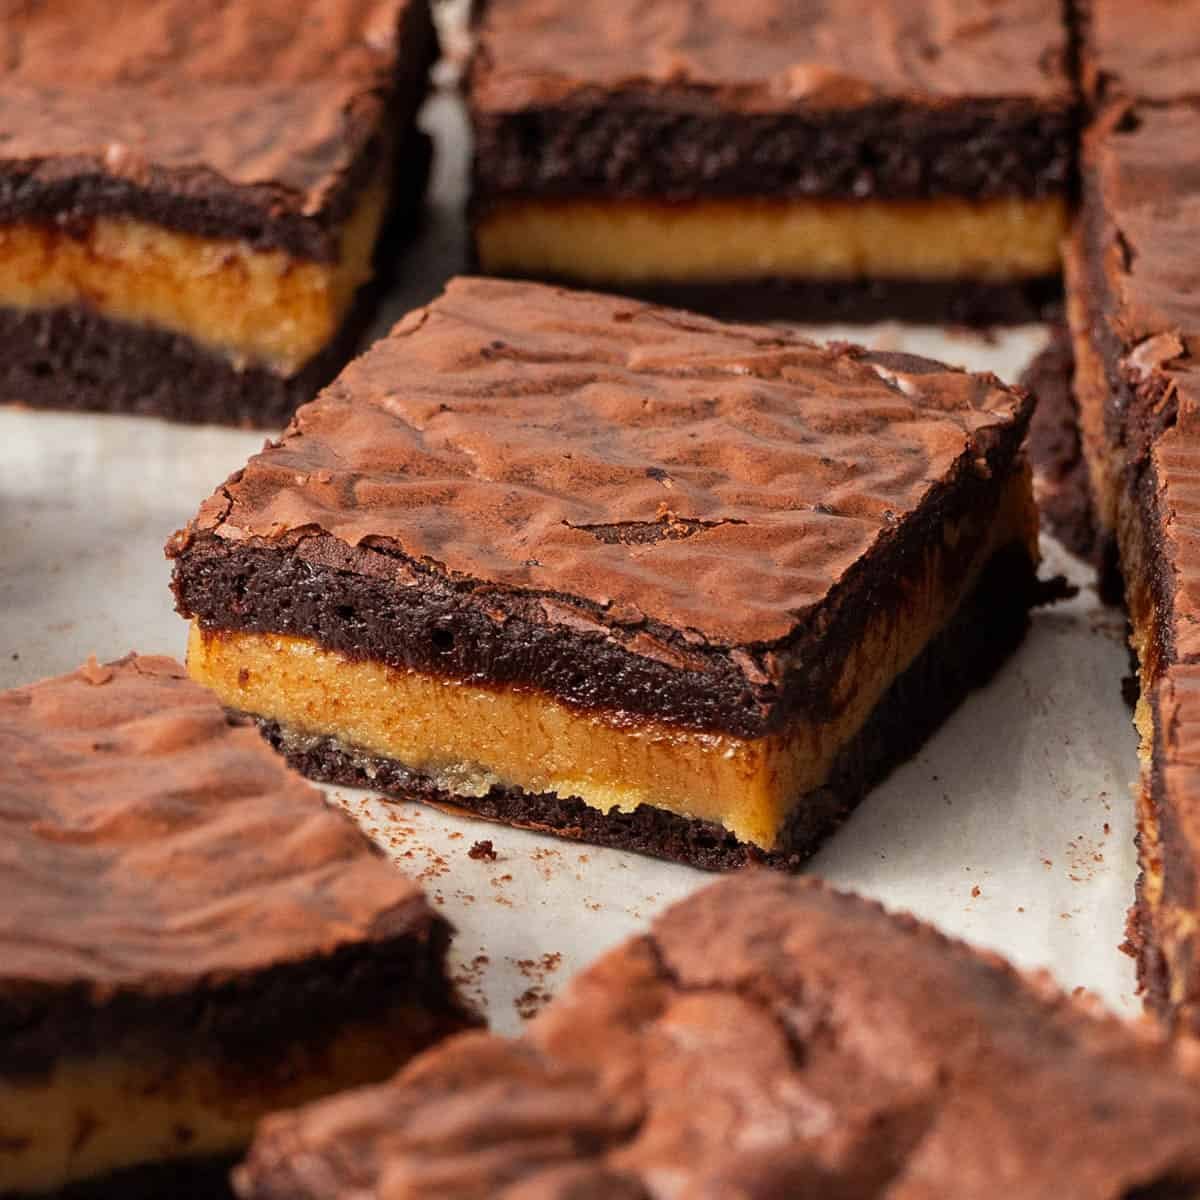
My Caramel Brownies are rich, fudgy, and filled with smooth buttery caramel that melts into every bite. They have a texture that sits somewhere between chewy and soft. And yes. They have that glossy brownie top that everyone is obsessed with!
Hey team, Nick here. I’ve always wanted to have a caramel brownie recipe on the site, but I wanted a version where the caramel stayed put. Not runny or sticky, just a clean silky layer that looks neat when sliced and gives that perfect mix of textures.
Everything bakes in one tin, they slice up perfectly and they’ve quickly earned a spot in my brownie collection.
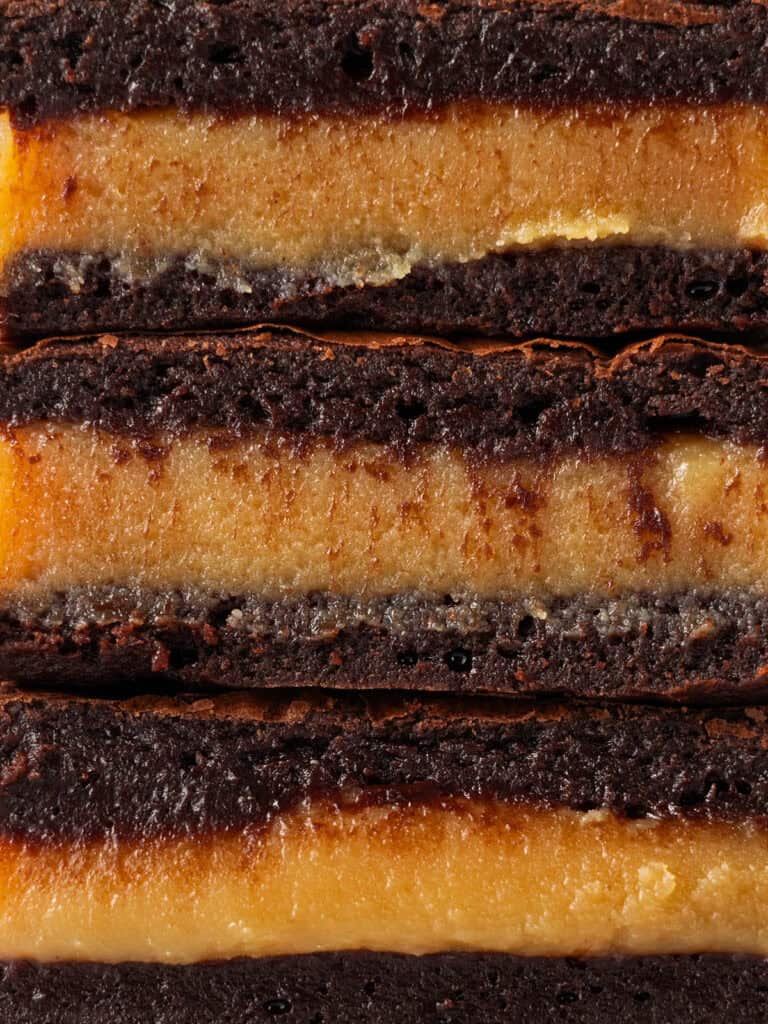
The caramel in these brownies comes from my millionaire shortbread recipe because it sets beautifully without hardening. It’s layered between my deeply chocolate brownie base, the same one I use for my cosmic brownies, so the combination is rich balanced and indulgent.
Related – I have an entire section of caramel recipes on the site but the one caramel recipe I keep coming back to are my soft and moist salted caramel cupcakes. They have a chocolate base too, so if you love these, you’ll love those
The caramel that worked in my testing!
I set myself a simple goal for these brownies: A soft, fudgy caramel layer that you could see when you sliced into the brownies. And one that was easy to make too!
Nothing annoys me more than oozy caramel or caramel that basically melts into the brownie. What’s the point?
- What I tried – I tried a thicker version of my caramel sauce, but that melted right into the brownies. I thought about using my caramel chews, but they’d make the recipe too fussy and time-consuming for something meant to be easy.
- What worked – The answer came from a recipe I already had on the website. Actually, it’s one that I’ve used in my chocolate caramel tart, caramel slice and millionaire bars. It takes 10 minutes to make and sets beautifully without hardening or melting into the brownies. I added a pinch more salt in this one to balance the sweetness and in the end I got a clean and perfectly set caramel layer!
Preparing your baking tin
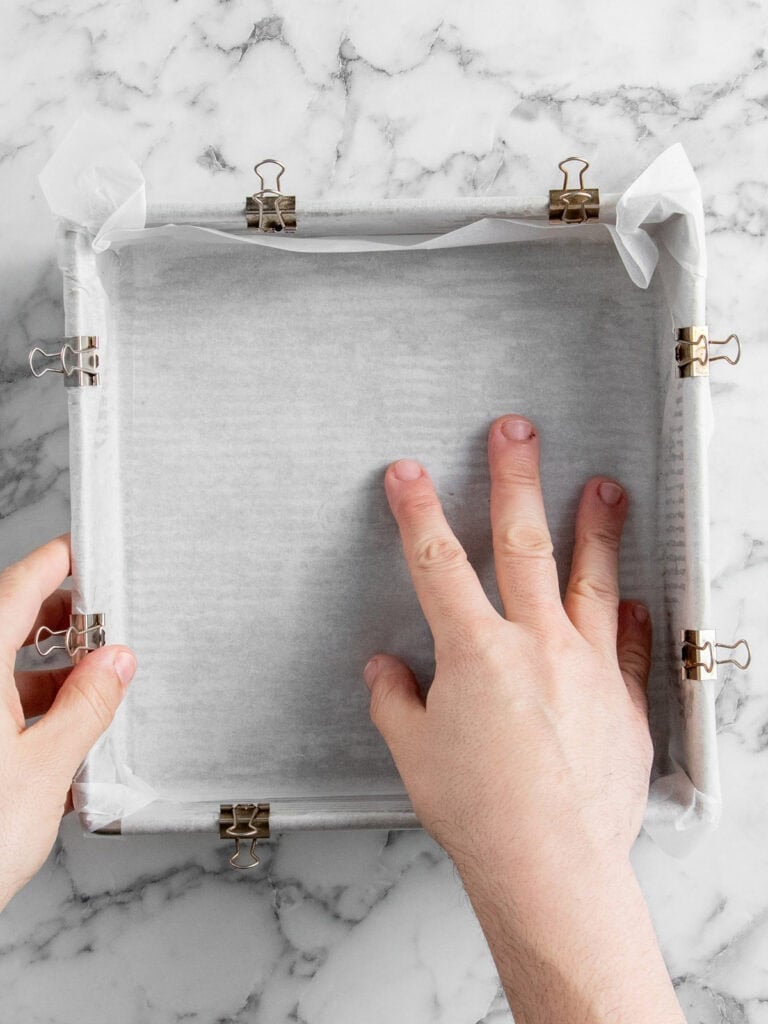
- Rub a stick of cold butter on the bottom and sides of a 23cm / 9-inch square baking tin. Then line the bottom and sides with baking paper.
- Add another large piece of baking paper on top of the lined baking tin. You don’t need to be precious here it’s just to keep the caramel layer in place as it cools and sets.
TIP: Leave some overhand so that you can easily lift the baked brownies out. I like using bulldog clips to keep the paper in place.
Making the caramel layer
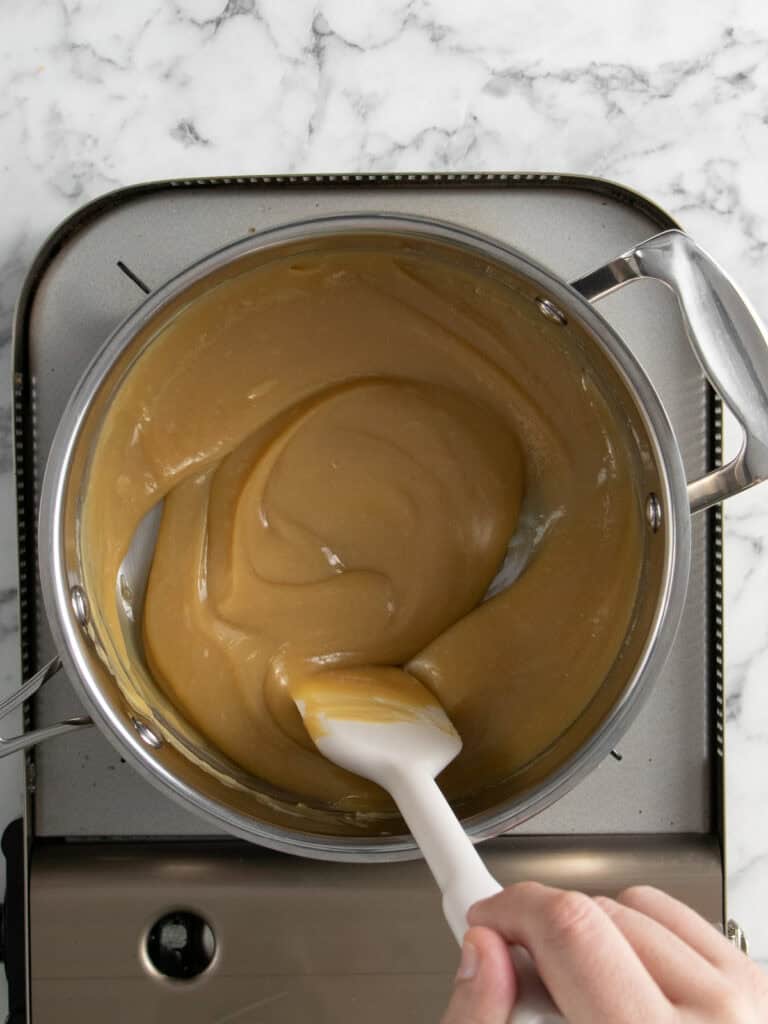
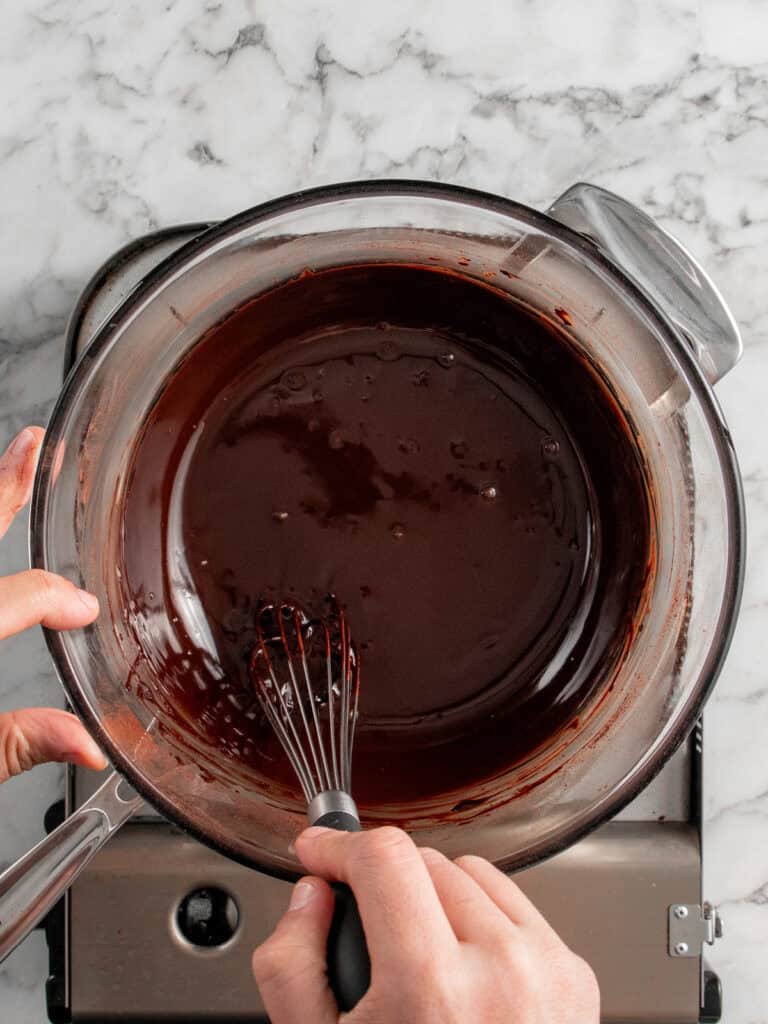
- Add butter, brown sugar, golden syrup, and sweetened condensed milk to a saucepan. Place over medium heat and stir until melted and smooth.
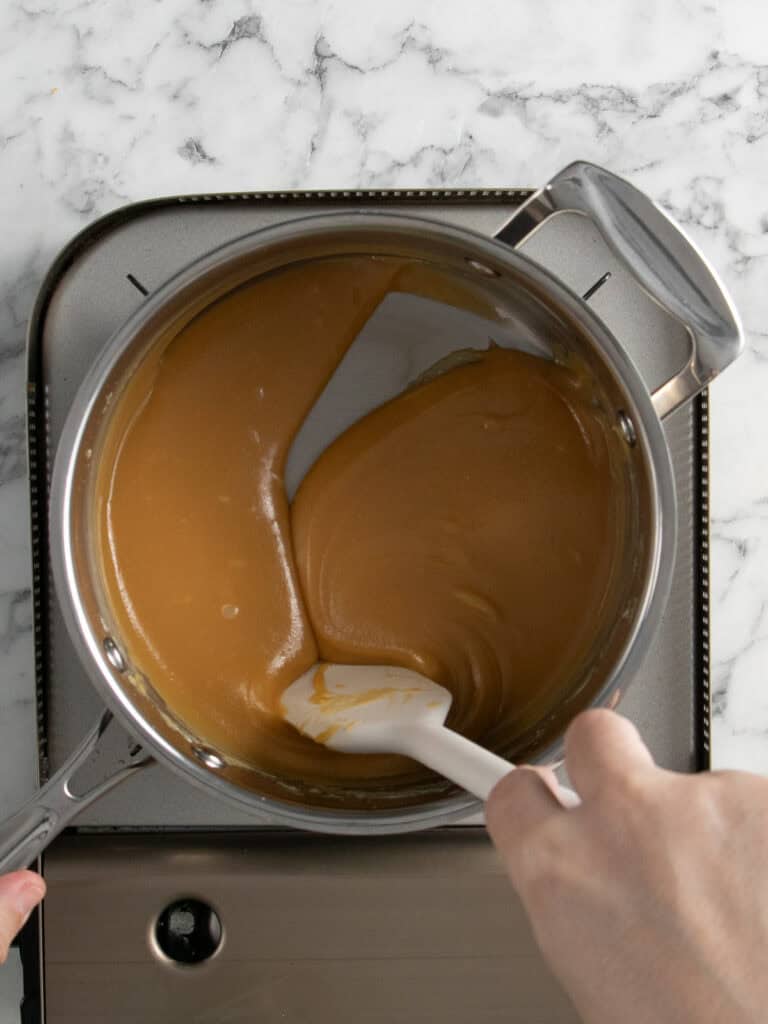
- Keep stirring as it gently bubbles for 8 minutes until thickened and slightly darker.
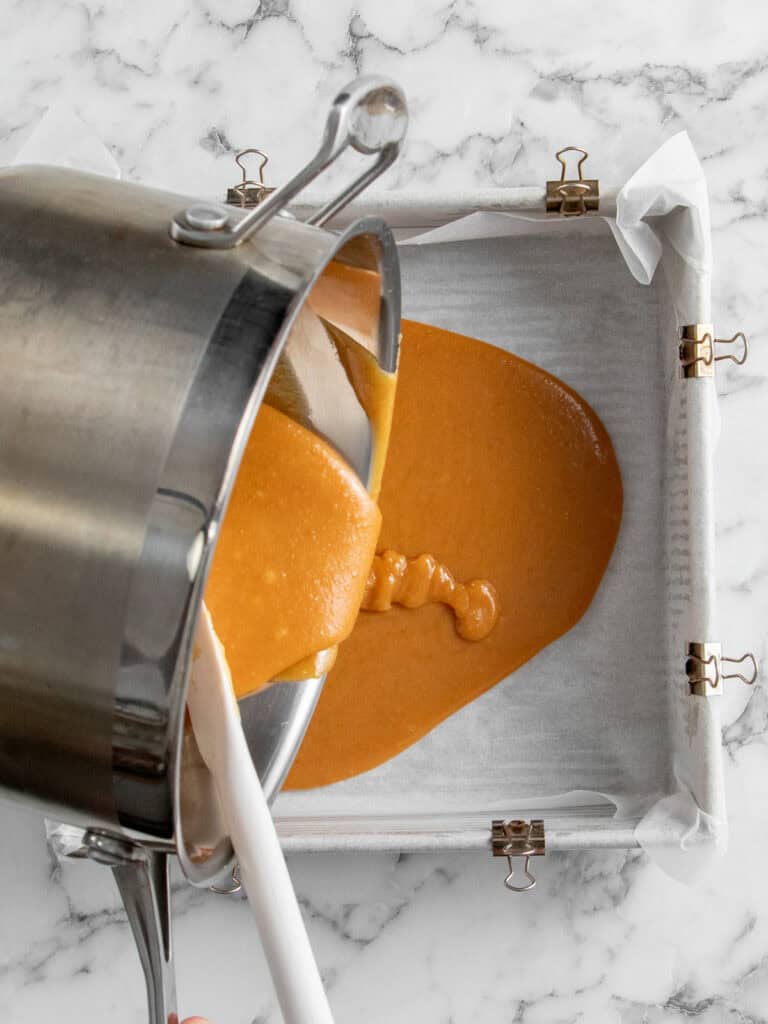
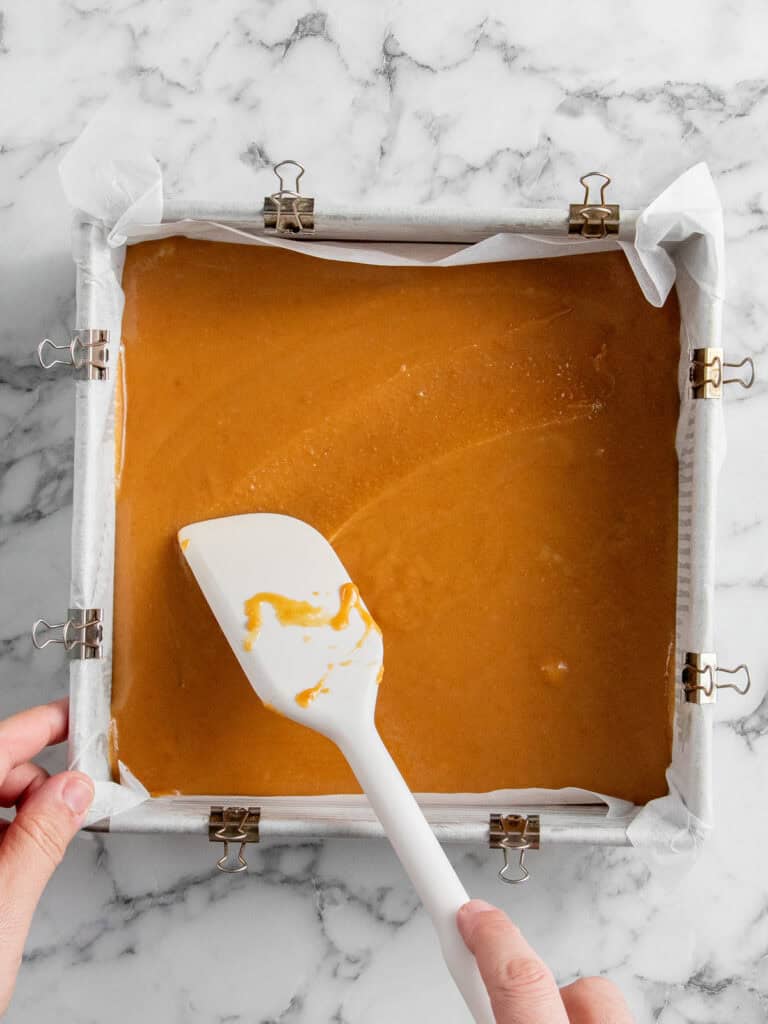
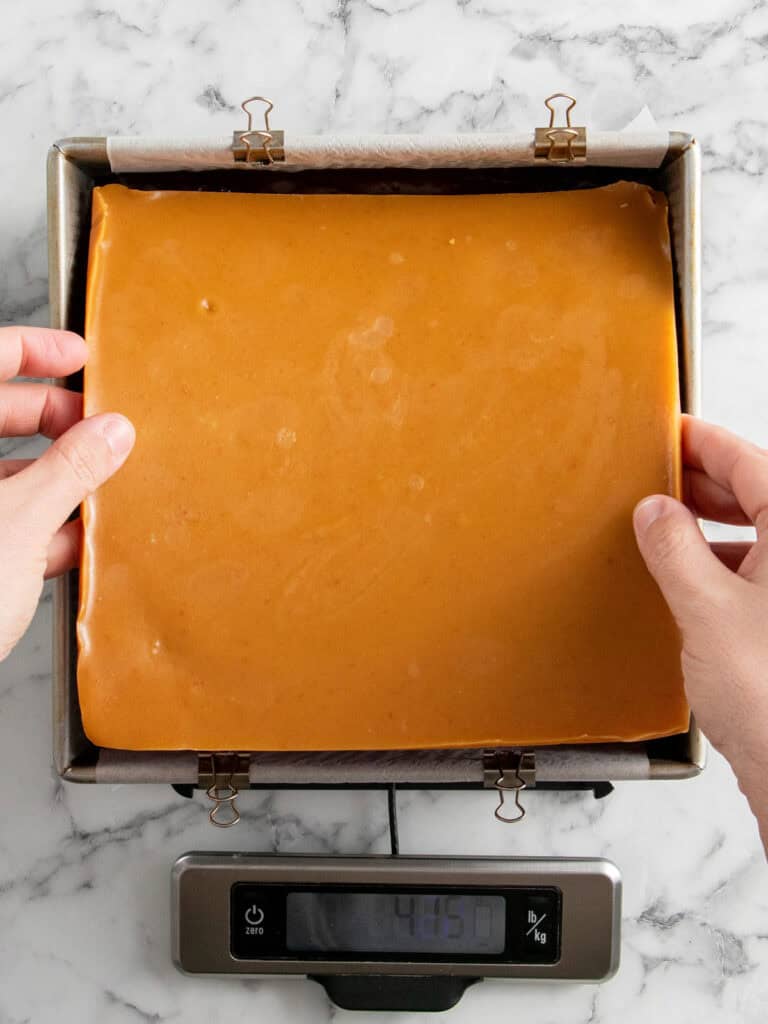
- Remove from heat and stir in vanilla and salt. Pour into the prepared tin and smooth out the top.
- Let it cool at room temperature, then freeze for 2 hours until firm.
Tip: Don’t skip the cooling step! It’ll make handling the caramel layer easier and give you that nice defined layered look!
How to make the chocolate brownie layer
- Melt the butter and dark chocolate in a double boiler until smooth. Whisk in cocoa powder to bloom and deepen the flavor. Let cool to room temp.
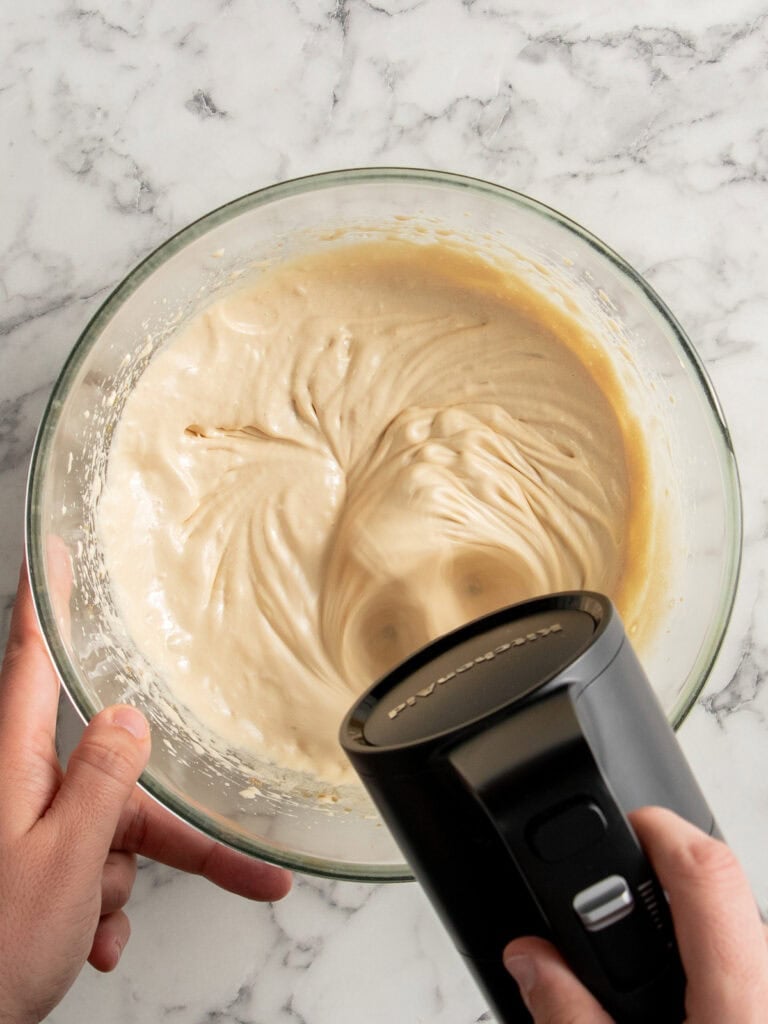
- Beat eggs, sugars, vanilla and salt using until pale and fluffy. I like using an electric hand beater.

- Fold in the cooled chocolate mixture, then the flour using a spatula until no dry ingredients are showing.
Layering it together
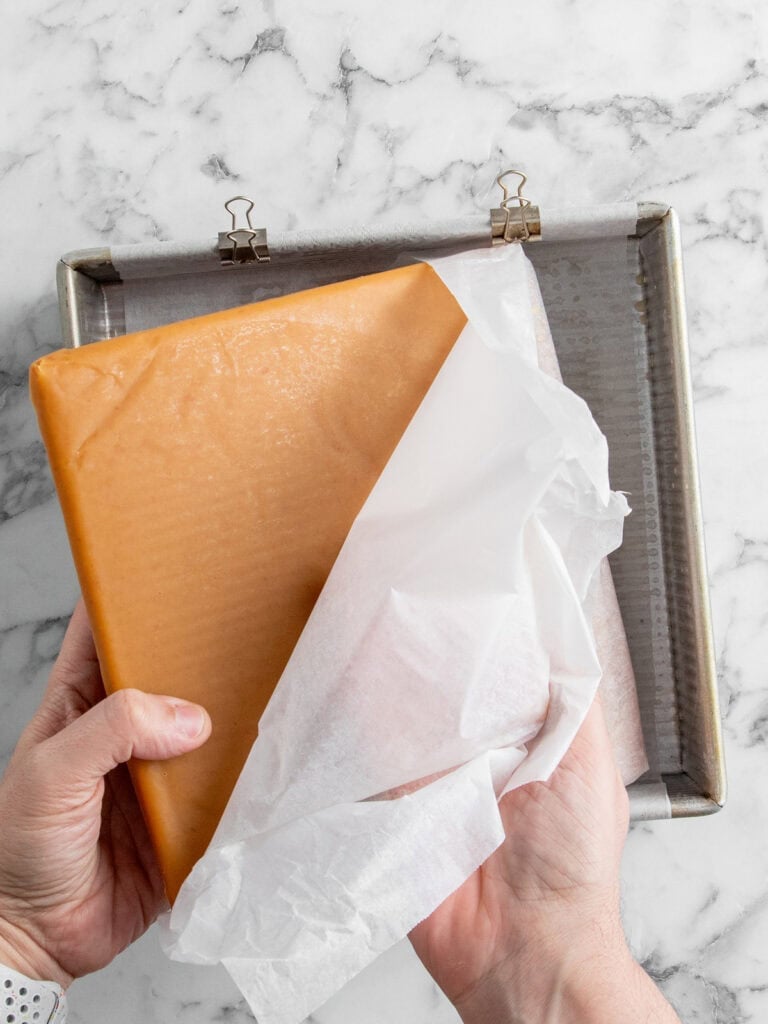
- Take the chilled and set caramel layer out of the baking tin and set aside.
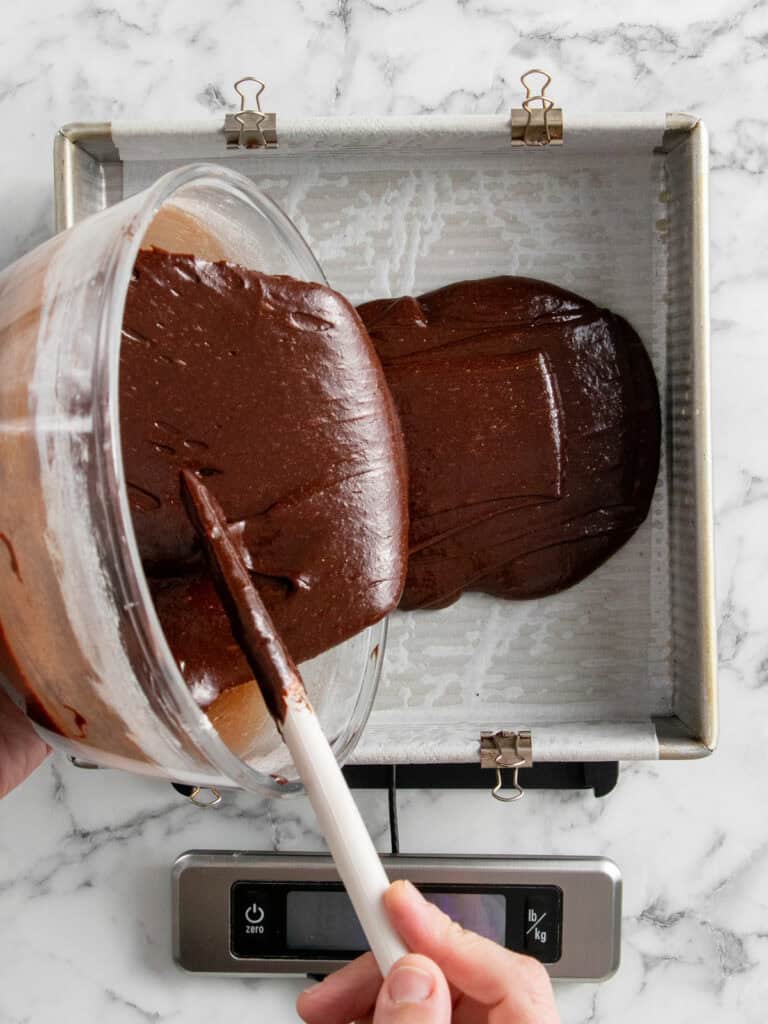
- Add 1/2 of the brownie layer into the baking tin. It works out to be about 420g of brownie batter. Spread evenly across the lined baking tin.
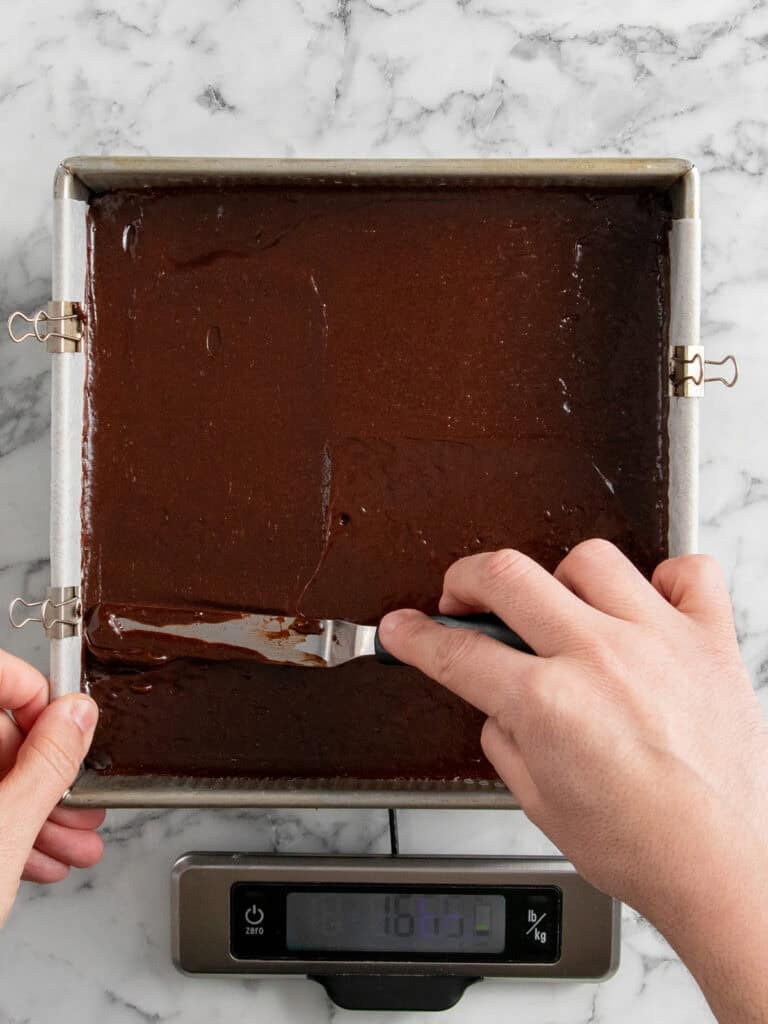
- Add the caramel layer on top.
- Pour the rest of the brownie batter on top and spread evenly. You want to bake these brownies for 30-35 minutes. The edges of the brownies will puff up. That’s when you know the brownies are done. Let the brownies cool completely at room temp.
How I think you should slice your brownies
Listen, if you want super clean cuts, chill the baked and cooled brownies in the fridge for 2-3 hours and then slice. Make sure you wipe the knife clean after each slice.
My problem with that is the brownies look almost like a solid piece of fudge. I like my brownies to look more like a dense fudgy chocolate cake.
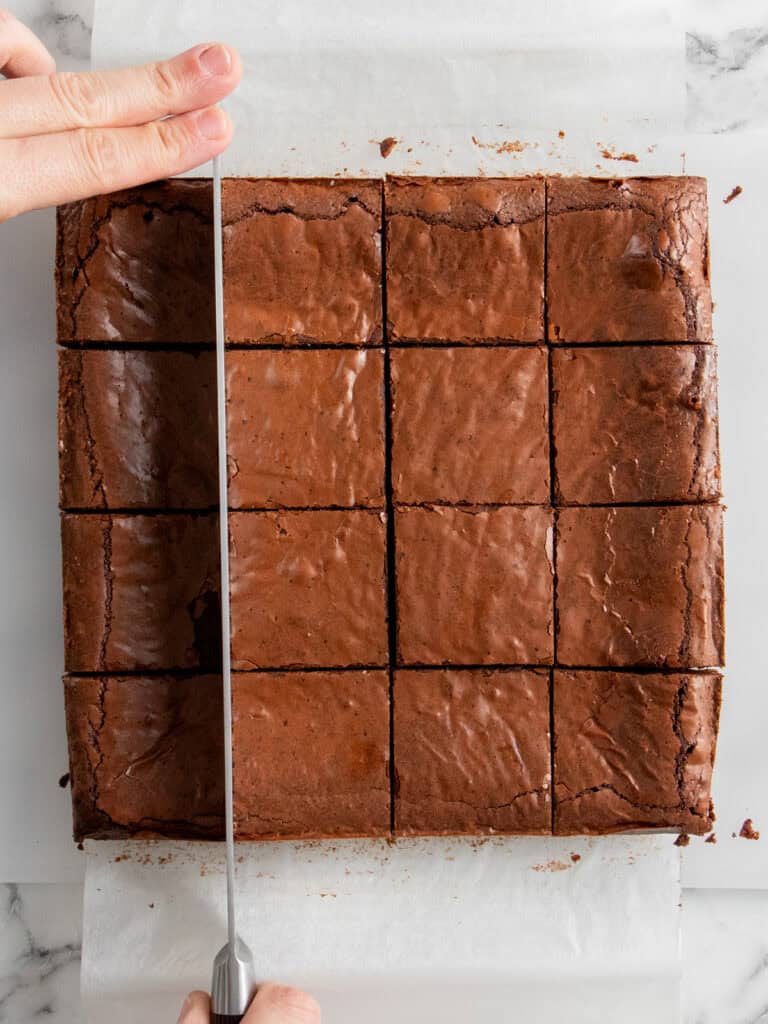
How I like to do it – The only way to get that look is to slice when the brownies are room temp. Again, you’ll need to wipe the knige after each slice!
A Quick Baking Guide
If you’re new to baking or just want to brush up on the basics, these guides are a great place to start!
Loved the recipe? Let me know!
If you enjoyed this recipe, leave a star rating and comment below. It helps others find the recipe and keeps the baking community growing. Tag me on Instagram so I can see your version too!
Fudgy Caramel Layered Brownies
My fudgy caramel brownies are rich, chocolatey, and layered with silky caramel. A decadent, easy dessert for chocolate and caramel lovers.
Serves 12
Ingredients
Chocolate Brownies
- 125 g unsalted butter, cubed
- 180 g dark cooking chocolate, I used 70% (see notes)
- 25 g Dutch process cocoa powder, sifted (see notes)
- 3 large eggs, room temperature (55g each)
- 160 g caster sugar, superfine
- 100 g brown sugar
- 1 tsp vanilla extract
- Pinch of salt
- 75 g all-purpose flour, plain flour
Caramel Layer
- 125 g unsalted butter
- 70 g brown sugar
- 55 g golden syrup
- 395 g sweetened condensed milk, see notes
- 2 tsp vanilla extract
- 1/2 tsp of salt
Instructions
Caramel Layer
- Prepare baking tin – Grease a 23cm / 9-inch square baking tin with cold butter. Line the bottom and sides with baking paper, leaving some overhang for easy lifting. Secure with small bulldog clips if needed. Add a second sheet of baking paper on top, pressing it neatly into the corners. This top layer prevents caramel from leaking, while the bottom layer will be used later for baking the brownies.
- Syrup – Add the butter, sugar, golden syrup and sweetened condensed milk to a large saucepan. Place over medium heat and stir gently until everything has melted and the mixture starts to bubble around the edges.
- Cook mixture – Keep stirring the bubbling caramel over medium heat for 8 minutes to prevent burning or crystallization. It will thicken and darken slightly. Remove from the heat, then stir in the vanilla and salt until smooth.
- Cool – Pour the caramel into the prepared tin and let it cool at room temperature. Once cooled, transfer to the freezer for 2 hours to set completely. Proper cooling helps create a clean, defined caramel layer when slicing. Before layering with the brownie batter, peel away and discard the top sheet of baking paper. The bottom layer stays in place for baking the layered brownies.
Chocolate Brownies
- Preheat your oven to 180C / 355F (fan off), 160C / 320F (fan on).
- Melt chocolate and butter – Fill a large pot a 3rd of the way with water and bring to a gentle boil. Place a heatproof glass or metal bowl on top (making sure the bottom of the bowl doesn’t touch the water). Add the chocolate and butter. Stir until melted and smooth. Alternatively, you can melt the chocolate in the microwave for 30 seconds at a time, stirring each time until smooth.
- Add cocoa powder – Turn the heat off and the sifted cocoa powder in. Use a whisk to combine until smooth. Set aside to cool to room temperature, about 10 minutes.
- Whisk eggs and sugar – To a large mixing bowl, add the eggs, both sugars, vanilla extract and salt. Use an electric hand mixer to whisk until pale, fluffy and doubled in volume, about 2-3 minutes.
- Add the chocolate mixture – Add 1/3 of the cooled chocolate mixture and whisk until well combined. Repeat with the next 1/3 until all of it has been added.
- Add dry ingredients – Add the sifted flour and fold using the spatula until no dry ingredients are showing.
Layering
- To layer – Pour half the brownie batter (420g) into the prepared tin and spread it out evenly. Add the cooled caramel layer on top and press it down gently so it sticks. Pour the rest of the brownie batter over the caramel and spread it out evenly.
- Bake – Bake for 30 minutes or until a toothpick inserted into the center comes out with moist crumbs. Take out of the oven and allow to cool at room temperature.
- How to slice – For clean slices, chill your cooled brownies in the fridge for 2 hours before cutting. Wipe the knife clean between each slice for neat edges. I prefer slicing mine at room temperature because the brownie layer looks moist and cakey rather than dense and fudgy. Even then, cleaning the knife after each cut helps keep the slices tidy.
Notes
Chocolate – I used 70% dark cooking chocolate for this recipe for it’s slightly bitter chocolate flavor and because the brownies come out less sweet. Regular dark chocolate will also work, but the brownies come out sweeter.
Dutch processed cocoa powder – is an unsweetened cocoa powder which has been treated with alkaline and potassium carbonate to neutralize the acidity that is naturally found in cocoa powder. It’s darker in color and strong in chocolate flavor.
Sweetened Condensed Milk – Use regular, full fat sweetened condensed milk for this recipe, not low-fat or skim.
Storage – Brownies can be stored in an airtight container, in the fridge for up to three days.
Nutrition – is an approximate and is based on per slice. This recipe makes 9 slices.
A note on measurements – This recipe uses weight measurements for the most accurate results. Cup measurements can vary depending on where you are, which affects the precision needed for a recipe like this. Here is where you can learn more about how to measure ingredients using digital kitchen scales.
Nutrition
Calories : 491kcal
Carbonhydrates: 51g
Protein: 6g
Fat: 28g
Saturated Fat: 17g
Polyunsaturated Fat: 1g
Monounsaturated Fat : 8g
Trans Fat : 1g
Cholesterol: 103mg
Sodium: 163mg
Potassium : 221mg
Fiber: 2g
Sugar : 42g
Vitamin A: 674IU
Vitamin C: 1mg
Calcium: 122mg
Iron: 1mg
Nutrition Disclosure
Gave this recipe a go?Mention @thescranline or tag #thescranline!
previous post
12 comments
Hi Nick. I loved this recipe and I really wanna try it, but I’m from Brazil and I never heard before about gold syrup. We just don’t have this ingredient here. How can I replace it in this recipe? Thanks.
Hey Marynna, glad you want to try the recipe! You can replace golden syrup with light corn syrup or honey. They’ll both work to keep the caramel smooth and chewy. If you use honey, the flavour will be a little stronger but still delicious. N x
Delicious and so easy to make
Thanks so much Alison! Love that you loved them! N x
This looks AMAZING! I don’t dare make it now cause I’m an empty nester and I’m afraid I’d eat the entire pan! Have to wait until one of my kids comes over for dinner- thanks for sharing.
Hey Lisa, thank you! I get it, these are seriously hard to resist once you start. They’re perfect for sharing though, so definitely save them for when your kids visit. Hope you get to enjoy a slice soon. N x
Hi Nick, thanks for sharing this. It looks amazing. I’m wondering if you think this would be okay with natural non alkalized cocoa? Maybe a bit of added baking soda. I have a lot of standard organic cocoa powder I got at Costco and I’m trying to use what I have. Times are a bit tight financially. Thanks
Hey Vickie, thank you! You can definitely use natural cocoa powder, but the flavour will be a little lighter and less rich. I wouldn’t add baking soda here since the recipe is balanced for Dutch process. It’ll still taste great and bake up fine. N x
I have died and gone to Heaven! Nowhere has anyone ever explained this process so perfectly AND had such a wonderful recipe for the perfect fudgy caramel layered brownie. It is delish! Thank you!
PS I am also loving using grams instead of our US measurements. Makes much more sense.
First of all, love it! haha. Died and gone to heaven. I love these brownies too. I worked hard on getting that layer nice and crisp looking! And I’m so glad you love the gram measurements instead of cups. N x
Caramel and chocolate is my FAVOURITE pairing, so when I saw this, I just had to make it. What an absolute delight! Perfection in every fudgy (but not undercooked) bite.
This one is entering into my repertoire!
Also, love the instructions. Super clear, with hints on the visual cues to get the recipe right.
Yay! I love this recipe too Kiara! THat’s so amazing to hear. Thanks for the lovely feedback! N x