Swedish Princess Cake (soft and creamy)
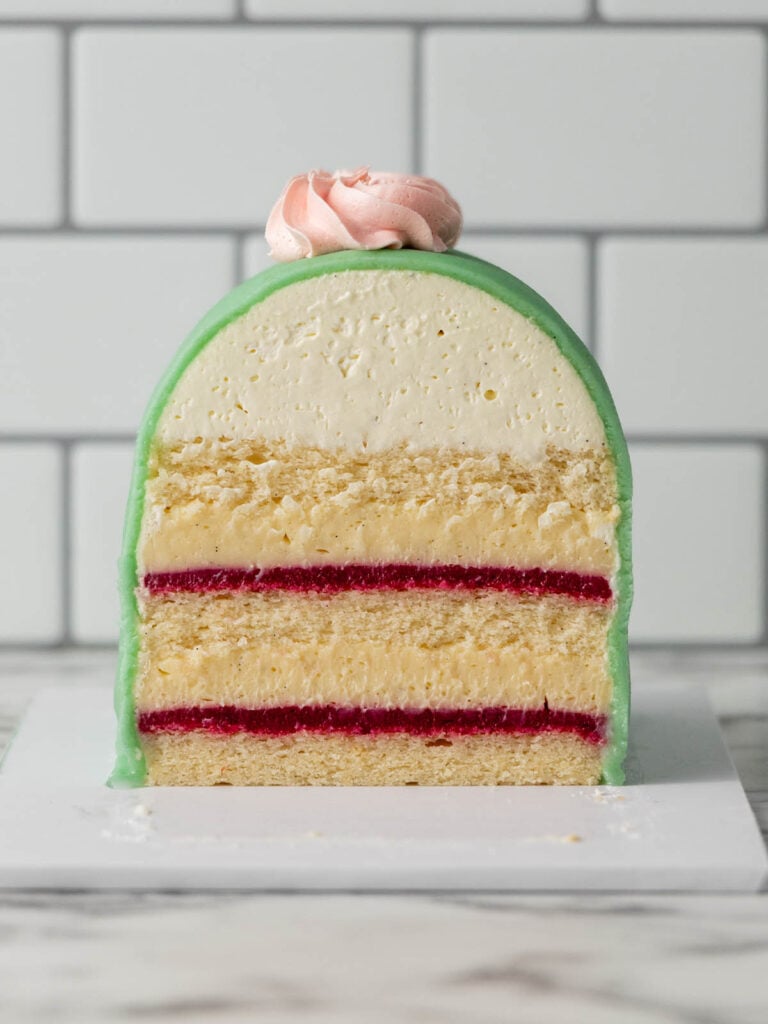
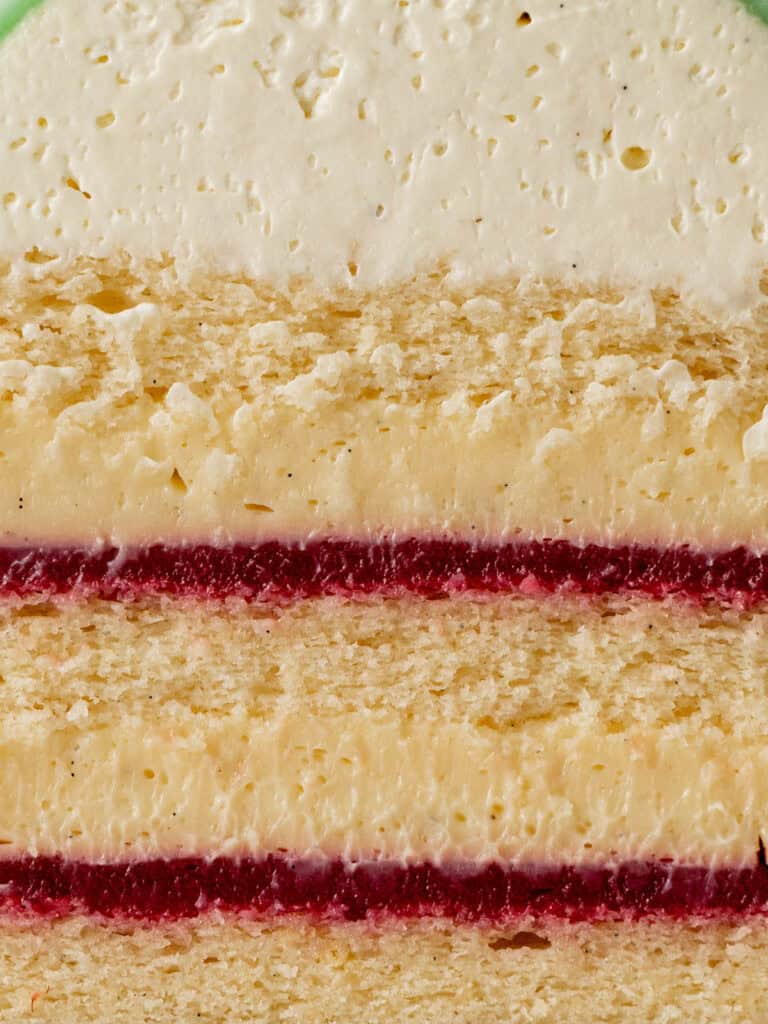
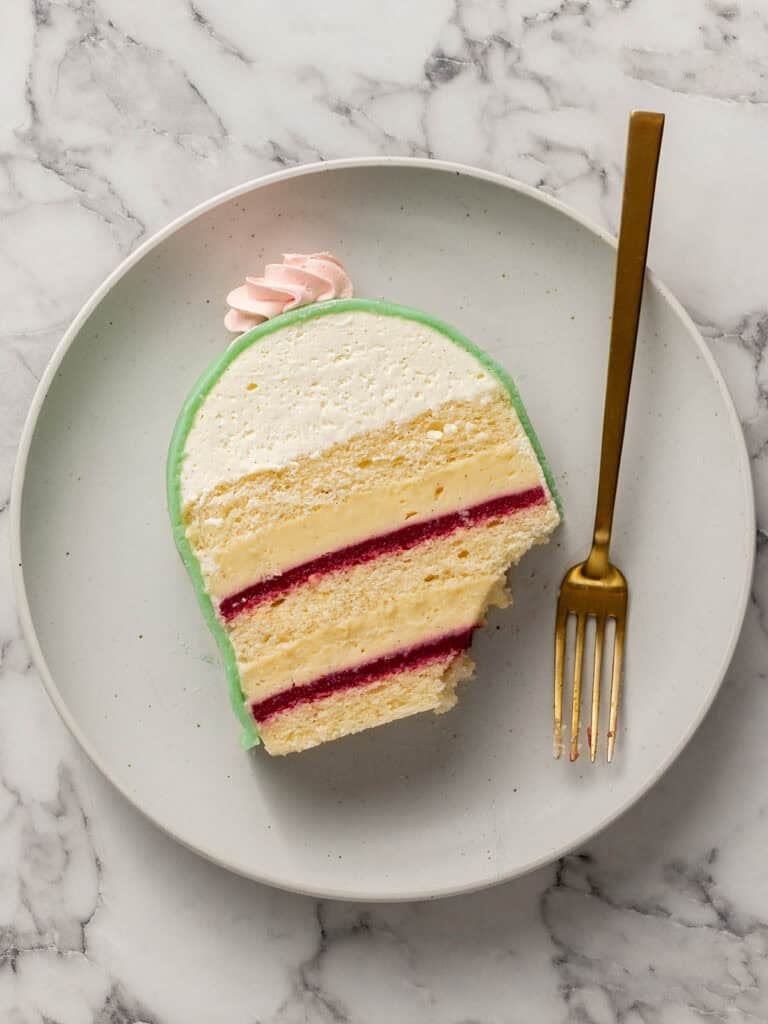
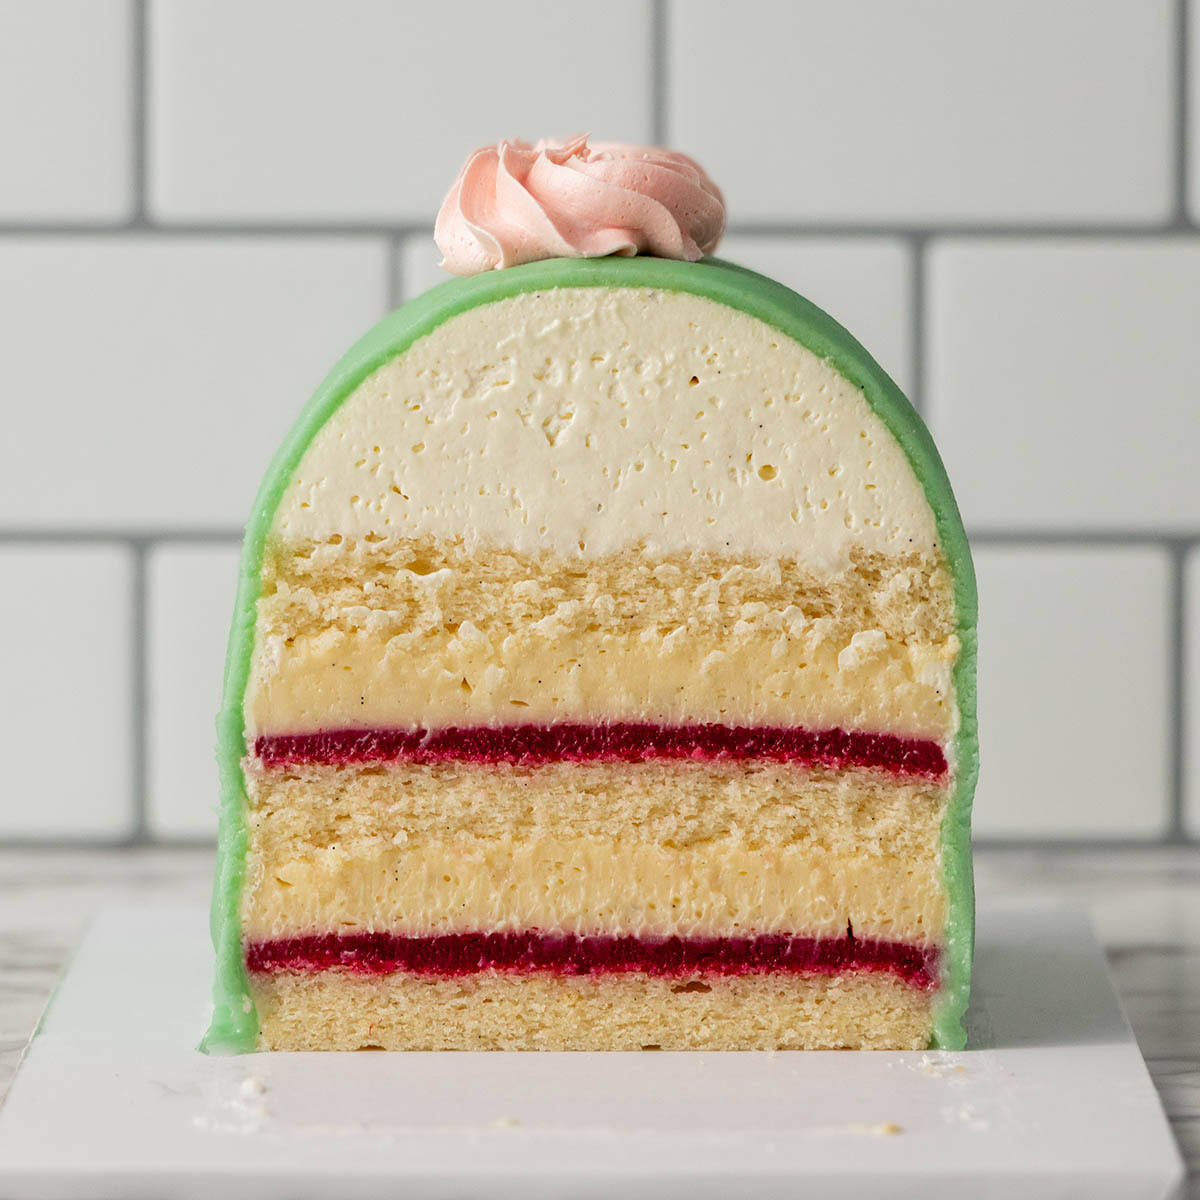
This Swedish Princess Cake looks like the kind of layered dessert you’d find in the window of a fancy European cake shop. Underneath that green almond marzipan layer is layers of soft chiffon sponge, a bright raspberry filling, vanilla bean infused pastry cream and an arch of Chantilly cream.
Almost too pretty to eat, but too delicious not too!
Hey team, Nick here! One of my favorite things to do is break a recipe and then put it back together again. And this one was fun to break! 9 rounds of testing gave me a cake I could slice into with super crisp neat looking layers (fun for the eyes) and a soft and balanced flavor with creamy pastry cream layers and tangy home made raspberry jam.
Oh by the way! I used the same chiffon sponge in this cake as I used in my Continental cake. That one is just as soft and lush as this cake.
The raspberry jam layer tested my patience because a simple jam wasn’t gonna cut it for this cake. It kept seeping into the soft sponge which made it look terrible when you sliced into it. So I ended up coming up with a way to get that same great fresh raspberry jam flavor (not too sweet) but one that behaved itself so I got nice crisp and neat layers.
Once I got the layers looking right, I worked on the shape. And even though a Swedish Princess Cake is traditionally round, I wanted something unique looking and easier to slice into. I worked on it being a bar with an arch of Chantilly cream on top.
Yes, this was invented for princesses
Specifically, by a Swedish home economics teacher named Jenny Åkerström who taught three princesses and designed this cake for them in the 1920’s. They loved it so much it was named in their honor from ‘green cake’ to Prinsesstårta cake.
But don’t worry, you can be a princess too. We all have the potential.
My workflow.
This cake takes a little time to make, but it’s all worth it. If you break it up into a couple days it’s not only manageable, it’s enjoyable!
First Day
- Make the pastry cream and chill to set.
- Same with the raspberry jam.
Second Day
- Bake, cool and slice up the sponge
- Make the Chantilly
- Layer the cake
- Shape the Chantilly arch on top
- Chill the cake for a minimum of 4 hours. Overnight is best and is what I do!
Third Day
- Color the marzipan
- Roll it out and shape over the cake
- Finishing touches including the pink buttercream on top.
A pastry cream that’s easy to work with
I love my pastry cream recipe. Especially for layer cakes like this one. It’s thick and creamy, it’s made in one pot and holds its shape really well which means it won’t spurt out in between your cake layers.


- It’s very straight forward to make. The dry ingredients get mixed with the egg yolks before you add the milk. Whisk until it thickens.
- Then add the butter and vanilla.
- You let it set in the fridge overnight.
- Then use an electric hand beater to whisk it until its smooth right before you’re ready to pipe it on the cake.
Whisking it with a hand whisk means it comes out silky smooth every single time! That’s another thing I love about this recipe!
I’m super proud of this raspberry jam!
Major problem I had when testing the cake was the jam I was making would seep into the cake layers which looks terrible when you sliced into it. So in my frustration I had a stroke of genius one day and decided to thicken it with corn flour. It turns it into a paste consistency, so it doesn’t seep and it still gives you that nice bright flavor!
- The starch is mixed with water to create a slurry and it helps thicken this into a spreadable jam consistency.
- To make the jam portion add the sugar and raspberries into a pit. I like using frozen because they’re cheaper and available year round. Stir the mixture until it boils and the sugar dissolves.

- Then run it through a fine mesh sieve to get rid of the seeds.
- Then add whatever is left back to the pot and bring to a gentle boil. Gently pour in the corn starch slurry as you stir. The mixture will thicken. Once it turns translucent and begins to bubble, take it off the heat.
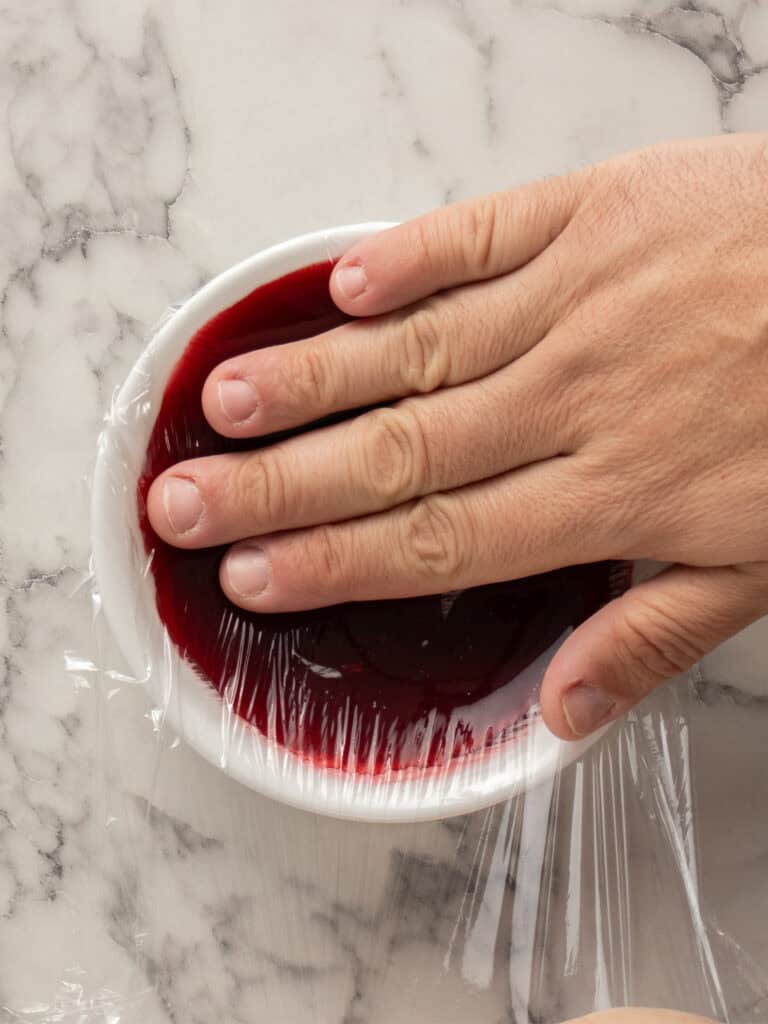
- Add it to a bowl and cover the surface with plastic wrap. Pop it in the fridge to chill completely.
Tip – Before you use the jam, just give it a bit of a mix to smoothen it out. I like piping the jam onto the cake layers because they look neater so add it to a small piping bag right before you’re ready to use it.
Where has Chiffon been all my life?
I’m still gob smacked at the softness of this cake. I went through 27 rounds of testing when I created my continental cake. It’s soft and light and perfect for layer cakes like this one.
Couple things to prep
- To prepare your cake tin – Rub cold butter on the bottom of an 22x33cm / 9×13-inch cake tin. Don’t rub butter on the sides we want the cake to stick to the tin so it doesn’t shrink as it cools.
- Cleaning your meringue mixing bowl – add vinegar or fresh lemon juice to a glass or metal bowl and wipe dry with a paper towel. It’ll get rid of any fat residue which will help your meringue whip up nice and strong. A strong meringue means a fluffy cake!
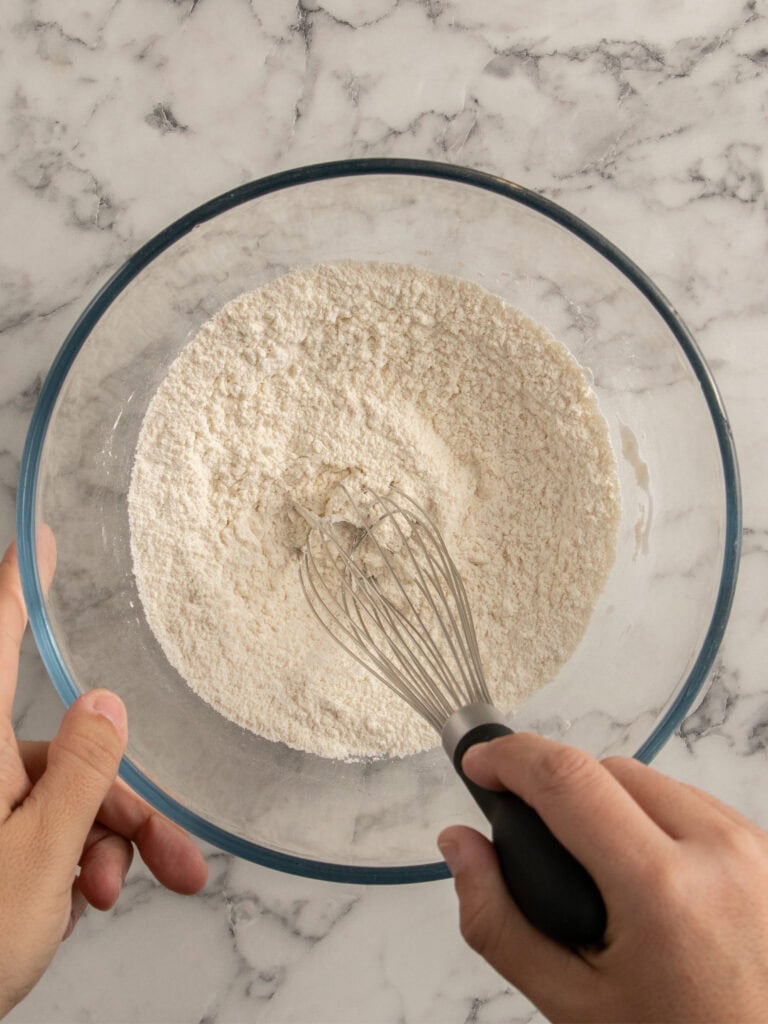
- Run the flour, corn flour, baking powder and salt through a sieve into a large bowl. Whisk to combine. Set that aside.
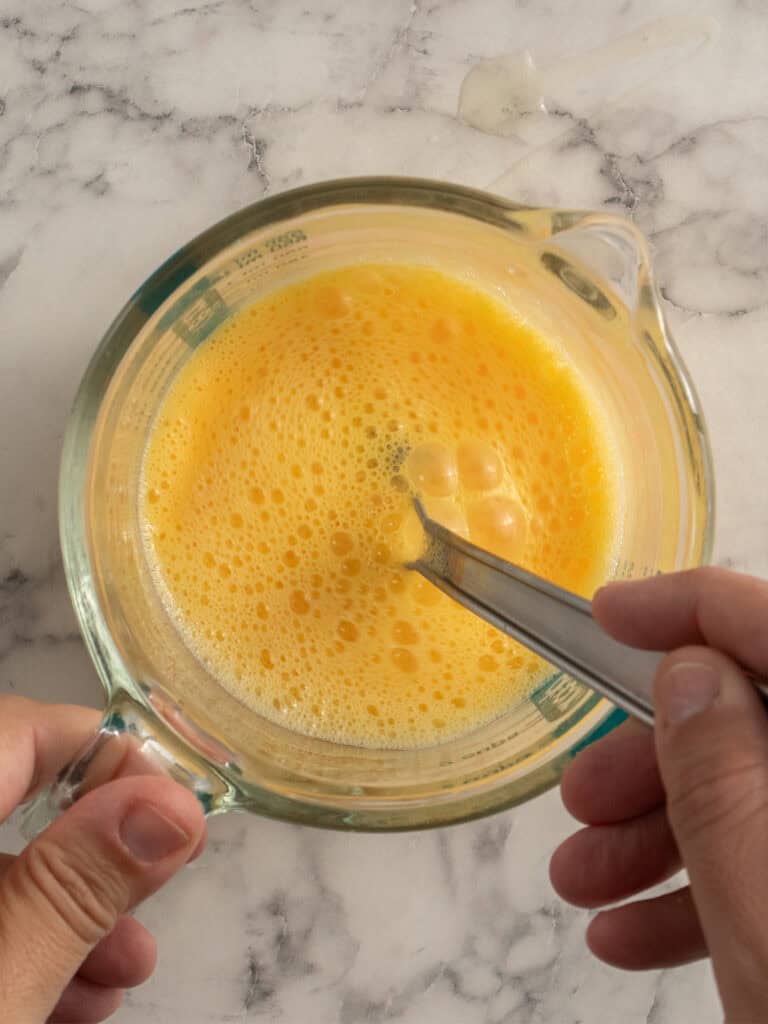
- Add the egg yolks, water and oil to a small jug and whisk. Set aside.
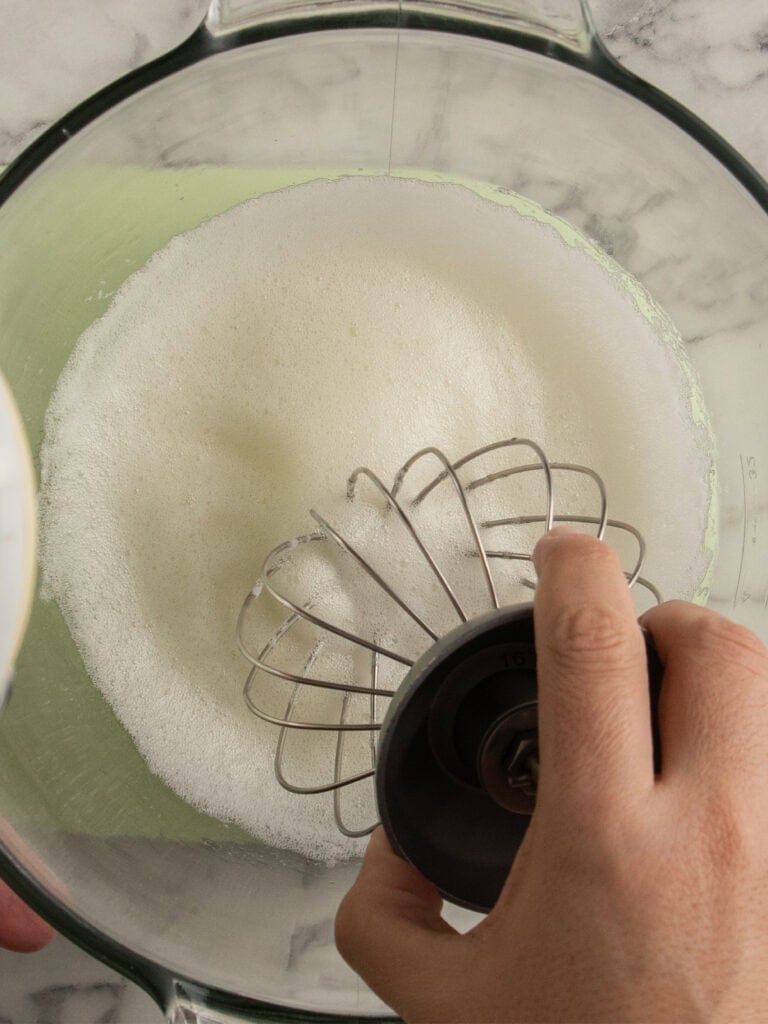
- Whisk together the egg whites and cream of tartar (or lemon juice) for 60 seconds until frothy. I whisked on speed 3.
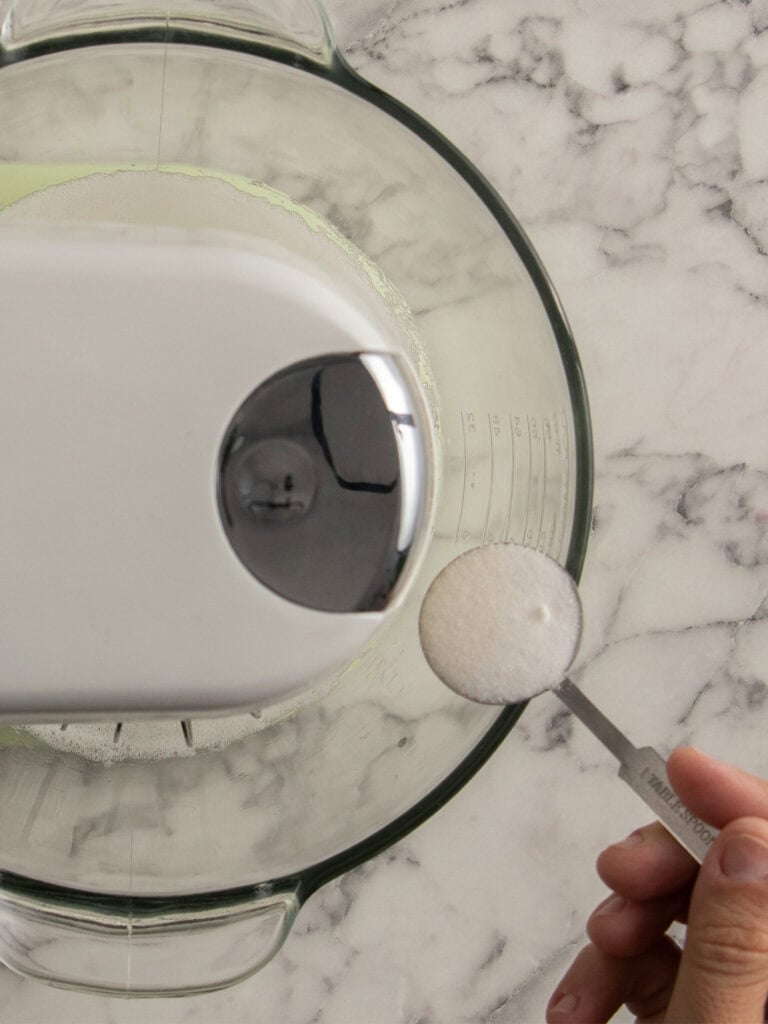
- Add the sugar to the whites gradually by pouring it in 1 tbsp at a time with the mixer running on speed 4 so it the sugar has a chance to dissolve properly.
Whisking speed – For reference, my mixer has 6 speeds in total so speed 3 is about 40-50%.


- Continue whisking the meringue on speed 4 for 8-10 minutes until you reach stiff peaks. The meringue will be thick and glossy and should feel dense when you swirl the whisk. It will hold a firm peak that doesn’t bend when you lift it out of the meringue.
- Add the egg yolk mixture into the bowl with the dry ingredients and whisk until a thick mixture forms.
- Fold through 1/3 of the meringue into the batter using the whisk until it’s smooth and there are no lumps of batter. Then add the next 1/3 and gently fold through so you keep all those air bubbles. Repeat with the remaining meringue. You’ll have a nice thick fluffy meringue.
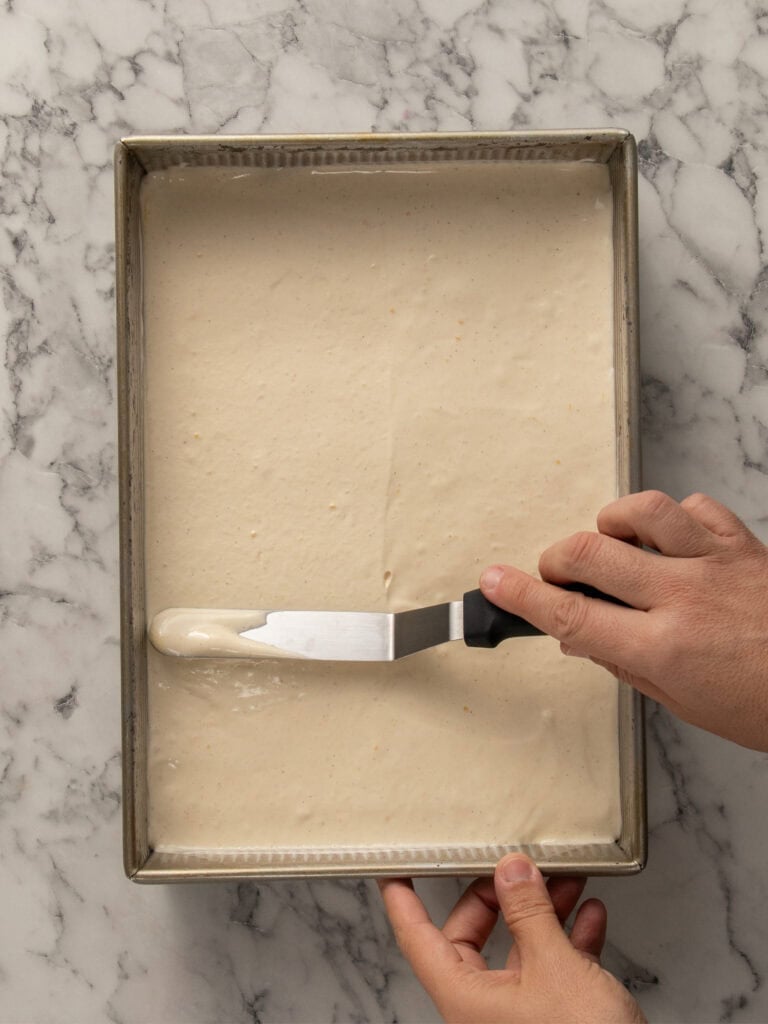
- Pour the batter into the cake tin and use a spatula to spread nice even and level. I used an offset spatula to do this.
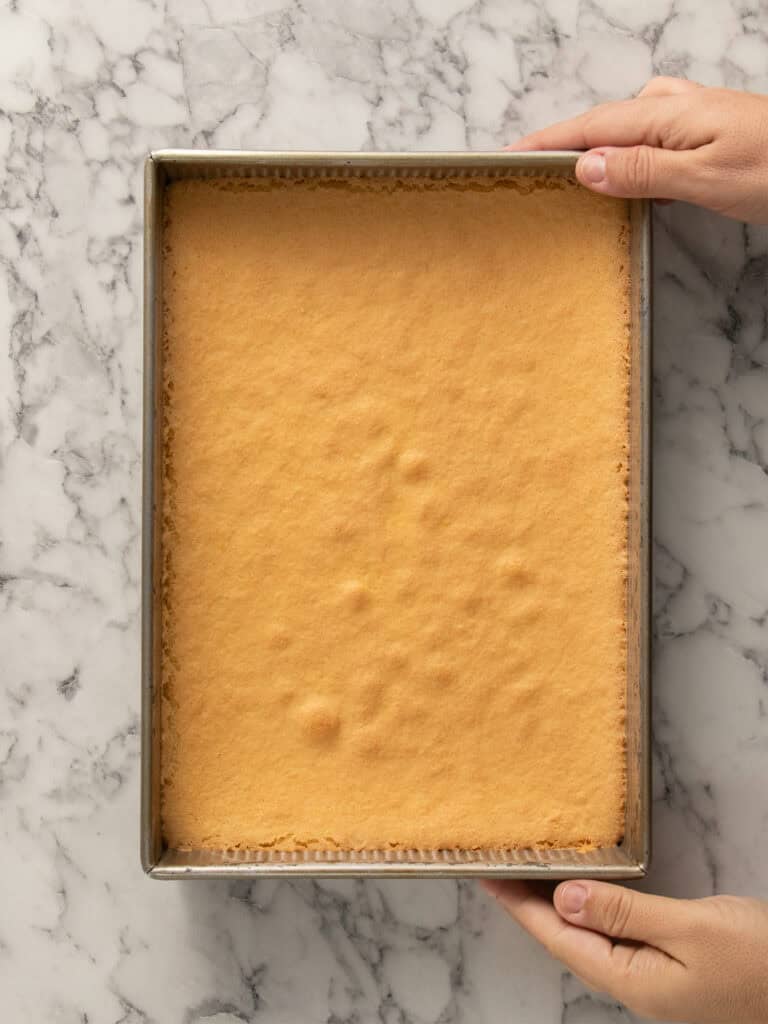
- Bake the cake for 25-27 minutes. Once it’s baked let it cool in the tin. Once it’s cooled, turn out onto your workbench.
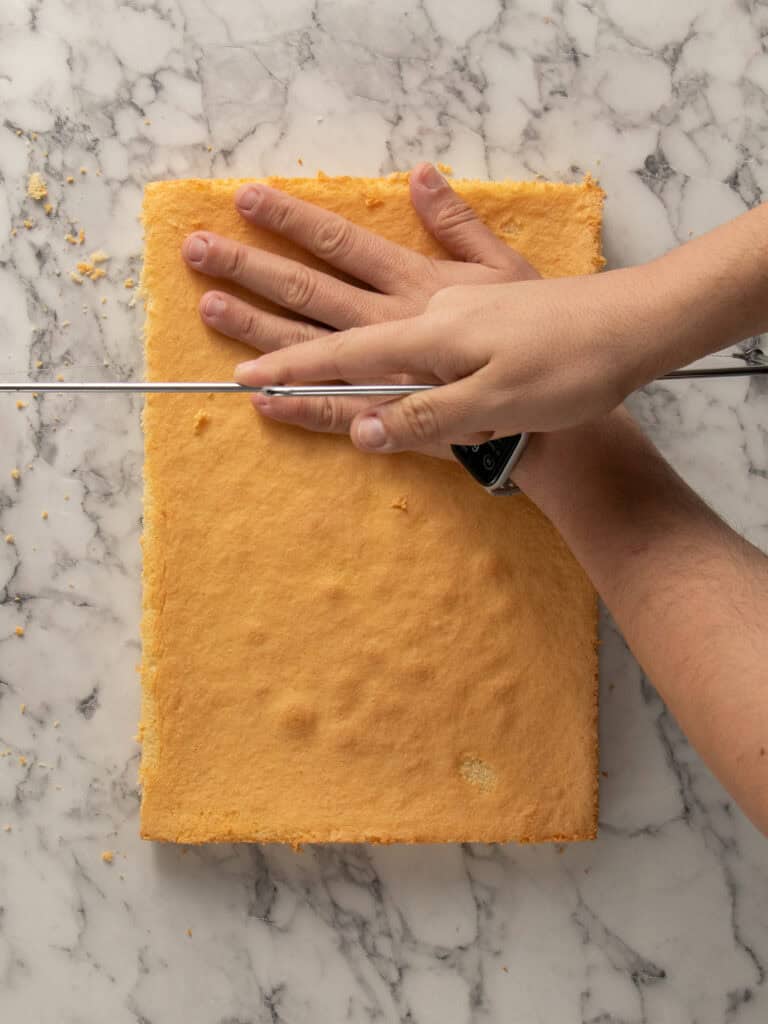
- To level the cake use a serrated knife or cake leveler to trim it to be 2cm high.
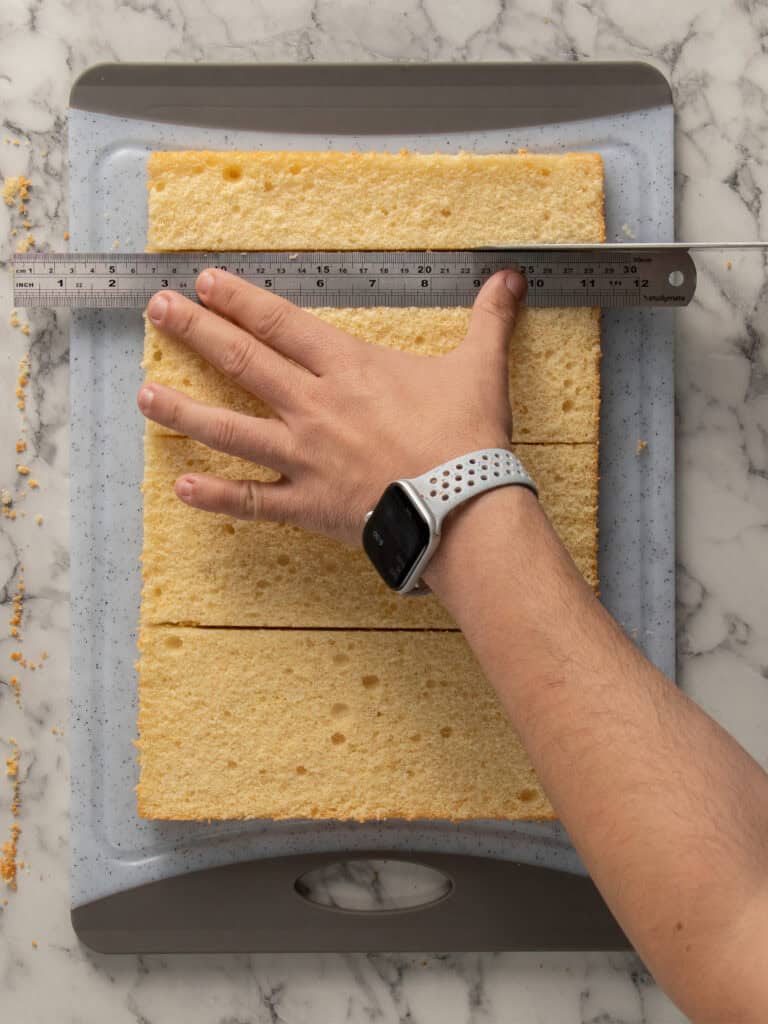
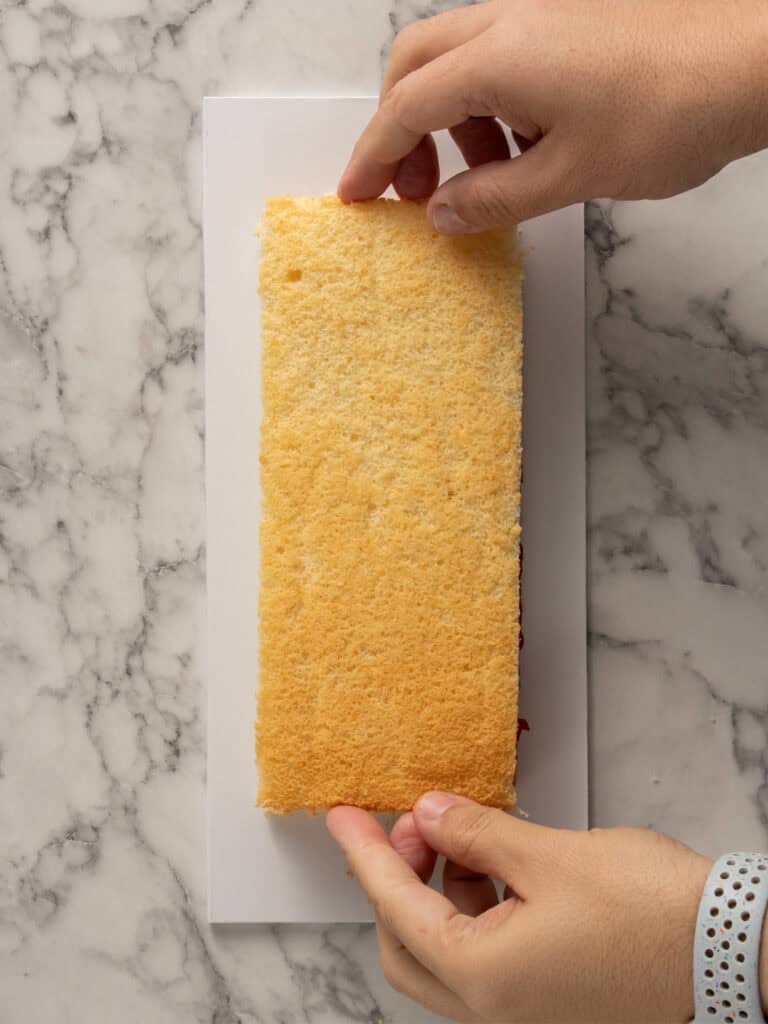
- Then use a ruler to trim it out to 9cm wide strips. You’ll have 3 layers of cake.
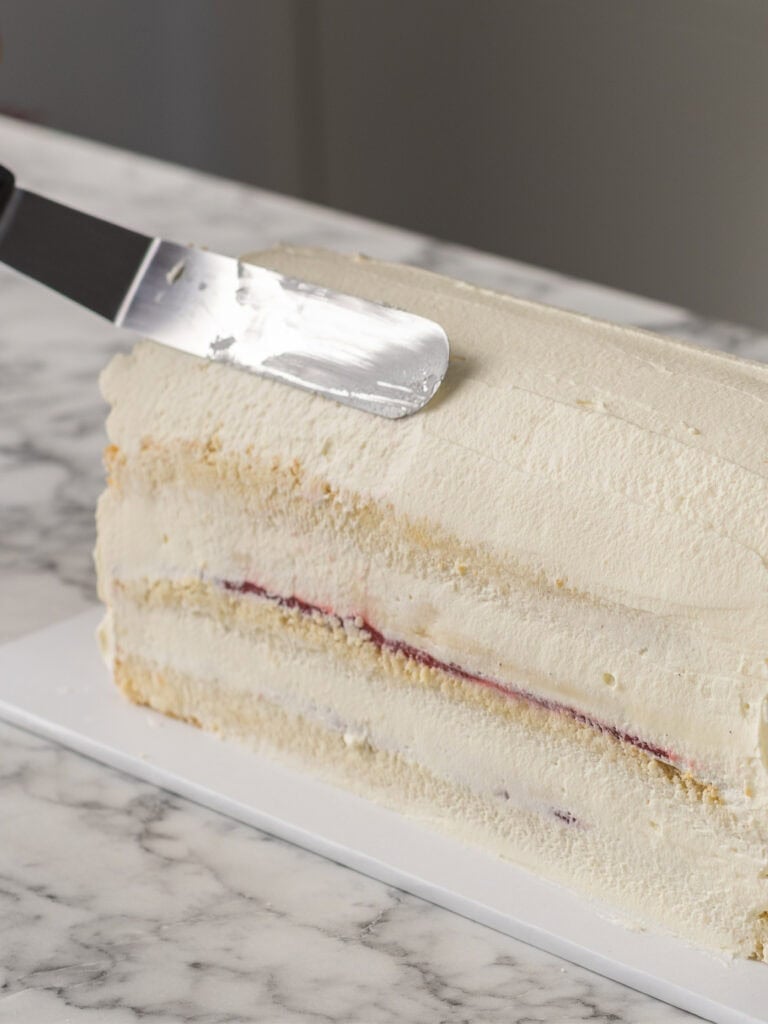
Layering the cake
- Add the first layer of cake to the cake board. I’ve left a note about cake board in the recipe card below. Go for a sturdy one.
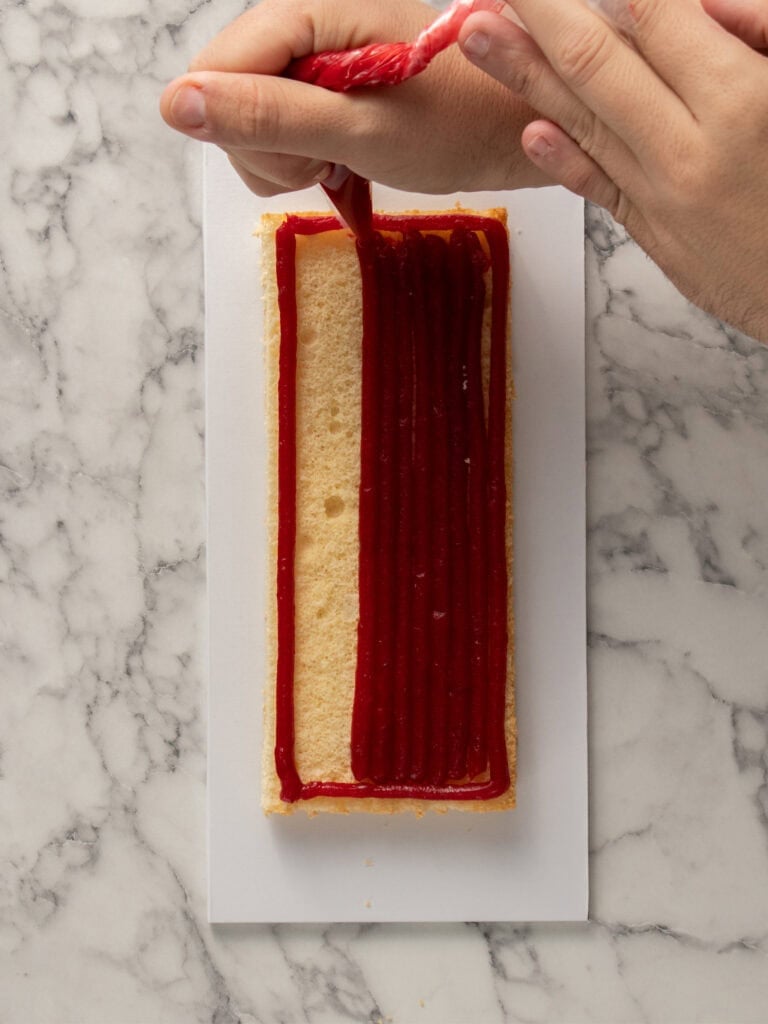
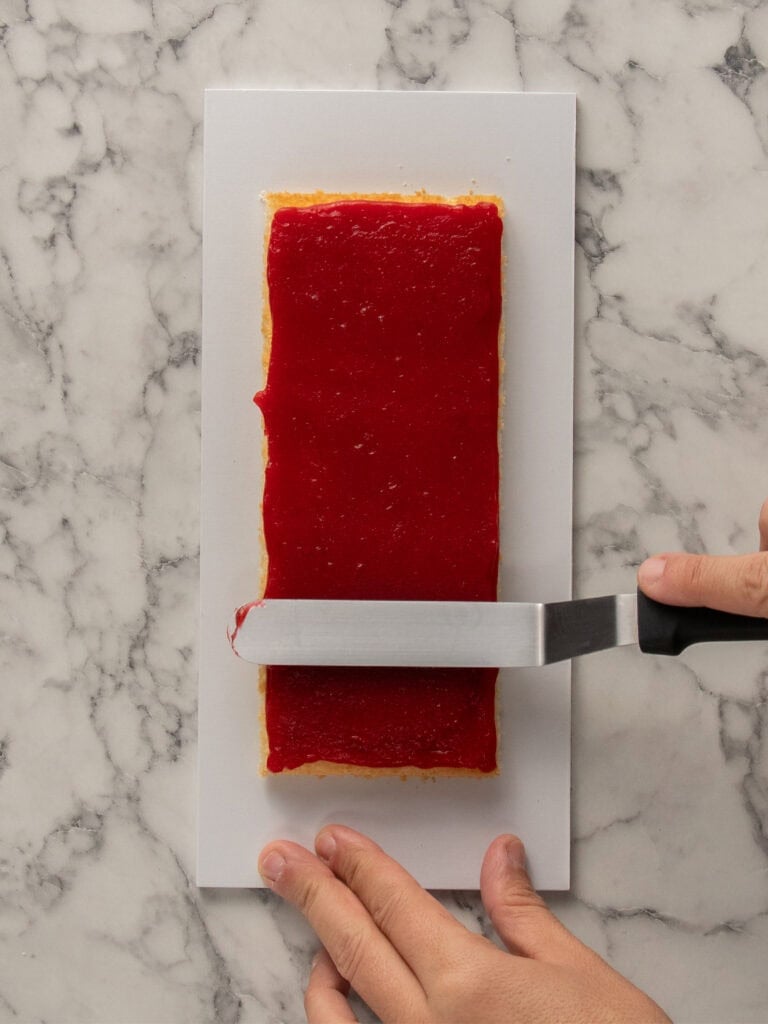
- Pipe an even layer of raspberry jam on top of the sponge and spread evenly using an offset spatula. You’ll use half the jam which works out to be about 100g.
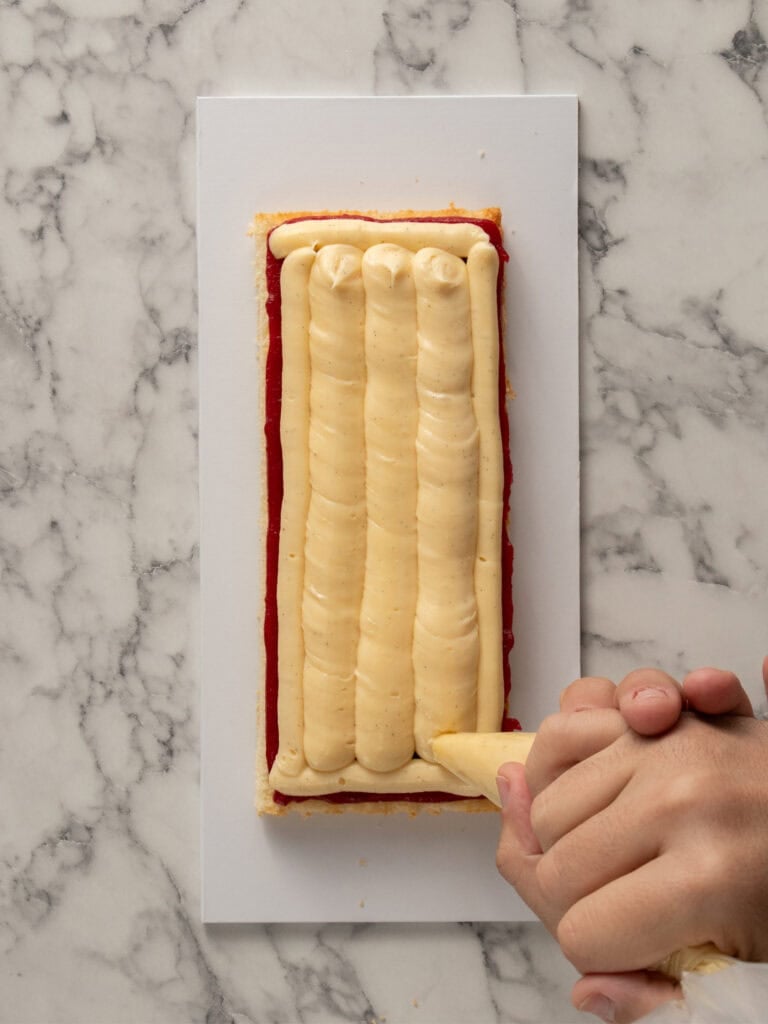

- Pipe a perimeter of the pastry cream on top of the jam then pipe lines to fill it in. It works out to be about 250g of pastry cream for each layer.
Why I pipe the fillings on – It’s all about getting neat looking layers. In my testing I tried just spooning the jam and pastry cream on and spreading it as even as I could. It doesn’t work as well as piping them.
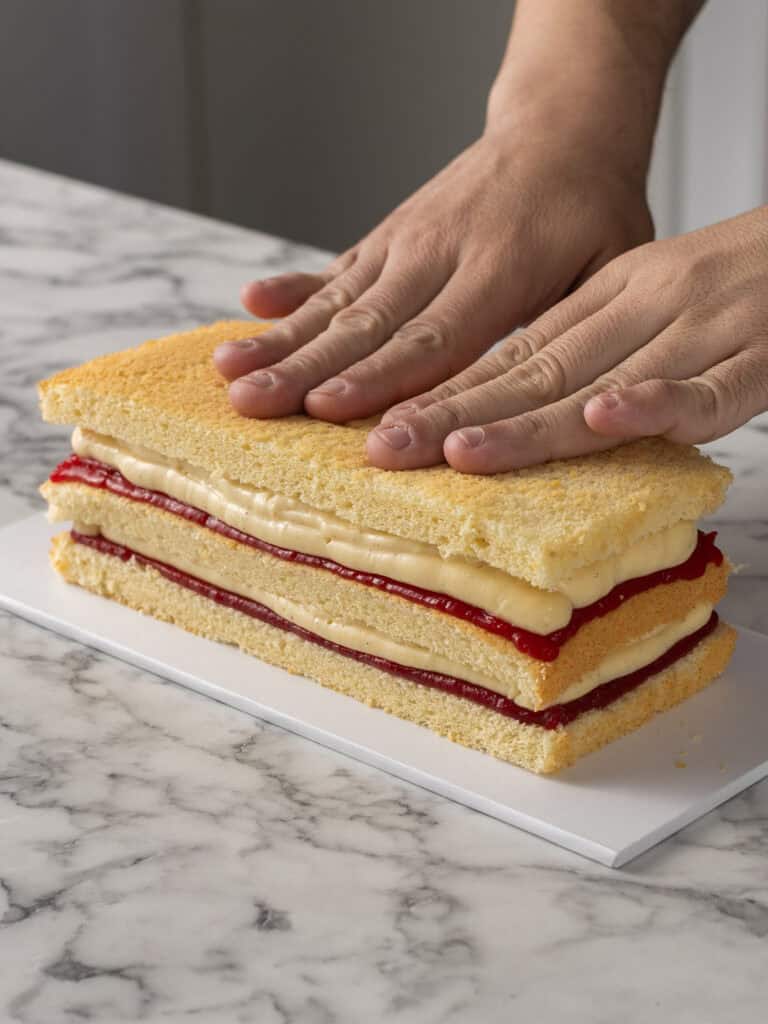
- Add the next cake layer and repeat until all the final cake layer has been added.
Making the Chantilly arch
I love how thick and creamy my Chantilly cream recipe is, and it sets perfectly because its stabilized with mascarpone.
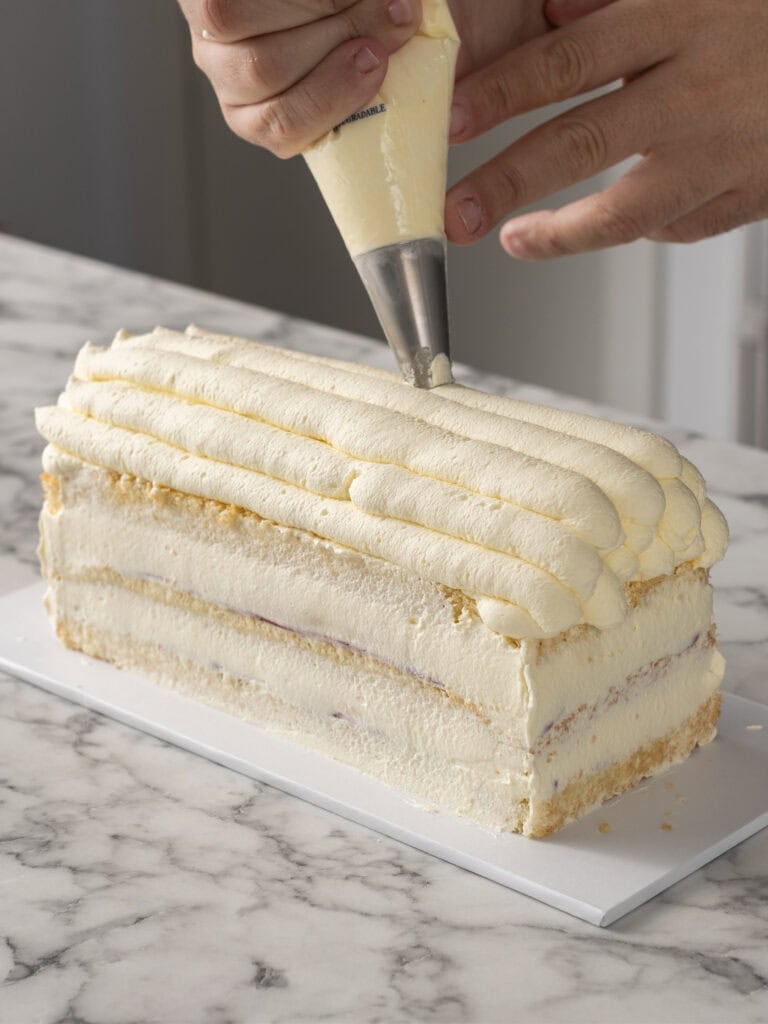
- To pipe the cream arch add to a piping bag fitted with a large round tip. Pipe lines of the Chantilly on top of the cake starting from one end, going to the other. You want some overhang to neaten up with a spatula when you’re done.
- Pipe the first layer of cream lines next to each other, then continue piping lines from end to end on top of the first layer of cream but go inward along the long end so you create an almost pyramid shape. Three stacked layers of cream will be enough.
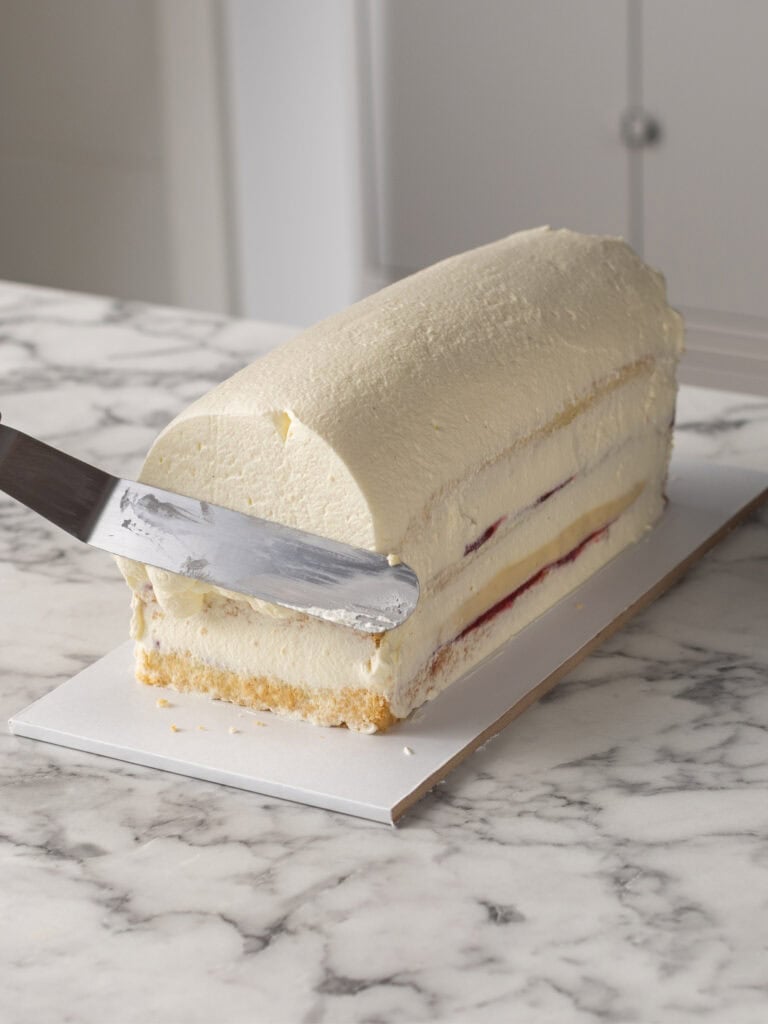
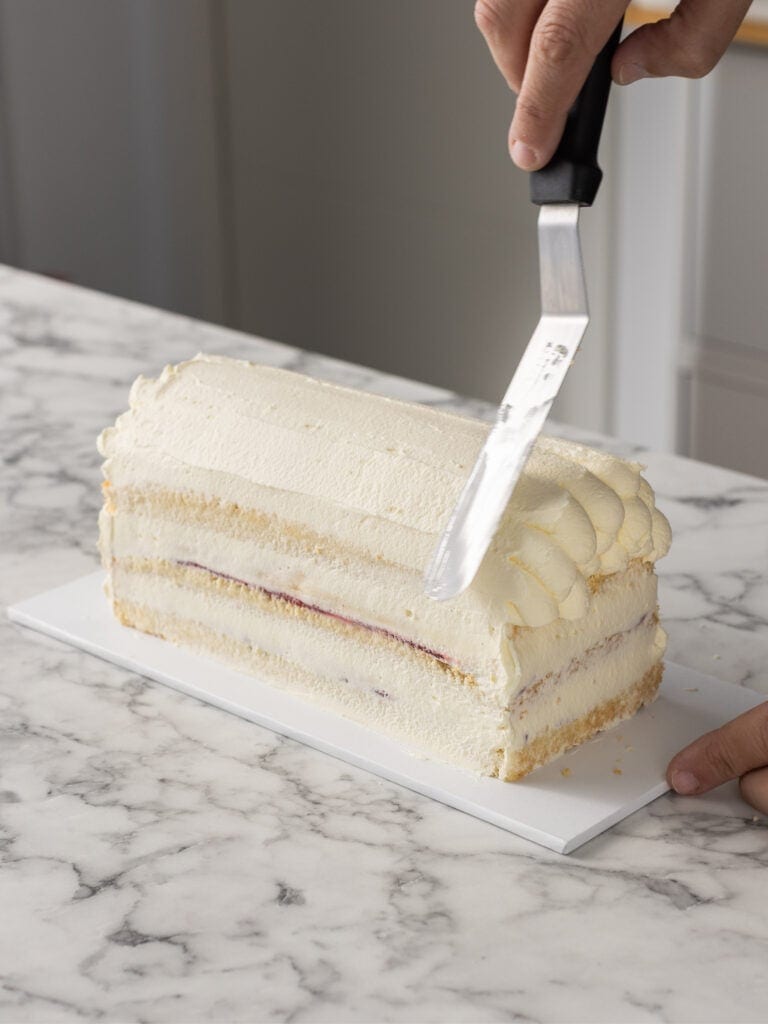
- Use an offset spatula to shape the cream into an arch shape. You might find you don’t need as much cream as you added as you shape it. I like to work length ways first, then use the spatula to go over it in the opposite direction to smoothen it all out.
- To finish shaping, use the spatula to straighten the sides starting from the top going down.
Chill time is super important for this cake
This cake needs time to chill. It’s all about letting the cake set and making sure that cream arch has time to firm up before the marzipan goes on top.
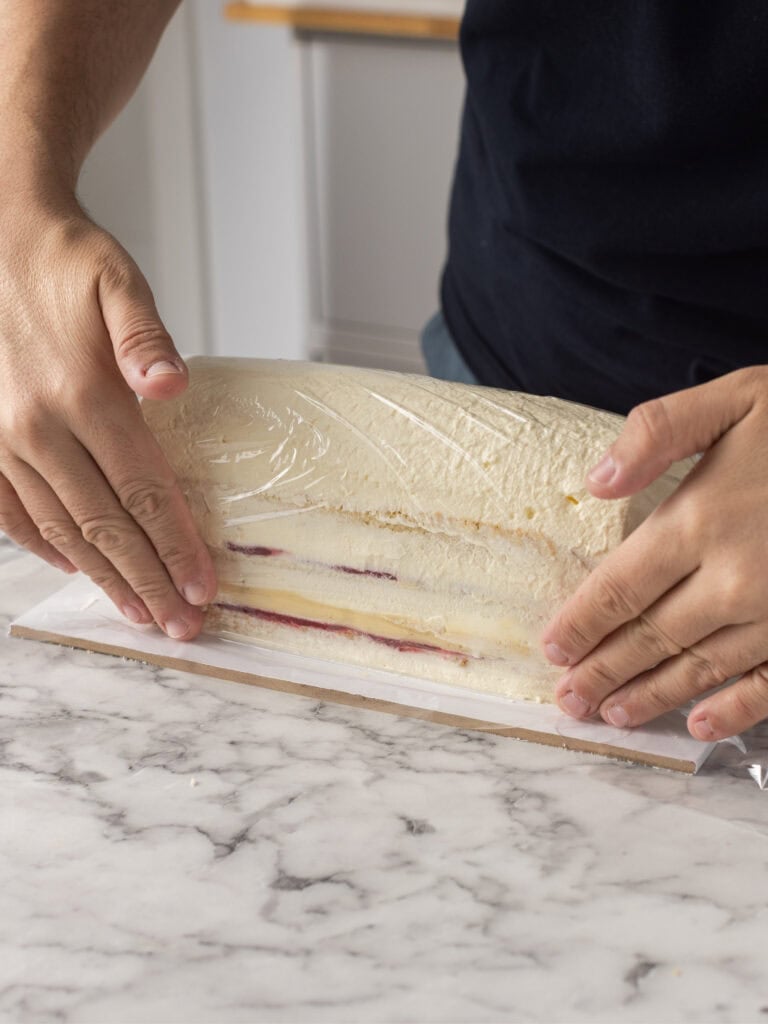
Technically 4 hours should do it, but in my testing letting it set overnight meant it was firm enough to slice into without it squashing the cream. It’s all about neat slicers!
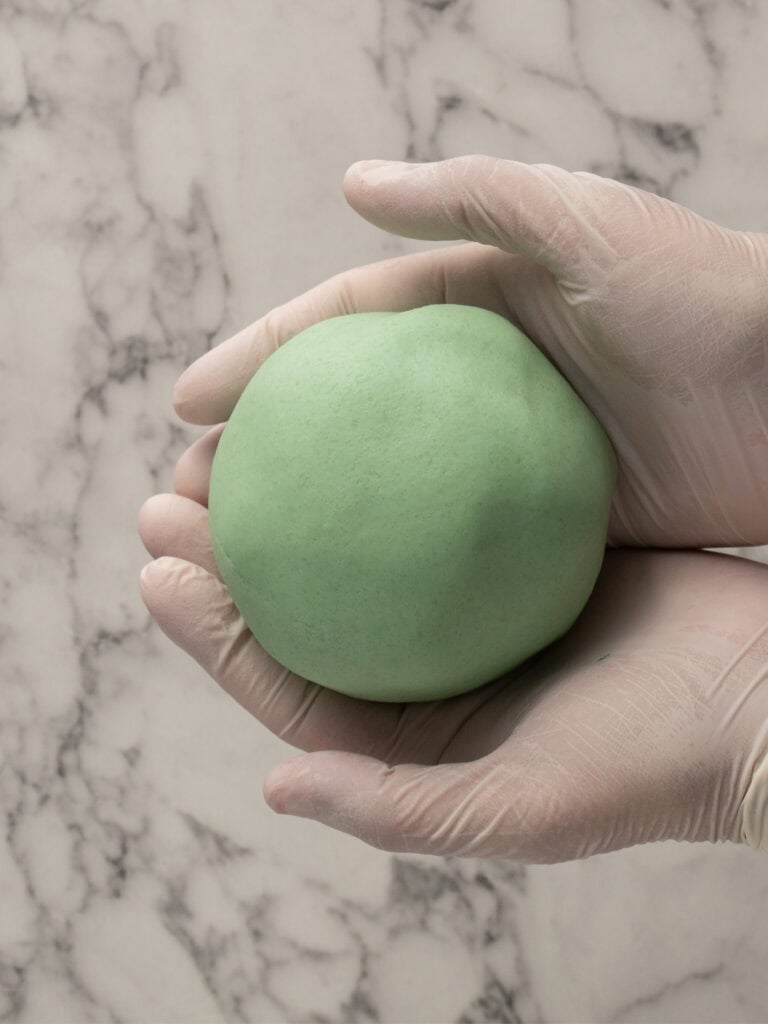
A note on that green marzipan
Use what you can get. I only have the Coles brand marzipan in my area here in Melbourne and it’s on the grainy side but it works. A higher quality brand will give you a smoother finish. You know what though? It all tastes great! I love the almond flavor it gives this creamy layered cake!
Oh, and don’t bother paying extra for pre-colored marzipan. Just color it yourself with green food gel (not liquid food dye) and knead it like bread dough until it’s evenly colored!
Rolling the marzipan out
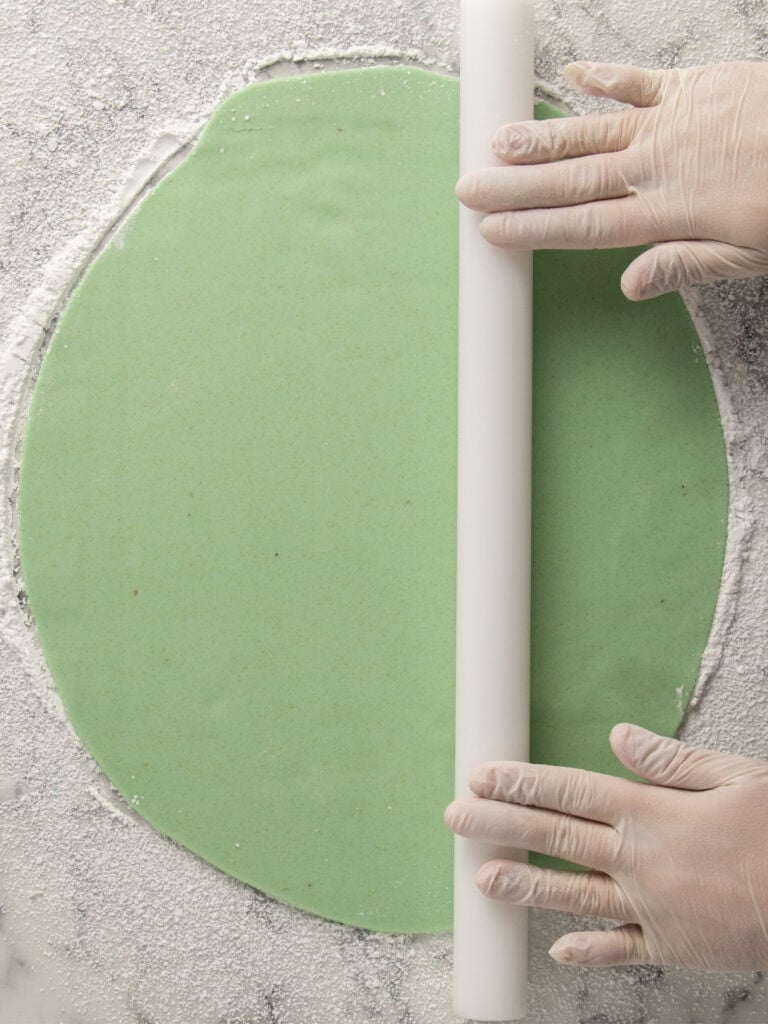
- Dust a generous amount of icing sugar (powdered sugar) on your bench. Then start rolling. The important thing here is to not get any sugar on the top of the marzipan so wipe it away from your rolling pin every time you roll. I also like lifting the marzipan away every couple rolls and dusting more sugar on top before rolling again.
- Roll it to about 40cm long and 35cm wide and aim to roll it out an even thickness. You don’t want it too thick, a bout 4mm for reference
Draping the marzipan on top
Listen, I don’t run a professional kitchen and neither do you, so we’re just going to try our best to make this look as neat as possible. And I’ve made this cake enough times that I’ve got some tips and tricks to share along the way.
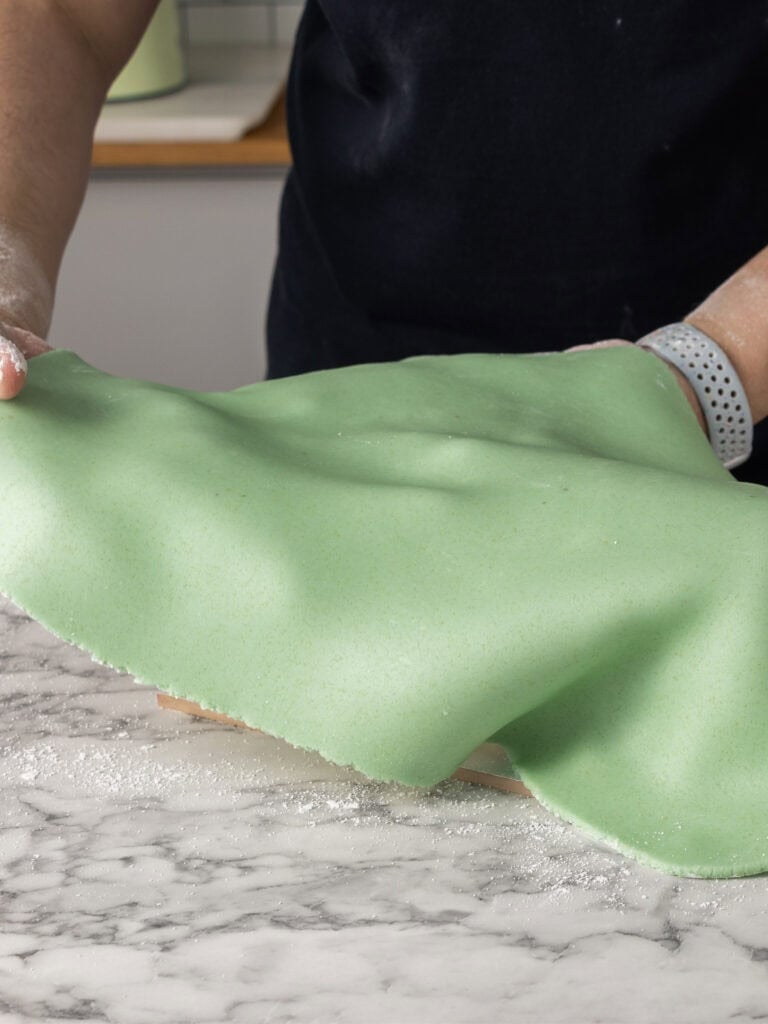
- Carefully slide your hands under the rolled marzipan and lift to drape over the cake.
- Use the heel of your hands to shape over the cake and smoothen the top (arch) and sides out. I start with the ends, get those as flat as I can and then focus on shaping the longer sides. Pinch the corners together as neatly as you can.
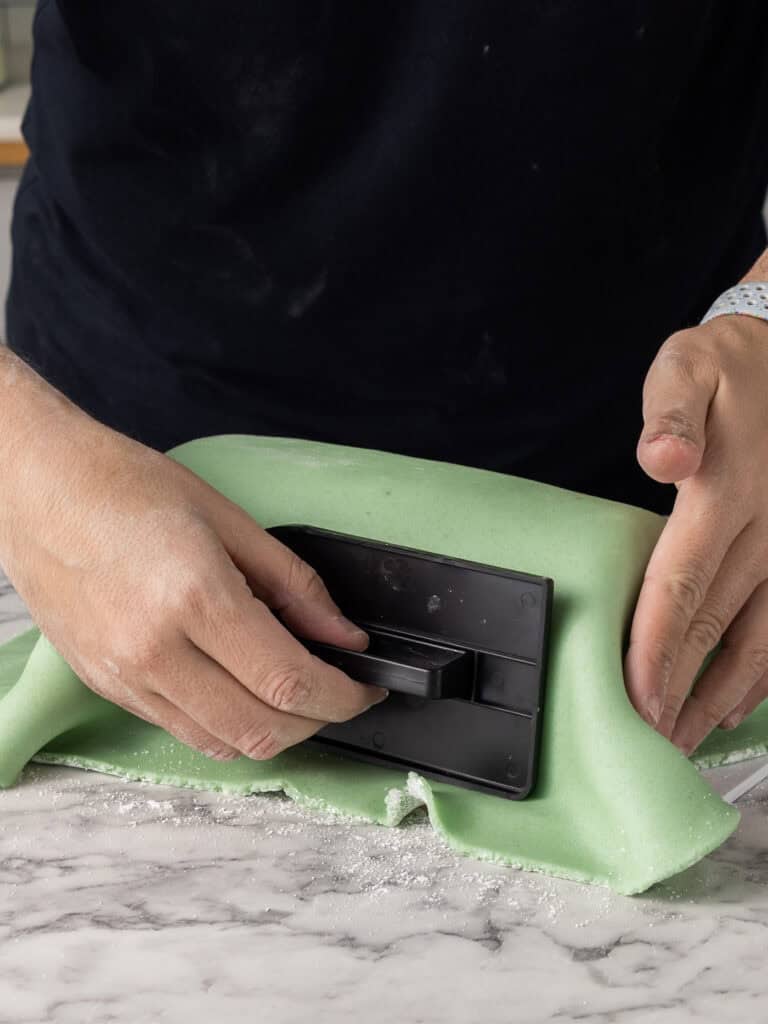
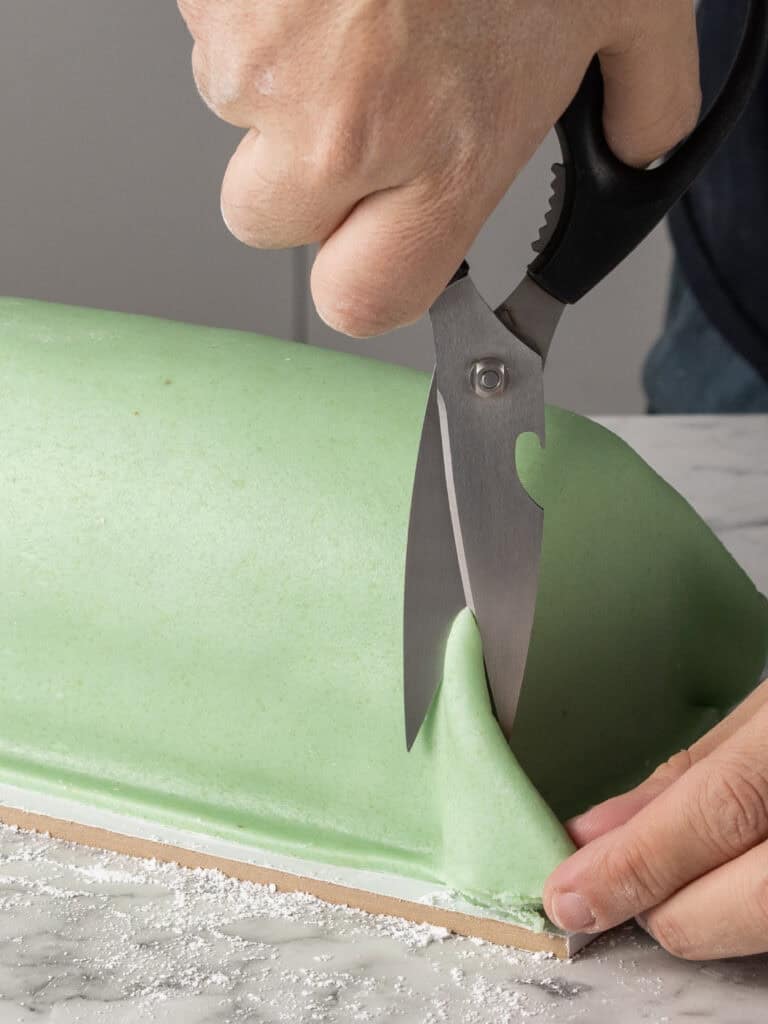
- To trim the bottom – Use a large knife or a pasta cutter wheel to trim away the excess at the bottom of the cake first. Don’t trim flush to the bottom of the cake. Leave a couple mm of it on the cake board because it shrinks a little when you trim it.
- To trim the sides – Use a pair of scissors to trim starting from the top of the pinched corners to the bottom. Use long strokes when cutting so you get them looking like neat cuts.
Tip – I like to cut less than needed at first, then work my way in. It’s better to do this than to cut too much off on the first go. The goal here is to make things look as neat as possible.
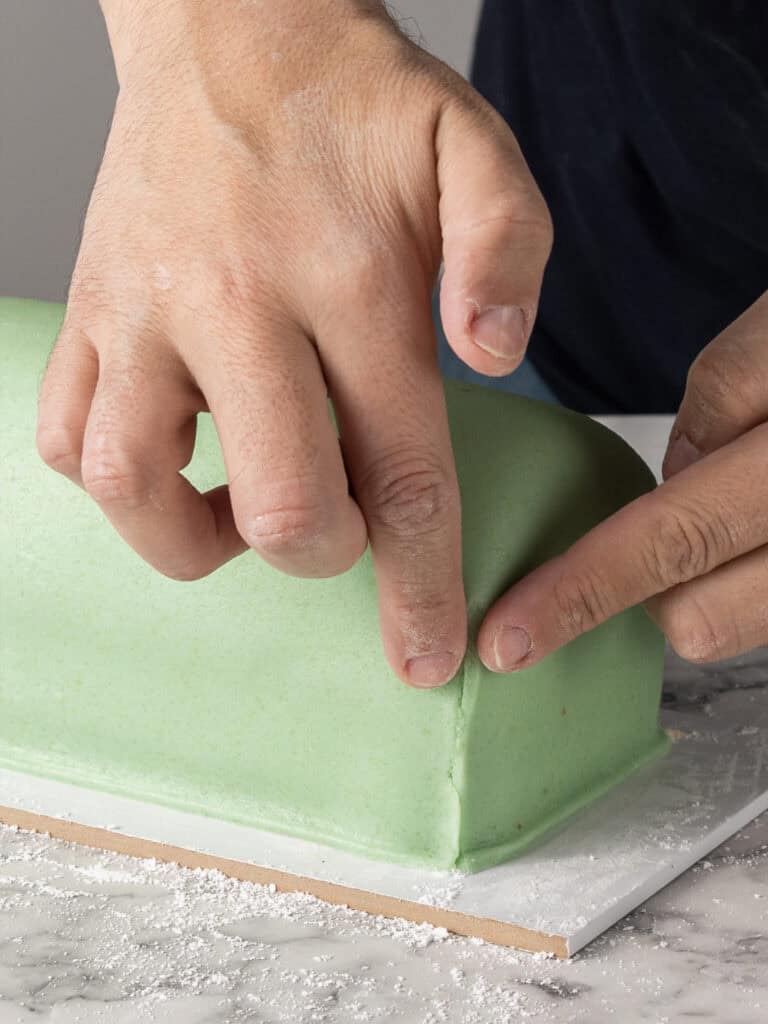
- Once you’ve got the corner neatly trimmed, pinch them together and gently pat down any small jagged looking bits with your finger.
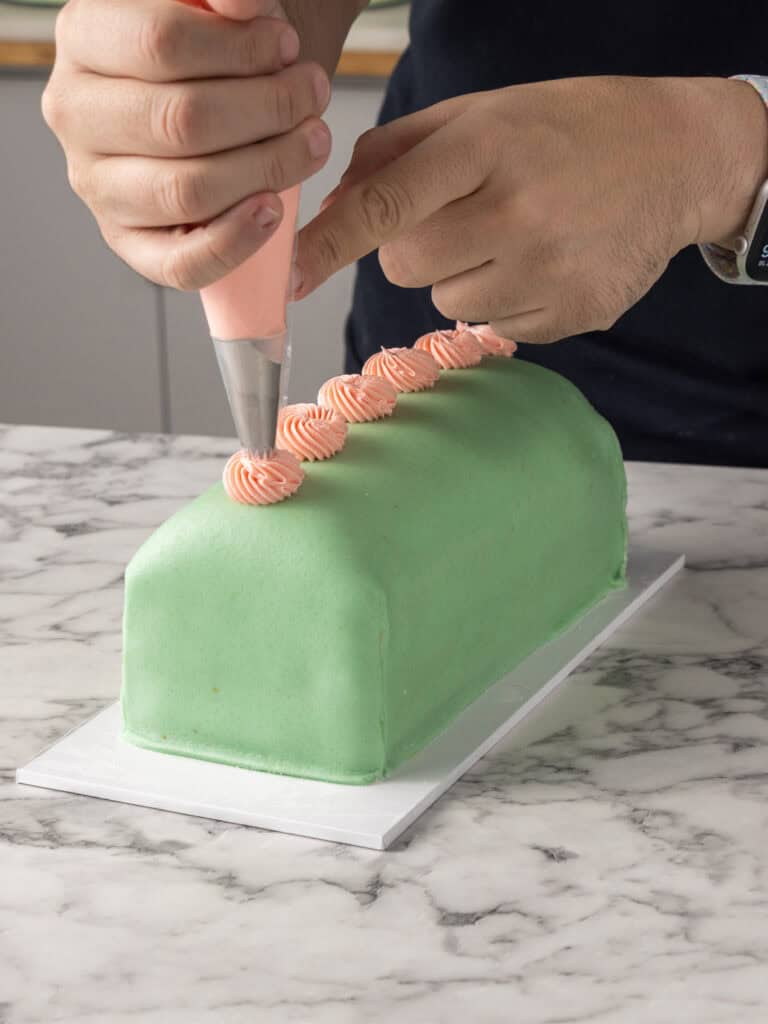
- This is totally optional but I made a very small batch of my buttercream and colored it in pink using a small amount of pink food gel. I piped little rosettes of frosting with an open star tip along the top of the finished cake.
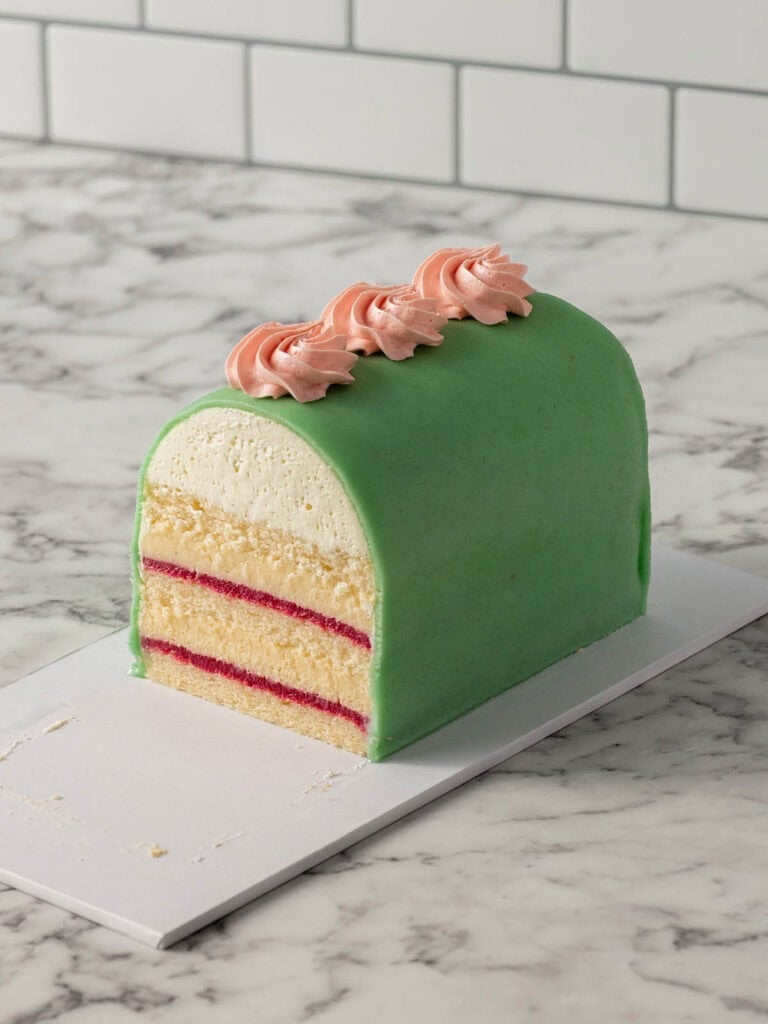
Slicing your cake
Use the sharpest knife you have to slice your cake! I actually sharpen mine before slicing this cake.
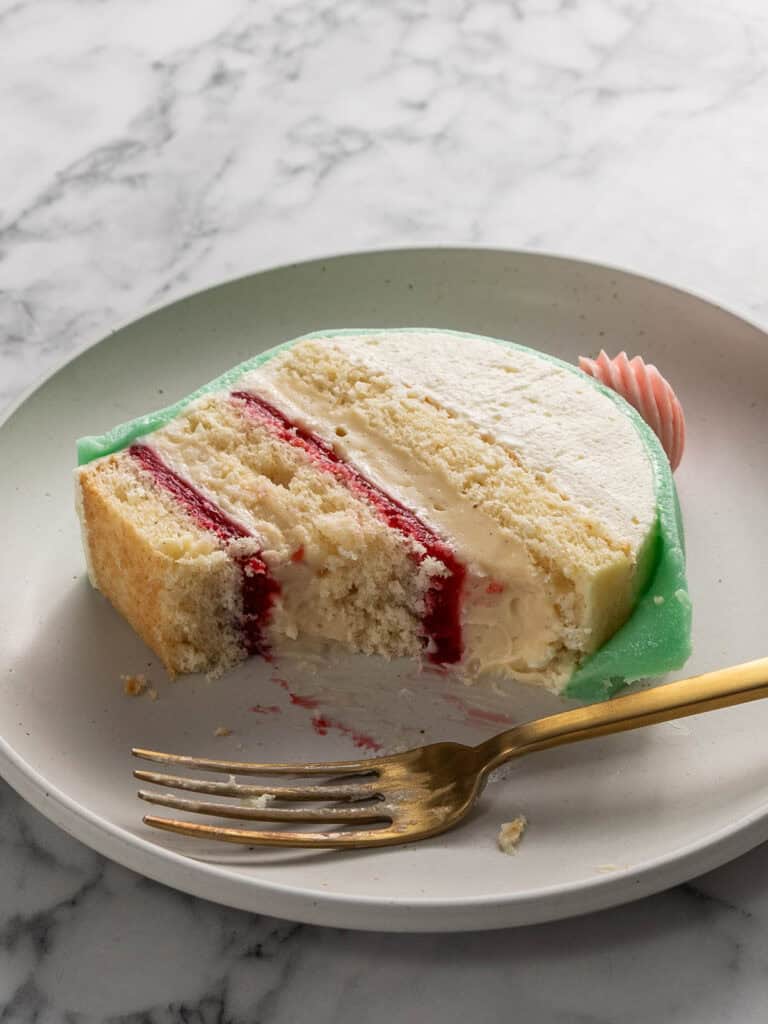
I like to score along the sides of the marzipan first, then slice from the top. Give people nice thick slices. It’s a very light dessert. This will serve about 8-10 people.
A Quick Baking Guide
If you’re new to baking or just want to brush up on the basics, these guides are a great place to start!
Loved the recipe? Let me know!
If you enjoyed this recipe, leave a star rating and comment below. It helps others find the recipe and keeps the baking community growing. Tag me on Instagram so I can see your version too!
Swedish Princess Cake
A soft and creamy Swedish Princess Cake with chiffon sponge, raspberry jam and pastry cream draped in marzipan.
Serves 10
Ingredients
Pastry Cream
- 45 g corn starch, corn flour
- 55 g caster sugar, superfine sugar
- pinch fine salt
- 3 egg yolks
- 375 g whole milk, not skim
- 7 g pure vanilla extract
- 7 g vanilla bean paste
- 60 g unsalted butter, cubed and cold
Raspberry Layer
- 180 g raspberries, frozen is best!
- 100 g granulated sugar
- 20 g corn flour, corn starch
- 50 g water, cold
- 1/4 tsp vanilla extract
Chiffon Sponge
- 95 g all-purpose flour, plain flour
- 25 g corn starch, corn flour, see notes
- 1 1/4 tsp baking powder
- Pinch of fine salt
- 75 g cold water
- 35 g vegetable oil
- 3 large eggs, 50-55g each, separated
- 1/2 tsp cream of tartar
- 130 g caster sugar, superfine sugar (not granulated)
- 7 g pure vanilla extract
- 7 g vanilla bean paste
Marzipan
- 500 g Marzipan, see notes
- 1 drop teal food gel, not liquid food dye
Chantilly Cream
- 125 g mascarpone, cold (see notes)
- 450 g heavy cream, cold (see notes)
- 14 g vanilla bean paste, or vanilla extract (see notes)
- 20 g powdered sugar, sifted (optional)
Buttercream (optional)
- 100 g unsalted butter, softened (see notes)
- Pinch fine salt
- 7 g tsp vanilla extract
- 10 g heavy cream, cold (see notes)
- 110 g powdered sugar
- 1 drop pink food gel
Instructions
Pastry Cream
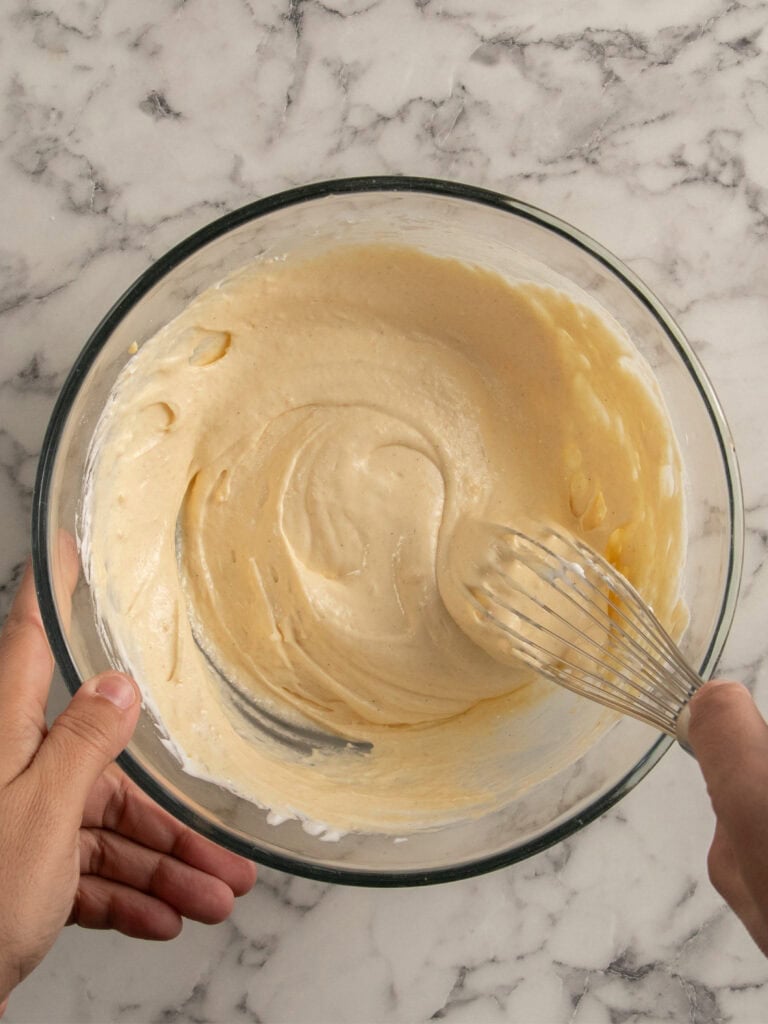
- Mix dry ingredients and eggs – To a medium sized, heavy bottomed stainless-steel pot (not non-stick), add the corn starch, sugar and salt and use a whisk to combine. Add the egg yolks and a little splash of the milk and whisk until smooth.
- Add the milk – Slowly add the milk, about 1/3 of it at a time, and whisk each time until all the milk has been added.
- Cook pastry cream – Place the pot on medium heat. Use a hand whisk to continuously whisk. Do not stop mixing or the pastry cream will become grainy. After about 3-4 minutes the mixture will begin to thicken. Continue whisking until the mixture begins to bubble. When it bubbles, whisk for 30 seconds, then take off the heat. If the mixture becomes lumpy, run it through a fine mesh sieve before cooling.
- Add butter – Add 1/4 of the butter and both vanillas and whisk until the butter is melted and well combined. Repeat until all the butter has been added. You want to do this slowly, so the pastry cream doesn’t split.
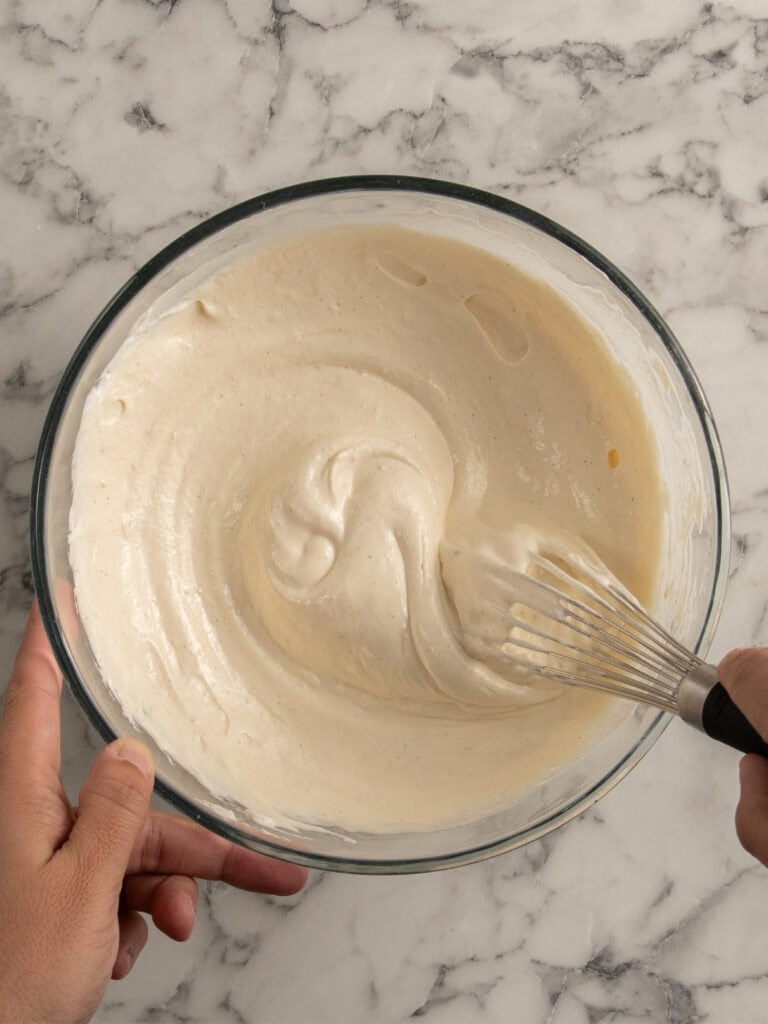
- Whisk to smoothen – Give the pastry cream a whisk to smoothen it out again. I actually like to transfer it to a larger mixing bowl and use my electric hand mixer to whisk it until smooth. This will break down the gelatin formation in the pastry cream and cause it to thin out a little, but it will still be thick enough to hold its shape in the cake layers.
- Transfer to a piping bag – Transfer it to a piping bag. You’ll use 250g per layer in the cake.
Raspberry Jam
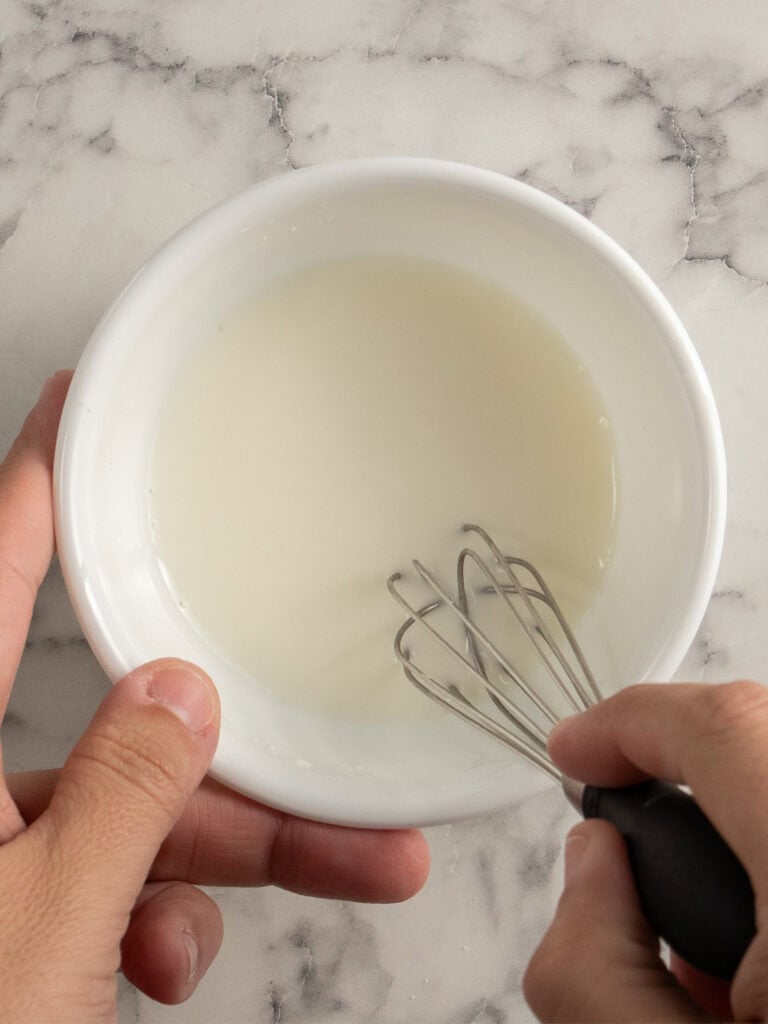
- Mix slurry – Add the corn starch and water to a small bowl and mix until well combined.
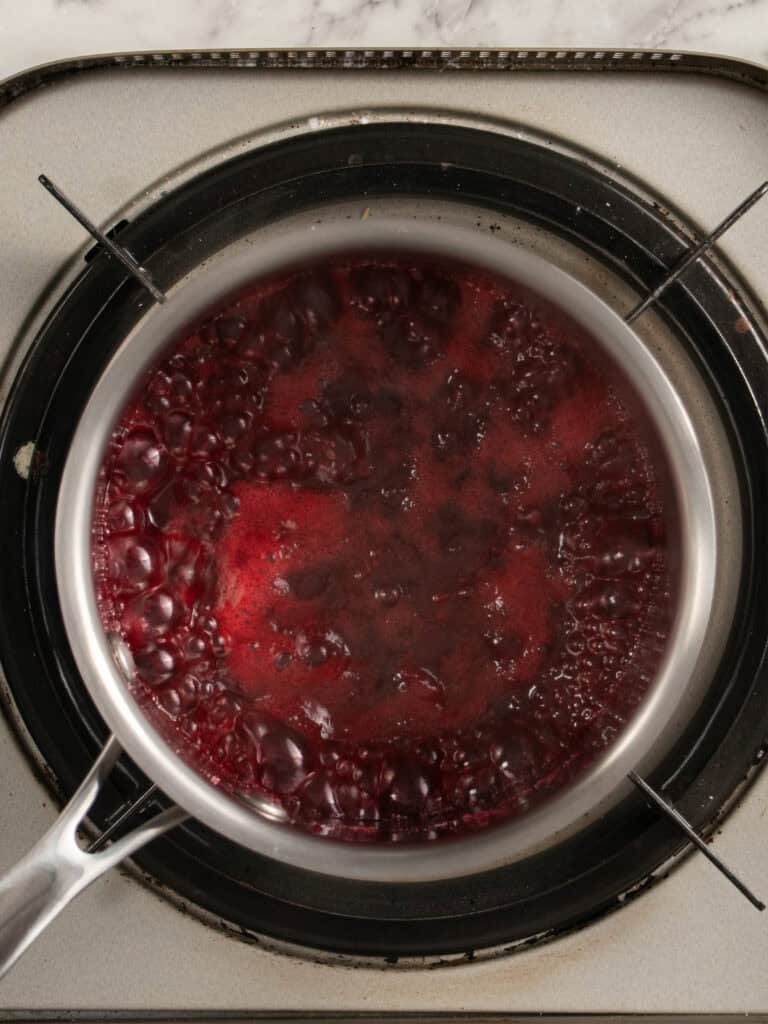
- Cook jam – Add the raspberries, sugar and lime juice to a heavy bottomed pot. Place on medium high heat and stir until it comes to a boil.
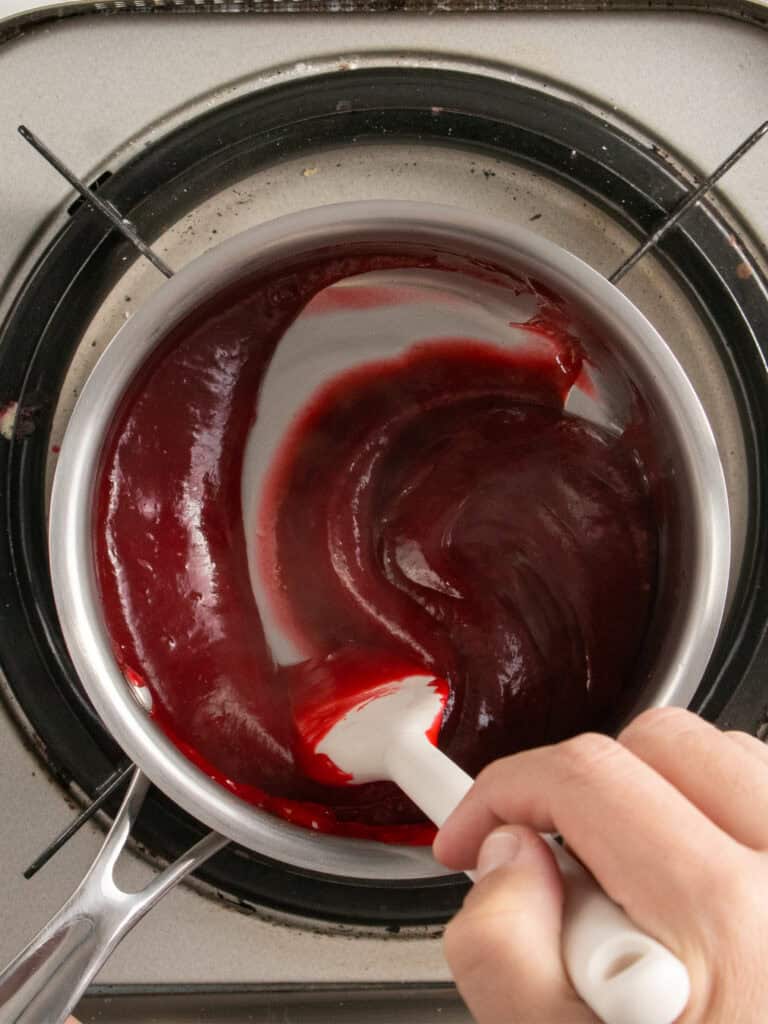
- Add the slurry – Add the slurry to the jam as you continue stirring. It will begin to thicken and then become translucent. Once it begins to boil, take off the heat.
- Cooling – Transfer to a heat proof bowl or dish and cover the surface with plastic wrap. Let it cool down completely.
- Transfer to a piping bag – Once the jam has cooled completely, transfer it to a piping bag. You’ll use 100g per layer in the cake.
Chiffon cake
- Preparing your oven – Preheat your oven to 165C / 330F (fan off), 145C / 300F (fan on). I like baking with the fan off for an even rise. Position your rack in the middle of the oven.
- Preparing your cake tin – Rub cold butter on the bottom (not sides) of a 22x33cm / 9×13-inch cake tin. You don’t want any butter on the sides of your tin because you want the sponge to stick so it holds its shape as it cools instead of shrinking away.
- Combine dry ingredients – Run the flour, corn flour, baking powder and salt through a sieve into a large mixing bowl. Use a whisk to combine. Set aside.
- IMPORTANT! To clean your bowl for the meringue – To ensure your eggs whip up properly add 1/2 tsp of lemon juice or white vinegar around a large glass or metal mixing bowl and use a paper towel to wipe dry. This removes any grease in your bowl, so your egg whites whip properly. Avoid plastic bowls as they hold onto grease.
- Make the meringue – Add the egg whites and cream of tartare to your mixing bowl. Use an electric hand mixer or a stand mixer fitted with a whisk attachment to whisk on medium high speed for 1 minute until frothy. Then, while the mixer is still running, slowly add the sugar 1 tbsp at a time. This will allow the sugar to dissolve properly and should take about 3 minutes for all of it to be added. Continue whisking until the meringue reaches stiff peaks, about 8-10 minutes (usually 8). The meringue should hold it’s shape completely when the whisk is lifted up.
- Add water, egg yolks and oil to dry ingredients – Add the water, vegetable oil and egg yolks to the bowl with the dry ingredients and use the whisk to combine until smooth and no lumps are showing. You want to do this when the meringue is almost done whipping.
- Fold meringue into batter – Add 1/3 of the meringue into the egg yolk mixture and use a balloon whisk or spatula to fold through until the batter is uniform. No meringue streaks are showing. Then repeat until all the meringue has been added. You will have a thick, fluffy batter.
- Bake – Gently pour the batter into the cake tin. Use a spatula or spoon to spread evenly. Bake in the middle rack of your oven for 25-27 minutes or until lightly golden on top. Once it’s baked, let it cool in the tin to room temperature.
- Taking out of the tin – Gently run a knife around the inside of the cake tin to loosen it. Place a large cutting board on top and flip over so the cake comes out on the board. Use one hand to hold the top of the cake against the board as you flip it right side up (baking paper on the bottom), onto your workbench.
- To trim the cake – Use a large, serrated knife or cake leveler to level the cake to 2cm in height. Use a ruler to cut out 9cm wide cake strips. You’ll have 3 cake layers all up. Excess cake: It might seem like there’s a lot of excess cake left over but less cake would be much harder to trim. Discard the excess cake or turn it into a single serve trifle with cream, fruit and jelly!
Chantilly cream
- Prepare mascarpone cheese – Add the mascarpone to a large mixing bowl (glass or metal) and use a spatula to stir and break up as some brands can be firmer than others. This helps break it up a little to prevent lumps in your whipped cream.
- Whip remaining ingredients – Add the cold heavy cream, powdered sugar and vanilla to the mascarpone. You can use an electric hand mixer or a stand mixer with a whisk attachment to whip to stiff peaks. I actually find it easier to get the right texture with a hand whisk. You’re aiming for a smooth, stiff whipped cream that holds its shape but still looks silky.
- Add to a piping bag – Add the cream to a large piping bag fitted with a large round tip. Pop it in the fridge until you’re ready to use it.
Layering the cake
- Peel away the baking paper from the bottom of the first layer of cake and place on top of your cake board. Pipe a perimeter of jam around the cake layer (100g per layer), then fill it in with more jam and spread using an offset spatula as evenly as you can. That’s really important because it’ll determine how neat your cake looks when you slice into it. Add half the pastry cream (250g per layer) and spread it evenly as well. Then add the next layer of cake and repeat the process adding the final layer of cake on top.
Adding the cream arch
- Piping the layers – Pipe lines of the Chantilly on top of the cake starting from one end, going to the other. You want some overhang to neaten up with a spatula when you’re done. Pipe the first layer of cream lines next to each other, then continue piping lines from end to end on top of the first layer of cream but go inward along the long end so you create an almost pyramid shape. Three layers of cream will be enough.
- Shaping the arch – Use an offset spatula to shape the cream into a arch shape. Use the spatula to straighten the sides starting from the top going down.
- Add a thin layer of cream and chill (4 hours) – Add a thin layer of cream around the sides of the cake. Carefully cover the cake with a large piece of plastic wrap and chill in the fridge for 4 hours at a minimum. Overnight is best and is what I do because it helps everything set properly and makes slicing into the cake easy.
Vanilla Buttercream Frosting (optional)
- Cream butter – Add your softened butter, salt and vanilla extract to a small bowl. Beat on medium high speed for 5 minutes (I used an electric hand mixer) until pale and fluffy. You will want to scrape down the bowl halfway through with a spatula to ensure everything beats together evenly!
- Add sugar – Scrape the bowl down using a spatula and add all of the sifted powdered sugar. Begin beating on low speed at first. When no dry ingredients are showing, turn the speed up to medium high speed again and beat for 5 minutes.
- Add cream – Finish by adding the heavy cream and pink food gel. Beat in on medium high speed for 2 minutes. Add to a piping bag with an open star tip when you’re ready to use it.
Marzipan and Decorating
- Coloring the marzipan – Add a very small dab of teal green food gel to the marzipan. Put on some gloves if you want to save your hands from turning green! Knead the marzipan until it’s evenly colored. If you feel it needs to be darker, add another very small dab and knead until you get the color you want. We’re not going for pastel here but not bright either.
- Rolling the marzipan out – Dust your work bench very generously with icing sugar (powdered sugar) and I mean generously! Start rolling the marzipan out. The key thing here is to get no icing sugar on the top of the marzipan. Carefully lift the marzipan and shift it over, then dust more sugar on top. Roll the marzipan out to be about 40cm long and about 35cm wide and aim to roll it out an even thickness. You don’t want it too thick, a bout 4mm in thickness if you’re measuring.
- Covering the cake -Carefully slide your hands under the rolled marzipan and lift to drape over the cake. Use the heel of your hands to shape over the cake and smoothen the top (arch) and sides out. I start with the ends, get those as flat as I can and then focus on shaping the longer sides.
- Cut away excess marzipan at the bottom – You can use a knife or a pasta cutter to do this. Don’t cut flush to the sides of the cake, leave just a couple mm of marzipan on the board. It shrinks a little after you cut it.
- Cutting the ends – Pinch the corners of the marzipan where they meet. Use scissors to slowly slice through as neatly and as straight as you can. Then press/pinch the cut sides into each other. They’re not going to look super neat, we’re not professional bakers here and nobody will see those ends after you’ve sliced into the cake. Just get it as neat as you can. The key thing is to not cut too much. Cut the excess off first, then keep cutting as straight and nearly as you can until it all looks flush where the corners meet.
- Piping frosting on top (optional) – Right before you add the frosting to the piping bag, give it a mix in the bowl with a spatula to smoothen it out. It’ll give you neat looking roses. Pipe little roses along the top.
- To slice your cake – Use a the sharpest knife you have! I like to score along the sides first, then slice from the top. Give people nice thick slices. This will serve about 8-10 people.
Notes
Let’s talk about cake boards – You want to use a strong and sturdy cake board for this cake to ensure it looks as neat as possible. A round plate or even a long plate will prevent you from getting the sides as neat as possible. I bought my cake board from my local cake supply store. They’re available online too. Ensure you get a plywood board one which is sturdy. Not a paper cardboard one which bends easily. I ended up having to trim my cake board in half to measure 20 x 14cm / 7 x 5-inches.
Making ahead of time – In my testing I saw that if I made this a day in advance (marzipan on) the marzipan began to weep and soften a little. It’s not a huge issue, you can just wipe it away but just keep that in mind. Every single element of this cake can be made, and it can be constructed up to the point of adding the marzipan if you want to stop the weeping. The marzipan will stay fresh and wont weep for a good 3-4 hours before serving. Any more than that, it will weep.
Corn flour – Also known as corn starch is what’s going to give you a super soft sponge. I also use it to thicken the custard and strawberry glaze.
Caster sugar – Also known as superfine sugar is best for this recipe when making the meringue. It dissolves into the meringue much quicker which means you lessen the risk of overwhipping. Granulated sugar will not work for the meringue but can be used for the pastry cream and syrup.
Marzipan – Aim to get the best possible marzipan you can. This is different from fondant which will melt. Marzipan is made from almond paste and is kind of like fondant but tastes way better. I used the Coles brand one, it’s all I could find close to me. It’s the best one I had available to me. If you can get it already green, great, if not, just use a very small dab of leaf green food gel (not liquid food dye) and knead until you get the color you want.
How to soften your butter
Make sure your butter is softened for this recipe. It’ll help with the structural integrity of the frosting. I have a full guide on how to properly soften butter on the blog, but for reference, softened butter is 18C / 65F on a thermometer. Cut it into cubes and let it sit at room temperature for 1-2 hours until it reaches this temperature to until it’s soft enough that when you press on it with your finger, it leaves an indent with some resistance.
Storage – Swedish princess cake can be stored in an airtight container, in the fridge for up to three days.
Nutrition – is an approximate and is based on per slice. This serves 20.
A note on measurements – This recipe uses weight measurements for the most accurate results. Cup measurements can vary depending on where you are, which affects the precision needed for a recipe like this. Here is where you can learn more about how to measure ingredients using digital kitchen scales.
Nutrition
Calories : 868kcal
Carbonhydrates: 74g
Protein: 13g
Fat: 53g
Saturated Fat: 25g
Polyunsaturated Fat: 4g
Monounsaturated Fat : 18g
Trans Fat : 1g
Cholesterol: 218mg
Sodium: 130mg
Potassium : 357mg
Fiber: 3g
Sugar : 51g
Vitamin A: 1480IU
Vitamin C: 5mg
Calcium: 180mg
Iron: 2mg
Nutrition Disclosure
Gave this recipe a go?Mention @thescranline or tag #thescranline!
previous post
10 comments
Read through intstructions. No egg yoke is mention in pastry cream?? I don’t see the instructions for adding more cream….
Hi S! Sorry about that, have gone through and updated the recipe! N x
The video shows using way more (maybe twice as many) eggs than the recipe. Were you doubling the recipe in the video? Thanks
i Robin! I’ve had to make an adjustment to the recipe over time. I will be working on a new swedish princess cake recipe in the new year! Nx
MMMMMMMMMMMMMMMMMMM now this is a tasty cake. ! yummy yumy i enjoy making. .. … and eating! very g ooodo they should make MORE like this in scandonavia mmmm. Merry christmas!
Thanks Gestapo! N x
Looks delicious.
But fyi… Real swedish princesscake IS made with pastry cream 😉
Not stabilized whipped cream 😉
I live in Denmark (neighbour to Sweden) and has had my share of Real swedish princesscakes 😉
Good to know! Thanks for the comment Rikkie! N x
Hi Nick,
I cannot wait to try this. Please could you say how much cream/milk goes into the custard and then the amount of cream used to whisk in after. It doesn’t state this in the recipe. Just says put in the remaining cream. It says 750ml on the recipe but not how much to use for the custard and leave for the cream.
Thank you for you time.
Hi Sharni! I’ve gone in and updated the pastry cream recipe so that it works better wit this recipe! N x