Piped Butter Cookies with Raspberry Jam (Viennese Whirls)
My Piped Butter Biscuits are buttery, crumbly, and melt in your mouth. Also known as Viennese Whirls, yhey’re not overly sweet, so the fresh raspberry jam filling and thin, crisp chocolate coating add just the right pop of sweetness. They’re easy to make and a dream to pipe.
Hey team, Nick here! I bloody love a classic European cookie. There’s something about their simplicity that makes them invite. Traditionally, these are shaped as whirls (hence the name), but I think they work better as finger shapes. They’re easier to pipe, dip into the chocolate coating and eat!

Related – if you love a simple European biscuit, try my soft and chewy amaretti cookies. I have an indulgent chocolate amaretti too!


Six rounds of testing went into creating this recipe. The first problem I had was making them keep their shape. The first batch melted into a puddle. More flour fixed the problem but I nearly got RSI from how hard they became to pipe. Turns out, a little corn flour will help them keep their shape while a little bit of cream will make the dough soft enough to pipe. More on how to pipe them below!
One of my favorite things is the little bit of orange zest in the cookie dough. It helps brighten them up a little, but it’s optional. The homemade raspberry jam adds a soft tartness, while the chocolate gives a little boost of sweetness. It’s all just perfectly balanced and frankly a delicious cookie recipe you’ll want to keep coming back to.


These go so well with my home made raspberry jam
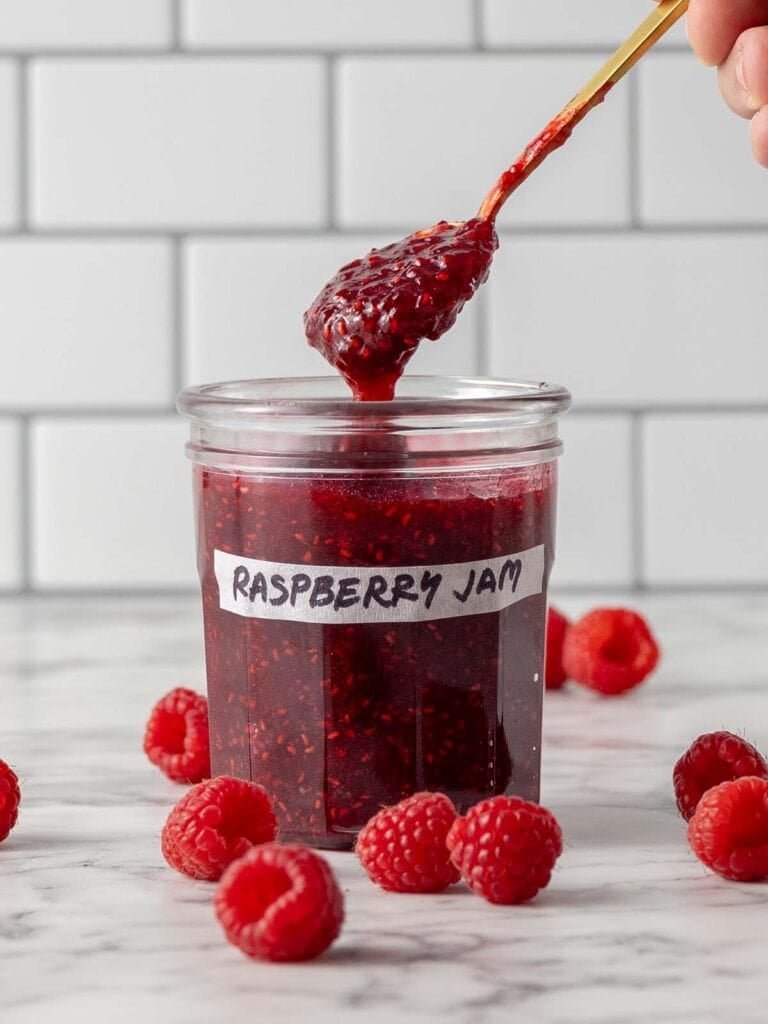
I’ve always wanted a raspberry jam recipe on the blog because it can be used in so many desserts. I use it in my lamington cake because its nice and thick and doesn’t ooze out of the cake. It’s also a small enough batch that you can use it for most desserts like these cookies!
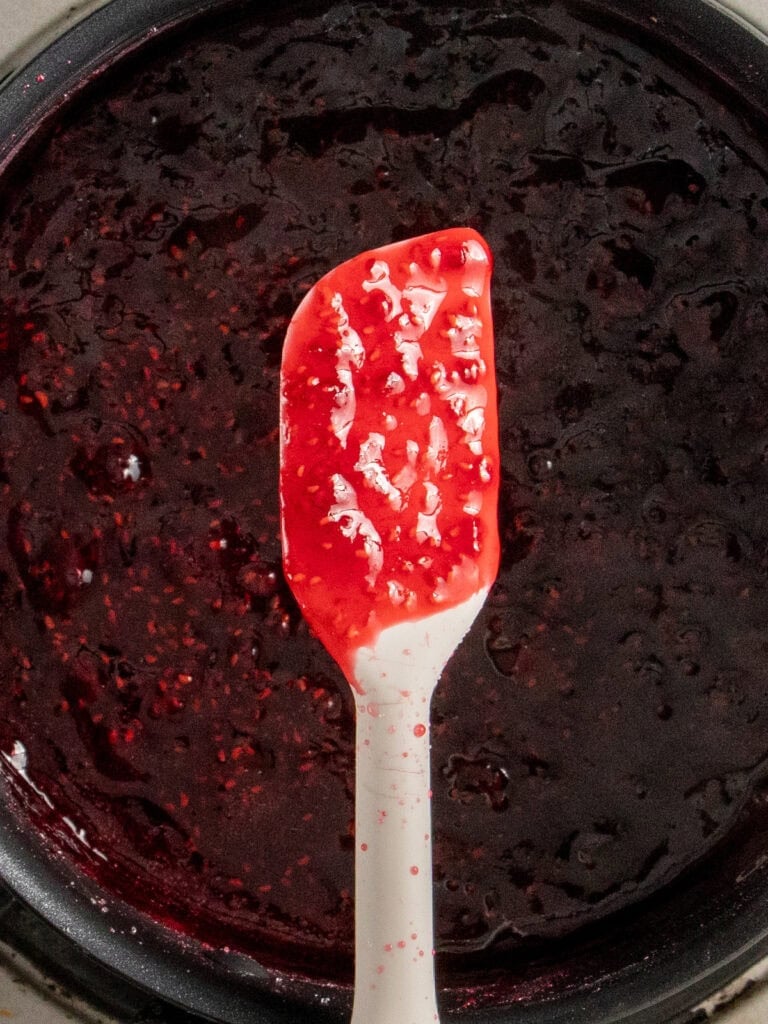
- Start by simmering the raspberries, sugar and lime juice until slightly thickened. It’ll take about 10-15 minutes.
- Check how set it is by adding a dab on a cold saucer that’s been in the freezer and let it cool. If it doesn’t slide around it’s done!
BONUS: This recipe works with either frozen or fresh raspberries. Oh and if you want to skip making your own jam, you can absolutely use store bought jam.
It’s really really important that your butter is soft.
It is really important that your butter is soft. I mean really soft. If it is not, your dough will be too firm to pipe. Just make sure it is not melting.

How to soften your butter – I soften mine by cutting it into small cubes, putting it in a heatproof bowl, and microwaving it for 10 seconds at a time, mixing with a spatula until it is very soft. You want it soft enough to spread on very fresh bread without tearing it.
How to make the biscuit dough


- Whip the butter, sugar, salt, vanilla extract and orange zest together until creamy. Don’t overwhip it though.
- Add the flour, corn starch and cream and mix to form a dough.

- It should be a quiet soft. Almost at a spreadable consistency, but still something that can hold its shape.
Piping your biscuits
I like to use a medium sized open star tip to pipe my cookies. Fit it on the end of a piping bag and fill the bag halfway with soft cookie dough.
Template: I drew up a piping template to help me get the same sized cookies. That makes pairing them up much easier and makes everything nice and uniform.
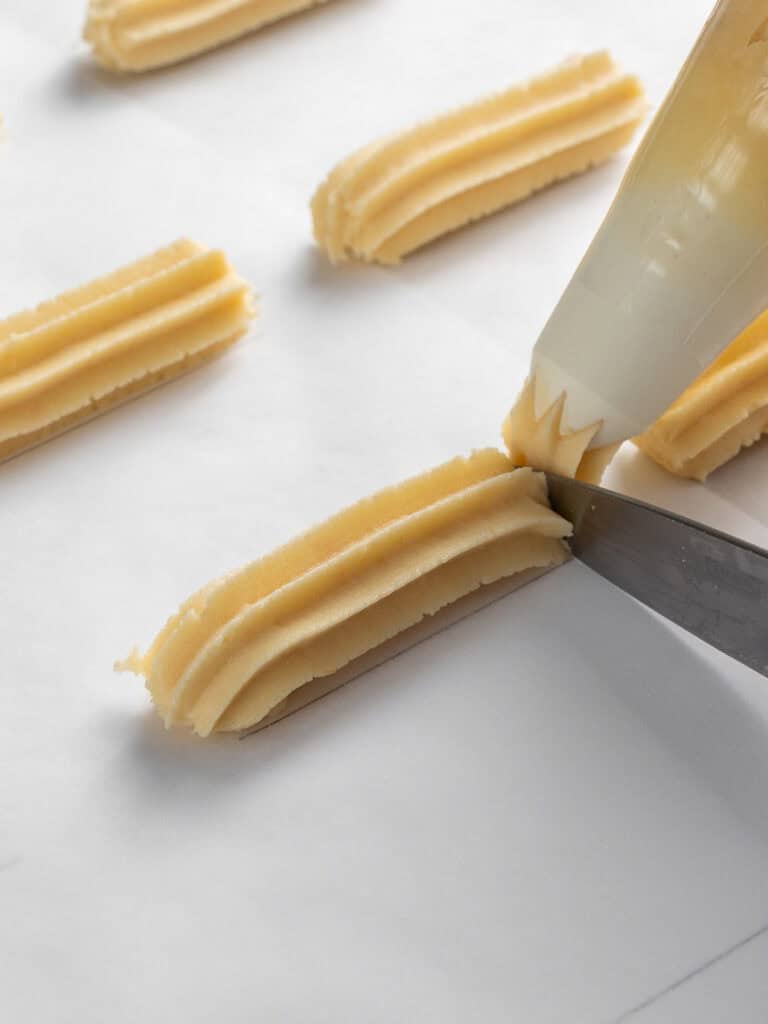
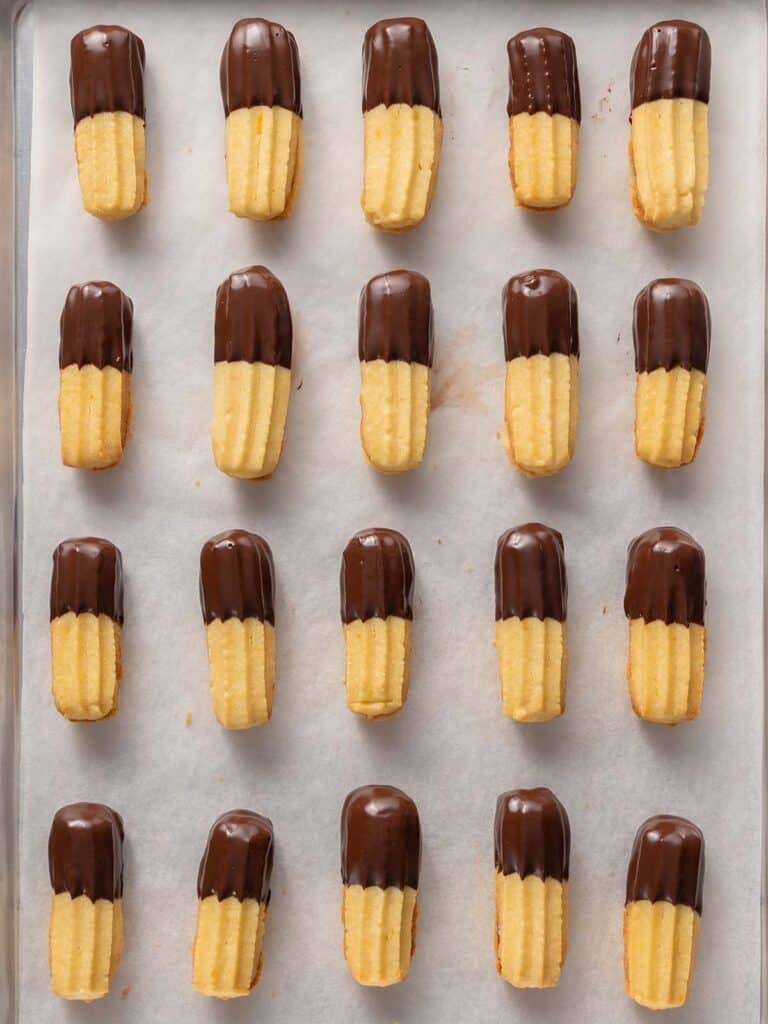
- Line your two half sheet baking trays with baking paper and pipe your biscuits 7cm long.
- Use a small sharp knife to cut the end of the biscuit to neaten it off before you pull the piping bag away. It’ll be 16 cookies on each tray.
Chilling and baking – One of the best ways to make sure your biscuits keep their shape is to chill them in the fridge for at least 30 minutes. Once you’ve chilled them, bake until golden on the bottom.
Making the thin chocolate coating
What I love about this chocolate coating is that it tastes great but its thin so it gives you a nice thin coating.
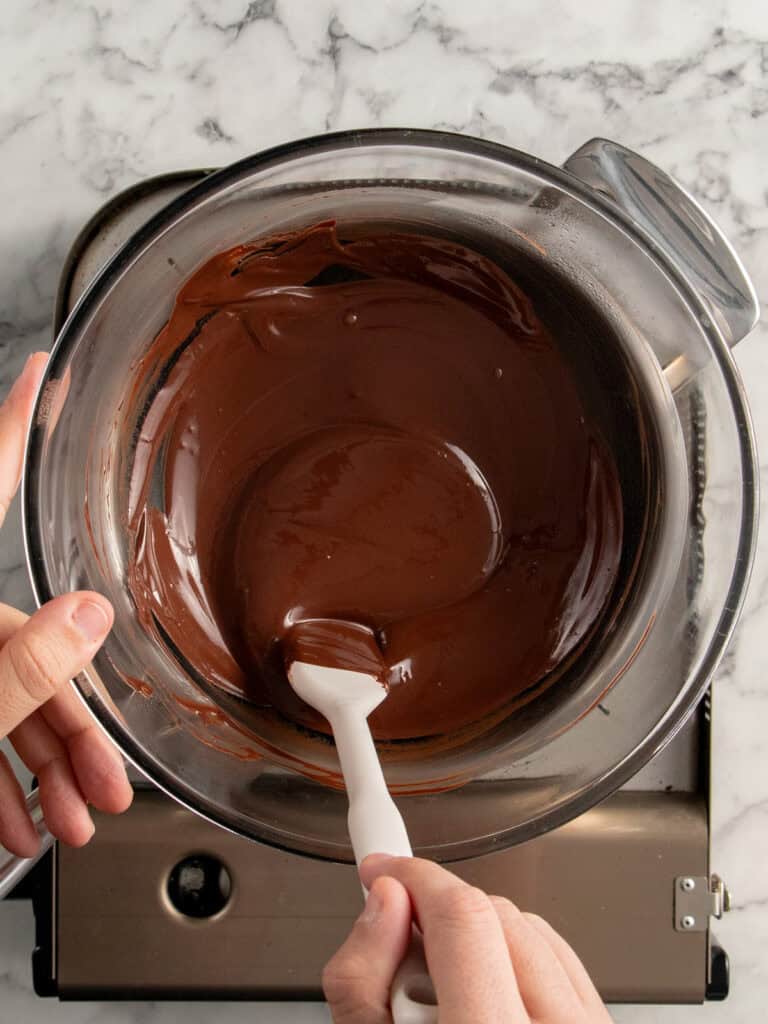
The best way to do melt the chocolate and oil together is in a double boiler. Bring a large of water filled about 1/3 of the way with water to a gentle boil. Place a heatproof bowl on top making sure the bottom of the bowl doesn’t touch the water. Add the chocolate and oil and stir until completely melted. You’ll want to let your chocolate cool for about 20 minutes before dipping the cookies in.
Tip: I like transferring the melted chocolate into a smaller bowl so that I can have enough depth to dip my cookies in. Otherwise if you leave it in the larger bowl you’ll only have enough depth to coat about 1/4 of each cookie.
My tips for putting them together

- You want to start by pairing up the baked cookies. Some still might be wider or longer than other. Just do your best to pair them up.
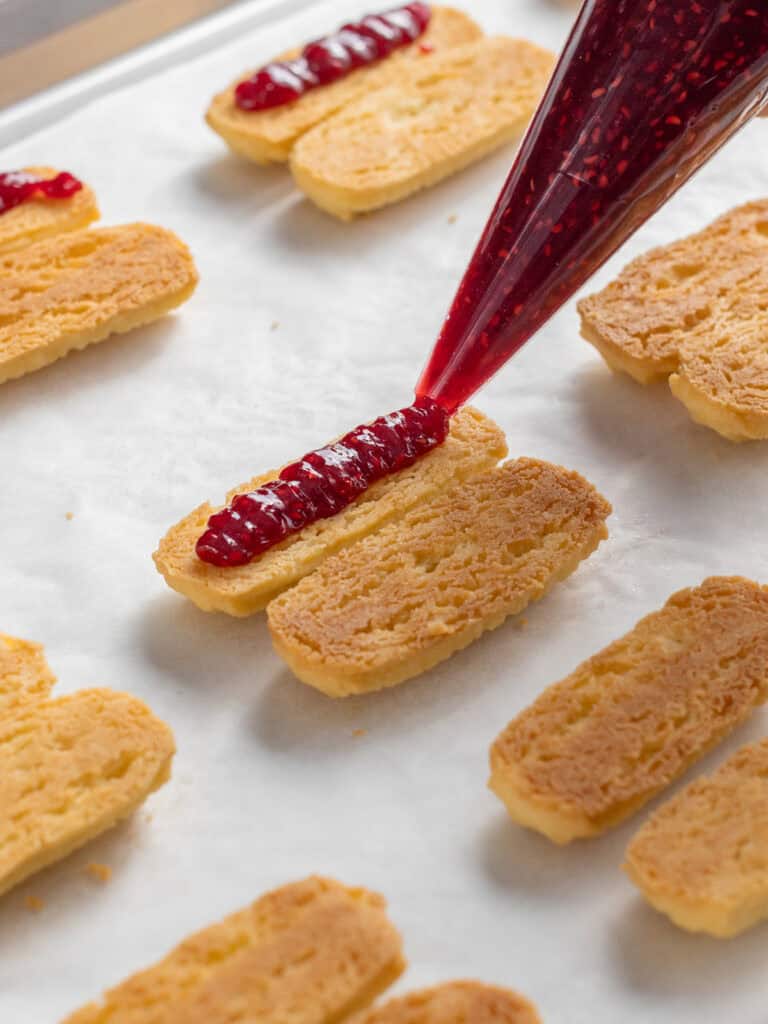

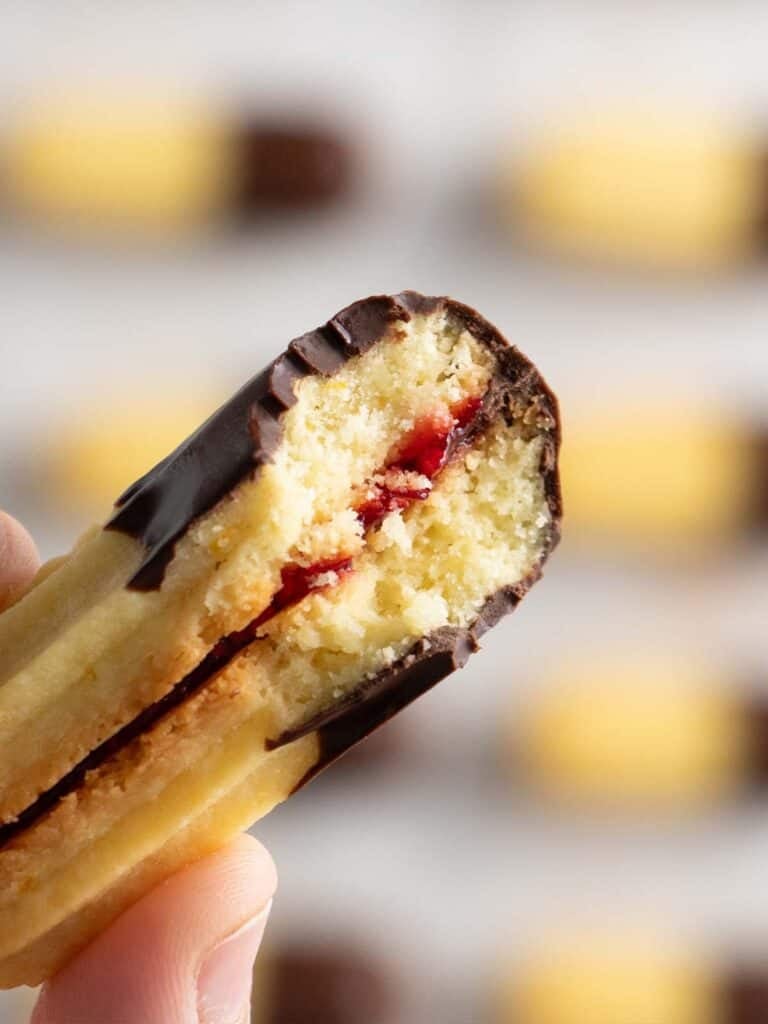
- I like adding my jam to a piping bag to pipe a line on top of half the cookies but you can do this with a teaspoon too. Just don’t fill too wide or all the way to the ends to allow room for the jam to spread as you sandwich the cookie halves.

Tip: Let the cookies sit for about 30-60 minutes so the cookies can soak some of the jam in. It’ll help them stick together much better which will make coating them but easier.
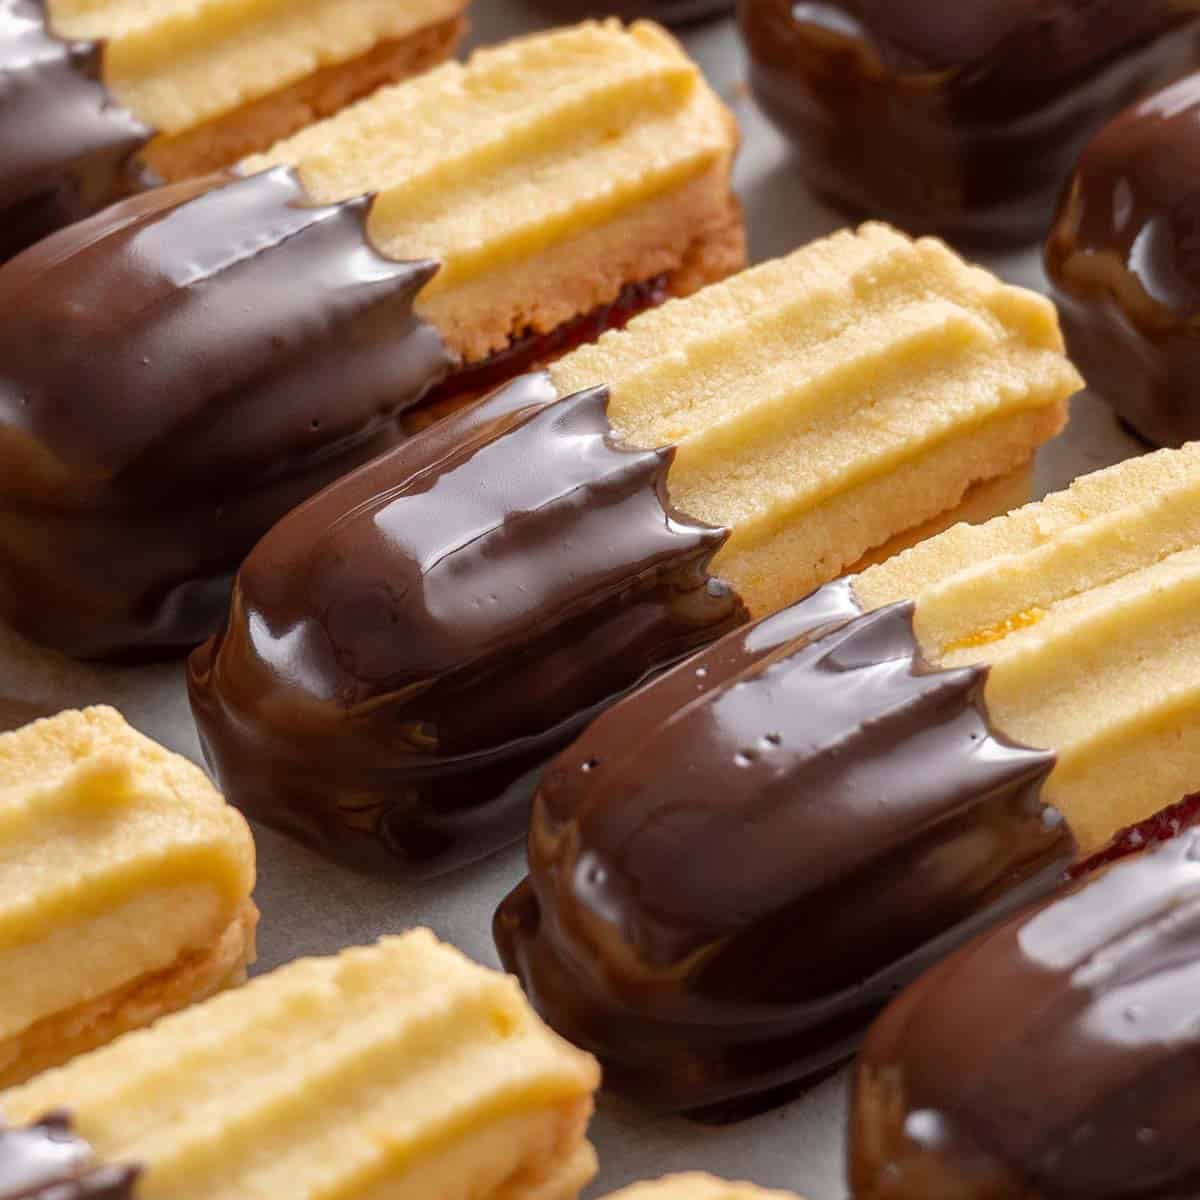
- To coat the cookies in the chocolate just dip half of each sandwiched cookie in the chocolate.
- Scrape the bottom of the cookie on the side of the bowl and place it on your baking tray lined with baking paper. Let them set at room temperature and serve!
Tip: You can sprinkle things on top of the chocolate before it sets to dress them up a little. Things like chopped nuts, coconut or sprinkles.
Just a heads up about the coating – I know the chocolate coating in the photos looks glossy, but the chocolate coating doesn’t set glossy.
How to store your cookies
The chocolate coating on these cookies is slightly softened with that oil in it so it will melt in warm environments. Keep them in an airtight container and in the fridge. They’re just as delicious when served chilled, but they thaw pretty quickly too.
If you give these cookies a go, or have any questions, let me know! N x
A Quick Baking Guide
If you’re new to baking or just want to brush up on the basics, these guides are a great place to start!
Loved the recipe? Let me know!
If you enjoyed this recipe, leave a star rating and comment below. It helps others find the recipe and keeps the baking community growing. Tag me on Instagram so I can see your version too!
Piped Butter Biscuits (Viennese Whirl Cookies)
My piped butter biscuits are soft and delicate with a crumbly texture, filled with raspberry jam and perfect for anyone who loves a classic melt-in-your-mouth cookie.
Serves 16
Ingredients
Pipe Butter Biscuits (Viennese Whirl Cookies)
- 200 g unsalted butter, very soft (see notes)
- 50 g powdered sugar, icing sugar
- Pinch of fine salt
- 14 g vanilla extract
- 1/2 orange zested, optional
- 220 g all-purpose flour, plain flour
- 30 g corn starch
- 40 g heavy cream, warm
- 150 g raspberry jam, to sandwich
Chocolate Coating (optional)
- 300 g dark cooking chocolate, see notes
- 20 g vegetable oil
Instructions
Pipe Butter Biscuits (Viennese Whirl Cookies)
- Whip butter and sugar – Add your soft butter, sugar, salt, vanilla extract and orange zest (optional) to a medium sized mixing bowl. Use an electric hand mixer or stand mixer fitted with the paddle attachment to cream the ingredients together until pale and fluffy, about 1 – 2 minutes or until it’s pale in color and creamed together. Don’t overwhip it. We’re aiming for a light texture, not whipped with lots of bubbles like frosting.
- Add flour to form dough – Add half the dry ingredients and all of the warm cream and mix on low speed until well combined. Scrape down the bowl and add the remaining dry ingredients until a soft dough forms. It will almost be a spreadable consistency.
Pipe the biscuits
- Prepare piping bag – Transfer the dough to a piping bag fitted with a large open star tip. Something like the Wilton 1M or Ateco 827.
- Pipe cookies – Pipe your chosen shapes onto your baking tray. You can pipe 5cm long éclair shapes or rosettes (swirls), Space each cookie a few cm apart to allow for them to spread a little.
- Chill – Place the tray into the fridge for 30 minutes before baking. This will stop them spreading too much and losing definition.
- Preheat your oven to 175C / 350F (fan off), 155C / 310F (fan on). Place the rack in the middle of your oven.
- Bake – Bake your biscuits for 10-12 minutes or until the edges begin to turn golden. Allow to cool on the tray completely before putting them together.
Sandwiching the cookies
- Pair the cookies up – Not all the cookies will be the exact same size, so pair them up with the closest size cookie so they look neat when sandwiched.
- Fill and sandwich – Add raspberry jam to half the cookies and sandwich with the other half. Pop them in the fridge while you get your chocolate ready. I like to let them sit for 30-60 minutes to let the cookies set a little with the jam so they don’t slide around when you’re coating them in the chocolate.
Chocolate Coating (optional)
- To prepare the chocolate coating – Add the chocolate and oil into a heat proof bowl and melt in the microwave for 30 seconds at a time, stirring each time until melted. Alternatively, you can bring a pot of water to a gentle simmer and place the bowl on top, making sure the bottom of the bowl isn’t touching the water and stir until melted. Allow to cool slightly before using.Tip – I like to transfer the melted chocolate into a small bowl so that the chocolate pool is deep which will allow you to dip the biscuits in a little more than if it was in a large bowl.
- To coat the biscuits – Dip the sandwiched cookies into the chocolate, allow excess to drizzle off and then scrape the bottom of the cookie along the side of the bowl before placing back on the baking tray lined with baking paper. Allow to set at room temperature before serving.
Notes
Soft Butter – You want your butter really soft for this recipe so the dough pipes easily. Not melted, but softer than what you’d normally use for frostings. I leave mine out overnight so it softens properly. If you’re short on time, cut it into cubes and leave it at room temperature for about an hour until it’s soft enough to mix with a spatula and has a spreadable consistency.
Dark chocolate – I used dark cooking chocolate for this recipe. Specifically, the Nestle cooking buttons which are designed to be easily melted and used for baking and desserts, but any cooking chocolate that can be found in the baking isle of your supermarket will work. Just make sure it’s good quality.
Storage – These cookies can be stored in an airtight container, in the fridge for up to three days.
Nutrition – is an approximate and is based on per cookie. This recipe makes 12 sandwiched cookies
A note on measurements – This recipe uses weight measurements for the most accurate results. Cup measurements can vary depending on where you are, which affects the precision needed for a recipe like this. Here is where you can learn more about how to measure ingredients using digital kitchen scales.
Nutrition
Calories : 4727kcal
Carbonhydrates: 500g
Protein: 45g
Fat: 306g
Saturated Fat: 189g
Polyunsaturated Fat: 11g
Monounsaturated Fat : 87g
Trans Fat : 7g
Cholesterol: 475mg
Sodium: 106mg
Potassium : 472mg
Fiber: 38g
Sugar : 226g
Vitamin A: 5611IU
Vitamin C: 22mg
Calcium: 150mg
Iron: 11mg
Nutrition Disclosure
Gave this recipe a go?Mention @thescranline or tag #thescranline!
previous post
25 comments
Delicious! Thank you for such detailed instructions. Love the tips and tricks
Thanks so much Shamia, I’m really happy you found the instructions and tips helpful. I put a lot of time into testing and writing them clearly so it’s great to know they helped make baking easier for you. N x
I’ve tried tweaking another recipe I found online for butter biscuits but if they piped easily they would melt into a puddle in the oven, and if I added more flour it would change the texture too much and destroy my wrists. These were so easy to pipe and were delicious as well! And they held their shape beautifully in the oven. I didn’t sandwich them with jam, but dipped half the biscuit in chocolate and then topped with coconut, sprinkles, and nuts.
They also piped perfectly into stars which I put a chocolate chip in the middle of! Many thanks!
Thanks so much for letting me know Adrian! I’m so happy you loved the recipe, your comment made my morning. I worked hard on this one so it’s great to see people making it and enjoying it in their own kitchens. I’ve made them without a filling and they’re really nice that way too N x
These cookies were so easy to pipe, retained their shape, and taste delicious! Thank you for the wonderful recipe. I have tried other similar recipes before and they were always so difficult to pipe. These were the perfect texture. One question, is the vanilla to be 14g? It seemed like a lot so I wasn’t sure and added a bit less.
Thanks so much SL, I’m really happy you loved them. Getting the dough to pipe easily and keep its shape was the biggest challenge when I was testing, so I’m glad it worked perfectly for you. And yes, 14g of vanilla is right! It sounds like a lot but it helps bring out that buttery flavour. N x
These are absolutely amazing!!! I bake a lot but made these for the first time. They are better than any other I’ve ever tasted. Easy to make, easy to pipe, the shape held really well. So delicious! Next time I’m making double batch!
Thanks so much Petra, that honestly made my day. I’m so glad you loved them and found the dough easy to work with. I tested this recipe so many times to get that perfect texture, so hearing that it’s become a new favourite means a lot. N x
Fantastic recipe. Love how easy they were to pipe, unlike another recipe I’ve been using for a long time.
Thanks Christine, that makes me so happy to hear. Getting that dough soft enough to pipe easily but still hold its shape took a lot of testing, so I’m really glad it worked well for you. N x
I’m so excited to try these! Is there any chance the dough could be formed into a rectangle and then cut into uniform pieces rather than piped? I don’t have piping supplies but would absolutely buy something to try this recipe.
Hi Michelle, thank you so much! I’m so glad you’re excited to make them. This dough is really best for piping since it’s quite soft, but if you want something you can form and slice, I’d recommend my shortbread cookie recipe. It’s easy to work with and gives that same buttery, melt-in-your-mouth texture. N x
Made these for the first time today and the recipe worked perfectly! Thank you for such a pretty addition to my tea table ❤️
Thanks so much Jules! This recipe is really special to me so that means a lot. I’m glad you loved it too! N x
Love these,I used the wrong star tip BUT still the instructions were easy to follow..had fun making them..thanks for sharing 😉
I’m so glad you loved the recipe Virginia and that you found them fun to make. Makes my day when people love this recipe because I worked so long to make it great! N x
These look amazing and I’m very happy to try them out but where are you using the warm cream? I’ve read the recipe up and down and can’t find it?
Hi Jo! Thanks! The cream goes in with the dry ingredients 🙂 N x
Hi Nick. Thank you ! I tried your recipe and I’m pleased to say it is delicate and delicious. A lovely presentation.
Aww, Hannah that makes me so happy. I’m glad you loved these. They’re such a special cookie to me. N x
hey! tried the cookies today AMAZING really. used lemon zest instead of orange went well as well. the texture, the taste, the consistency they were all on par. thank you for the arduous trial runs the result is 10/10 recommend 🙂
Oh my goodness, I’;m going to have to give that a try. Thanks for letting me know and I’m glad you loved them Duru! N x
Quick questions, the cream how warm should it be? And what kind of cream?
Thanks
HI Fiza! Just a little warmer than room temp to help soften the dough and make it easy enough to pipe 🙂 N x
✨✨✨✨✨✨✨