Easy Vanilla Swiss Roll Cake (No Cracks!)
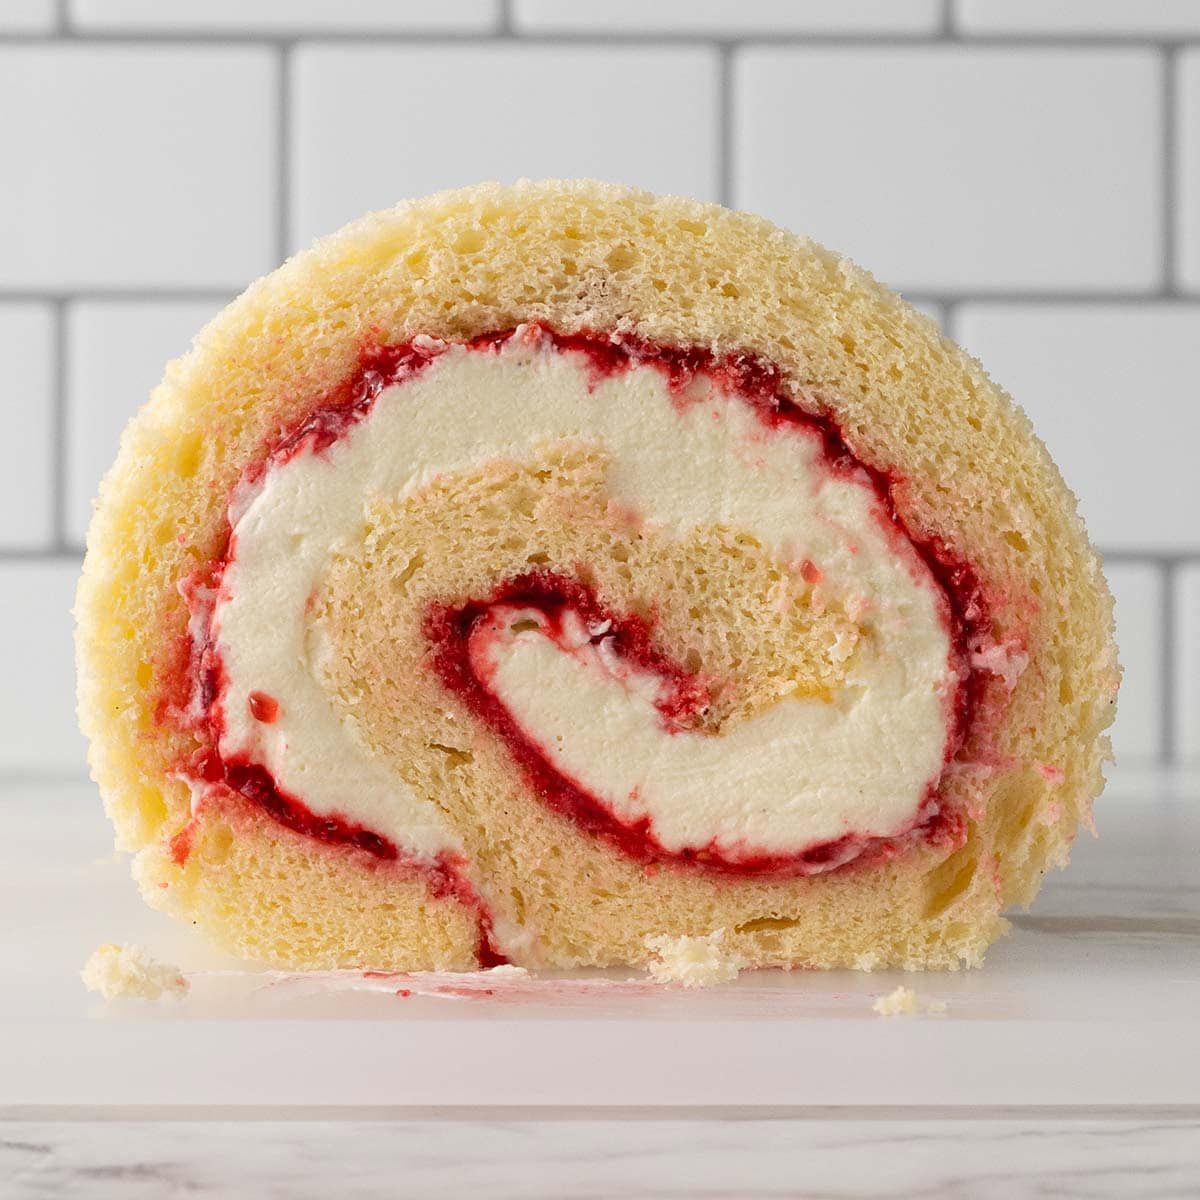
My Vanilla Swiss Roll Cake is soft, melt in your mouth and filled with Chantilly cream and raspberry jam. It’s an old school dessert that I’ve made easier and more reliable to roll into a perfect spiral without it cracking! Seriously, you’ll never go back after using this technique.

Hey team, Nick here! I love a nostalgic bake. Especially if it’s easy to make and delivers on flavor and texture. This cake swaps out the stress of rolling a Swiss Roll with something that ticks all of those things off perfectly. Yes. I’m promising a crack free Swiss roll that is tender and cloud like.
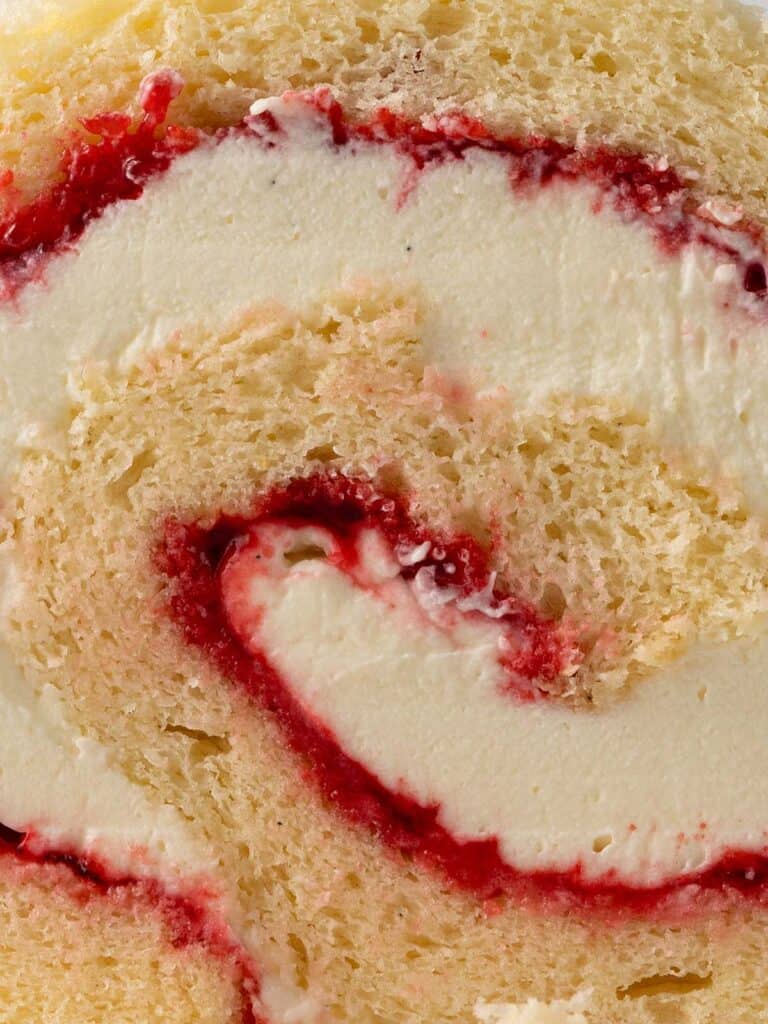
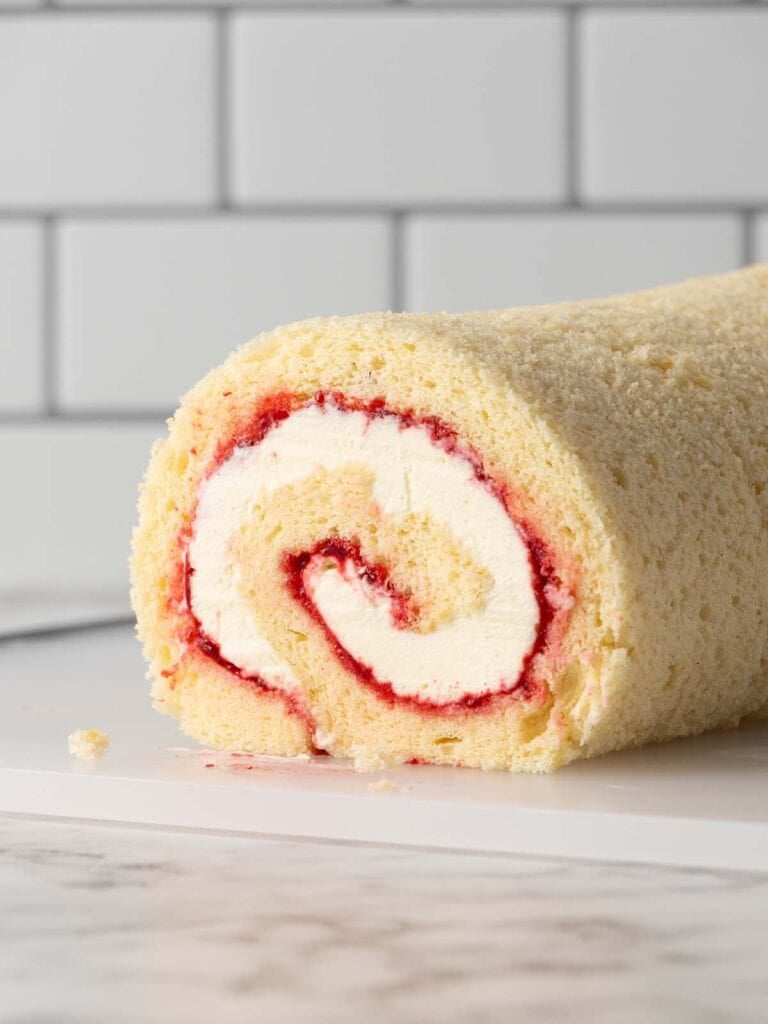
For this Vanilla Swiss Roll I decided to keep things simple filling wise. I think Raspberry Jam and cream are such a great flavor combo for a cake like this. And because the cake is so light and soft, the Chantilly cream pairs perfectly to create a melt in your mouth experience.
I’ve got step by step photos to guide you through the recipe so you can be on your way to mastering what is usually a frustrating cake to make. Oh! And this is easy to make in a day and even easier to transport to an event if you’re on dessert duty and your next gathering!
Related – I also use this sponge as a base for my Lamington Swiss Roll cake which has everything you love about that classic aussie dessert. My most popular Swiss roll cake is my Chocolate Swiss Roll which is rich in chocolate flavor and uses the same great Chantilly Cream Filling I used in this recipe.
This Swiss Roll will not crack. Ever.
We’re skipping the old pre-roll method with this recipe and using a technique I think works much better. Most Swiss roll recipes tell you to roll the sponge while it’s still hot so it “remembers” the shape, but when I tested it, the results were all over the place. Sometimes it cracked, sometimes it didn’t, and it always squashed the sponge.
Stella Parks’ genius technique – I adapted this technique from Stella Parks at Serious Eats. Once the sponge bakes, it comes out of the oven and you cover it with foil straight away. It traps the steam in the sponge as it cools which makes it softer and more pliable when you do eventually fill it and roll it.
Seriously, it’s so much more fuss free, I’m annoyed I did the other technique all these years.
To make the sponge more flexible I opted for using oil instead of butter. Sure, butter tastes great and gives you a rich flavor, but it sets firm and encourages cracks when you roll the cake. Oil keeps the sponge soft so rolling is much easier.
Which jam to use
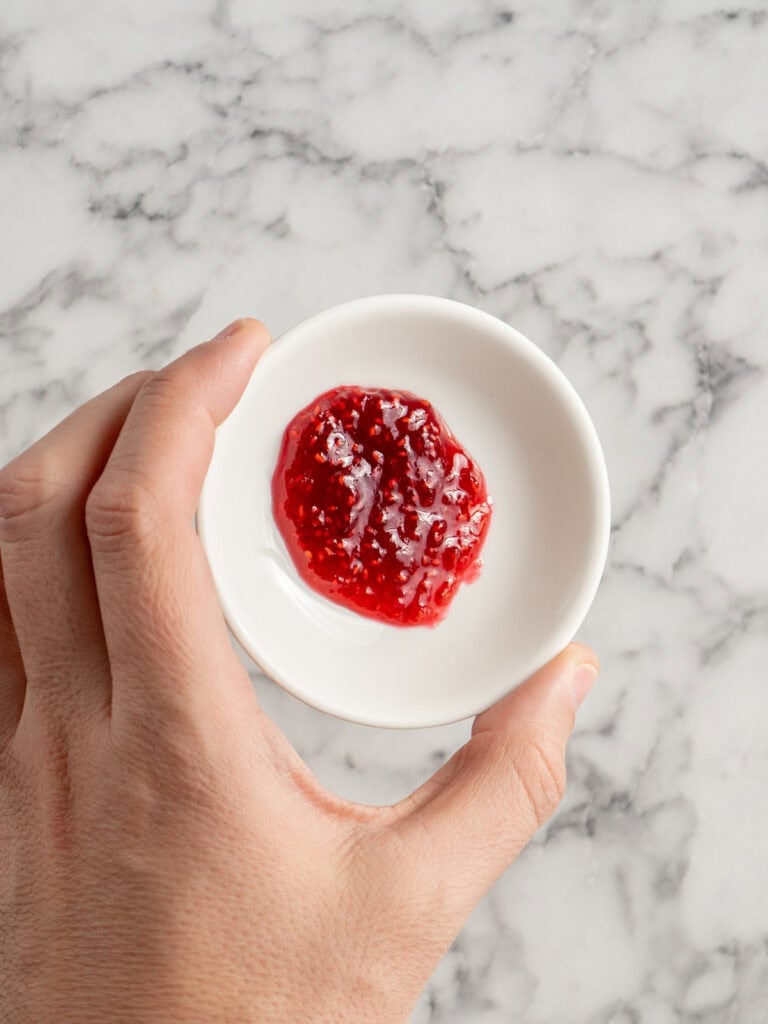
I actually think store bought jam which has less seeds gives you a cleaner cut and a more defined spiral, but nothing beats the bright flavor and color of thick home made raspberry jam!
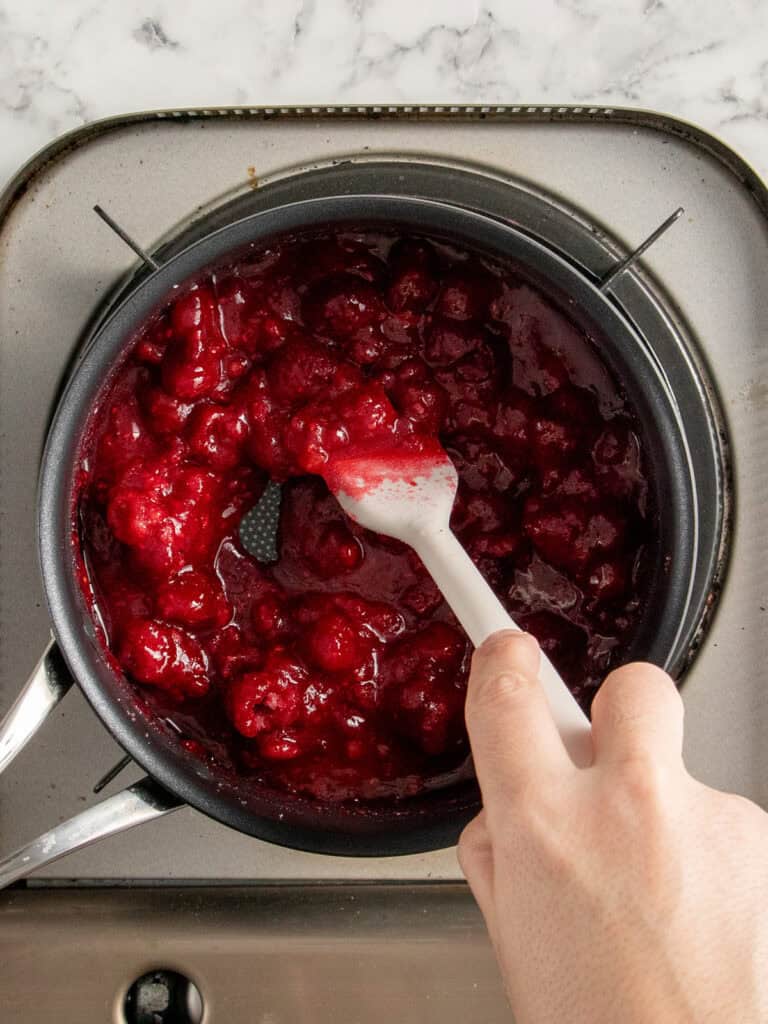
- To make your own jam add all the ingredients into a pot and stir until it comes to a boil. Then gently simmer away until it begins to thicken. Use a spoon to skim the foam away.
- Test the jams setting stage by adding some to a saucer that’s been in the freezer. If it sets without sliding around it’s done!
Tip – If you want to remove the seeds from your jam run it through a metal sieve with a spoon as soon as it’s finished cooking while it’s still hot.
Making the Sponge.
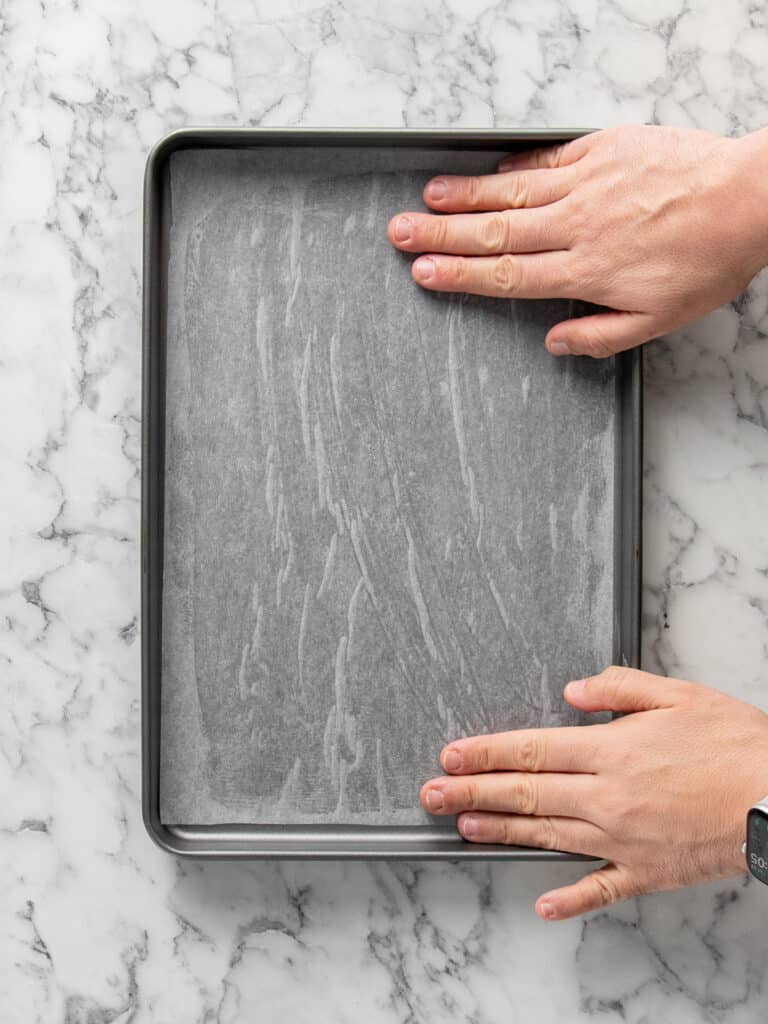
- Rub some butter on the bottom of your baking tray and line it with baking paper.
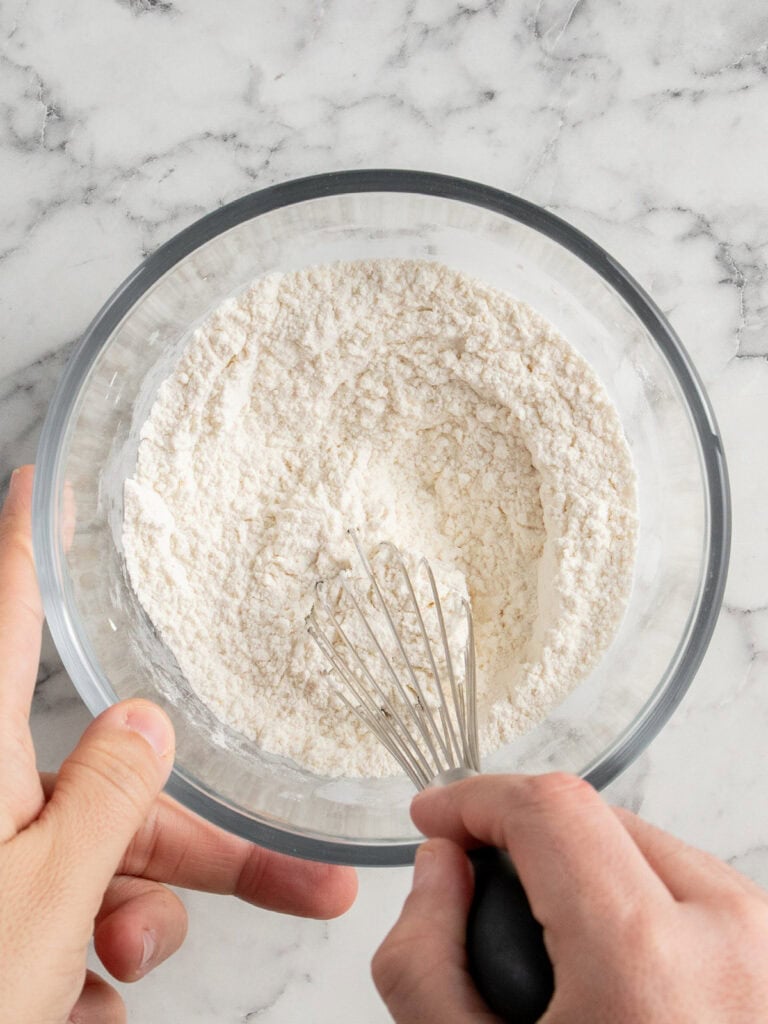
- Combine your dry ingredients together. Set aside.
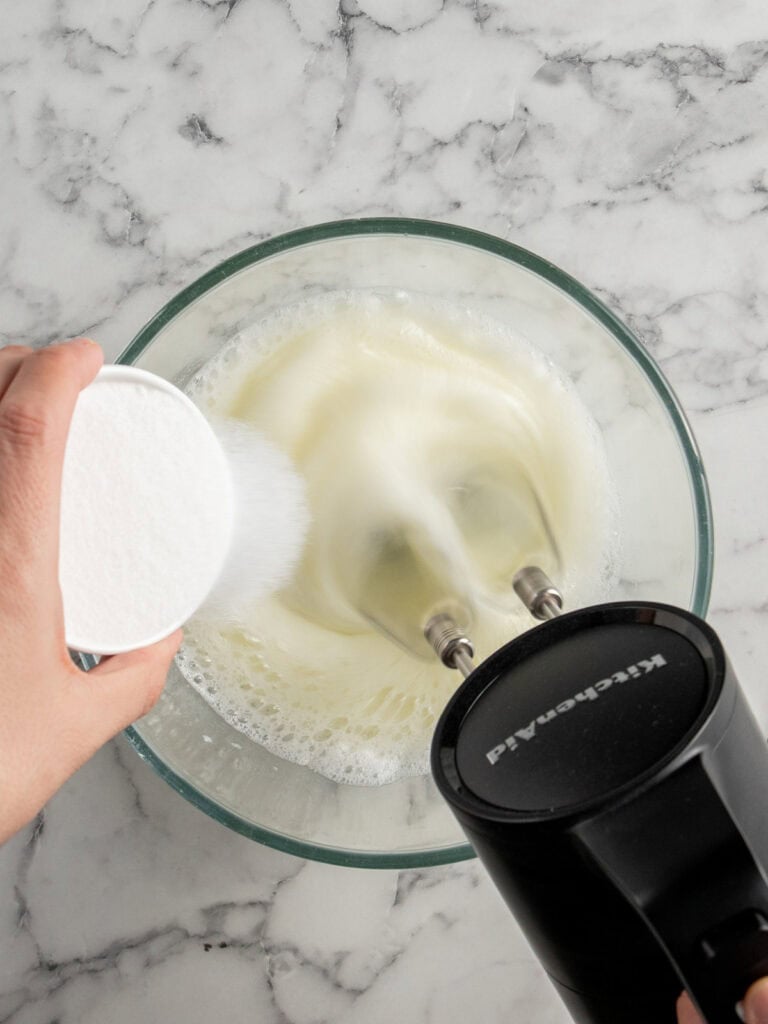
- Use an electric hand held mixer to beat your egg whites until frothy and then begin slowly adding your sugar, about a tsp at a time until it’s all in there.
- Continue beating on high speed after it’s all been added for about 4 minutes. It’ll become thick and glossy.

- To a separate bowl, whip your egg yolks, warm water, sugar and vanilla extract until thick and pale.
- Slowly add the oil while the mixer is on medium speed.

- Use a spatula to gently fold the egg whites into the egg yolk mixture until fully combined.
- Then sieve in the dry ingredients and fold through until completely combined.
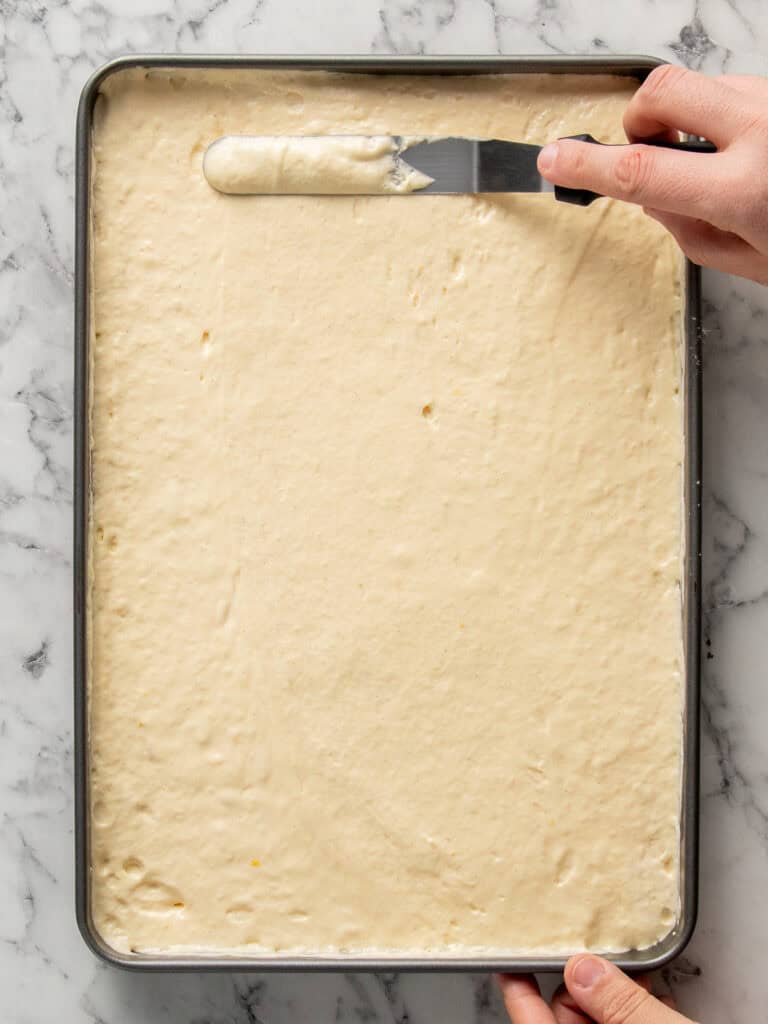
- Add the batter to the baking tin and spread evenly using a spatula. Bake for 14 minutes.
Baking tray measurements – For this recipe I used a jelly roll pan measuring 37 x 24cm / 10 x 15-inches and 3cm / 1-inch in height.
How to cool down the sponge.
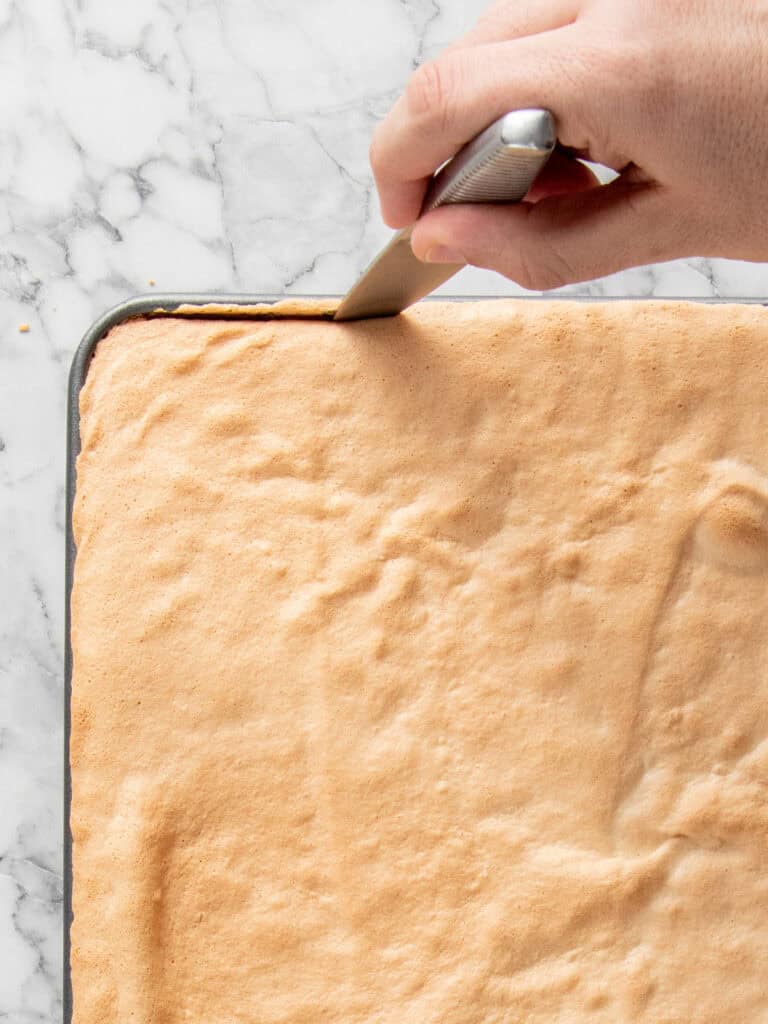
- As soon as it comes out of the oven, gently run a knife around the outside to release the cake.
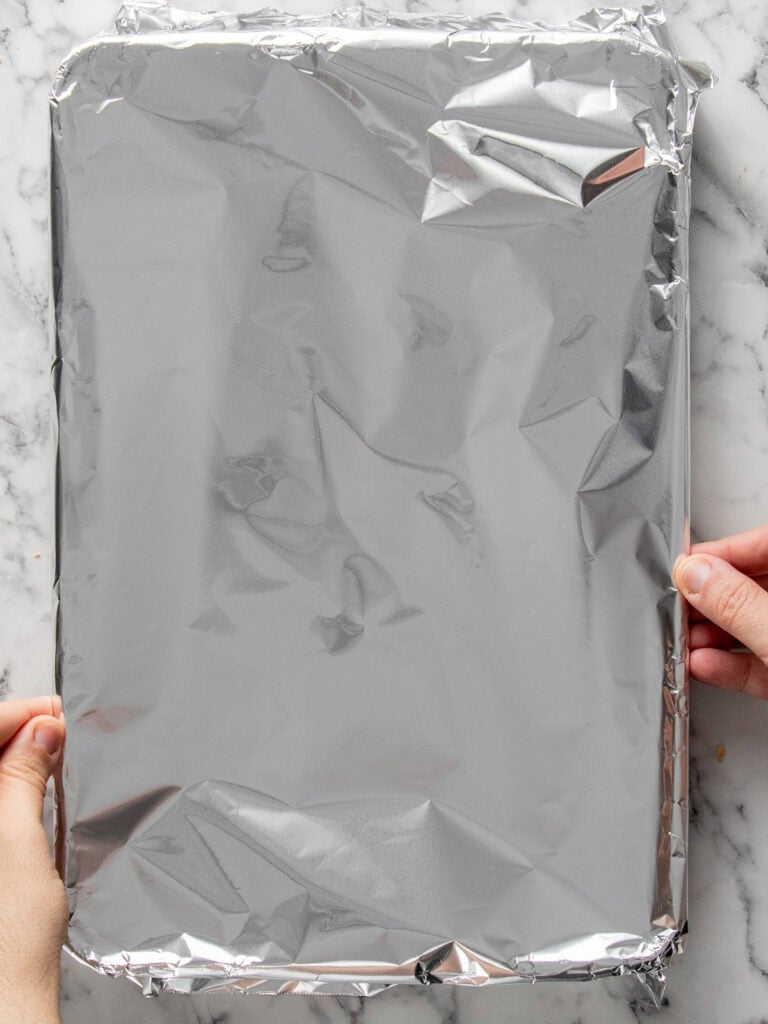
- Cover with a large piece of foil and let it cool for an hour at room temperature.
Why we cover it with foil – This is going to trap the steam that comes off the sponge and trap it in the cake which will keep the cake moist and pliable/soft.
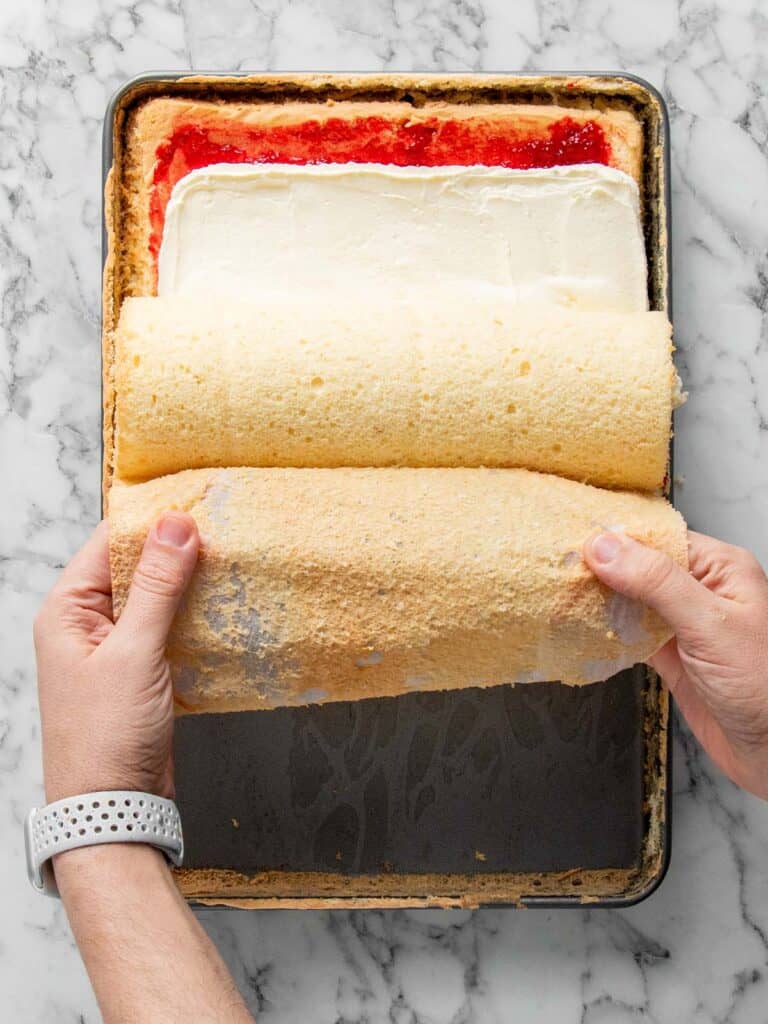
Rolling up the cake.
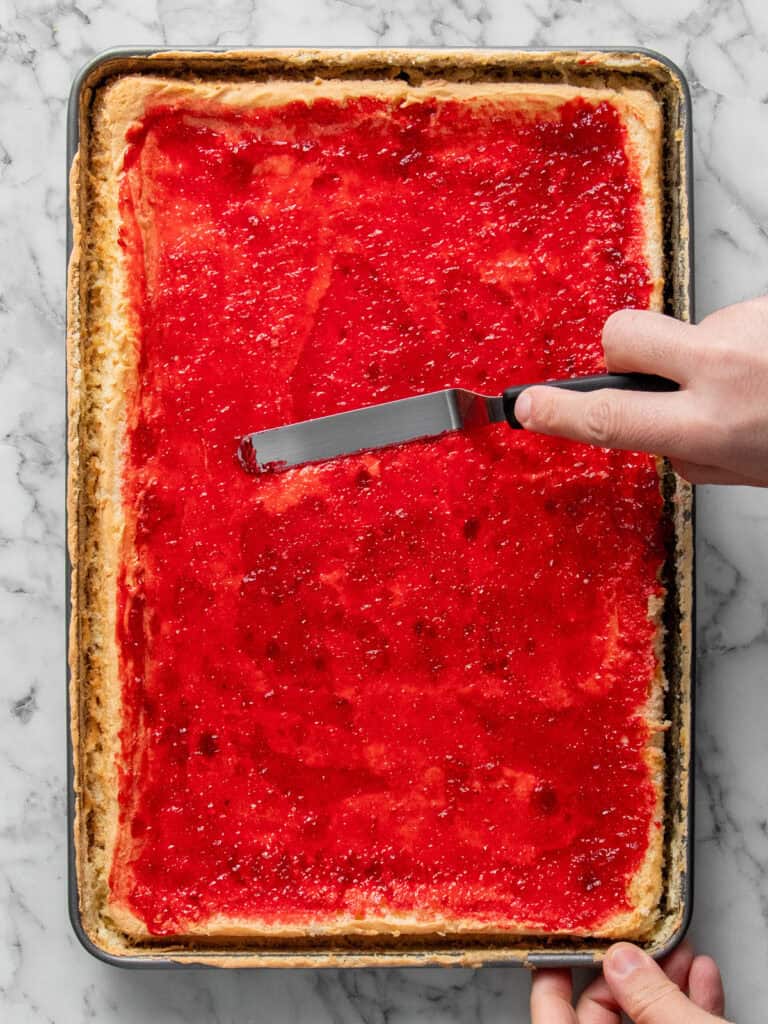
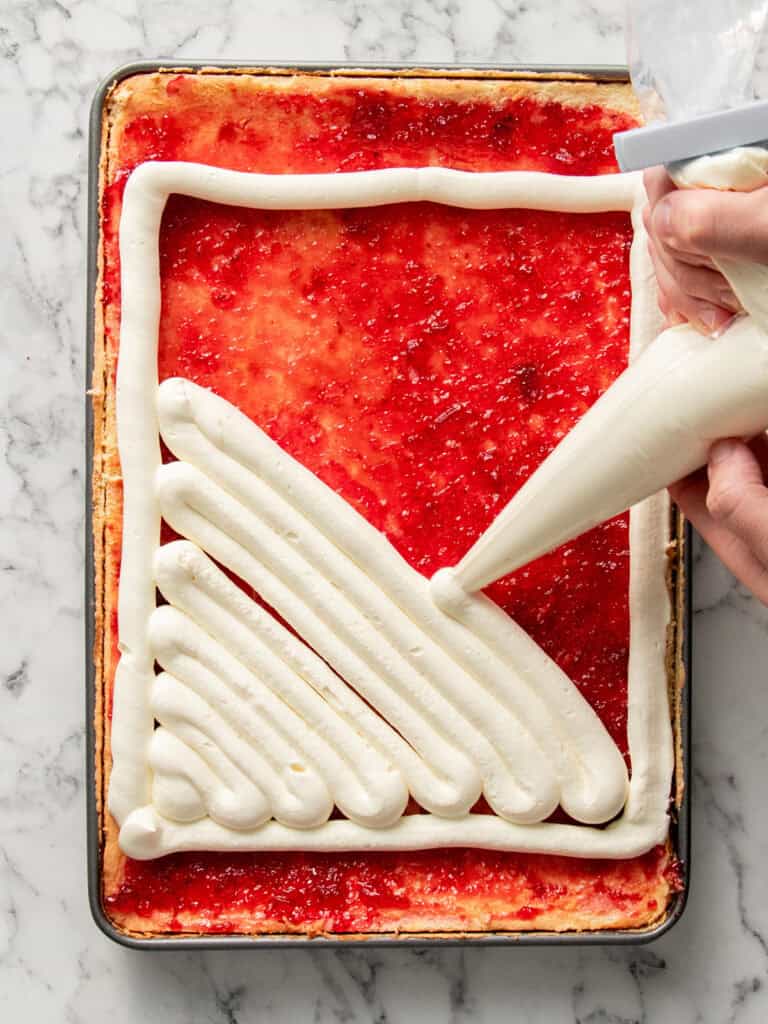
- Once it’s cooled, spread a thin layer of raspberry jam. And I mean thin!
- Pipe the cream on top then use a clean spatula o spread evenly. I’ve found piping the cream on gives you an even layer, unlike spreading by eye which leaves thicker and thinner spots and ruins the spiral.
Tip – when piping the cream on top, leave a 1-2 inch gap of on both sides of the Swiss oll so that everything rolls up neatly.
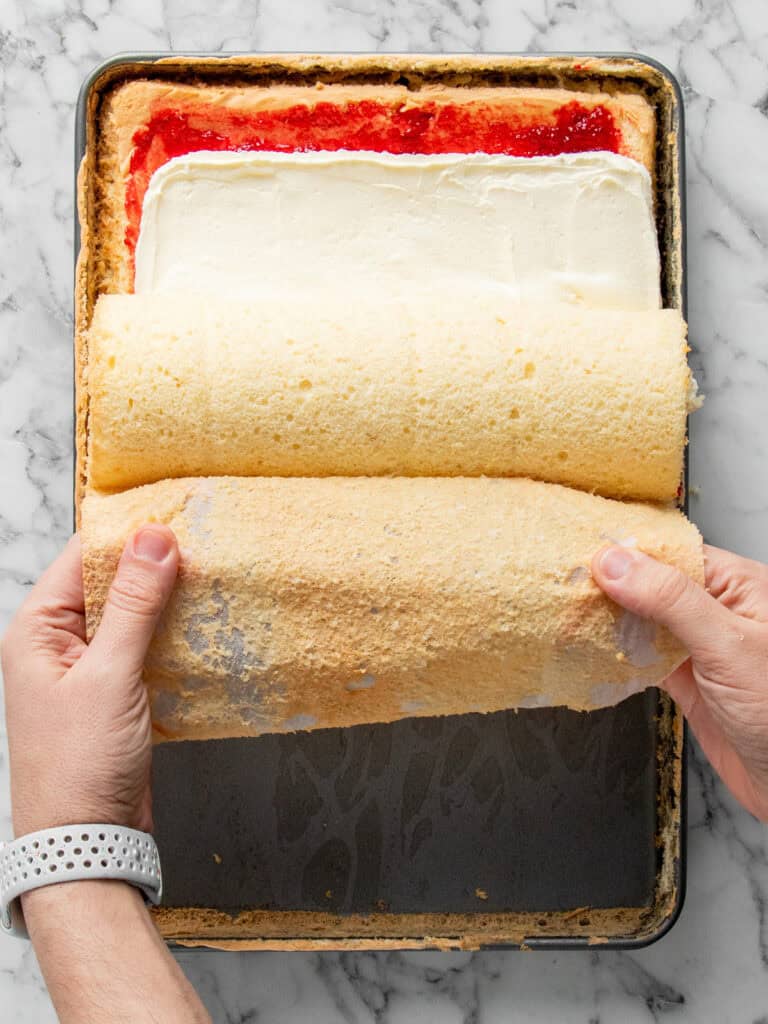
- Use a knife or spoon to help you lift one side of the sponge up and start rolling over itself. Do this slowly until you get to the end. Transfer to the fridge and chill for an hour.
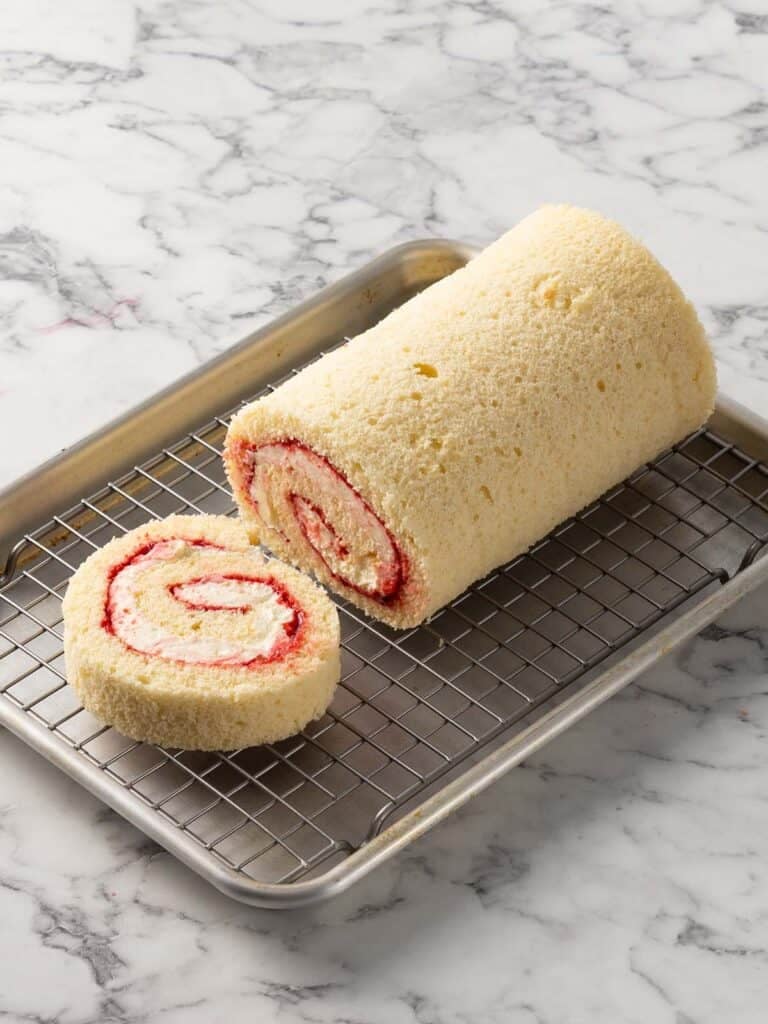
- Trim each side off using a sharp knife. Transfer to a serving plate. Slice and serve.
A Quick Baking Guide
If you’re new to baking or just want to brush up on the basics, these guides are a great place to start!
Loved the recipe? Let me know!
If you enjoyed this recipe, leave a star rating and comment below. It helps others find the recipe and keeps the baking community growing. Tag me on Instagram so I can see your version too!
Easy Vanilla Swiss Roll Cake (No Cracks!)
My Vanilla Swiss Roll cake is soft, light, and filled with mascarpone cream and raspberry jam, the perfect dessert for holidays or afternoon tea.
Serves 8
Ingredients
Vanilla Swiss Roll
- 80 g all-purpose flour, plain flour
- 20 g corn starch, corn flour
- 1/2 tsp baking powder
- 1/4 tsp salt
- 4 large eggs, room temperature (55g each), divided
- 60 g caster sugar, superfine sugar (for the egg yolks)
- 100 g caster sugar, for the egg whites
- 1/4 tsp cream of tartar, for the egg whites
- 1 tsp water, lukewarm (for the egg yolks)
- 40 g vegetable oil
- 7 g vanilla bean paste
Chantilly Cream
- 250 g heavy cream, cold (see notes)
- 50 g powdered sugar, sifted (see notes)
- 7 g vanilla bean paste or vanilla extract, see notes
- 250 g mascarpone, cold
- 100 g raspberry jam, or strawberry (see notes)
Instructions
Vanilla Swiss Roll
- Preheat your oven to 175C / 350F (fan off), 155C / 310F (fan on). For this recipe I used a jelly roll pan measuring 37 x 24cm / 10 x 15-inches and 3cm / 1-inch in height. Spray the bottom only with oil spray and line with baking paper. Set aside.
- Combine dry ingredients – To a small mixing bowl, add the flour, corn starch, baking powder and salt. Whisk to combine. Set aside.
- Whip meringue – To a separate medium sized mixing bowl, add the egg whites and cream of tartar and beat on medium speed using an electric hand mixer until you reach soft peaks, about 1 minute. Begin slowly adding (100g) of the caster sugar, about 1 tsp at a time, while the mixer is on high speed. The meringue will thicken and become glossy. Continue beating for 2-3 minutes until the sugar is mostly dissolved. Set aside.
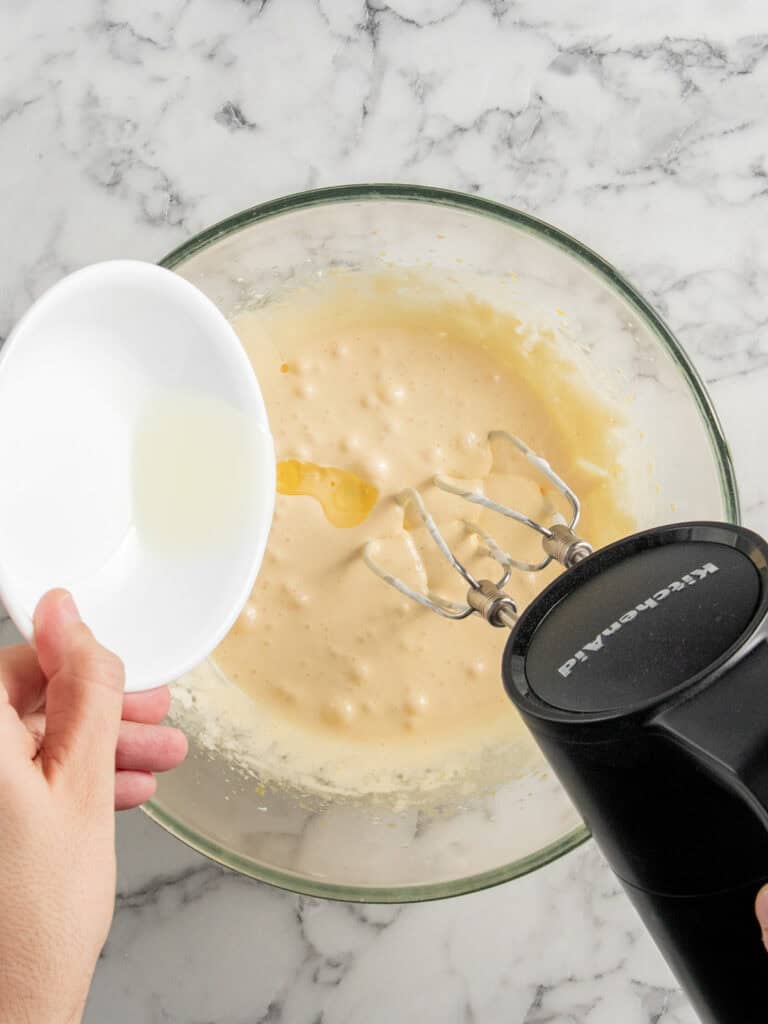
- Whip egg yolks and sugar – Add the egg yolks, warm water, remaining sugar (60g) and vanilla extract to a separate large bowl and whip on high speed for 5 minutes until it becomes thick and pale. Then, while the mixer is on high speed slowly drizzle the oil in until well combined.
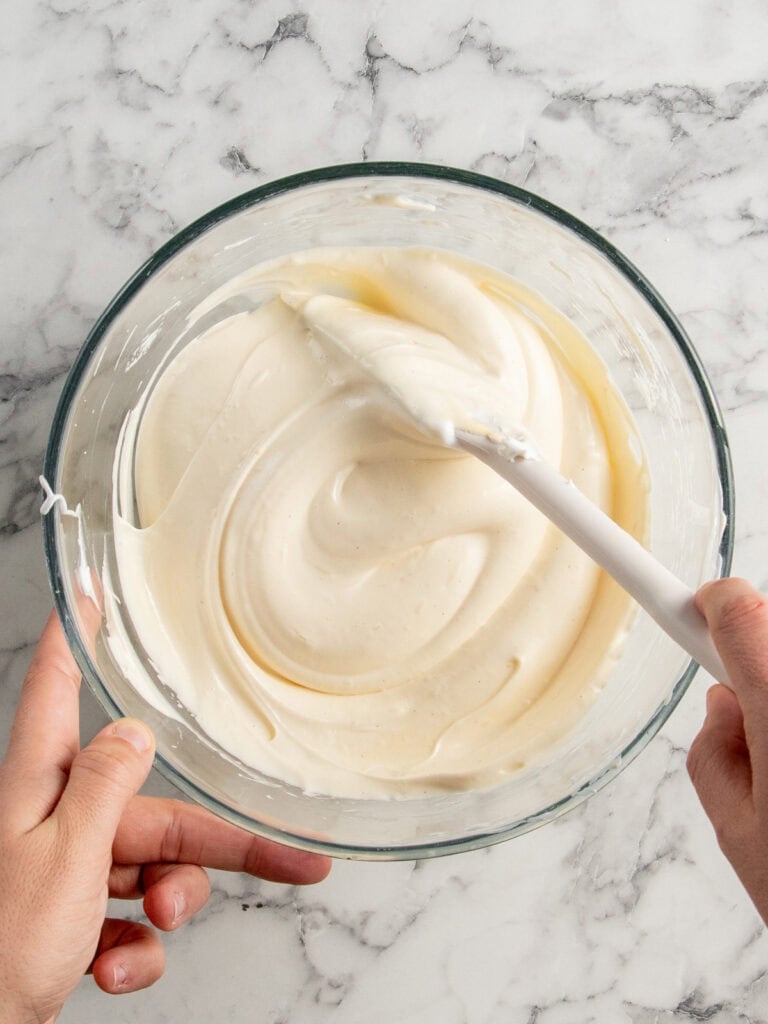
- Fold meringue through the egg yolks – Add half of the egg white mixture to the egg yolk mixture and use a spatula to gently fold through until almost completely combined. Add the remaining egg white mixture and repeat until mixture is uniform.
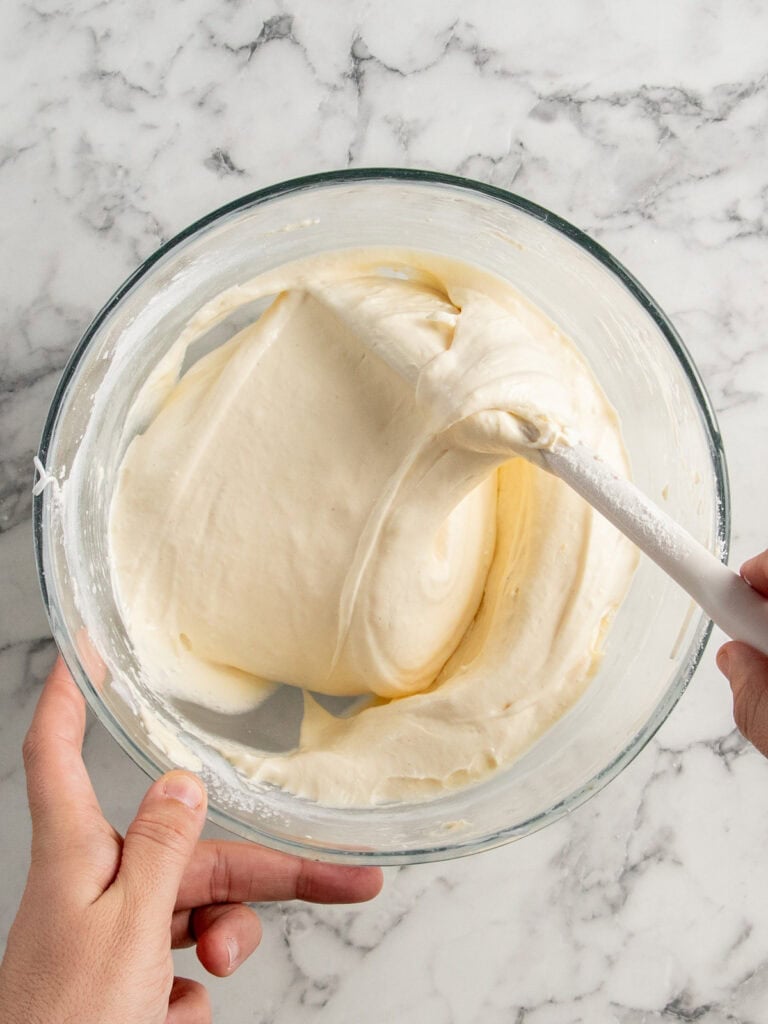
- Add dry ingredients – Sift half the dry ingredients over the egg mixture. Gently fold through until well combined. Sift the remaining dry ingredients in and repeat. The batter will be thick, airy and light.
- Bake – Add the batter to the prepared baking tray and use a spatula to gently spread the mixture as evenly as you can. Bake for 14 minutes.
- Cooling down – As soon as the sponge comes out of the oven, cover the pan with foil and seal the edges to trap the steam. This keeps the sponge soft and flexible, making it easier to roll without cracking. Let it cool at room temperature for one hour. Just above room temperature is fine, but don’t cool it in the fridge or a cold room or it will stiffen and crack when rolled.
Chantilly Cream
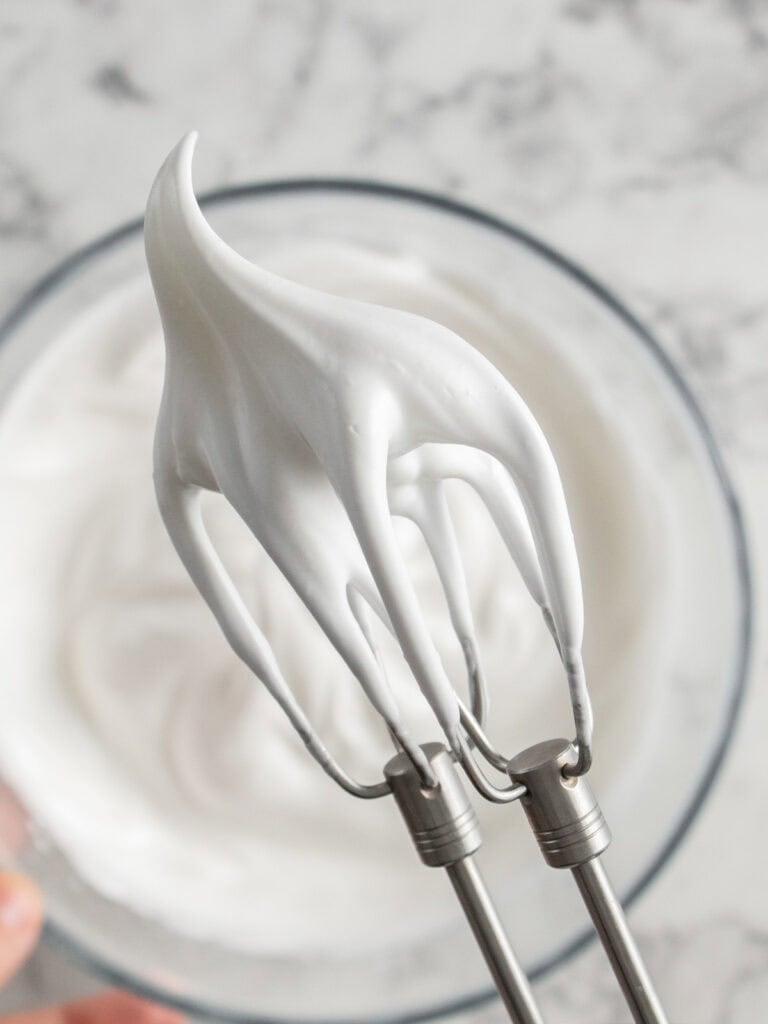
- Add all the ingredients in a large mixing bowl (glass or metal, not plastic) and use an electric hand mixer fitted with beaters or a stand mixer fitted with a whisk attachment to whip until you reach stiff peaks. This usually takes about 3 – 4 minutes to achieve. What you’re looking for is a smooth but stiff whipped cream, not one that looks split. If it looks split or separated, congratulations, you’re on your way to making butter, start again!
Let’s put it together!
- To fill the cake – Spread a thin even layer of jam over the cooled sponge. It must be a thin layer. Too much will pool as you roll, ruining the shape and swirl.
- Pipe the cream on top (super important!) – The best way to get an even layer of cream is to pipe it on. Add the Chantilly cream to a piping bag and pipe a perimeter of cream around the sponge, leaving a 2cm border along both short sides. Then fill in the center with more piped cream. Use a spatula to spread evenly. This gives you an even layer of cream and helps contain the filling as you roll, keeping the swirl neat and the cream from spilling out.
- To roll – Use one hand to lift the baking paper up and away from the sponge while using your other hand to gently guide and hold the roll in place as it curls over itself. Roll slowly and tightly, keeping even pressure without squashing the filling. Once rolled, carefully lift it off the baking paper and place it seam side down on your serving plate to help seal the roll.
- Chill and finish – Chill the rolled-up cake for an hour. Then trim 1cm off each end with a sharp knife to neaten. You can serve it straight away, but chilling for 1 hour makes slicing easier and cleaner.
Notes
Caster sugar – is also sometimes known as superfine sugar is best for making meringues because it dissolves quicker than granulated sugar without risking overwhipping. You can use granulated sugar if you don’t have caster, but I would recommend caster for the very best results!
Cream – make sure you use cream labelled heavy cream for this recipe. Whipping cream will work but won’t be as stiff as heavy cream. Low fat cream will not work.
Powdered sugar – I don’t like my cream too sweet, but if you like yours on the sweeter side you can use up to 1/2 cup. Make sure you sift it!
Mascarpone – is an Italian cheese that is similar in flavor to sour cream, but more creamy and less sour. Opt in for a better brand one as they tend to be thicker and make sure it’s cold straight out of the fridge! Make sure you give your mascarpone cheese a mix before using. Some brands are soft, some are firm and can cause your Chantilly cream to go lumpy.
Vanilla – I have a great recipe for home-made Vanilla extract here on the blog which is alcohol based. It can be used for most recipes. However, I would advise against using it for whipped creams (yes, even stabilized ones like this one) or meringues as it can muck around with the air whipped in the mixtures. Instead use a syrup based vanilla extract. I find vanilla bean paste is best.
Raspberry Jam – Use a smooth seedless store-bought jam for a clean swirl when sliced. If the jam has seeds or chunks, press it through a fine mesh sieve with a spoon. Avoid thick or chunky styles as they catch on the knife and ruin the swirl. Spread a thin even layer. Too much jam will pool, soak into the sponge, and make the roll look messy and uneven.
Storage – This Vanilla Swiss roll cake can be stored in an airtight container, in the fridge for up to three days.
Nutrition – is based on per slice. This makes 8 slices.
A note on measurements – this recipe is offered in weight measurements. This is in an effort to offer the most accurate way to get the best results. Cup measurements simply aren’t accurate enough for a recipe that needs precision and cup sizes differ depending on where you are in the world. Here is where you can learn more about how to measure ingredients using digital kitchen scales!
Rolling method credit – This is a technique I’ve adapted from Stella Parks at Serious Eats and it’s genius!
Nutrition
Calories : 456kcal
Carbonhydrates: 30g
Protein: 7g
Fat: 28g
Saturated Fat: 17g
Polyunsaturated Fat: 1g
Monounsaturated Fat : 4g
Cholesterol: 160mg
Sodium: 162mg
Potassium : 127mg
Fiber: 0.4g
Sugar : 17g
Vitamin A: 1027IU
Vitamin C: 1mg
Calcium: 98mg
Iron: 1mg
Nutrition Disclosure
Gave this recipe a go?Mention @thescranline or tag #thescranline!
34 comments
Hello
Looks great and the new method is much easier
In the recepie ingredients it says that the warm water is for the egg whites, but in the instructions iy says to add the water to the egg yolks
What is right?
Thanks
Hey Yaron! Thanks so much. You’re right, the warm water goes with the egg yolks, not the whites. I’ve updated the recipe so it’s all clear now. Glad you found the new method easier! – N x
I think you meant for the warm water to be for the egg yolks (no the whites)
Looks delicious!
Hey Debbie! You’re absolutely right, the warm water goes in with the egg yolks. I’ve updated the recipe to fix that. Thanks so much, glad you like the look of it! – N x
Your ingredients it states the 1 tsp of warm water is for the egg white. But in method section, you mentioned to mix in with egg yolk . Which is it for actually? 🙂
Hey Ani! Great catch. The warm water goes in with the egg yolks, not the whites. I’ve updated the recipe so it’s all correct now. Thanks for checking! – N x
I don’t eat sweets but my boys said this was a 9 out of 10! Great flavor, moist spongy cake…the baking part was fun, I found the directions easy to follow.
That’s so lovely to hear, Rose! I’m glad your boys enjoyed it and that you found the directions easy to follow. Thanks for giving it a go. – N x
Absolutely delicious! Rolled beautifully and so tender! I used a seedless blackberry jam since that was all I had. I will be making this again! Thanks for this amazing recipe!
So glad you loved it, Kathleen! Blackberry jam sounds perfect with this sponge, and I’m happy to hear it rolled so well for you. Can’t wait for you to make it again. – N x
There’s a mistake in your recipe:
You say add water to egg whites but it’s added to the yolks 🙃
Hey Shelly! You’re absolutely right, the warm water should be added to the egg yolks, not the whites. Thanks for spotting that! I’ve updated the recipe so it’s all correct now. – N x
hi, to be clear, the rasberry jam under Chantilly cream is to go on the cake, not into the cream?
Hey Susan! Yes, the jam goes directly onto the cake first, then the Chantilly cream goes on top of it. They layer together when you roll it up. – N x
Wonderful recipe! The whole family raved about it! Is there a way to adapt it to be a chocolate sponge?
Thanks so much Joanna! I actually have a chocolate version of this on the site! N x
Anyway of converting this recipe to a pumpkin roll?
Hi Linda! No plans yet, but I’ll add it to my list for pumpkin season 2026! N x
Hi how cocoa could I add and sugar to make it a chocolate roll…thanks.
Hi Angie! I actually have a dedicated chocolate swiss roll recipe here on the blog which is a reader favourite! N x
Incredible recipe! Making the cake in 3 steps seems a bit of a faff but it’s well worth it. Baked and assembled the night before, kept refrigerated and covered to serve today and it was still fluffy and delicious. Will absolutely be making this again. Thanks, Nick!
This has made my day Lauren! So glad you loved the recipe. I love how fluffy it is too. All thanks to the method of rolling! N x
I made this and it is awesome. Can’t wait to try the chocolate on next weekend …..
Oh I hope you love it as much as this one! N x
Awesome bake – stepping back in time.
Thanks so much Trish! So glad you enjoyed it 🙂 N x
Hi! Is it possible to make this into a chocolate sponge??
Hi Caroline! Try my Sponge Cake recipe here on the blog 🙂 N x
Hi Nick!
Loving the recipe, can I freeze the sheet of sponge without jam or cream?
Thanks
Hi Yvonne! So glad to hear that! Yep, without the cream and jam, that’s totally fine. Wrap tightly in plastic wrap and then freeze. Thaw completely at room temp (wrapped) before using 🙂 N x
Excellent recipe and technique
Thanks so much Fatma! So glad you loved the recipe 🙂 N x
So happy to see another baker has adopted Stella Parks’ method for cake rolls! The foil makes it so much easier. She shared a brilliant idea with us all.
It’s genius! I wish I’d thought of it myself! N x