How To Make Soft Brioche Dough (Step-By-Step Guide)
Making buttery, pillowy soft brioche dough at home is completely doable. I’m talking bakery level brioche you can make in your kitchen that stays soft all day. This post is a bit of a deep dive on all the things I learned in my testing to get you baking a great tasting brioche that has a tender, buttery texture and works great with sweet and savory bakes. From fluffy burger buns to cream buns with jam.

Hey team, Nick here. I went on a bit of a 4-month long bender to work on my brioche dough recipe. I’d always thought of it as a fussy French bread until I tried a cream bun from one of favorite bakeries here in Melbourne and I was gob smacked at how soft and melt in your mouth a bread could be. I mean, it’s enriched with eggs, butter and milk but I’d never had a brioche like it. After trying it, I home and immediately started testing. That brioche was the benchmark.
The first few tests were rough. They came out so dense. Once I figured out how to get that lift (longer kneading time), I shifted focus to getting them to stay soft all day.
The secret to my home-made brioche staying soft all day is in a technique called Tangzhong. It starts by cooking a portion of the flour and liquid before you add it to the dough. It helps lock in moisture and gives you a tender dough that stays soft all day.
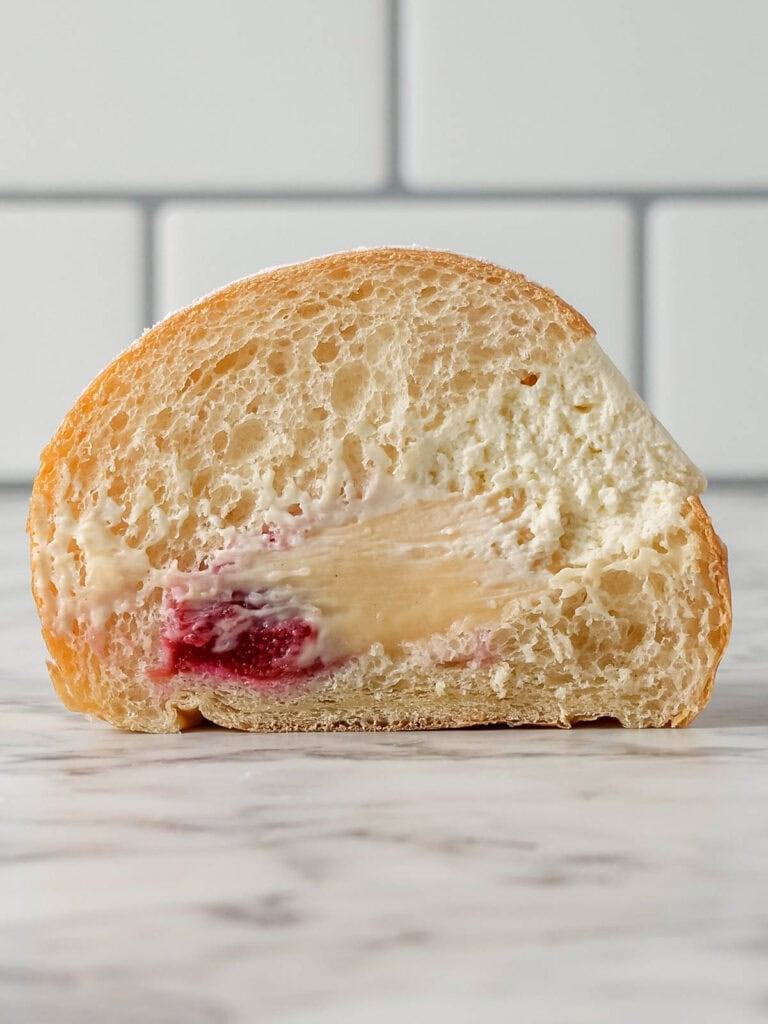
Related → Soft and fluffy cream buns with raspberry jam. They use this brioche and it’s honestly a match made in heaven!
Todays post is all about the base brioche recipe I came up with. I’ll share everything I learned in my testing so you can bake a great brioche. Better than you thought you could. I’ve used this recipe to make my cream buns. It’s great for savory recipes too, like burger buns, cheese scrolls and I reckon these would make a mean vegemite scroll.
All the things I’ll be covering
- The bakery that started my 4 month brioche bender
- The biggest thing I learned in my testing
- This was my brioche Wishlist
- How I got a soft dough that stays soft for days!
- How to make soft brioche dough
- Why resting time is important
- Adding the butter and second long knead
- How to know when your dough is finished
- Now we let the dough rise!
- Couple more things
The bakery that started my 4 month brioche bender
Akimbo! It’s a Melbourne based bakery that do mostly yeasted and sourdough breads and bakes. Things like croissants, cream buns, fougasse, breads etc. I’d always seen the cream bun and on one of my visits I decided to try it. I honestly expected a dry, firm bread with cream in the middle. I was bloody wrong. The bun was softer than the cream. The entire thing was melt in your mouth. I’d never had anything like it.
I wanted that recipe on my website to share with you guys, so I started testing that same day.
The biggest thing I learned in my testing
Akimbo sent me their brioche recipe early on and it came with one simple instruction: “knead to full development”. Basically, you need to knead the dough long enough to build up the gluten before adding the butter.


Once the butter goes in, it coats the gluten and slows gluten development down. That first 15 minute knead is what gives you a light, fluffy, bakery style brioche. If you don’t knead it enough, you’ll end up with dense, heavy dough. I learned that pretty quickly in my first few tests.
This was my brioche Wishlist

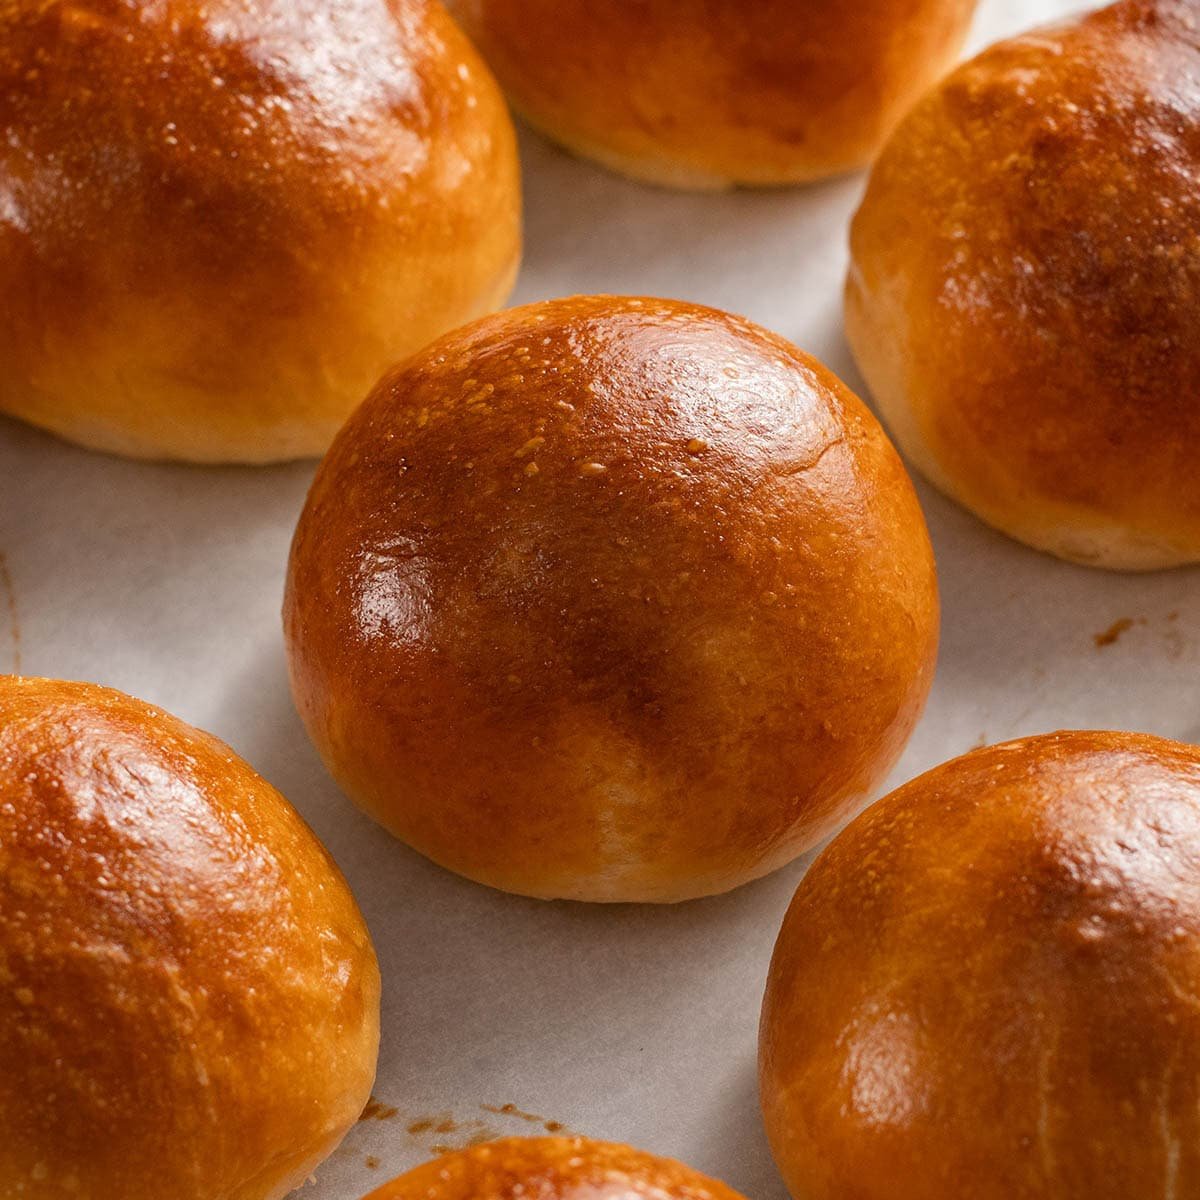
- Soft – I went through 20 tests to get it bakery soft.
- Bakery level – If you look inside Akimbos brioche, it almost looks laminated like a croissant. It’s golden and has nice even sized bubbles.
- Easy to make – There are simpler recipes out there, but that quick three-minute Tangzhong step takes the texture to another level.
- Tasted good – The overnight rise makes all the difference. It helps the flavor develop and creates stronger, more even bubbles. You could do a shorter rise, but that slow ferment is probably what gives Akimbo’s its depth.
- Versatile – could be used for a range of bakes. Sweet and savory. I plan on sharing a couple recipes using this base brioche dough.
I got all these things down pat in my brioche.
How I got a soft dough that stays soft for days!
I’ve been using the Tangzhong method a lot lately on my breads because it gives me a softer crumb and the bread comes out pillowy soft and stays that way for longer.
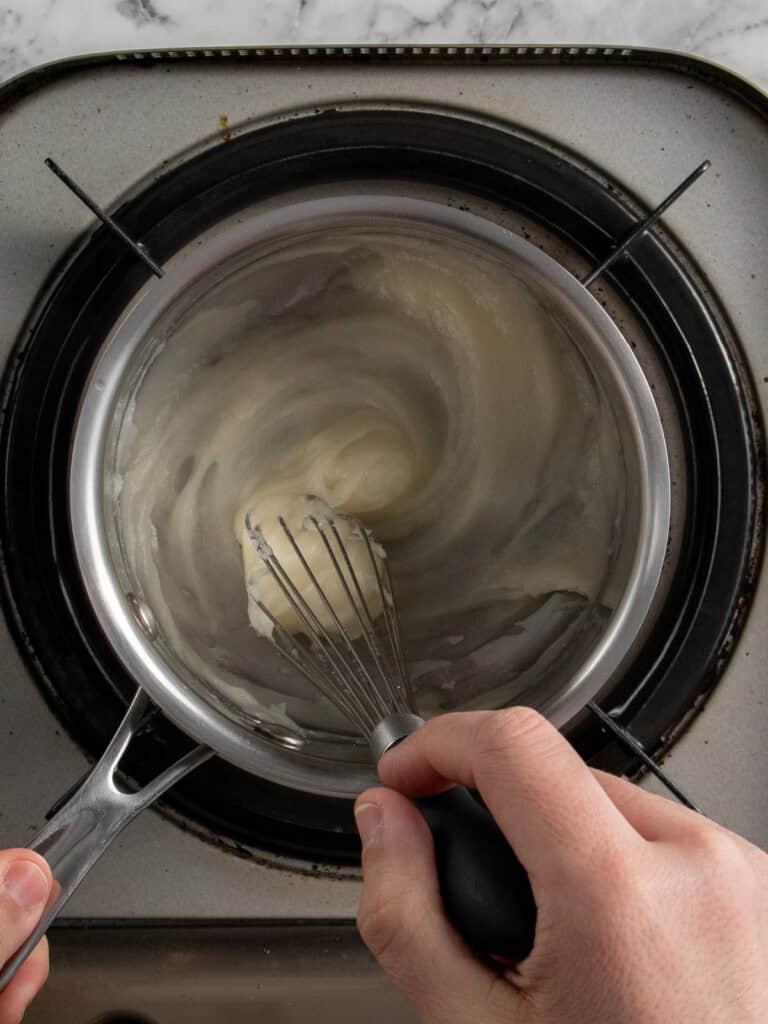
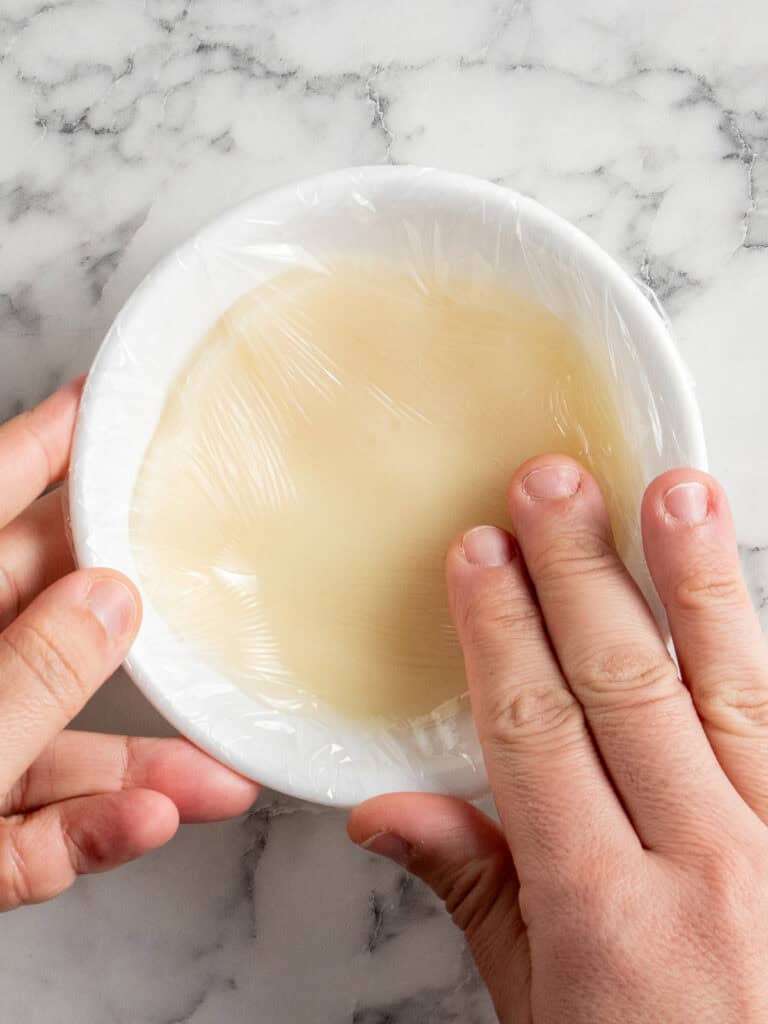
- It works by whisking some of the flour and liquid in a saucepan and cooking it on medium heat until it forms a paste. Once that paste begins to bubble, it comes off the stove.
- Transfer it to a bowl and cover it with plastic wrap. Let it cool at room temp before adding it to the dough.
Cooking a portion of your flour and liquid helps gelatinize the flour. The gelatinization is what helps it trap liquid in the dough so that you end up with a really soft texture that doesn’t go stale quickly.
Tip – I like making the tangzong 20 minutes before I’m ready to start the dough to make sure its cooled completely but you can make it a couple hours in advance.
How to make soft brioche dough

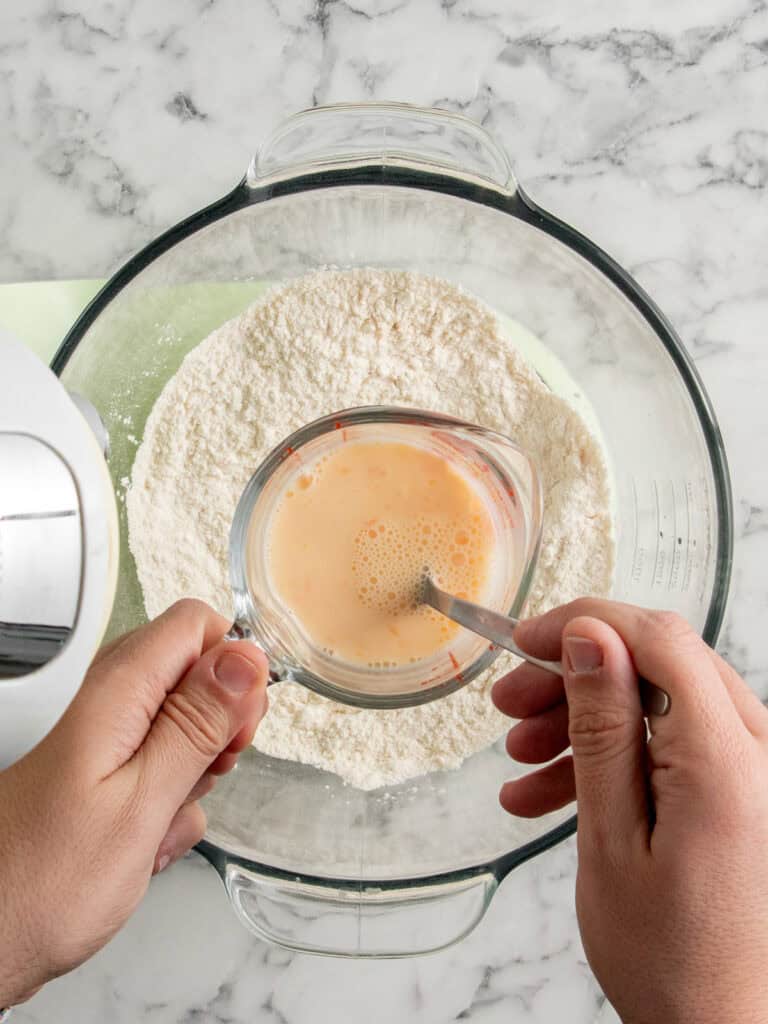
- Add the flour, sugar, salt, yeast and milk powder into the bowl of your stand mixer. Whisk them together. Theres no cup measurements here, I only bake using kitchen scales now. I get more accurate results.
- Whisk together the eggs and milk and add them to the dry ingredients with the cooled tangzong.
Tip – Use cold milk and eggs straight from the fridge. It’ll lower the temperature of your dough after the long kneading time. The yeast will have a chance to do it’s thing in the first rise at room temperature and then again in the slow cold rise in the fridge.
- Knead #1 (15 minutes) – Knead on 30% speed using a spiral mixer or speed 2 / medium using a stand mixer with dough hook for 15 minutes.
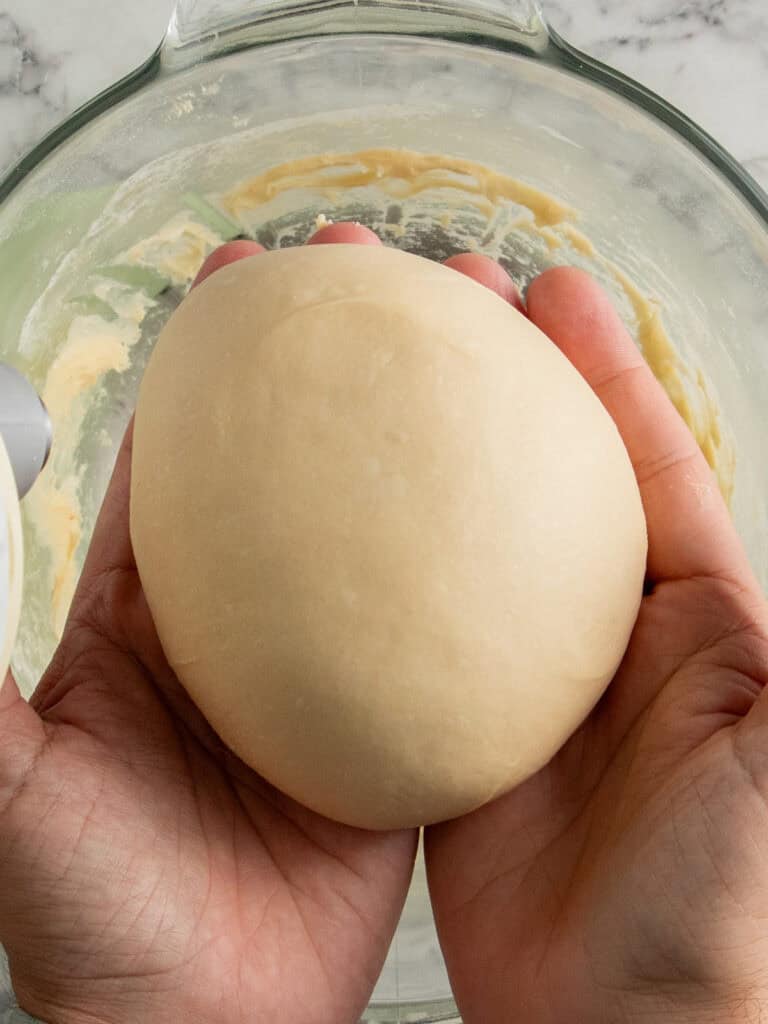
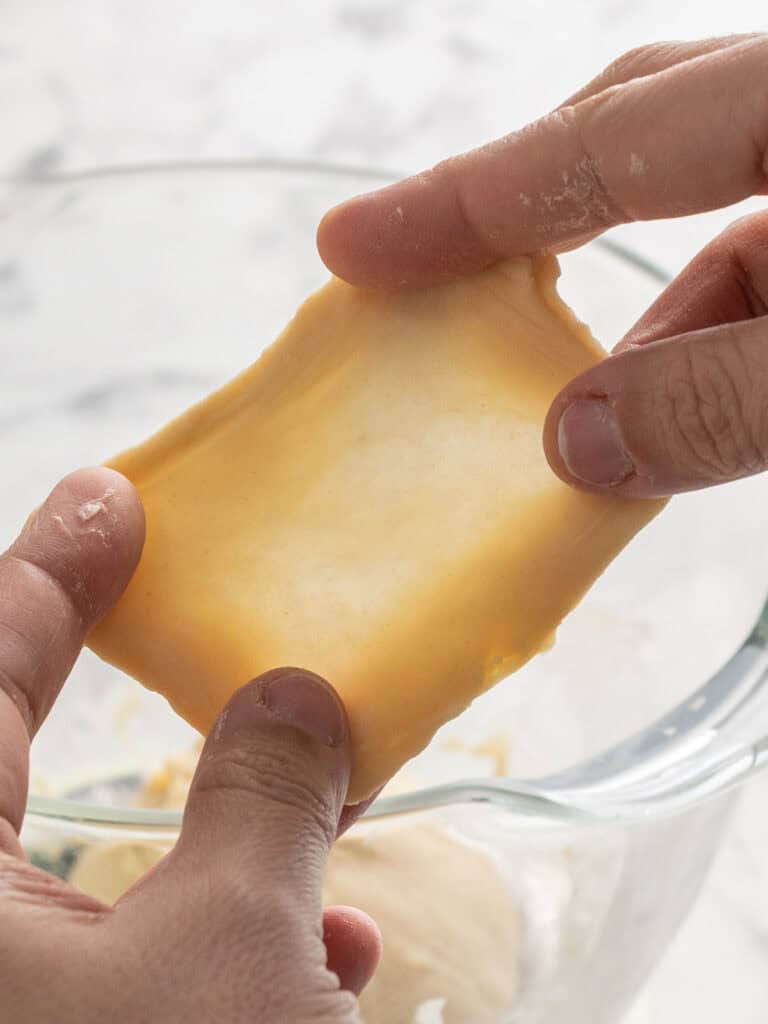
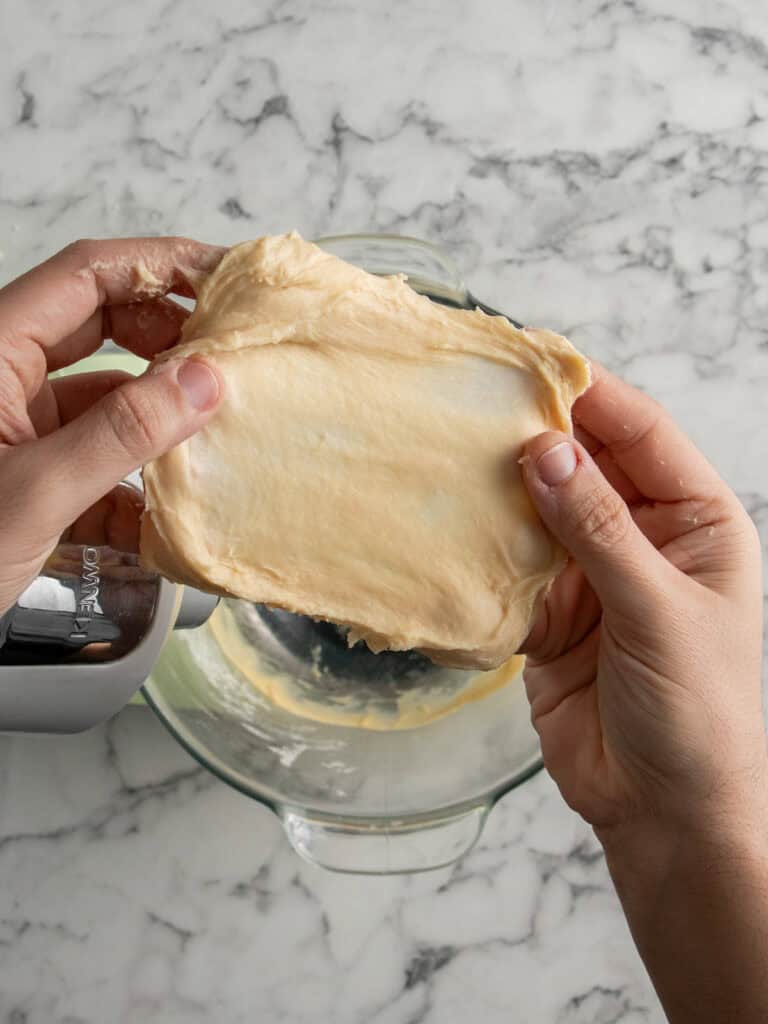
- You’re looking for a dough that will be smooth and won’t break easily when you stretch a small piece between your fingers.
Why resting time is important
Once the dough has had it’s first knead we’re going to let it rest for 10-15 minutes. If your dough feels warm, do this in the fridge.
That rest time is going to relax the gluten in the dough and give us a stronger gluten structure on our next knead when we add the butter. That means more air and a lighter brioche!
Adding the butter and second long knead
You want to make sure your butter is properly softened. Soft enough to make an indent when pressed with some resistance. Not overly soft or melted.
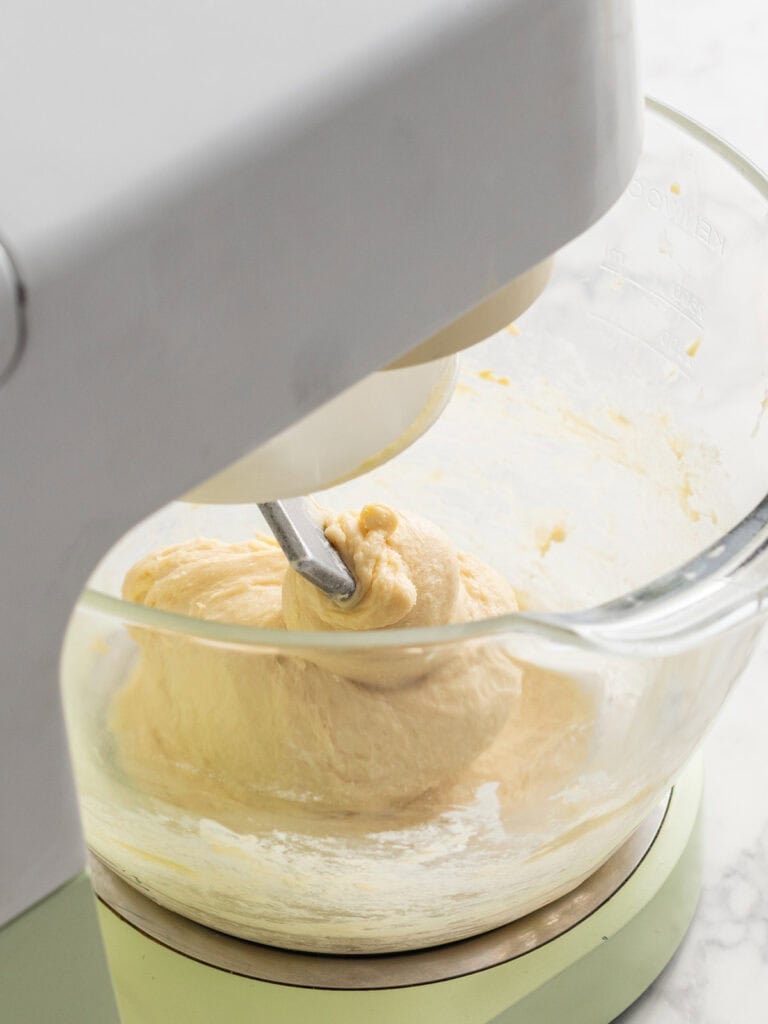
- Knead #2 (5 minutes) – Before you add the butter, knead for 5 minutes on the same speed as before. This will help develop more gluten for a lighter brioche.
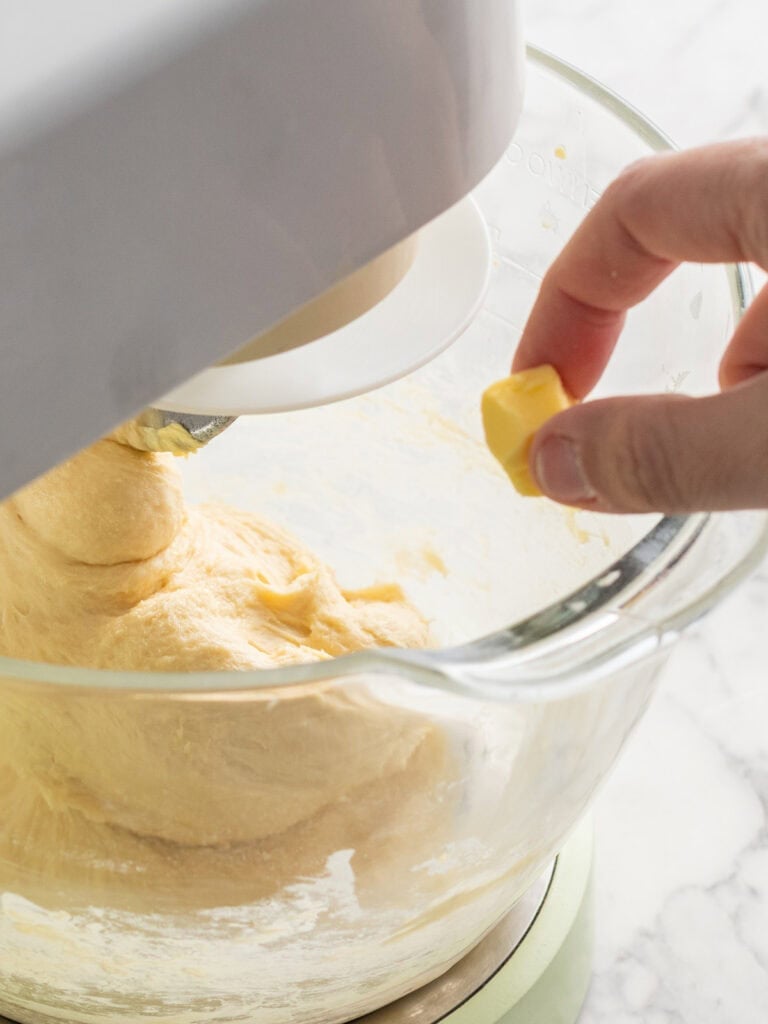
- Slowly add the butter (5 minutes) while the mixer is on the same speed you used in the long knead. 30% / speed 2 / medium speed. It’ll take about 5 minutes all up.
- Knead #3 (5-10 minutes) – Once all the butter has been added, knead for another 5-10 minutes. You’re looking for a super smooth dough that comes away from the sides of the bowl and isn’t overly sticky when touched.
Tip – If the dough begins to look overly shiny as you begin adding the butter, it’s likely your butter is way too soft or the dough is too warm. Cool the dough in the fridge or make sure your butter is properly softened.
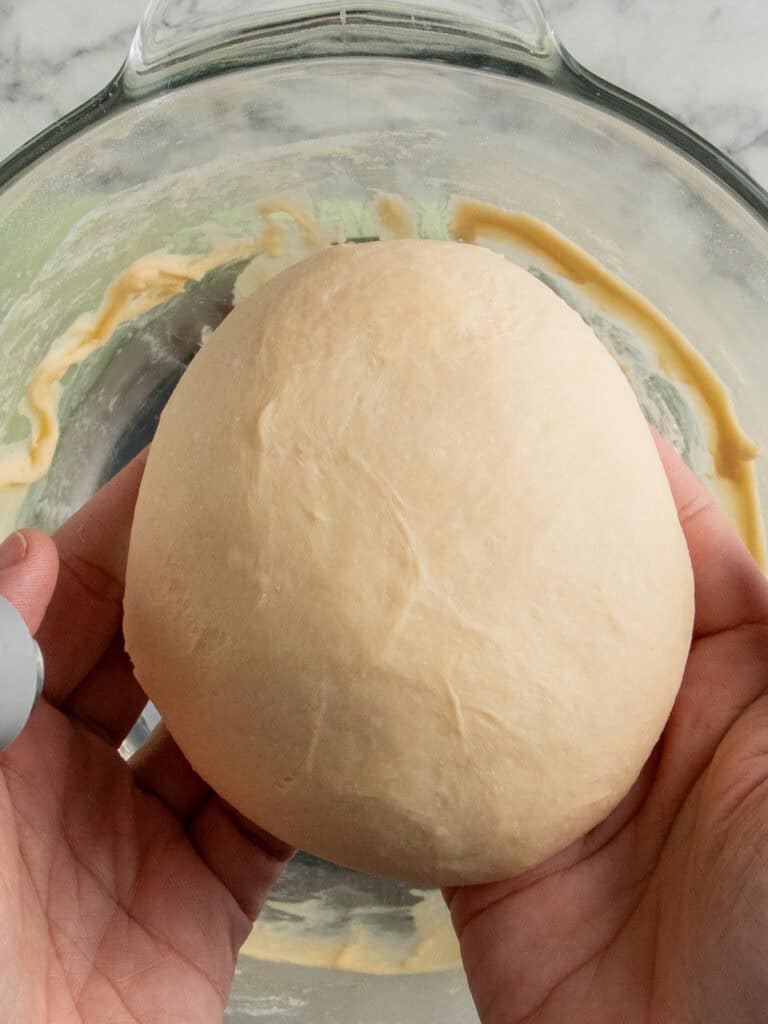
How to know when your dough is finished
When you stretch a small portion of the dough between four fingers and the dough doesn’t break, it’s ready!. If it breaks, it needs more kneading time.
Now we let the dough rise!
- Rise #1 (1 hour at room temperature) – I like letting my dough rise at room temperature for an hour until it’s doubled in size. It’s a much quicker rise than when it’s in the fridge and kind of gives the dough a big lift before it does its slow rise in the fridge. It also helps the flavors begin to become complex and develop which they will also do in the cold rise in the fridge.
- Rise #2 (12 hours in the fridge) – I tested this for a minimum of two hours. You need that fridge rise for a couple reasons. It helps develop flavor, gives you lots of small air bubbles which means a much lighter brioche when it’s baked. But it also helps firm up the butter which makes the dough easier to work with when shaping for buns or rolling our for a cinnamon scroll.
That’s it! That’s how you make brioche dough. Once it’s rested in the fridge it’s ready for you to shape and bake. Baking time will depend on how Well, at least how you make MY recipe. It’s not as complex as you might think. And it becomes more like muscle memory after the first time you’ve made it.
Couple more things
Egg wash
A brioche is generally brushed with an egg wash before you bake it. Use a kitchen brush with bristles, not silicone. It gives better coverage.
Baking time
This is just the base recipe. But the general rule of thumb is a loaf will take about 20-25 minutes and buns, depending on how you portion them will take about 12 minutes to bake. You want them to look golden on the outside.
Kneading time
You’re kneading for a total of about 30 – 35 minutes. It’s a long time, but brioche it’s an enriched dough and it needs it. At each stage of the written recipe, I’ve written the texture to look out for to know how long to knead for. Looking out for the right texture is more important than using time as a guide for kneading. Each mixer will knead at different times.
How your mixer may affect your dough.
I used two different types of stand mixers through my testing. The brand you use doesn’t matter, the type of mixer does though so here are my notes on how to make sure you get the right texture depending on the mixer you have.
- Spiral mixer – I tested with the Ooni Halo at 30% speed. It has a breaker bar in the middle of the bowl to stop the dough flying around the bowl. Because of the way it kneads, it creates more friction in the dough and warms it up. That means you’ll need to let the dough cool in the fridge when you rest it before you add the butter to stop the butter melting.
- Standard stand mixer – I tested using the Kenwood Chef Sense at speed 2 which is just below medium speed. It takes longer to get to the right texture using a stand mixer, but the dough stays cooler which means it doesn’t need to go into the fridge before the butter is added. Unless it’s a warm day.
Let’s talk yeast.
I gravitate toward using instant dry yeast in my bakes because you don’t need to activate it in warm liquid before you use it. It just goes in with the dry ingredients.
If you only have active dry yeast, that works too. It just needs to be dissolved in warm liquid first. Warm the milk and water until lightly warm, stir in the sugar and yeast, and let it sit for about five minutes until frothy. Then mix it in with the eggs and Tangzhong.
Tip – If your dough doesn’t rise, your yeast might be inactive. Keep it in the fridge to help it last longer, and if you’re unsure, test a small amount in warm water before starting to make sure it bubbles up.
A Quick Baking Guide
If you’re new to baking or just want to brush up on the basics, these guides are a great place to start!
Loved the recipe? Let me know!
If you enjoyed this recipe, leave a star rating and comment below. It helps others find the recipe and keeps the baking community growing. Tag me on Instagram so I can see your version too!
How To Make Soft Brioche Dough (Step-By-Step Guide)
This is a simple deep dive into how to make bakery level brioche dough you can use to make hamburger buns, bread and cinnamon scrolls.
Serves 10
Ingredients
Tang Zhong
- 15 g all-purpose flour, plain flour
- 75 g cold tap water
Brioche Dough
- 275 g all-purpose flour, plain flour
- 30 g caster sugar, see notes
- 5 g fine salt
- 5 g instant dry yeast, see notes
- 5 g milk powder, see notes
- 50 g eggs, yes measured by weight!, cold
- 100 g whole-milk, cold
- 65 g softened unsalted butter, softened (see notes, very important!)
Egg wash (whisk together well)
- 1 large egg, 50-55g room temperature
- 1 egg yolk, optional
- 20 g whole-milk, room temperature
Instructions
Tang Zhong
- Cook paste – Add the flour and water to a small saucepan and use a whisk to combine. Place over medium heat and whisk continuously for about 2-3 minutes until the mixture thickens to a smooth, pudding-like consistency.
- Cool down – Transfer the mixture to a small bowl and press plastic wrap directly onto the surface. Let it cool down to room temperature before using. This can be made a few hours before using. Do not place in the fridge.
Brioche
- Mix dry ingredients – Add the plain flour, sugar, salt, yeast and milk powder to the bowl of a stand mixer. Use the dough hook attachment to mix until combined. See notes if using a spiral mixer like the Ooni Halo.
- Mix wet ingredients – In a large jug whisk together the eggs and milk until well combined.
- First knead (15 min) – Add the wet ingredients and cooled tang zhong to the dry ingredients. Use the dough hook to mix the ingredients. Turn the mixer on 30% (that’s speed two on my Kenwood) and knead for 15 minutes.
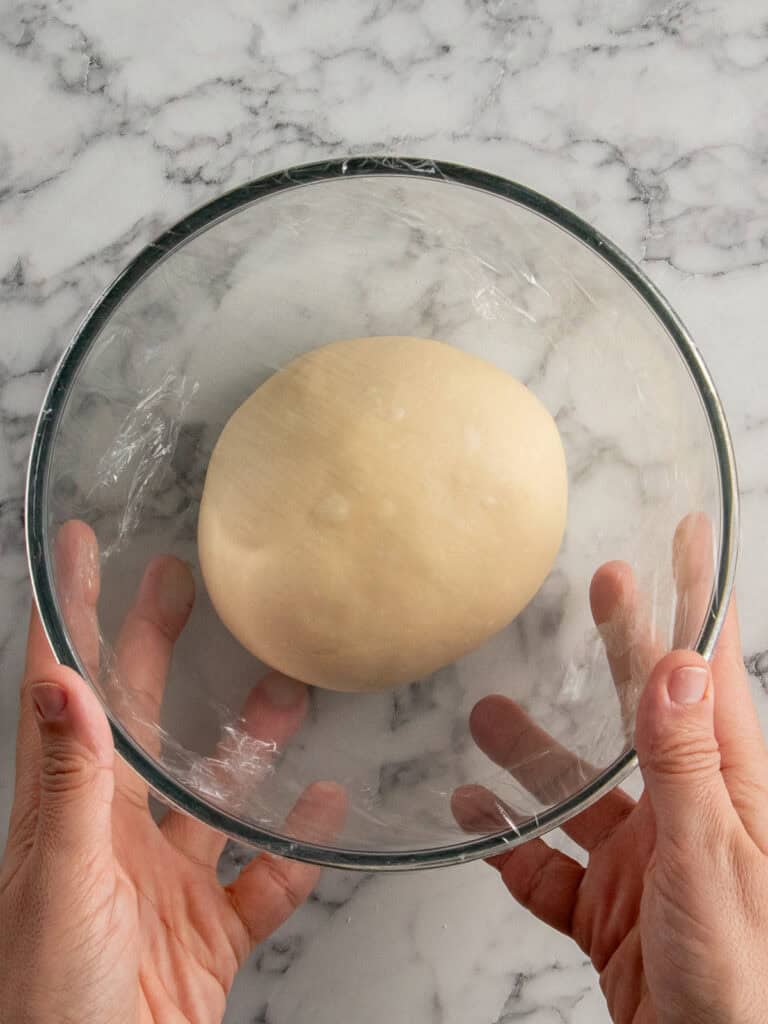
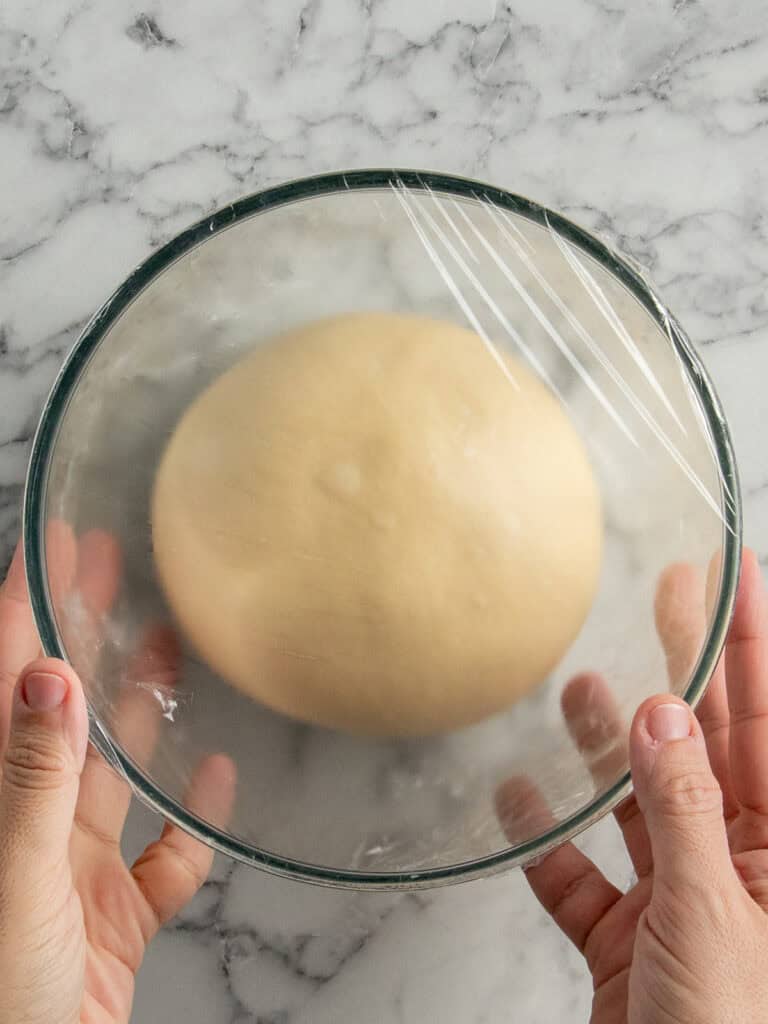
- Rest dough – Turn the mixer off and cover the bowl with plastic wrap. Rest the dough for 10-15 minutes. This will help relax the gluten in the dough and gives you an even smoother more elastic dough that is less sticky to work with later.
- Second Knead – Knead the dough for 5 minutes on speed 2 (30% speed).
- To test if dough is kneaded enough – Test by stretching a small piece between your fingers. It should form a thin, see-through sheet without tearing. Kneading time can vary depending on your mixer so focus on the dough’s feel rather than just time.
- Add the butter and finish kneading – With the mixer on speed 2, add the softened butter a little at a time, letting each piece mostly mix in before adding the next. This will take about 5 minutes all up. Once all the butter is added, knead on medium low speed for about 5-10 minutes until the dough is smooth, elastic and comes away cleanly from the bowl. A slight stickiness at this stage is normal. If the dough begins looking overly shiny as the first bit of butter is added, it’s too warm. Cool the dough down in the fridge for 10 minutes before adding the remaining butter.
- Room temp rise (Proof #1) – Add the dough to a large sized mixing bowl and cover with plastic wrap. Let it rise in a warm spot of the house for 1 hour or until doubled in size.
- Cold rise (Proof #2) – Place the bowl of dough in the fridge for at least 2 hours, or up to 8 hours (overnight) for better flavor. The dough will continue to expand as it chills.
- Your dough is ready! – Once the dough has finished chilling and doing its thing in the fridge it's ready for you to shape and bake. Baking time will depend on how you portion and shape it but the rule of thumb is to get it nice and golden on the outside. A loaf will generally take about 20-25 minutes and little buns will take about 12 minutes.
Nutrition
Calories : 1913kcal
Carbonhydrates: 236g
Protein: 53g
Fat: 75g
Saturated Fat: 42g
Polyunsaturated Fat: 6g
Monounsaturated Fat : 21g
Trans Fat : 2g
Cholesterol: 703mg
Sodium: 2573mg
Potassium : 814mg
Fiber: 9g
Sugar : 13g
Vitamin A: 2633IU
Vitamin C: 0.4mg
Calcium: 334mg
Iron: 16mg
Nutrition Disclosure
Gave this recipe a go?Mention @thescranline or tag #thescranline!
previous post
8 comments
Hi Nick, thank you for a great job on the recipe and its development. One final question before trying it. Do you let the shaped dough rise before baking it or put the buns straight to oven after they’ve been shaped and egg washed? Thanks.
Hi Jo! Thanks so much for the kind words! You let them have a final rise after they’ve been shaped. Take a look at the recipe card at the bottom of the post. I’ve got all the steps there 🙂 N x
This recipe is definitely next level good. Ive tried many. Thx for being awesome!
Thanks so much Nick! I’m so glad you loved it. I worked super hard on this one to get it as great as I could! N x
Wow, this is the most detailed bread recipe I have seen and trust me, I’ve seen heaps. Thank you so much for putting so much time and effort into making this recipe so clear. I’m a bread making newbie so these tips and tricks are super helpful. Is it necessary to use plain flour or would you get the same results with bread flour? I can’t wait to try this recipe!
honestly you’re strong my ego here Denise haha. I agonised over this recipe so hearing this kind of feedback makes it all worthwhile. Hmm, so this recipe doesn’t need bread flour. You’re looking for light, soft and puffy. I think a bread flour might make it too heavy. Hope that helps! N x
Hi Nick,
I am sure gonna try this recipe.
Maybe i am missing the oven temp.
Can you please let me know at what temp do we habe to bake them.
TIA
Hi Sara! Hmm, I actually didn’t include that because this is more of a base recipe. But it’s the same dough I used for my Cream buns. Bake on 195C / 385F (fan off), 175C / 350F (fan on). Gently brush buns with egg wash. Bake for 12 minutes until golden, light to lift, and fully cooked through. Hope that helps! N x