Soft Cream Buns With Cream And Jam
This is my version of the famous soft brioche cream buns you can get here in Australian bakeries with whipped cream and tangy raspberry jam in the center. When I say soft, I mean the brioche is just as soft as the fluffy whipped cream in the center. Pillowy, tender and rich. I love finishing mine off with a simple dusting of icing sugar for that classic country bakery look.

Hey team, Nick here! We’re about to delve into how to make my soft cream buns. This is a recipe I spent months developing and became obsessed with after a trip to one of my favorite bakeries here in Melbourne, Akimbo. The brioche is as soft as the whipped chantilly cream filling and the home raspberry made jamgives a little bit of tang which cuts through the richness of the buttery brioche.


I spent 4 months working on the brioche alone to get it as soft as Akimbo’s. I actually wrote a stand alone post on all the things I learned about brioche which goes through my testing and all my tips and tricks to making brioche that stays soft all day.
Why I’m obsessed with cream buns
Before I tried my first cream bun, I thought they were an old fussy dessert that wasn’t anything special. I bought one out of curiosity and I expected a firm bun and overly sweet cream filling. I was bloody wrong. The bun was softer than the whipped cream! I instantly became obsessed with getting it on the website.
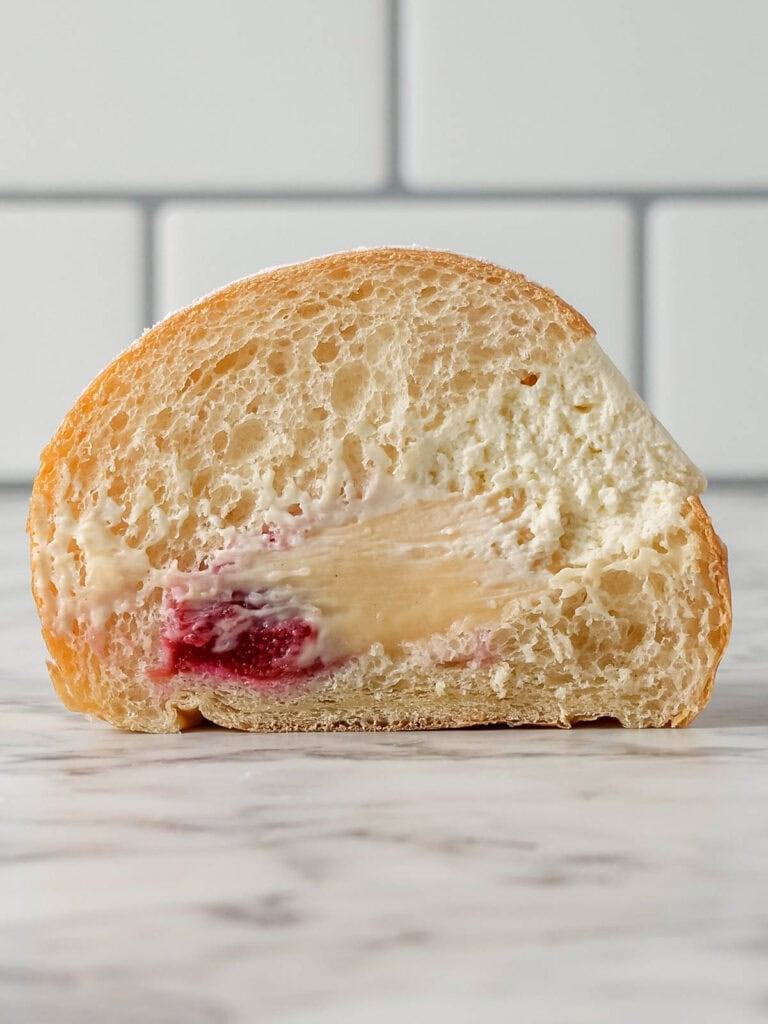
I’m obsessed with the buttery flavor of the brioche and how soft it stays. They’re only lightly sweet because the jam and sugar dusting do all the work. The jam adds a bit of tang from my home-made recipe, and the unsweetened Chantilly cream keeps everything balanced and creamy without being heavy.
The reason these buns stay soft all day
It because of a method called Tangzhong. I use it in my soft Japanese milk bread recipe.
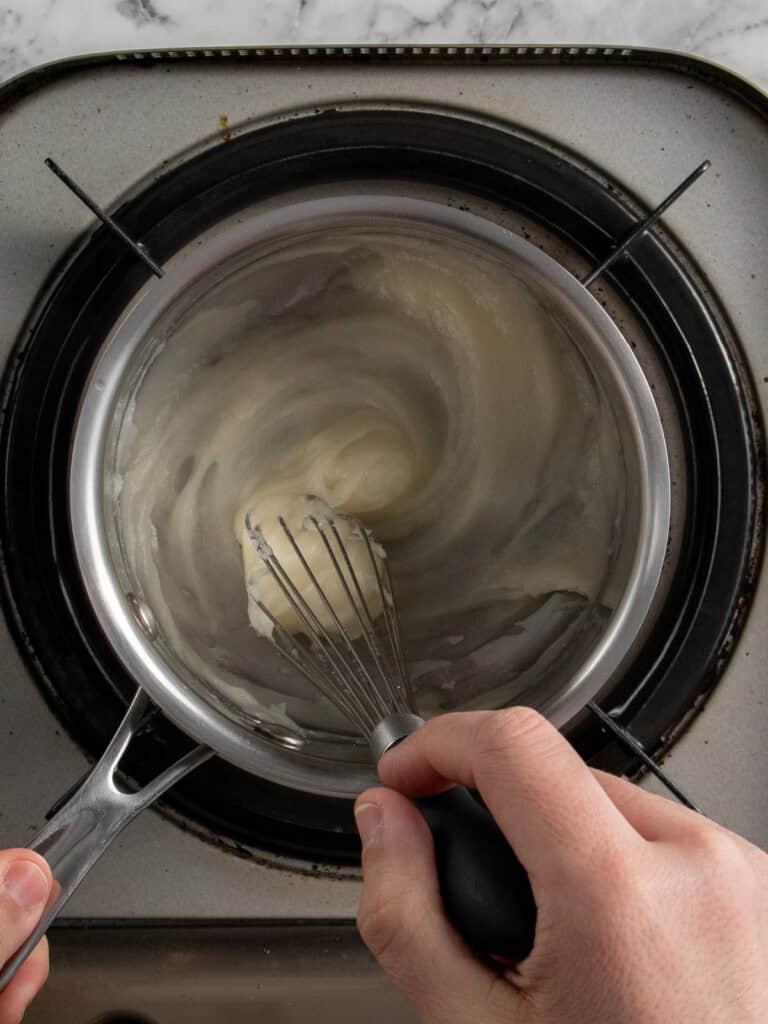
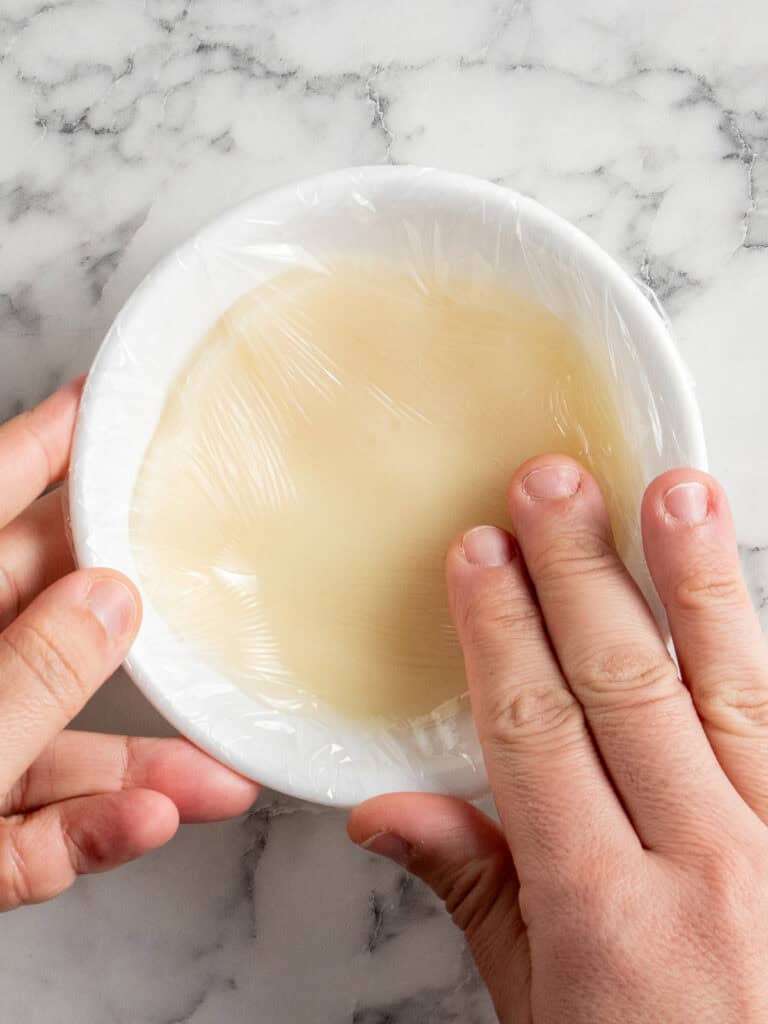
- A portion of the liquid (water in this recipe) and flour is cooked together until it forms a paste. Once you’ve made it, pop it into a small bowl and cover the surface with plastic wrap. Let it cool at room temperature.
The Tangzhong gelatinizes a portion of the flour which helps retain moisture in the bread and makes it super soft and fluffy. And it stays that way for days!
How to make the brioche buns
Brioche dough is known for being enriched with milk, sugar and butter. That’s what gives it it’s unique rich flavor and soft tender crumb.
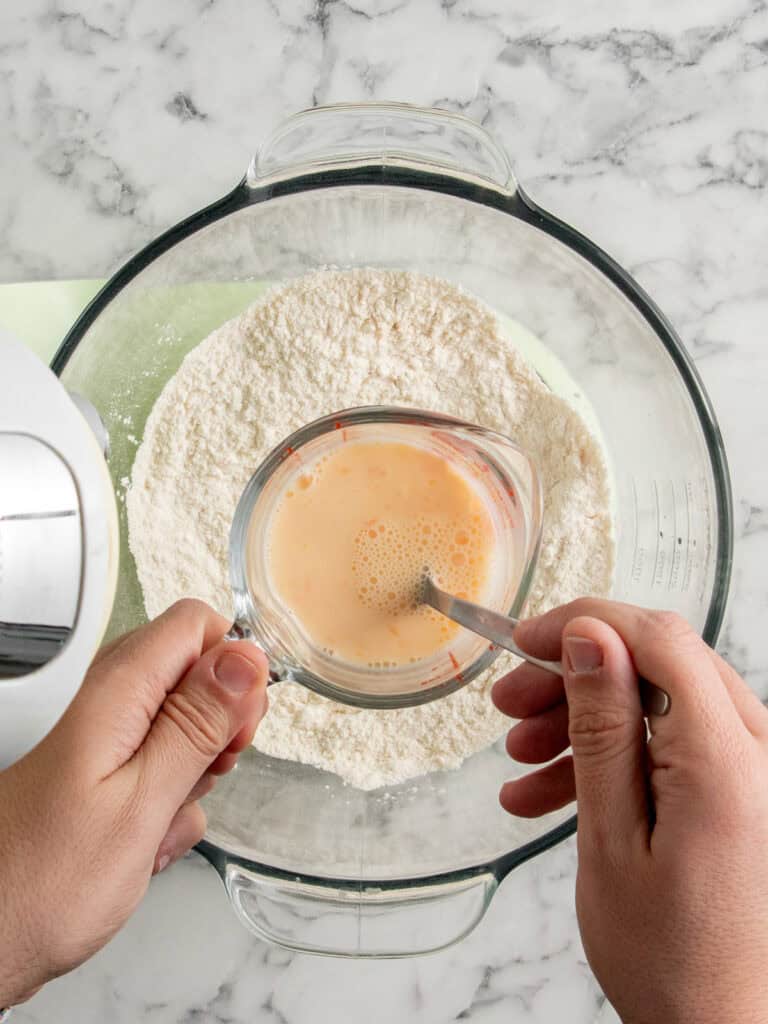
- Mix the dry ingredients together, then add the cooled Tangzhong, whisked eggs (cold) and milk (cold).
- Knead for 15 minutes on speed 30% on a spiral mixer and speed 2 (medium low) on a stand mixer with a dough hook.
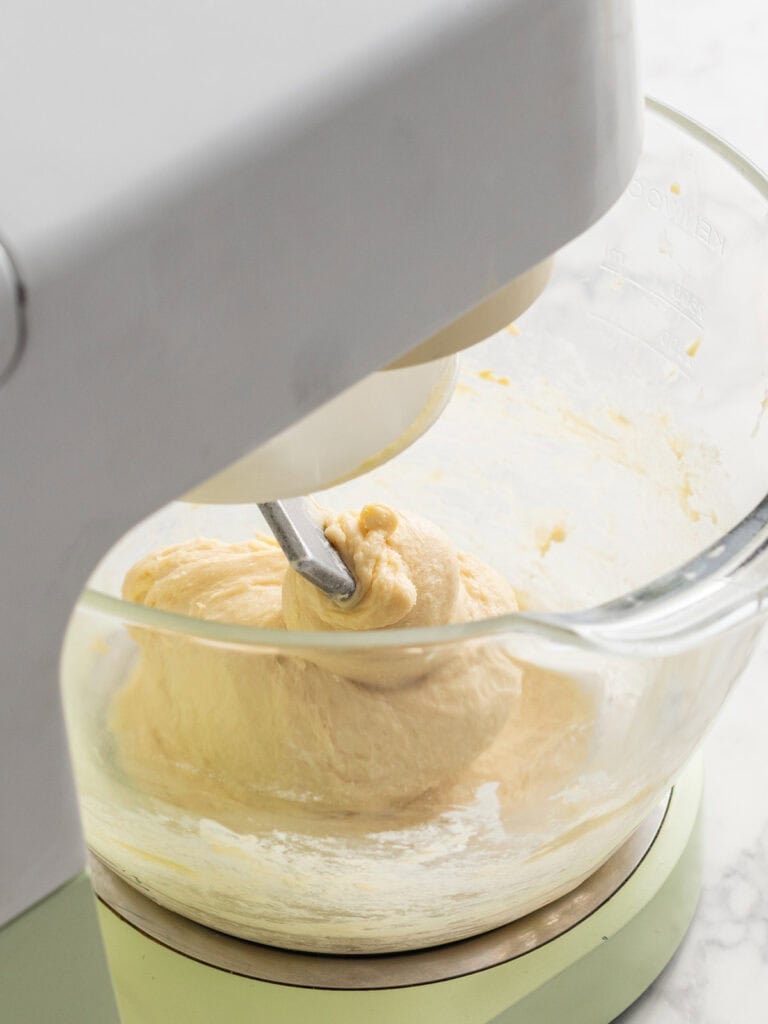
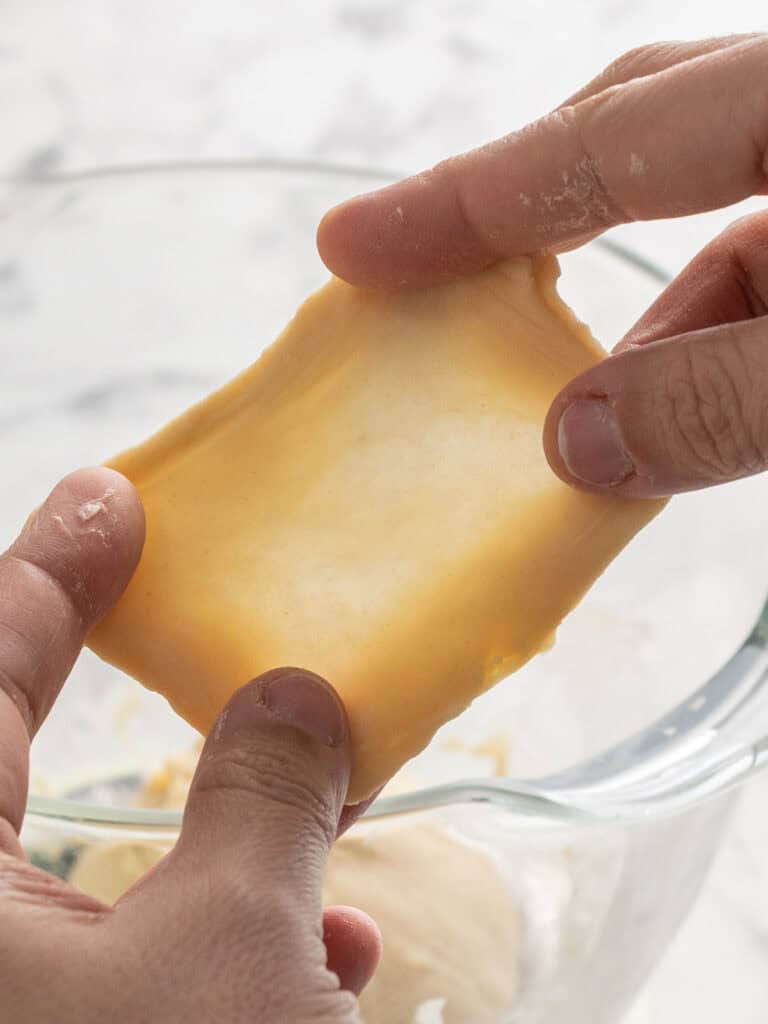
- After 15 minutes the dough will be smooth and elastic.
- You will be able to stretch a small portion out without it breaking too easily.
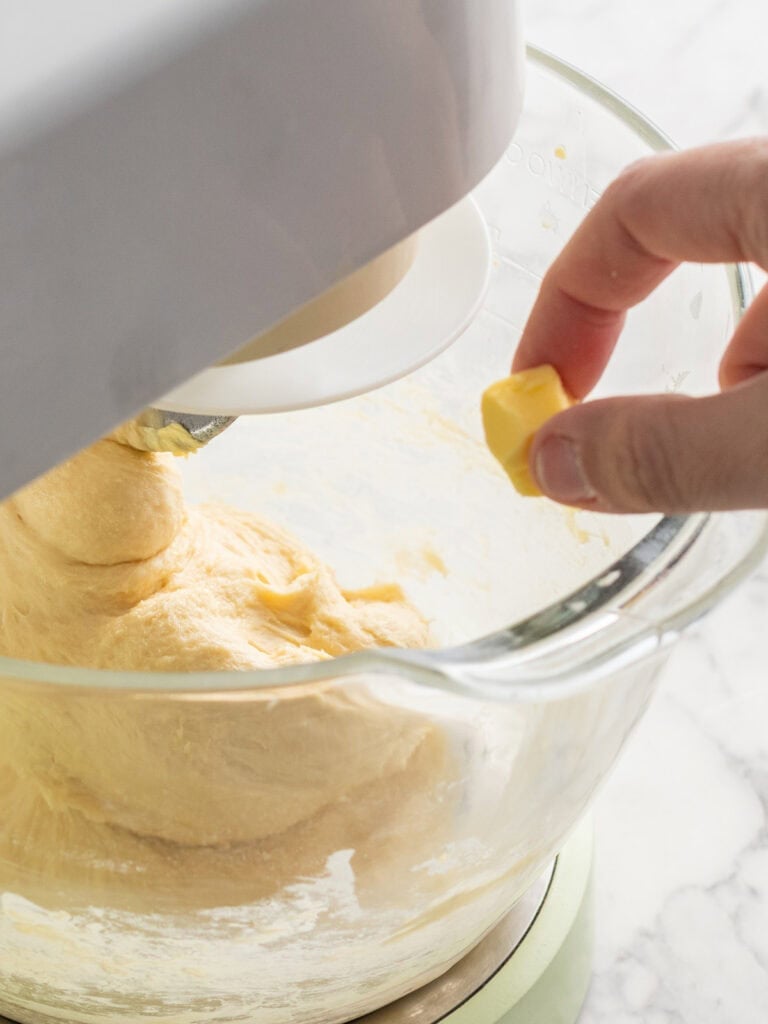
- Let it rest for 10-15 min minutes before kneading for 5 minutes on the same speed again. Slowly add the butter a cube at a time.
Tip – Make sure your butter is properly softened! I have an entire blog post about softened butter. Once you have a read, you’ll know how to soften butter properly forever!
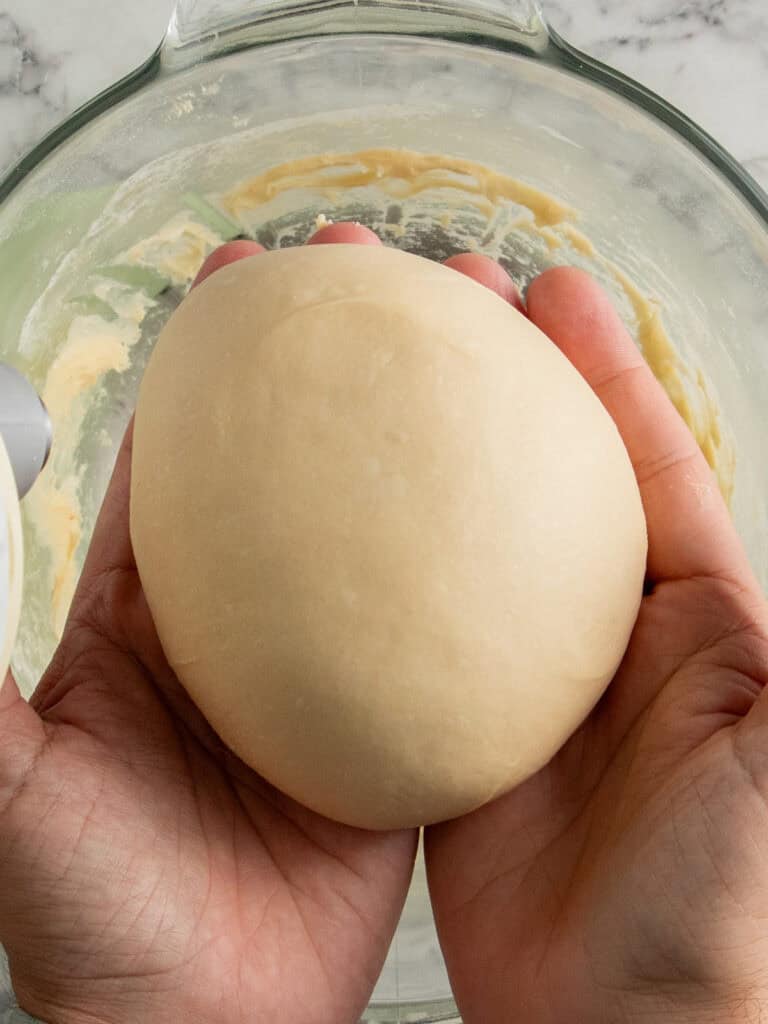
- After the butter has been added knead for about 5-10 minutes until the dough starts coming away from the sides of the bowl.
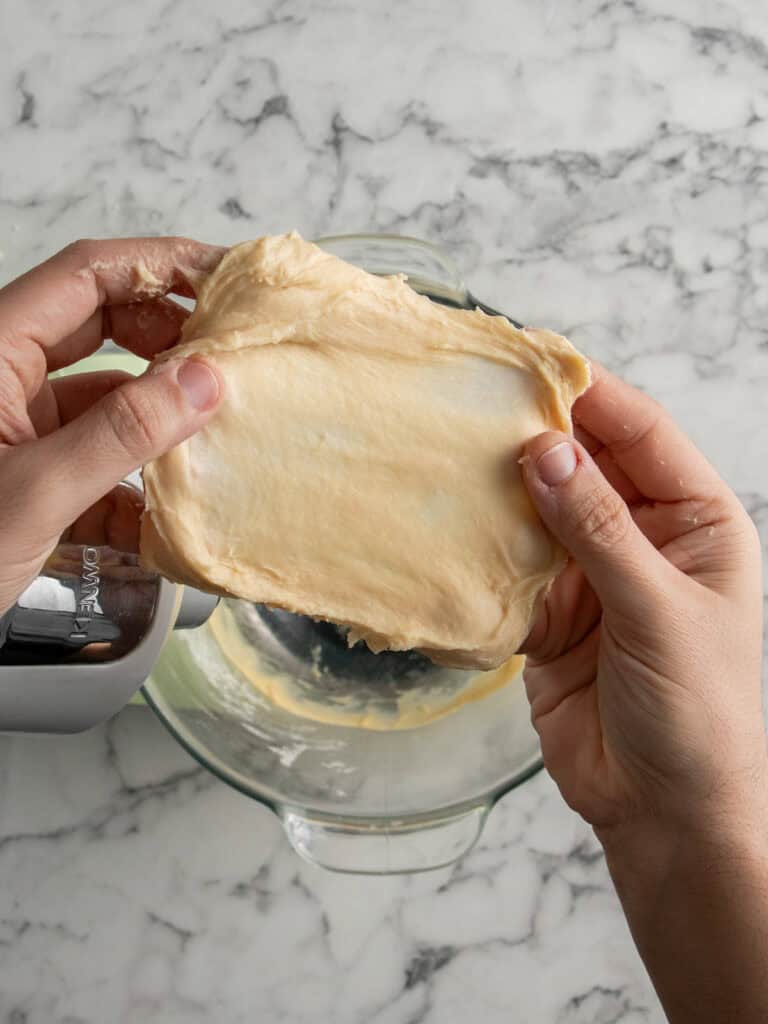
- Do another window pane stretch test. This time the dough shouldn’t break easily at all. It will be very smooth and tacky.
Tip – Make sure your dough isn’t warm before you add your butter or it will melt the butter. If the dough is warm after that first knead, pop it in the fridge for that 5 minute rest, then add the butter.
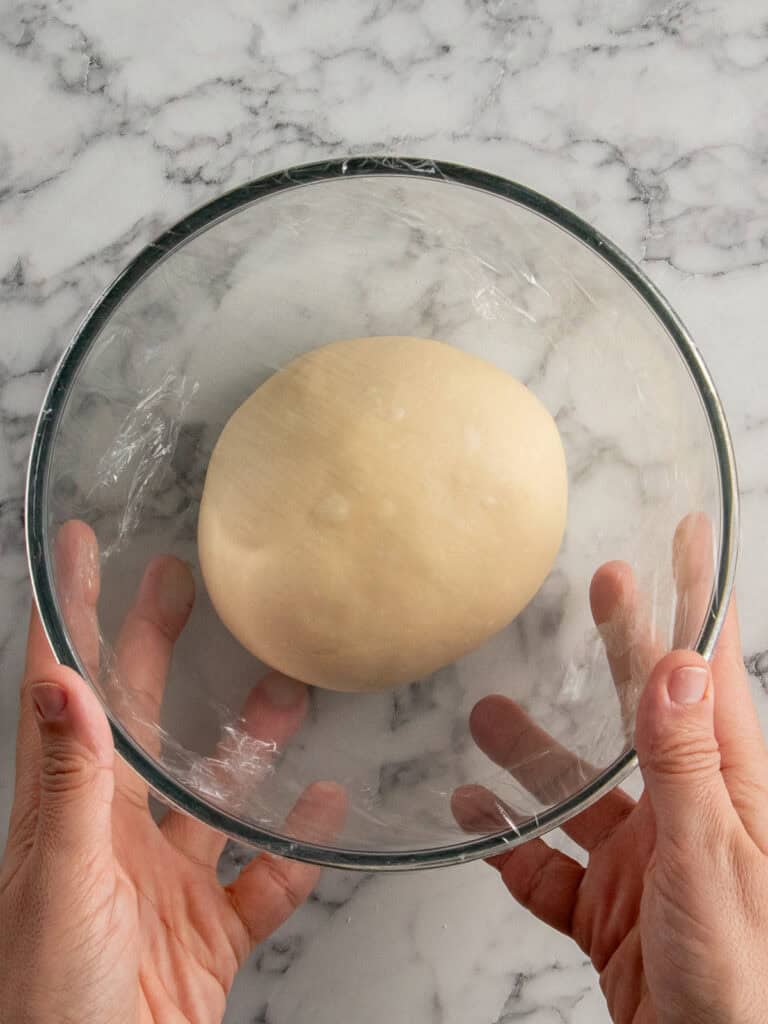
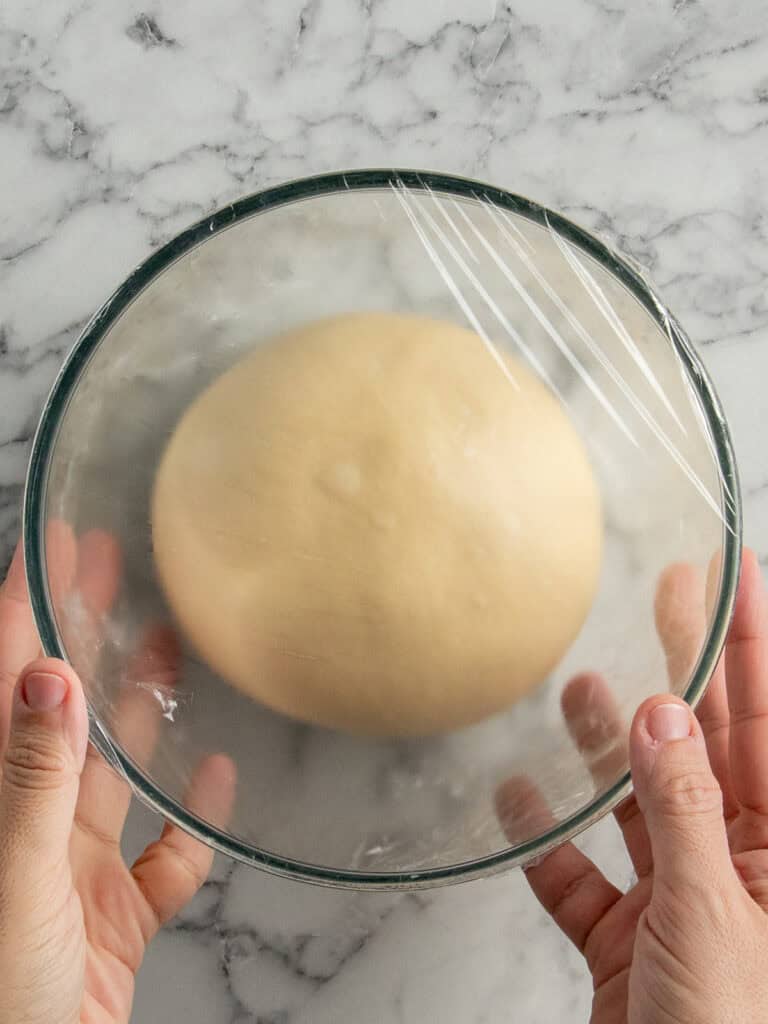
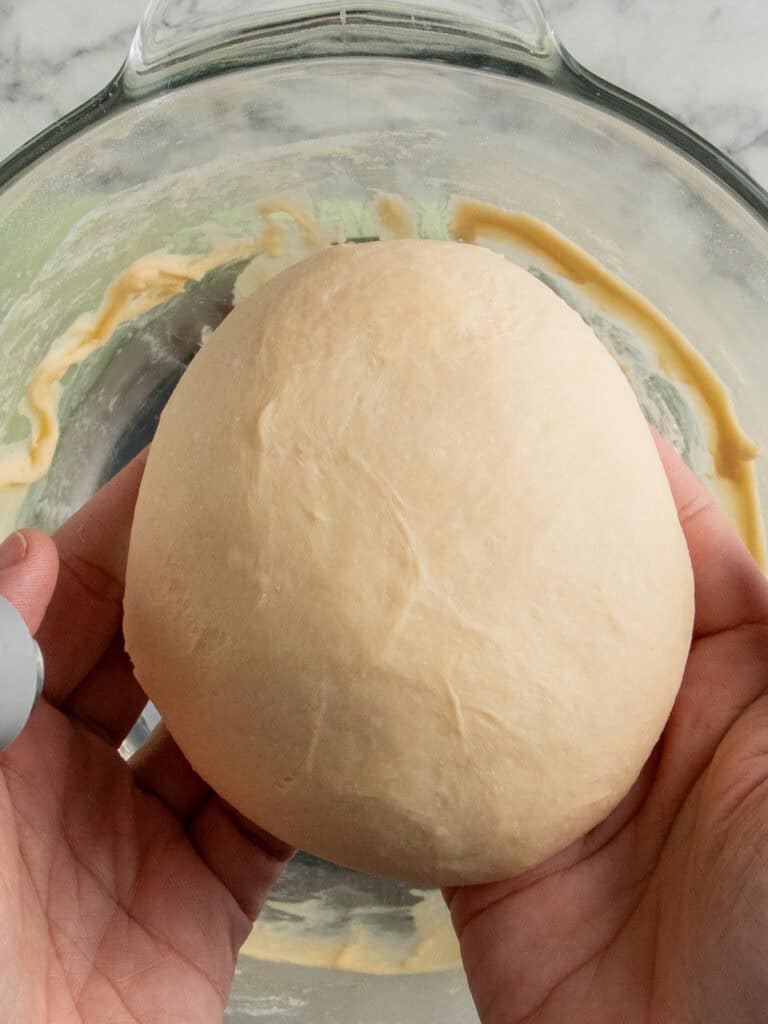
- Let your dough rest in a bowl covered with plastic wrap for an hour at room temperature. It will double in size. Then transfer to the fridge to slow rise for 12 hours. I make my dough the day before I want to use it.
Overnight proofing – An overnight cold proof helps slow down the yeast so that it actually creates lots of smaller bubbles. These expand in the final proof and when the buns are baked leading to a fluffier bun. It also helps develop the flavor. I tested these with a 2 hour cold proof and they worked, but I like doing the overnight
Shaping your buns

- After 12 hours in the fridge your dough will have expanded quite a bit and will be nice and stiff. Easier to work with. But work quickly because it comes to room temperature quite fast!
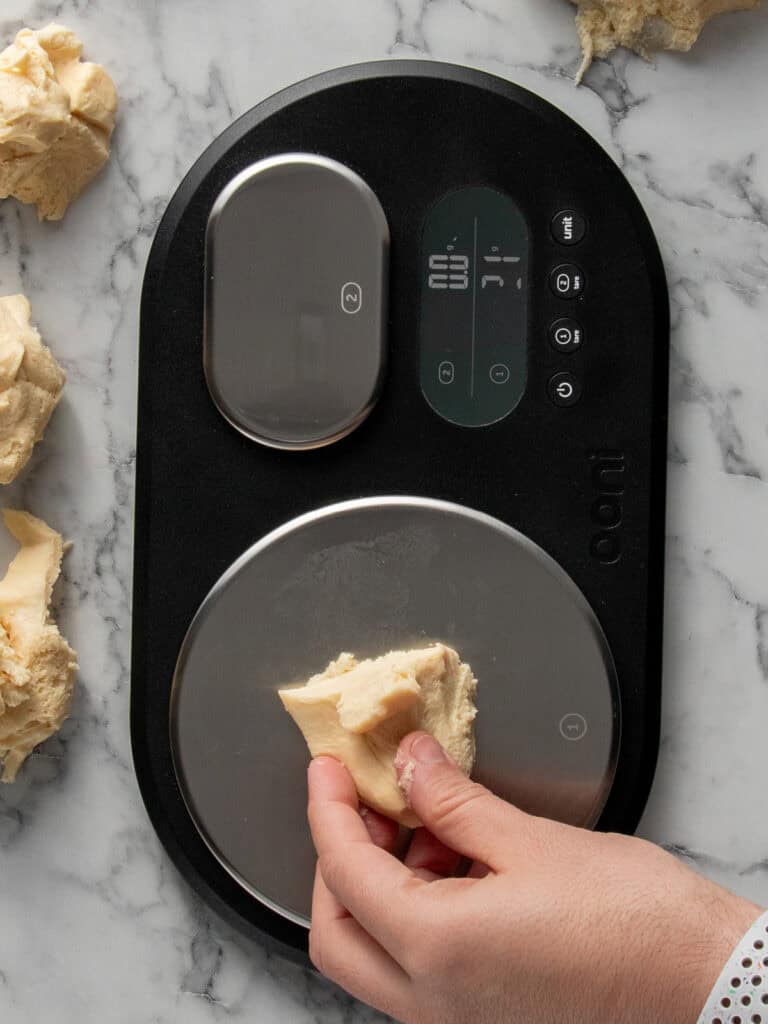
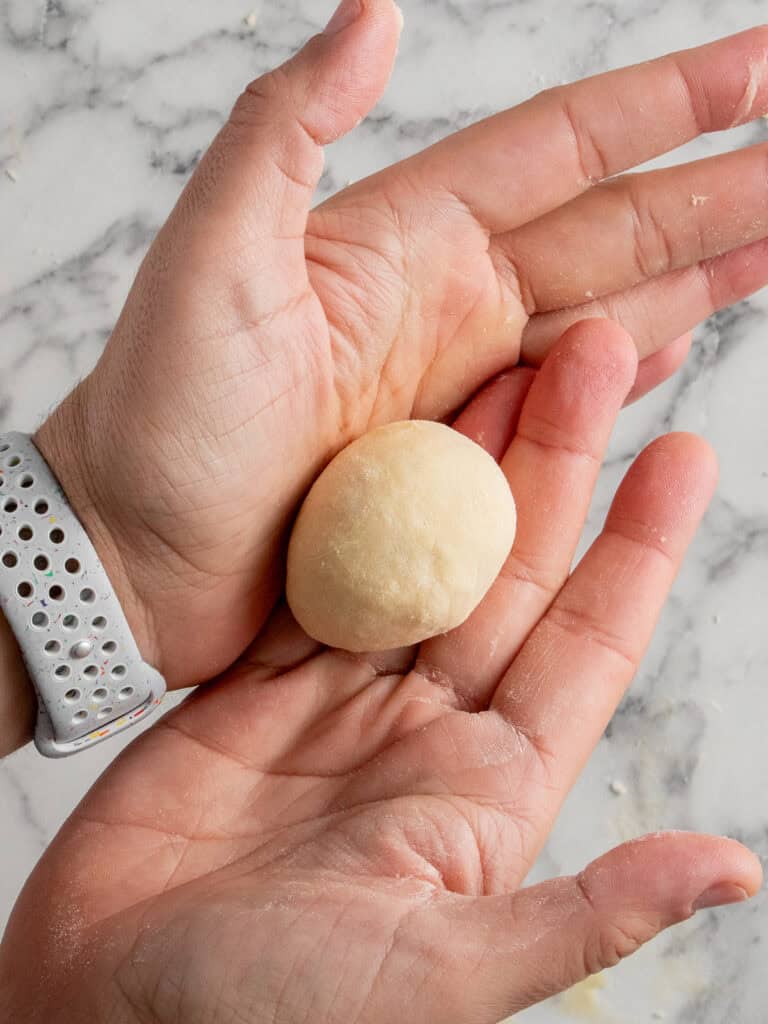
- Portion the dough into 10 pieces. I do this by weighing each portion. It comes to about 58g per piece.
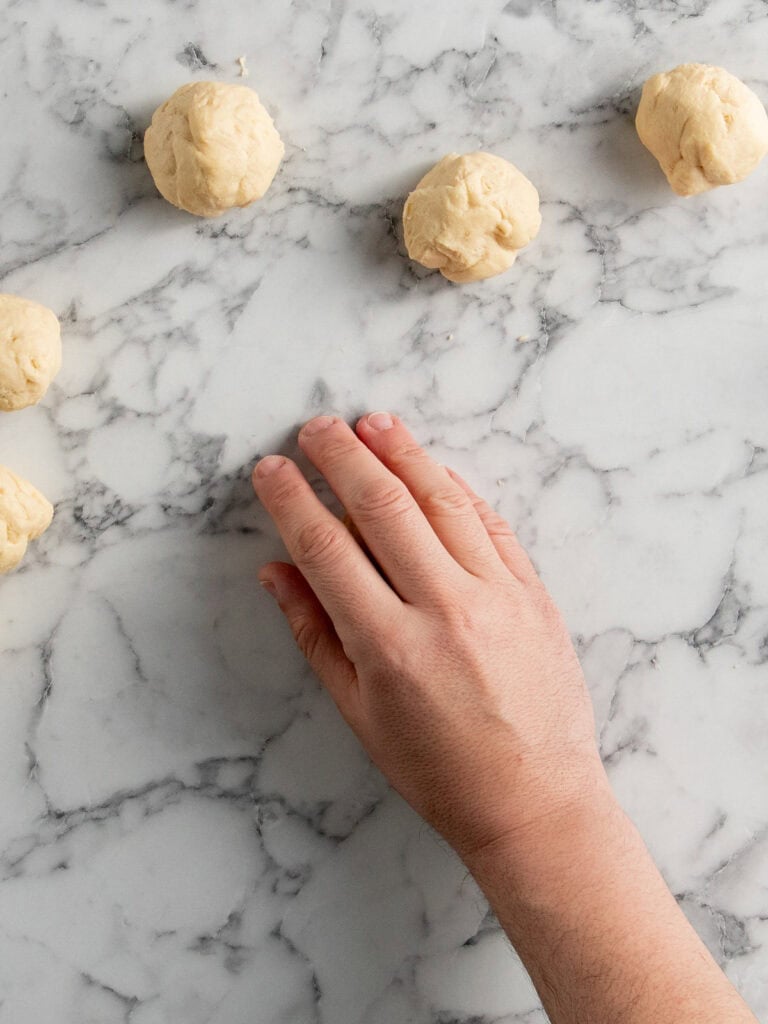
- Then cup a hand over each piece of dough and swirl around it to form a rough ball shape.
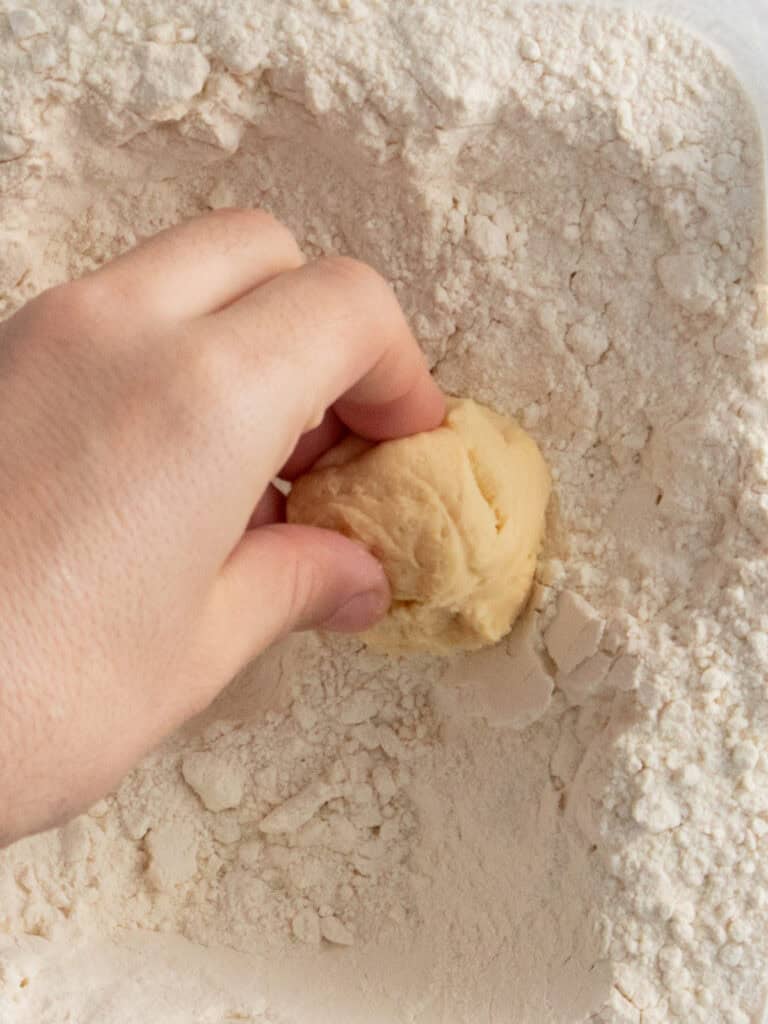
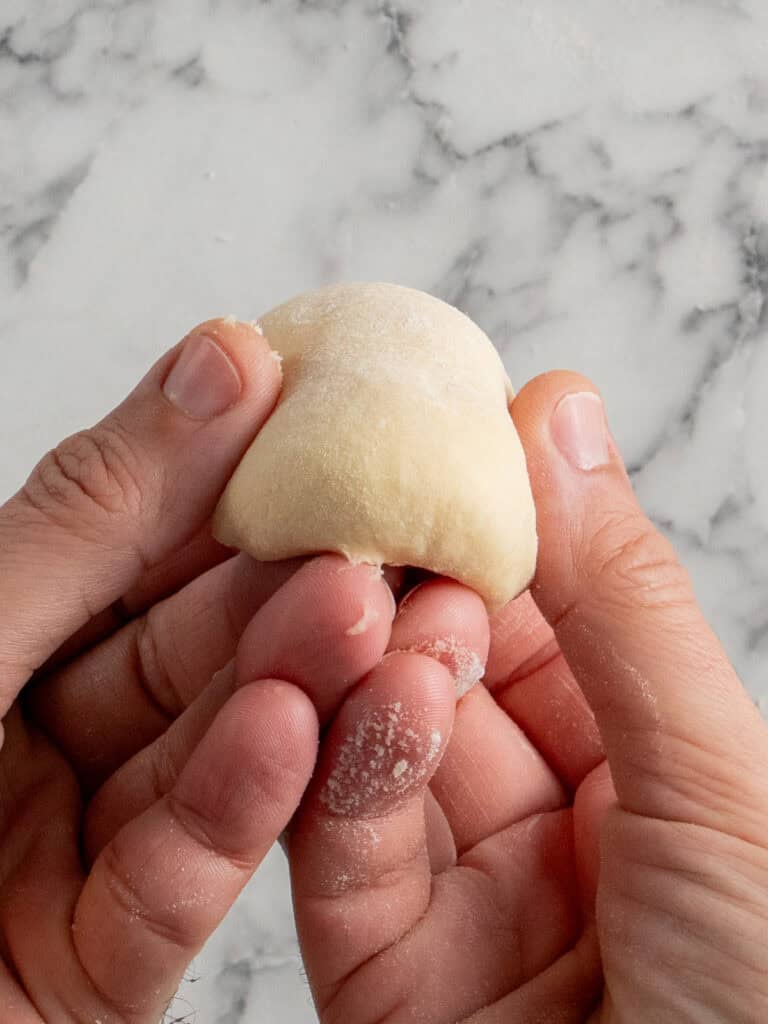
- Dip only the top of the dough ball into some flour
- Then slightly stretch the bottom (no flour) under itself to get a nice smooth top.
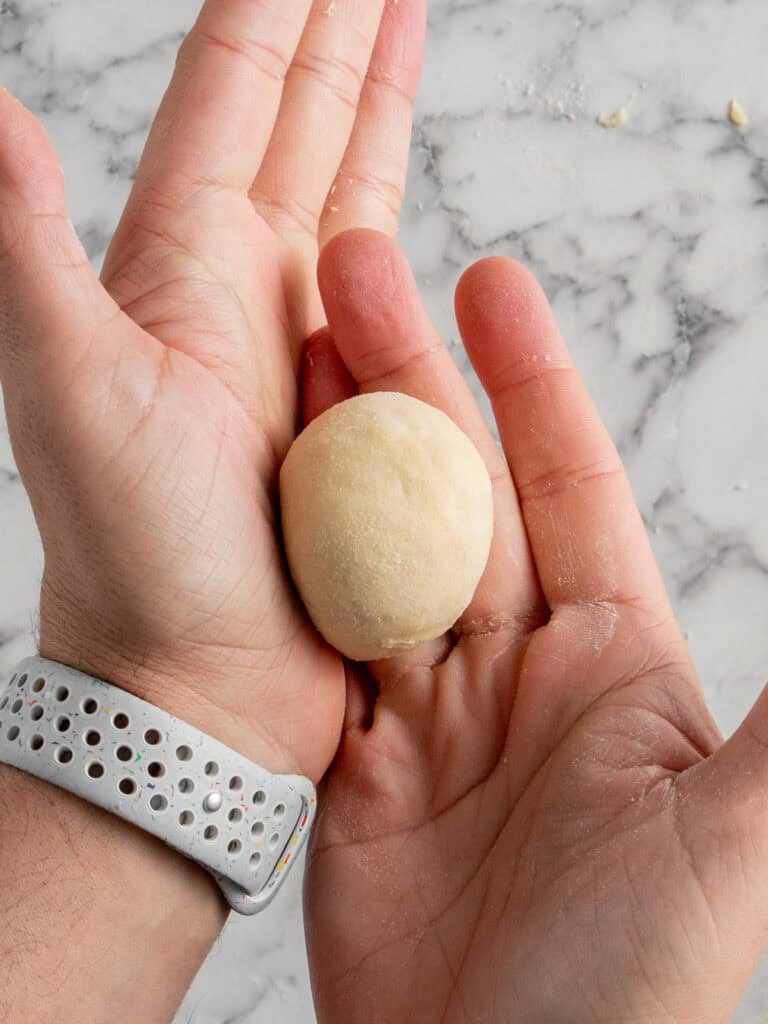
- I like to run the bottom of the dough between the heel of two hands to further tighten the seal under each bun and smoothen out the top.
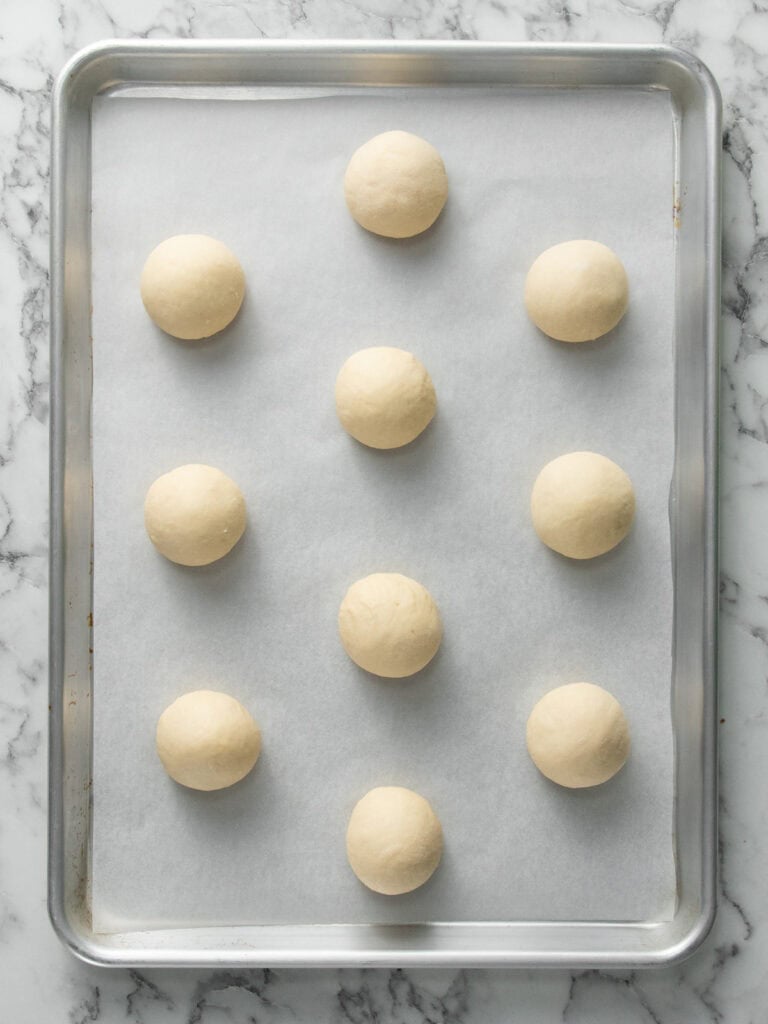
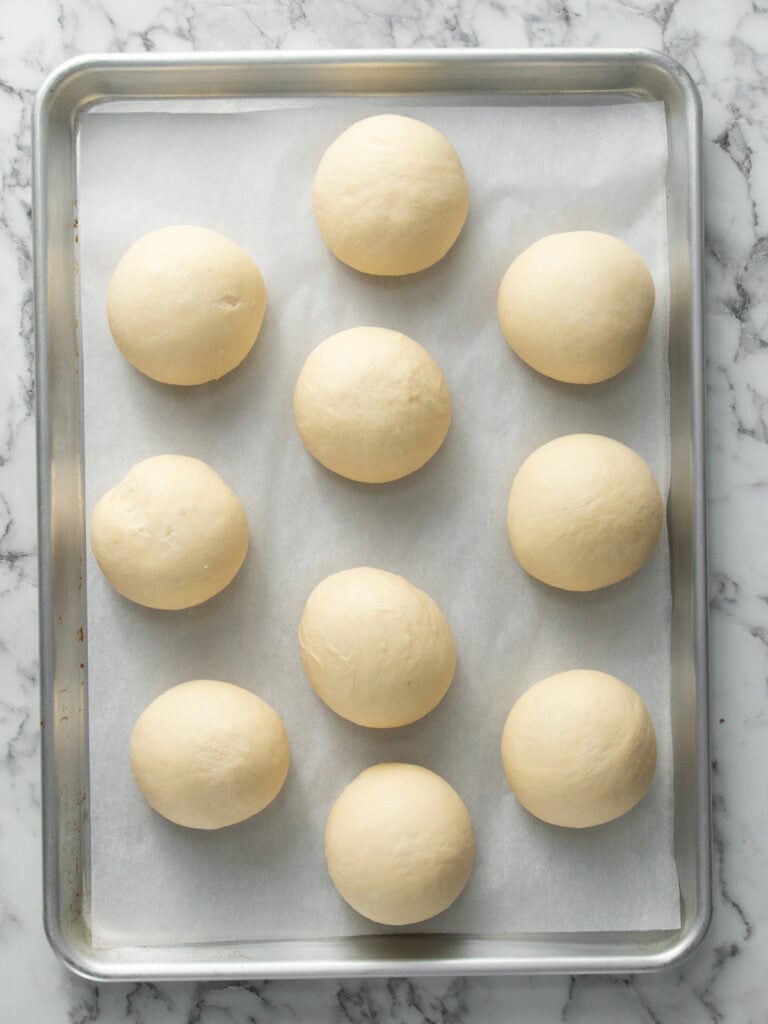
- Place each dough ball on two large baking trays lined with baking paper and cover them loosely with plastic wrap. I like to oil mine so it doesn’t stick to the dough.
- Let them rest at room temperature for about 2-3 hours.
How to know when your dough is ready to be baked
The buns will almost triple in size. Rather than going off time, go off sight and feel. When lightly pressed with your finger the buns will feel slightly springy. They should spring back partway, not fully. If they spring back all the way they need more time, if they don’t spring back at all they are likely over proofed and should be baked immediately. Properly proofed buns should feel room temperature, not cool and will jiggle slightly when the tray is gently wobbled.
Glazing and baking your buns
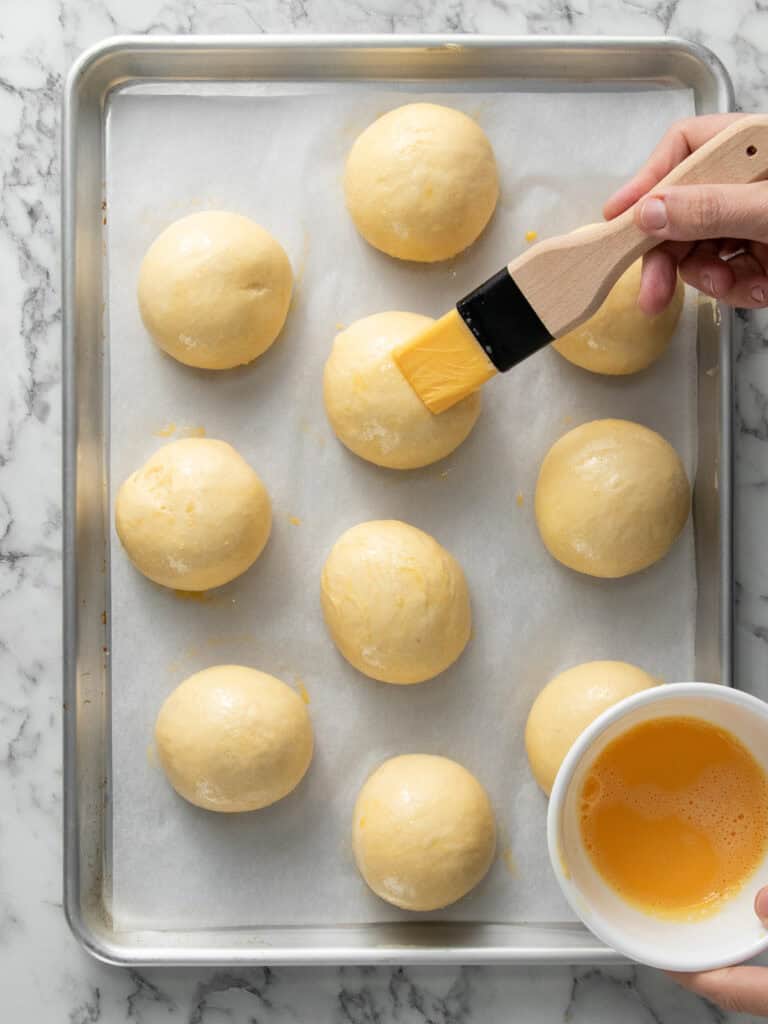

- Egg wash – I like brushing my buns with some egg wash before I bake them. Use a kitchen brush with hair instead of a silicone brush because it provides better coverage and there’s less chance of the brush deflating the buns. Just be gentle anyway.
- Baking – Bake each tray one at a time in the middle rack of your oven. I like baking on the bake setting with the fan off. But I’ve included temperatures for fan on baking. They only need 12 minutes and they’ll be golden and feel very light when picked up.
Let’s talk fillings
There are so many filling flavor combos you could use for these buns. Akimbo make a mean citrus butter and cream version. But for my recipe I stuck with the tried-and-true classic: cream and jam.
You’ll need to make my Chantilly cream for this recipe. It can be whipped a day in advance and stored in the fridge until you’re ready to use it. I used my home-made raspberry jam. I like it for this recipe because it’s not as sweet as store bought and the tang cuts through the sweetness of the finished bun.
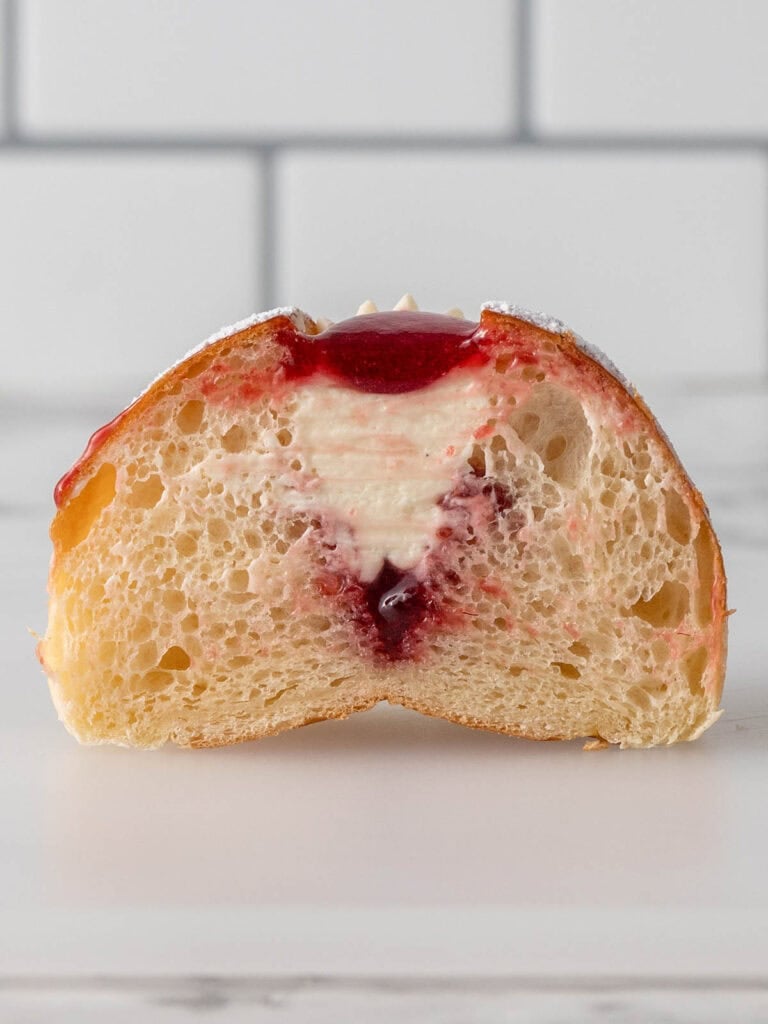
Finishing your buns
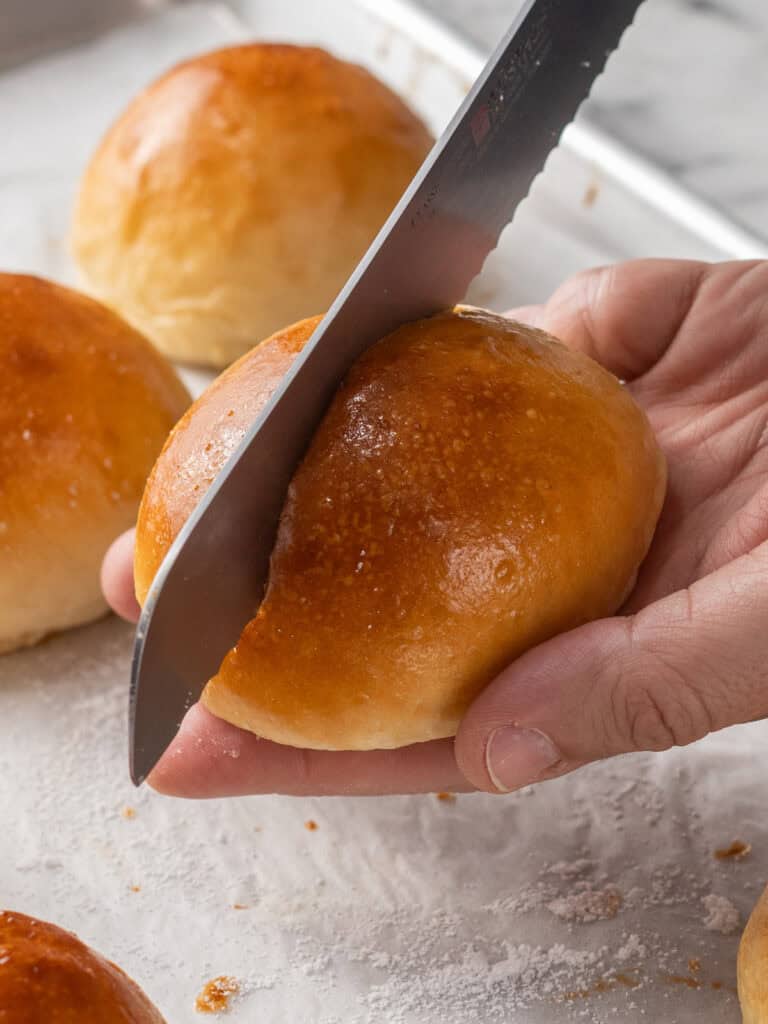

- Use a serrated knife to slice each cooled bun top down.
- Dust with sugar. You want to do this now so you don’t dust the cream which can cause it to become ‘liquidy’.
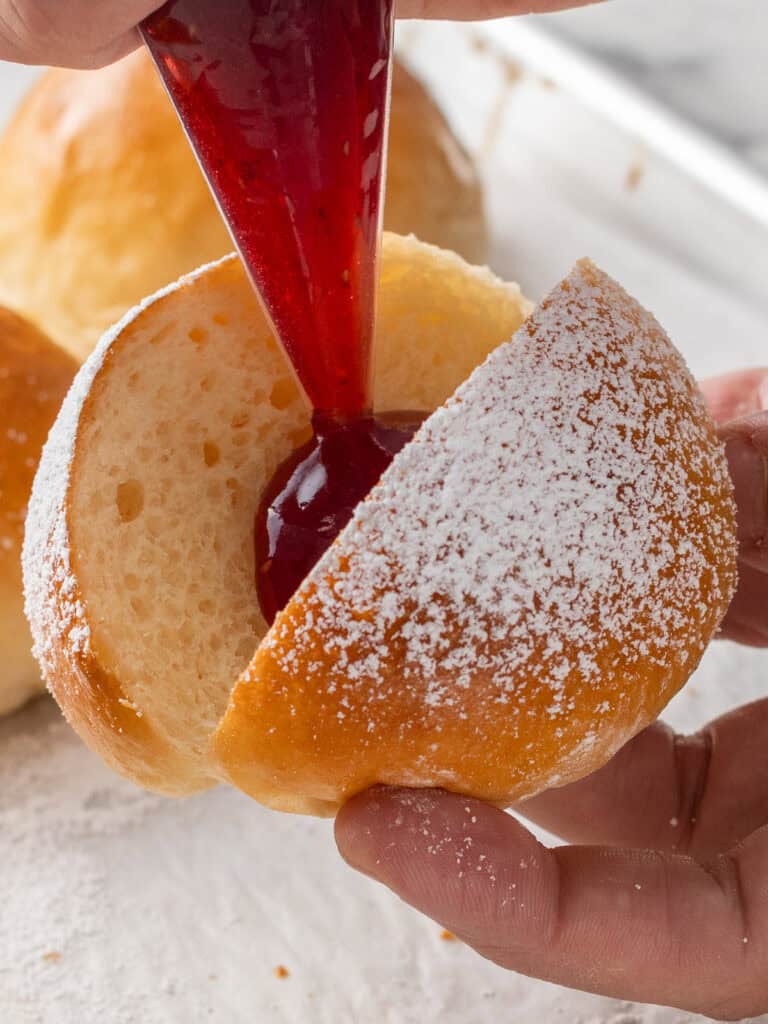
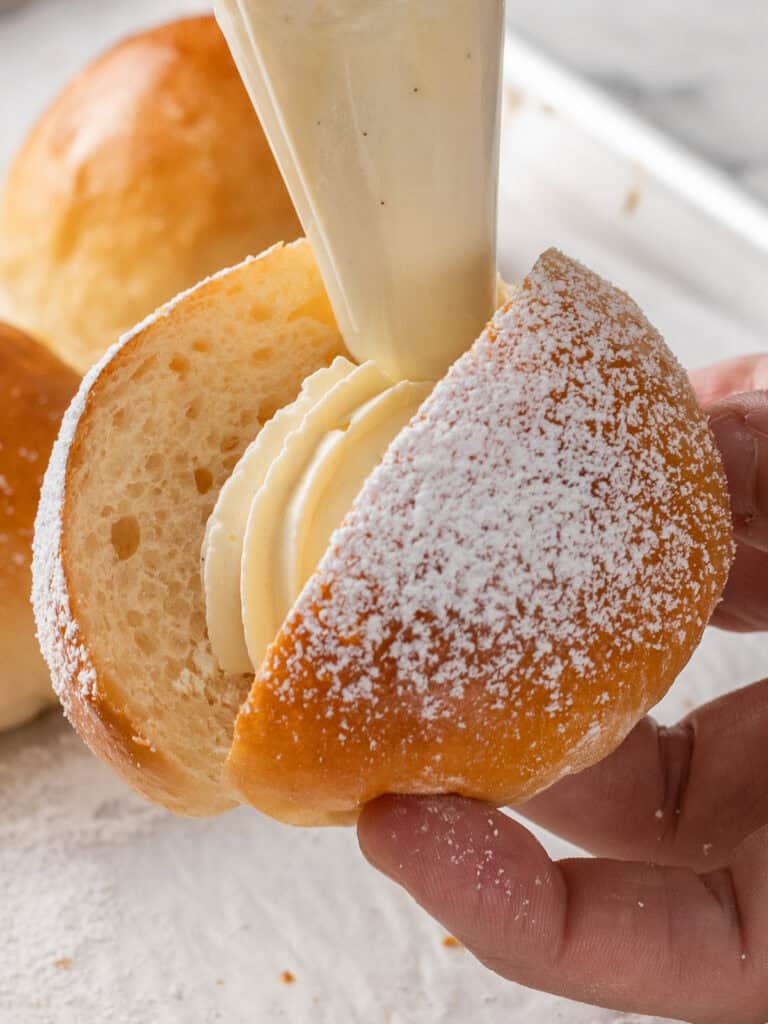
- Add some jam in the middle. I like using a piping bag to pipe it on but you could use two spoons.
- Pipe some cream over it as a barrier. I use a medium open star tip.
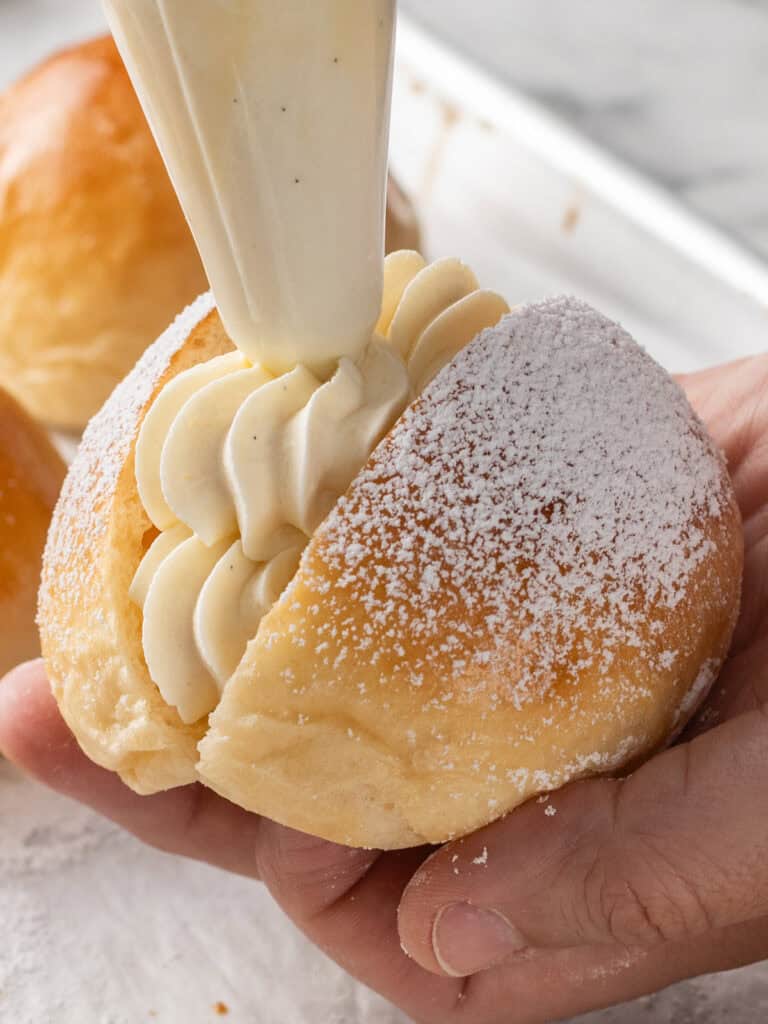
- Then pipe swirls on top of that first cream layer.
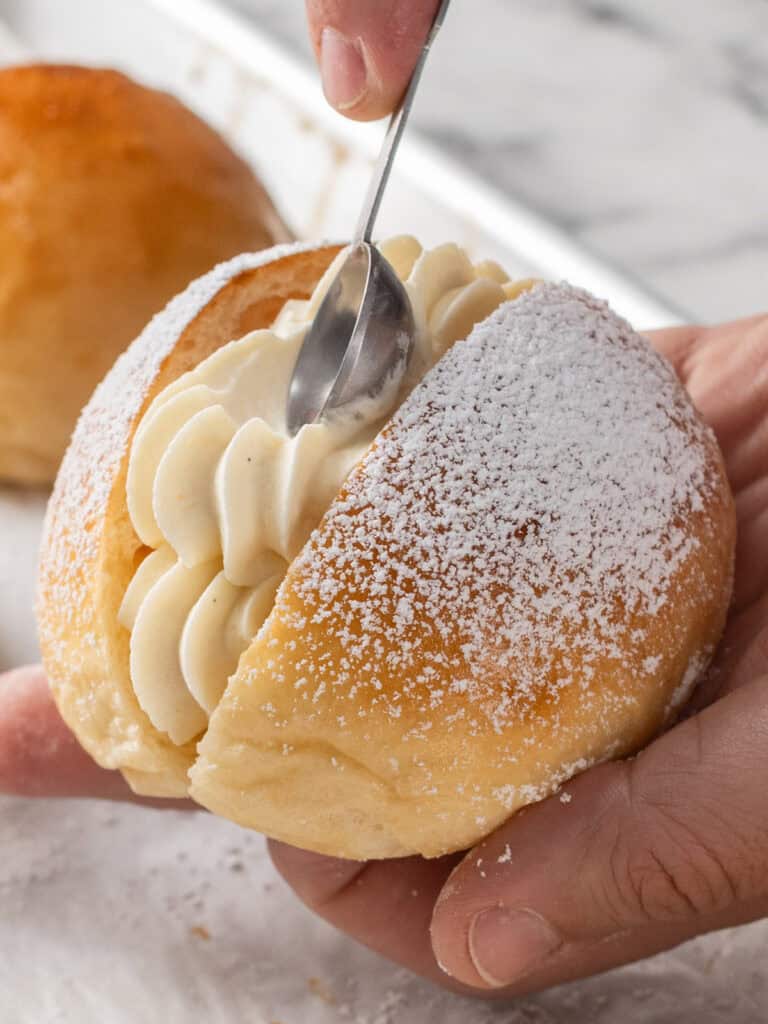
- Use a spoon to create an indent in the middle of the pipe cream
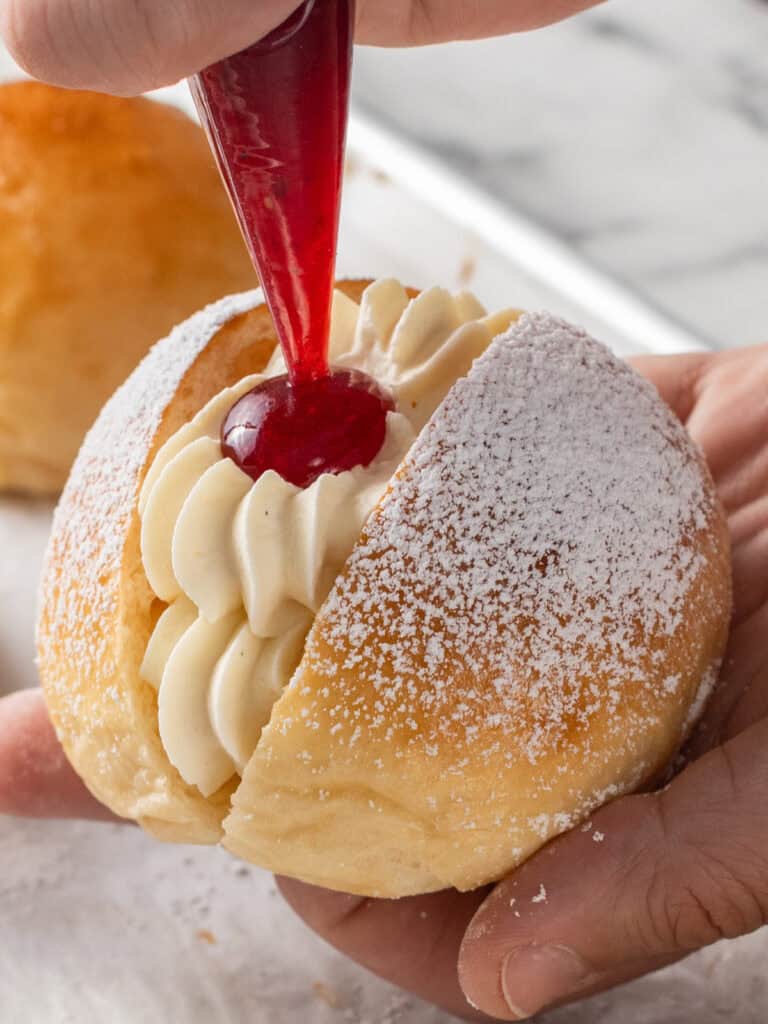
- Fill it with some more jam and you’re done!
Best eaten on the day they’re made?
Store your cream buns in an airtight container in the fridge for a day, but bring them to room temperature before serving. The butter in the dough firms up when cold, so they won’t taste as soft straight from the fridge. Honestly, they’re best eaten the day they’re baked and filled. I know some food bloggers roll their eyes when they see another food blogger write that about their recipes, but there’s a reason your favorite bakery bakes fresh every morning.
A Quick Baking Guide
If you’re new to baking or just want to brush up on the basics, these guides are a great place to start!
Loved the recipe? Let me know!
If you enjoyed this recipe, leave a star rating and comment below. It helps others find the recipe and keeps the baking community growing. Tag me on Instagram so I can see your version too!

Soft Cream Buns With Cream And Jam
My soft cream buns are filled with whipped Chantilly cream, and raspberry jam. light texture, rich flavor, and bakery-style results.
Serves 10
Ingredients
Cream Buns
Tang Zhong
- 15 g all-purpose flour, plain flour
- 75 g cold tap water
Brioche Buns
- 275 g all-purpose flour, plain flour
- 30 g caster sugar, see notes
- 5 g fine salt
- 5 g instant dry yeast, see notes
- 5 g milk powder, see notes
- 50 g eggs, yes measured by weight!, cold
- 100 g whole-milk, cold
- 65 g unsalted butter cubed, softened (see notes, very important!)
Egg wash
- 1 large egg, 50-55g room temperature
- 1 egg yolk, optional
- 20 g whole-milk, room temperature
Chantilly Cream
- 250 g heavy cream, cold (see notes)
- 1 tbsp vanilla bean paste, see notes
- 250 g mascarpone, cold (see notes)
- 40 g powdered sugar, sifted (optional)
- 150 g raspberry jam, home-made or store bought
Instructions
Cream Buns
Tang Zhong
- Cook paste – Add the flour and water to a small saucepan and use a whisk to combine. Place over medium heat and whisk continuously for about 2-3 minutes until the mixture thickens to a smooth, pudding-like consistency.
- Cool down – Transfer the mixture to a small bowl and press plastic wrap directly onto the surface. Let it cool down to room temperature before using. This can be made a few hours before using. Do not place in the fridge.
Brioche
- Mix dry ingredients – Add the plain flour, sugar, salt, yeast and milk powder to the bowl of a stand mixer. Use the dough hook attachment to mix until combined. See notes if using a spiral mixer like the Ooni Halo.
- Mix wet ingredients – In a large jug whisk together the eggs and milk until well combined.
- First knead (15 min) – Add the wet ingredients and cooled tang zhong to the dry ingredients. Use the dough hook to mix the ingredients. Turn the mixer on 30% (that’s speed two on my Kenwood) and knead for 15 minutes.
- Rest dough – Turn the mixer off and cover the bowl with plastic wrap. Rest the dough for 10-15 minutes. This will help relax the gluten in the dough and gives you an even smoother more elastic dough that is less sticky to work with later.
- Second Knead – Knead the dough for 5 minutes on speed 2 (30% speed).
- To test if dough is kneaded enough – Test by stretching a small piece between your fingers. It should form a thin, see-through sheet without tearing. Kneading time can vary depending on your mixer so focus on the dough’s feel rather than just time.
- Add the butter and finish kneading – With the mixer on speed 2, add the softened butter a little at a time, letting each piece mostly mix in before adding the next. This will take about 5 minutes all up. Once all the butter is added, knead on medium low speed for about 5-10 minutes until the dough is smooth, elastic and comes away cleanly from the bowl. A slight stickiness at this stage is normal. If the dough begins looking overly shiny as the first bit of butter is added, it’s too warm. Cool the dough down in the fridge for 10 minutes before adding the remaining butter.
- Room temp rise (Proof #1) – Add the dough to a large sized mixing bowl and cover with plastic wrap. Let it rise in a warm spot of the house for 1 hour or until doubled in size.
- Cold rise (Proof #2) – Place the bowl of dough in the fridge for at least 2 hours, or up to 8 hours (overnight) for better flavor. The dough will continue to expand as it chills.
- Divide and shape – Turn the chilled dough onto a lightly floured surface and divide into 10 pieces, aprox 58g each. Working quickly, roll each piece into a ball by cupping your hand over it and moving in small circles with gentle pressure. Repeat with all the dough pieces. Then dip the top of each bun in flour and use your hands to run the bottom of the dough between the heel of two hands to further tighten the seal under each bun and smoothen out the top. Take a look at the video and step by step photos for reference.
- Final proof (Proof #3) – Arrange the buns on two large baking trays lined with baking paper. Cover loosely with greased plastic wrap and rise in a warm spot for about 1-3 hours. Rising time will depend on room temperature. The buns will almost triple in size. Rather than going off time, go off sight and feel. When lightly pressed with your finger the buns will feel slightly springy. They should spring back partway, not fully. If they spring back all the way they need more time, if they don’t spring back at all they are likely over proofed and should be baked immediately. Properly proofed buns should feel room temperature, not cool and will jiggle slightly when the tray is gently wobbled.
- Bake – Preheat your oven to 195C / 385F (fan off), 175C / 350F (fan on). Gently brush buns with egg wash. Bake for 12 minutes until golden, light to lift, and fully cooked through. Cool completely before filling.
Chantilly Cream
- Prepare mascarpone cheese – Add the mascarpone to a large mixing bowl (glass or metal) and use a spatula to stir and break up as some brands can be firmer than others. This helps break it up a little to prevent lumps in your whipped cream.
- Whip remaining ingredients – Add the cold heavy cream, powdered sugar and vanilla to the mascarpone. You can use an electric hand mixer or a stand mixer with a whisk attachment to whip to stiff peaks. I actually find it easier to get the right texture with a hand whisk. You’re aiming for a smooth, stiff whipped cream that holds its shape but still looks silky. If it looks split or grainy, it’s been overwhipped. Add the whipped cream to a large piping bag fitted with an open star tip. Set aside in the fridge until ready to use.
To decorate
- Use a serrated knife to slice every bun in half from the top but not all the way to the bottom so it can hinge open. Then pipe in about 1 1/2 tsp of jam at the bottom of the open bun. Pipe some cream over the top of the jam to seal it but don’t pipe all the way to the edge of the bun. Begin piping cream beginning from the inside of the cream you piped only to the edge of the bun starting at the bottom of the bun and working your way to the middle top of the bun. Use a spoon to create a divot at the top of the bun and fill with a small round dollop of more jam. These are best served the day they’re made.
Notes
Caster sugar – This is also known as superfine sugar. It’s ideal for this recipe because it dissolves into the dough better. Granulated sugar works fine too.
Yeast
- Instant Dry Yeast – This type of yeast is added straight to the dry ingredients and doesn’t need to be foamed in warm milk first. Just make sure it hasn’t expired and always keep your yeast in the fridge, so it lasts longer.
- If using active dry yeast – Dissolve this in the warm milk with a pinch of sugar from the recipe. Let it sit for 10-15 minutes in a warm spot until foamy before using. Then add it in with the wet ingredients
Nutrition
Calories : 4521kcal
Carbonhydrates: 400g
Protein: 78g
Fat: 278g
Saturated Fat: 169g
Polyunsaturated Fat: 10g
Monounsaturated Fat : 44g
Trans Fat : 2g
Cholesterol: 1236mg
Sodium: 2827mg
Potassium : 1168mg
Fiber: 11g
Sugar : 141g
Vitamin A: 9808IU
Vitamin C: 15mg
Calcium: 880mg
Iron: 17mg
Nutrition Disclosure
Gave this recipe a go?Mention @thescranline or tag #thescranline!
previous post
10 comments
Dear Nick
These look so delish. I will make them very soon. Just one question, is it possible to use cake flour or is all purpose flour the best? Thank you for all your wonderful recipes.
xx
Hi there! Thanks for the lovely comment! That’s a great question. All-purpose/plain flour is best for these because you need a bit of gluten development. Not enough to use bread flour but definitely more than what cake flour can provide! N x
Hi Nick, love you recipes, have made quite a few. Made your cream buns and they where a bit family loved them, buns where so light and soft. I did take pics but nowhere to attach in here. Cheers
YES!!! You’re my first review for these and I’m so thrilled you loved these! I agonised over this recipe so it’s great that even one person loved them! Thanks so much for letting me know Lisa, I literally fist bumped the air when I read you feedback! Made my day! N x
Hi it looks like in the photo you shared that the buns from Australia are filled with a pastry cream? Am I wrong in assuming this? Could we also do a pastry cream? Thank you for the wonderful recipes!
Hi Jackie! Yes, I believe in some bakeries they fill them with pastry cream and you could totally do that if you like! My vanilla pastry cream would work really well because it’s a little on the thick side. N x
Hi Nick,
I made the dough last night and put it in the fridge but when I checked it this morning it hadn’t risen and was quite stiff. Could this be due to the yeast i’m using? Could I bloom it beforehand to check if it’s okay and then add it? Will be trying it again today! 🙂
Hi Aamena, thank you so much for the 5 stars and I’m so sorry for the delayed reply! I’m really glad it all worked out in the end and you got those super soft buns. And yep, if you ever want to double check your yeast next time, you can absolutely bloom it first with a little warm milk and a pinch of sugar before adding it in. Thanks again for trying the recipe! N x
Hi Nick,
I tried this recipe and initially I thought I had messed up as the dough didn’t rise in the fridge. However, once I took it out and let it finish rising at room temp it resulted in the softest buns!!! I am so impressed and will definitely be adding this recipe to my favourites – thank you!
Hi Aamena, thanks so much for your comment! That’s completely normal with fridge proofed dough, it often won’t look like it rises much until it warms back up at room temp. I’m so glad you stuck with it and ended up with super soft buns. Really appreciate you trying the recipe, and I’m glad it’s going on your favourites list! N x