How To Make A Continental Cake (Italian Rum Cake)
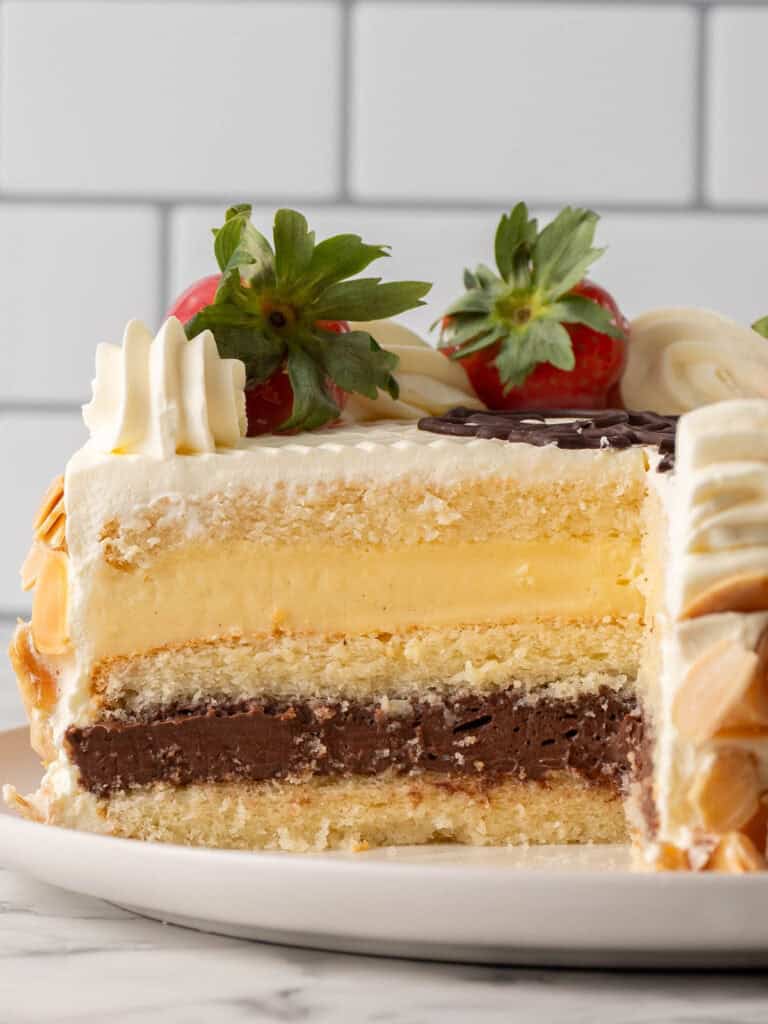
Brace yourself, I’m about to show you how to make my Continental Cake (Italian Rum Cake). It’s made with layers of soft, rum soaked chiffon cake, silky vanilla and chocolate custard, finished with Chantilly cream, toasted almonds, and glazed strawberries. I tested this 27 times to match the Greek and Italian bakery versions here in Melbourne. In this post, I take you through every step with photos so you can recreate that bakery texture at home for your next celebration.
Not a joke, just a fact. I don’t think any bakery continental cake will ever be able to match my continental. Mine recipe is better.
Hey team, Nick here. I have just been through 2 months and 27 tests to create this recipe. It’s one of my favorite cakes and its really popular amongst wogs (Greeks and Italians) at birthdays. You go to a wog birthday, especially in Melbourne and Sydney (although many of you around the world have told me you love this), this cake is on the table. And now it’s on my website ready for you to make and frankly it’s better than any bakery one I’ve had.

That’s a really big statement to make, but guys, I agonized over every single part of getting this cake right. From the mirror glaze on the strawberries (which lasts all day) to making the custard easy to make in one go. My biggest problem though was the sponge. Up until test 23, I just couldn’t find a sponge soft enough to match what the bakeries were using. That is until I started working on a chiffon cake recipe. It’s unbelievable soft and fluffy and perfect for this cake.
Related – A while back I made a strawberry cake which is loosely based on this and perfect for strawberry lovers.
As ridiculous as this might sound, it’s actually a little emotional letting go of this recipe after so much testing to perfect it, but its ready to share so here we go!
Table of contents
- Why you should never buy a continental cake again.
- My workflow.
- Making two custards from one recipe
- I don’t know where chiffon has been all my life.
- Toasting the almonds
- Turning this into a bespoke cake (optional)
- A glossy strawberry glaze that lasts all day (optional)
- Layering the cake
- A Chantilly cream that won’t melt
- Decorating the cake
Why you should never buy a continental cake again.
It comes down to the cream. Bakeries use mock cream so their cakes can sit out and stay stable. It won’t melt, but it’s not real cream. I use fluffy Chantilly cream, stabilized with mascarpone, so it holds its shape in the fridge for days without losing that real cream texture.
Also, bragging rights. Imagine being in a room of 50 wogs and they ask where you ordered the cake, and you say you made it. The look on their face will stay with you for years. A wog never forgets.
My workflow.
Day 1
- Make the pastry cream, let it set (minimum 4 hours).
- Make the chiffon, let it cool.
- Make the syrup, let it cool.
- Layer the cake on day 1 or 2, let it set (minimum 4 hours).
- Toast the almonds.
- Pipe the chocolate message, let it set at room temp.
Day 2
- Make the strawberry glaze
- Cover the strawberries
- Make the cream
- Cover the cake
- Decorate the cake.
You can make this day in a day, but you’d have to start really early morning and finish it at the end of the day by the time it’s all set and decorated. It’s much easier to spread the workload over 2-3 days.
Making two custards from one recipe

- Make the cocoa slurry by mixing hot milk and cocoa powder. Doing this ahead of time allows the cocoa to bloom and fully dissolve, which helps prevent any graininess in your chocolate custard later on.
I’m going to use my French pastry cream for the filling. It’s made in one pot, super creamy, and thick enough to hold the cake layers, which is why I use it here instead of an Italian pastry cream.
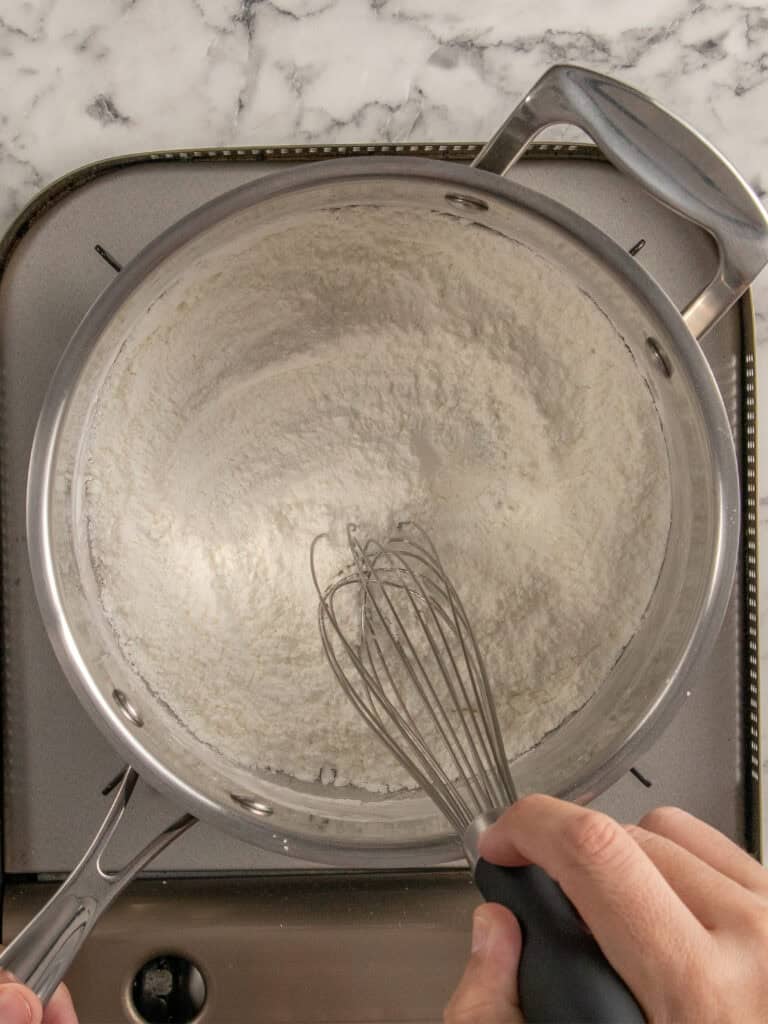
- Whisk together the corn flour and sugar in a large stainless-steel pot with a heavy bottom.
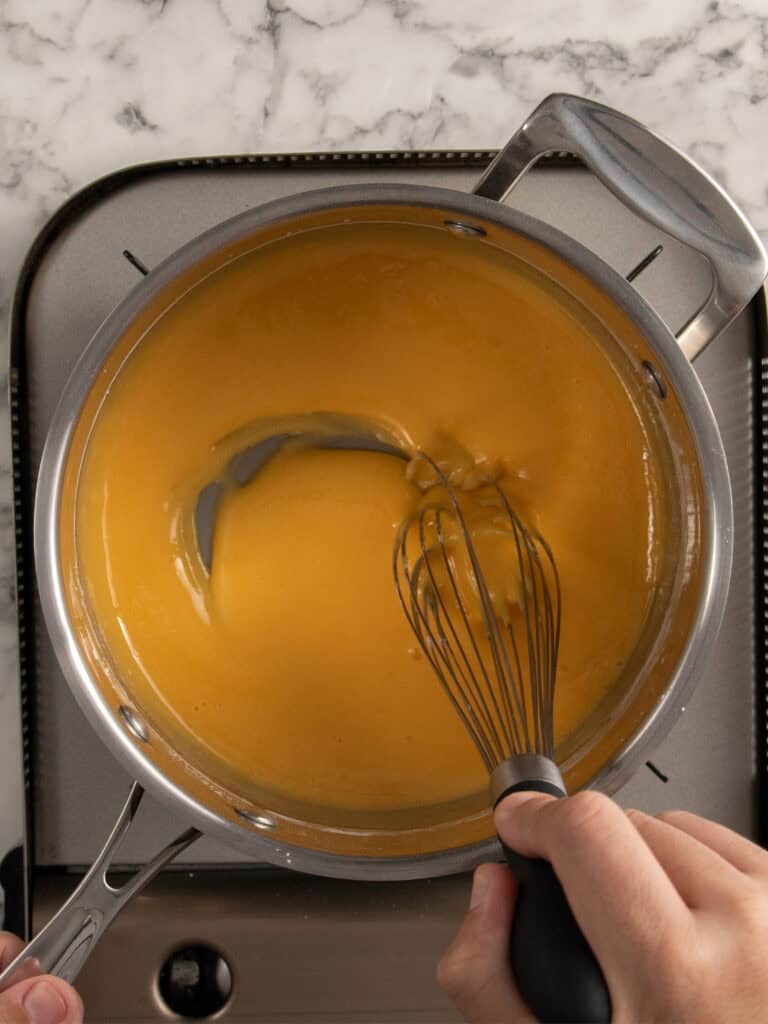
- Add the egg yolks and a splash of the milk. Give it a whisk to combine.
- Add the rest of the milk and whisk until combined.
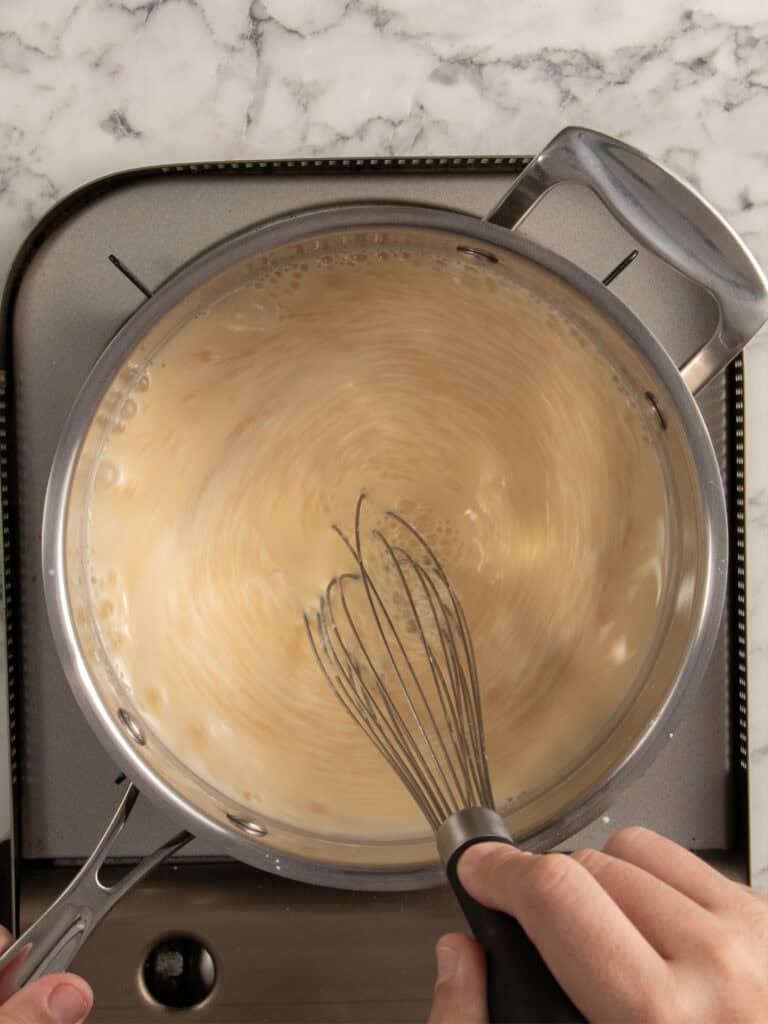
- Pop it on the stove and whisk continuously on medium high speed until the mixture thickens. It’ll take about 3-4 minutes.
How to get smooth pastry cream – The secret is using a whisk instead of a spatula. It ensures no lumps form. It’s honestly like magic. A silicone whisk will not work. It needs to be a metal whisk and because of that it needs to be made in a stainless-steel pot.
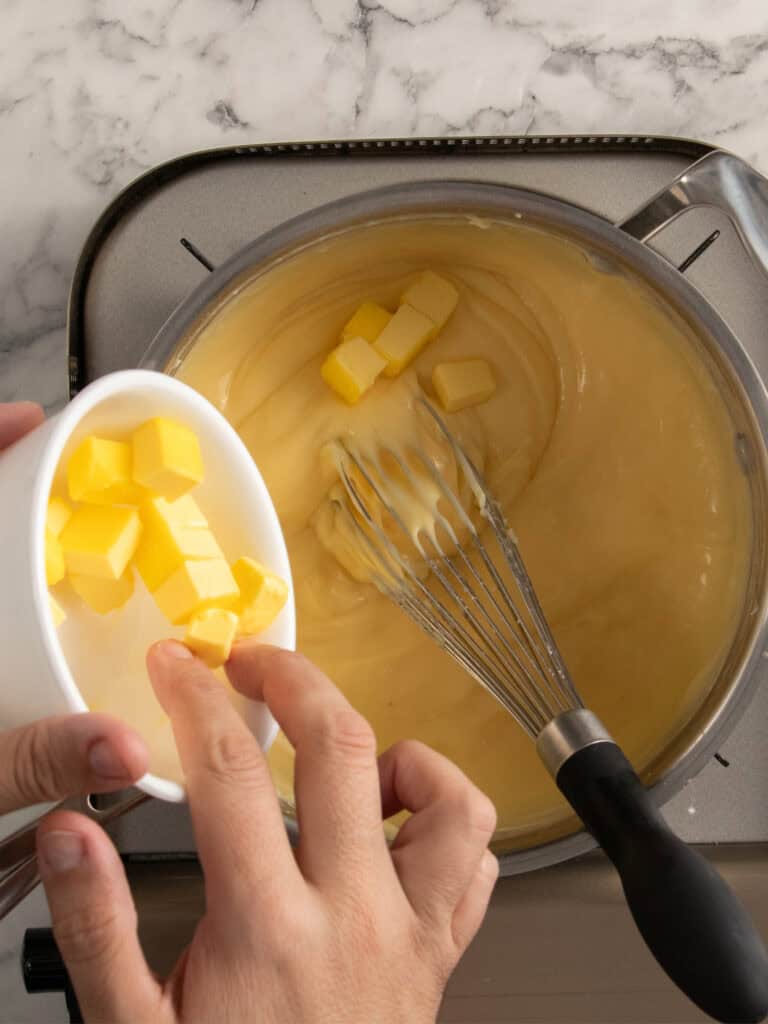
- Once the mixture thickens, continue whisking for 30 seconds as it bubbles away. Then turn the heat off and add 1/3 of the cold cubed the butter and whisk until melted and combined. Continue doing that until it’s all added.
- Add the vanilla extract and paste and whisk in.

- Add 600g of the pastry cream into a heatproof bowl and cover the surface with plastic wrap.
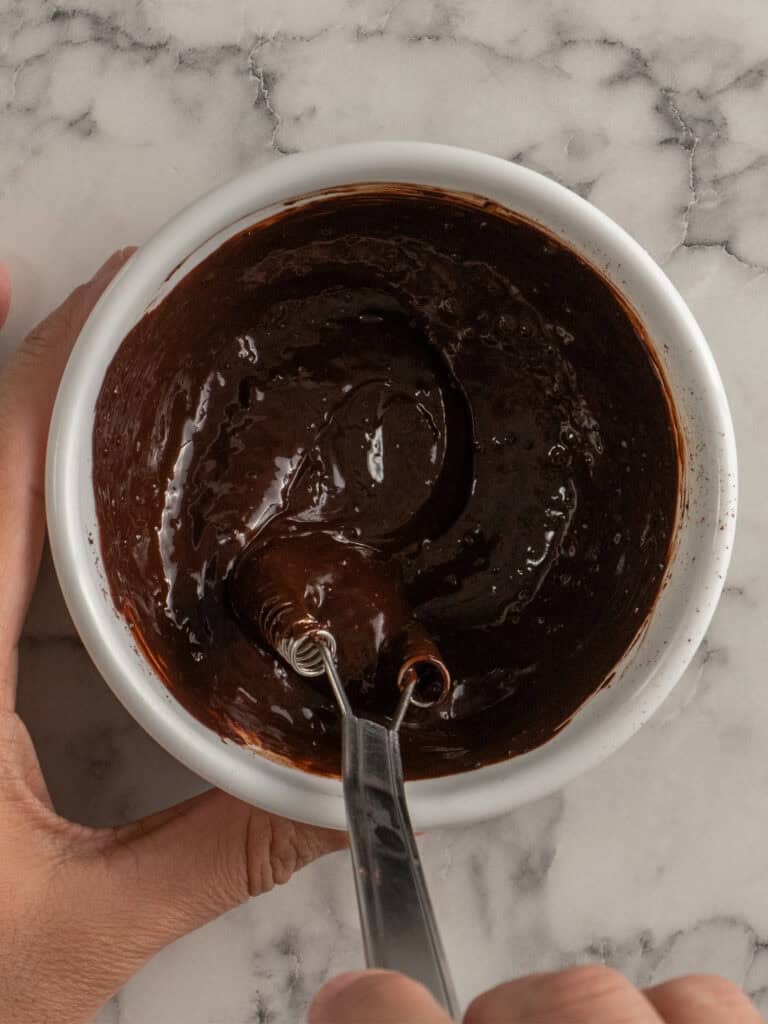
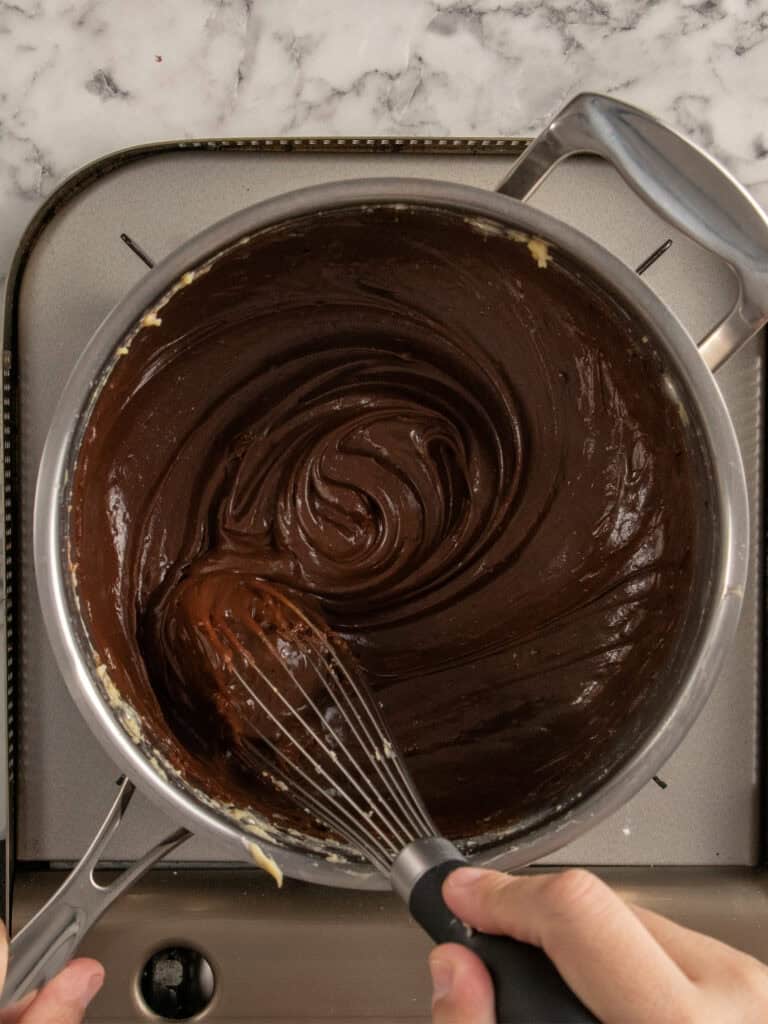
- Make the chocolate pastry cream by whisking in the cocoa slurry and dark chocolate until melted and smooth. Transfer to a bowl, cover with plastic wrap, cool to room temp, then chill for at least 4 hours. I like making it the day before.
To get super smooth pastry cream – use an electric hand mixer to whip the vanilla pastry cream until smooth. You can add it to a large bowl if you prefer. It’s easier to whip. Do the same to the chocolate. You want to whip these right before you use them to layer the cake.
I don’t know where chiffon has been all my life.
In my testing I became obsessed with the sponge for this recipe. I was going out of my mind trying to figure out which sponge the Italian and Greek bakeries are using for their continental cakes. It wasn’t until test 17 that I tried using a chiffon. It was my first time.
Not only was it the right sponge for this cake, but it is incredibly soft and moist, but still ‘meaty’ enough to hold the syrup without going soggy. A problem I had in tests 1-3 using my sponge cake recipe. Let’s start with the cake tins!
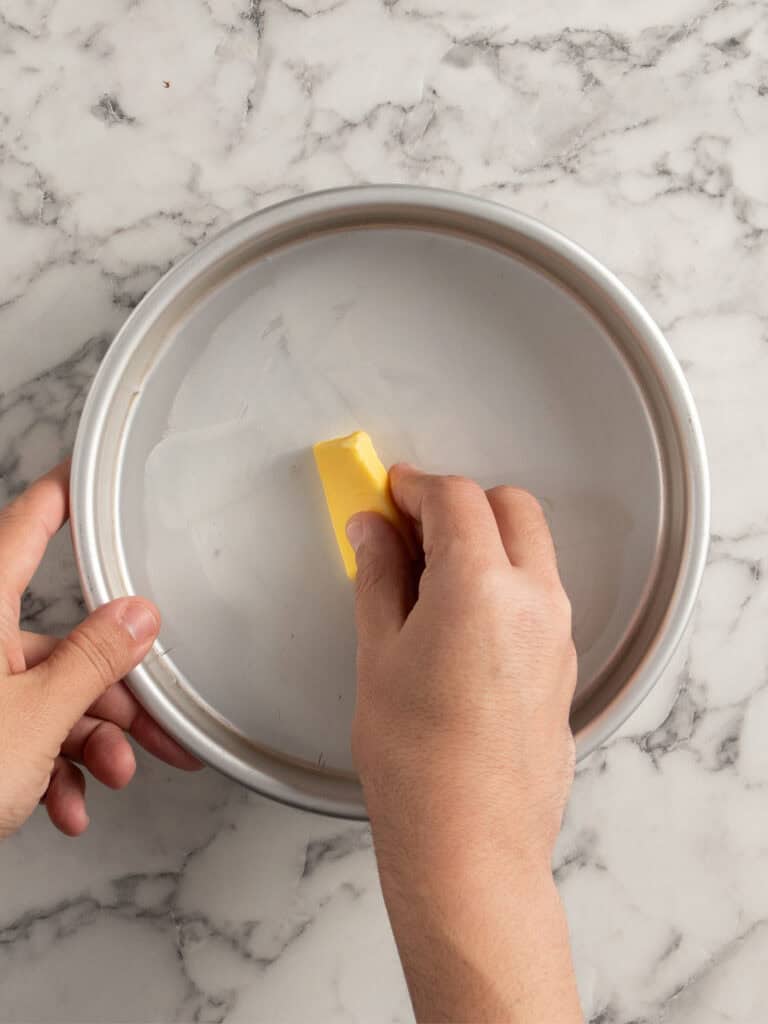
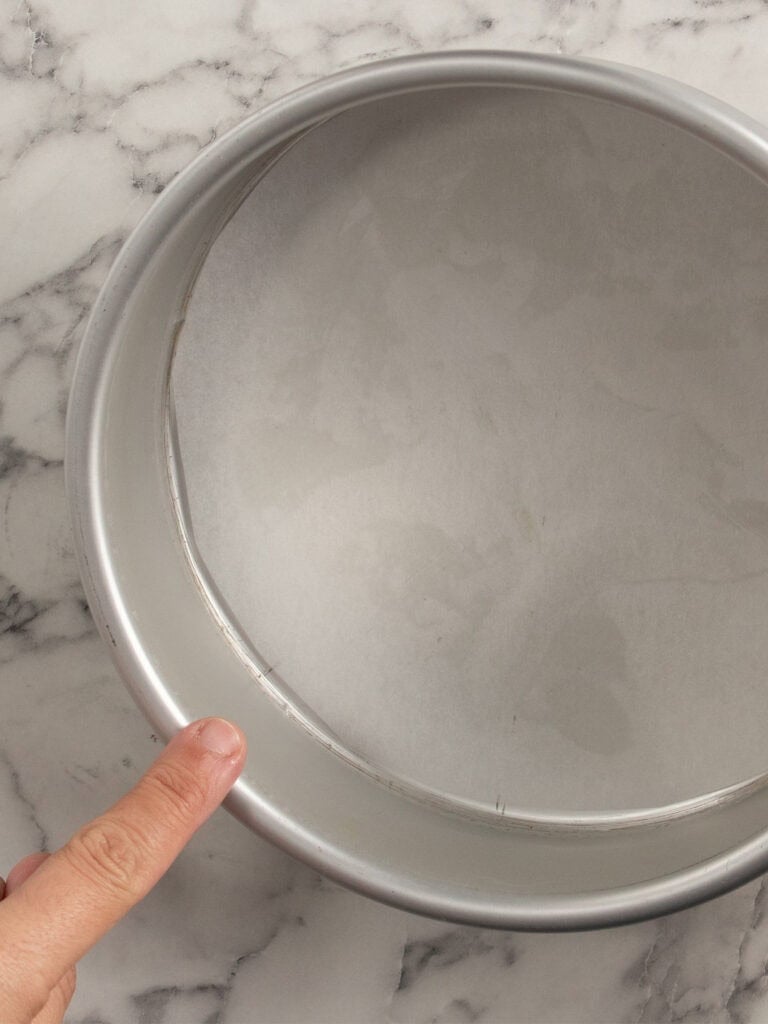
How to prepare the cake tins – I’ve switched over to rubbing cold butter on my cake tins instead of oil spray. Tastes better. For this cake you want to only grease the bottom of the tin and line it with baking paper. We want the cake to stick to the sides of the tin because as this cake cools it wants to shrink. Letting it stick to the sides of the cake tin stops that from happening, so you end up with a nice round cake.
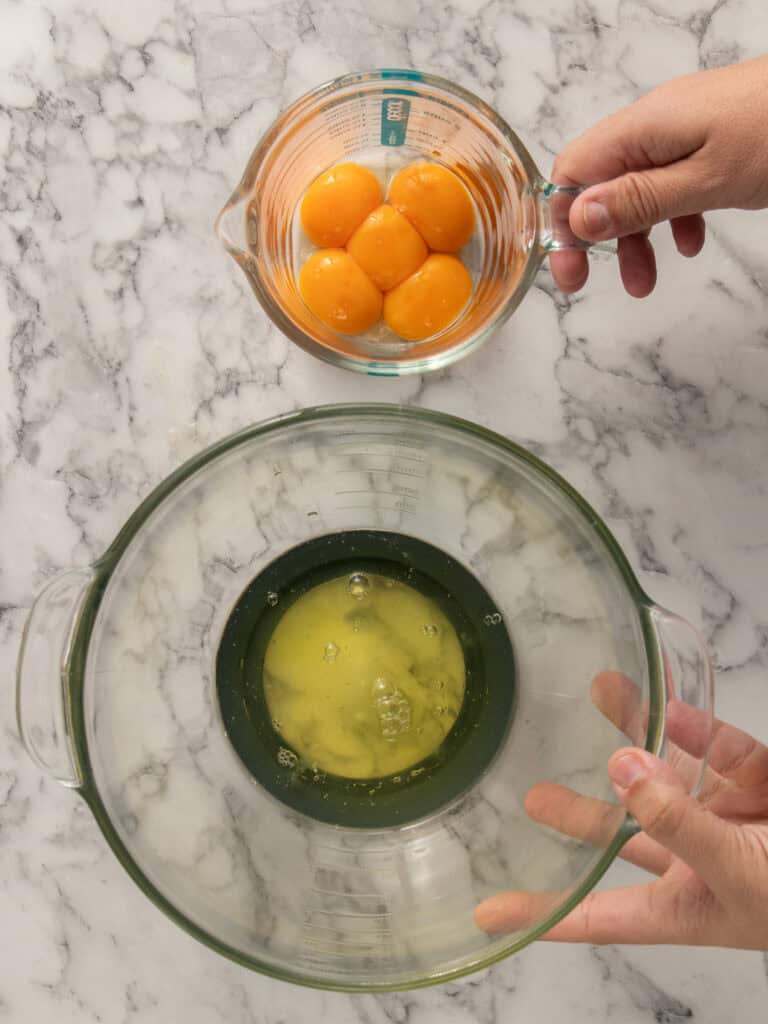
- To make the sponge separate the egg yolks from the whites. The yolks go in a jug, the whites go in a large mixing bowl.
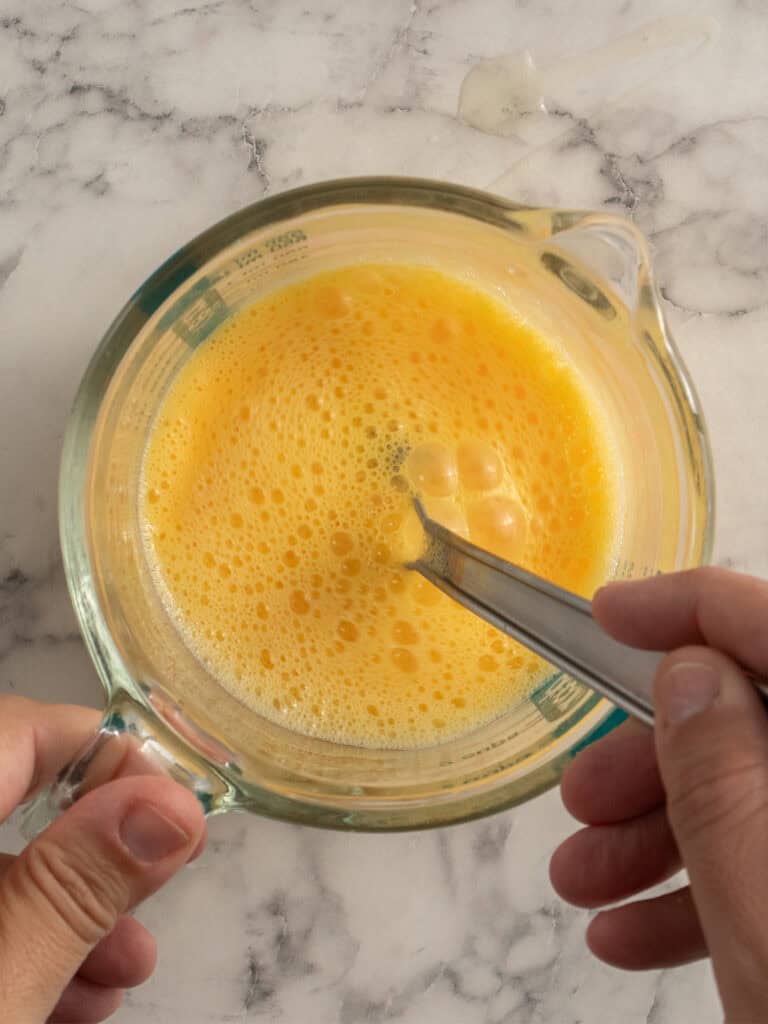
- Whisk the egg yolks, water and oil in a jug. Set aside.
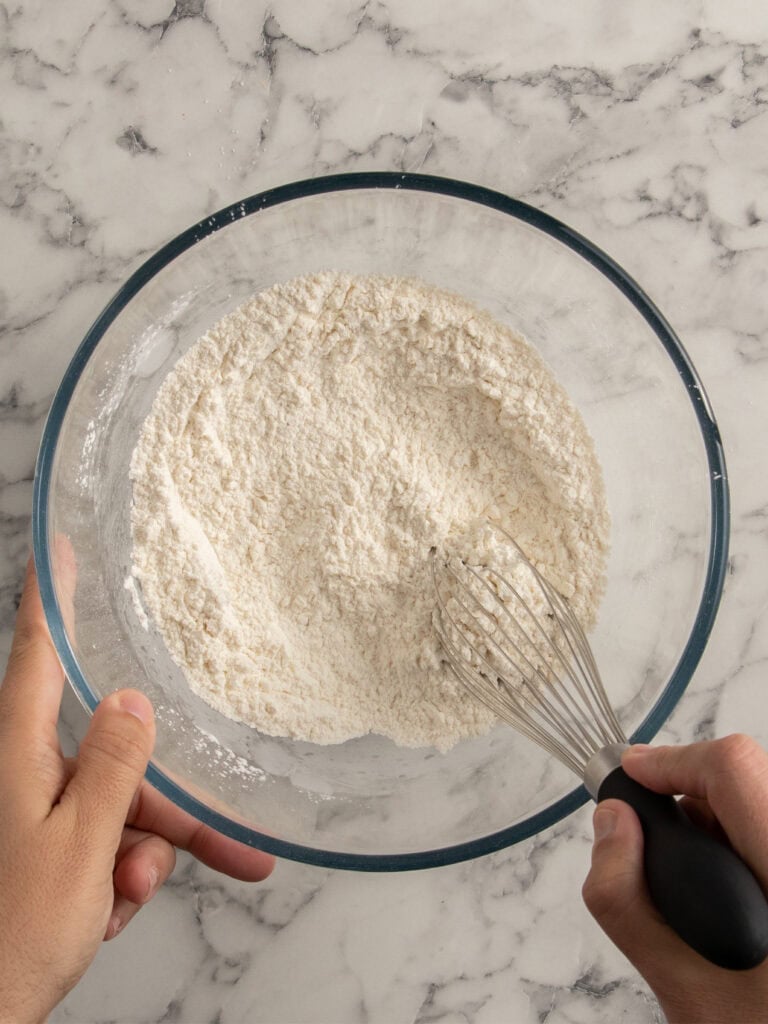
- Whisk together the flour, corn flour, salt and baking powder in a large mixing bowl.
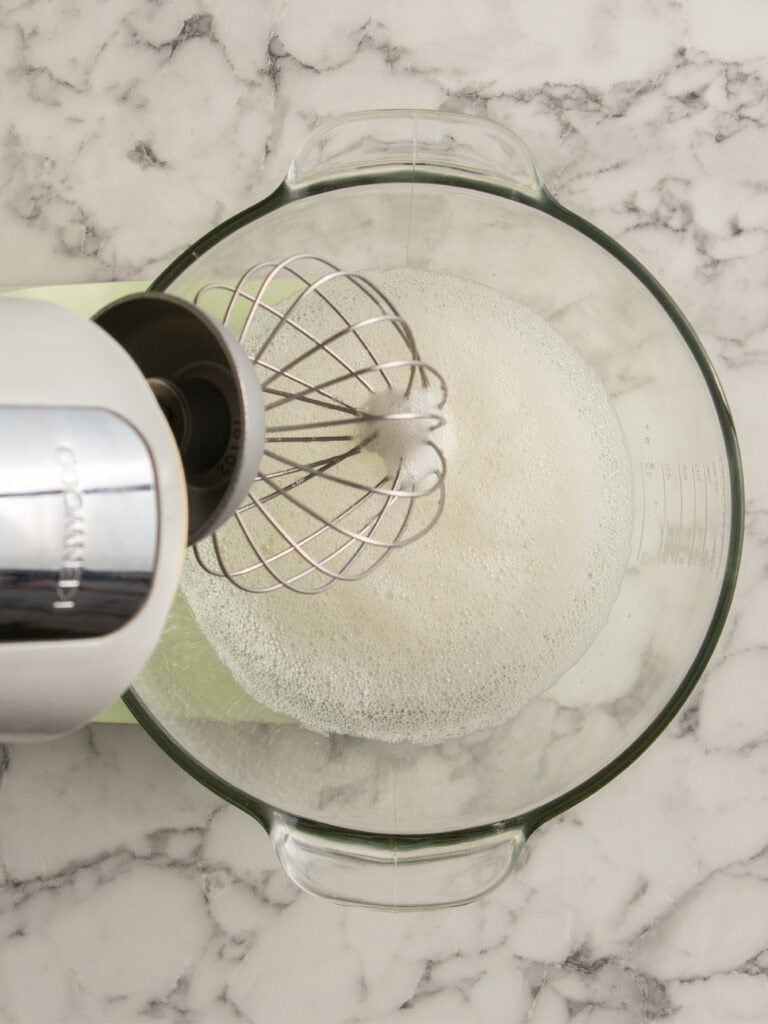
- Whisk the egg whites and cream of tartar (or lemon juice) for 60 seconds until frothy.
Whisking speed – I whisked the meringue on medium speed the entire time. It gives you lots of smaller air bubbles which means a fluffier cake.
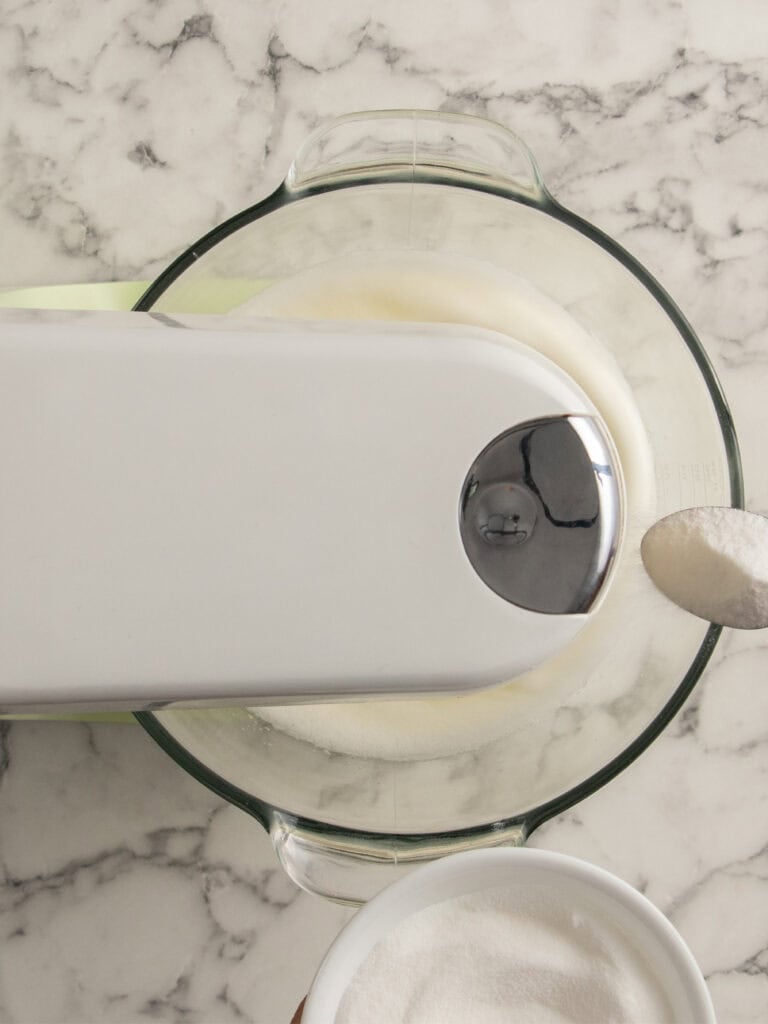
- Add the sugar gradually by pouring it in 1 tbsp at a time with the mixer running so it dissolves properly.
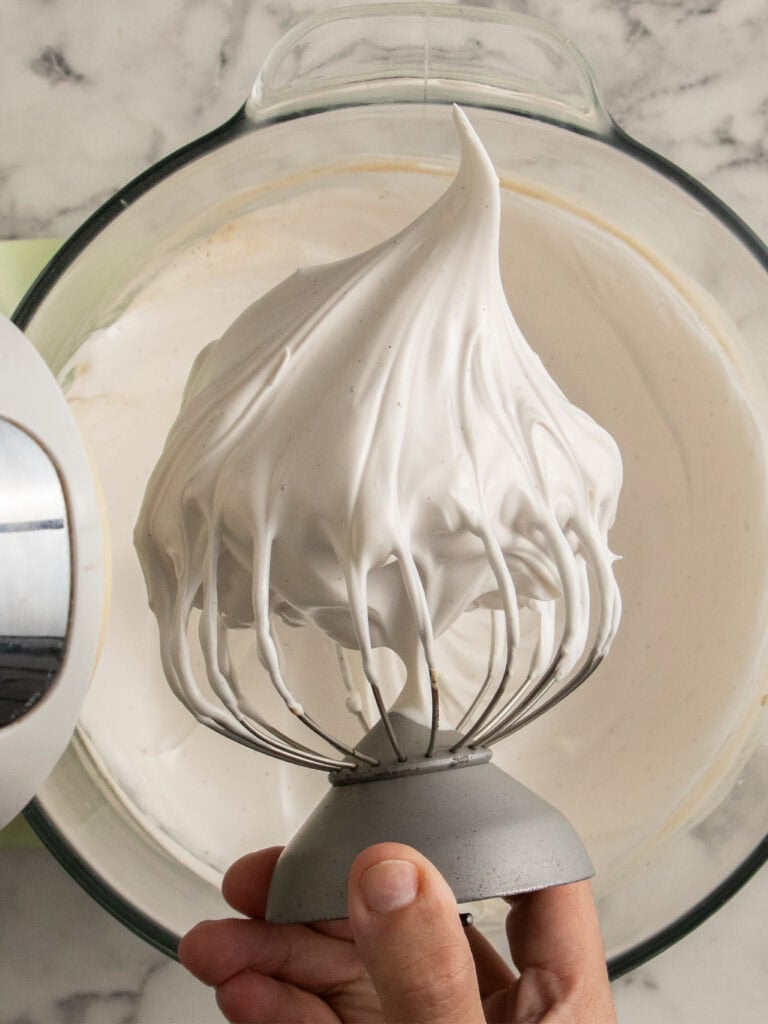
- Whip to stiff peaks by continuing for 8 to 10 minutes until thick and glossy. It should feel dense when you swirl the whisk, and hold a firm peak that doesn’t bend.
- Add the egg yolk mixture to the dry ingredients and use a whisk to whisk it until smooth.
- Fold through 1/3 of the meringue to loosen the batter, then fold in the next third, and finally the rest until smooth and uniform.
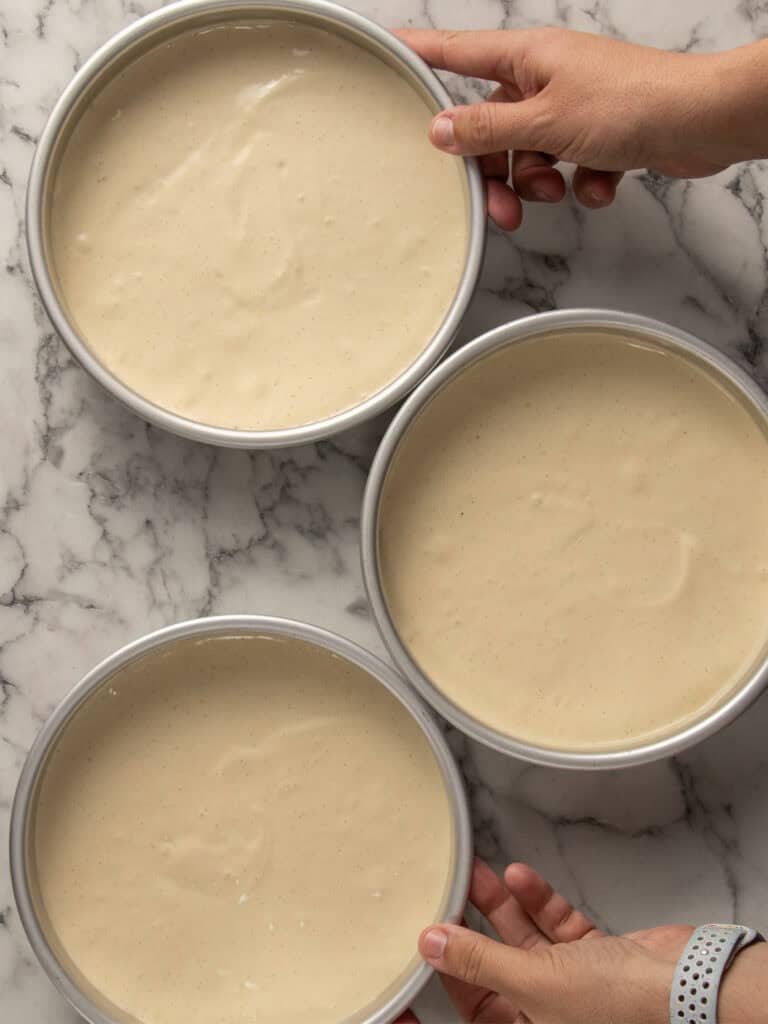
- Pour the batter into the three cake tins. It works to about 290g per tin if you want to weigh it.
- Use a spatula to even out the tops.
- Bake the cakes for 25 minutes or until golden on top. Bake them all in the middle rack of your oven if they’ll fit. Otherwise two seperate levels will work.
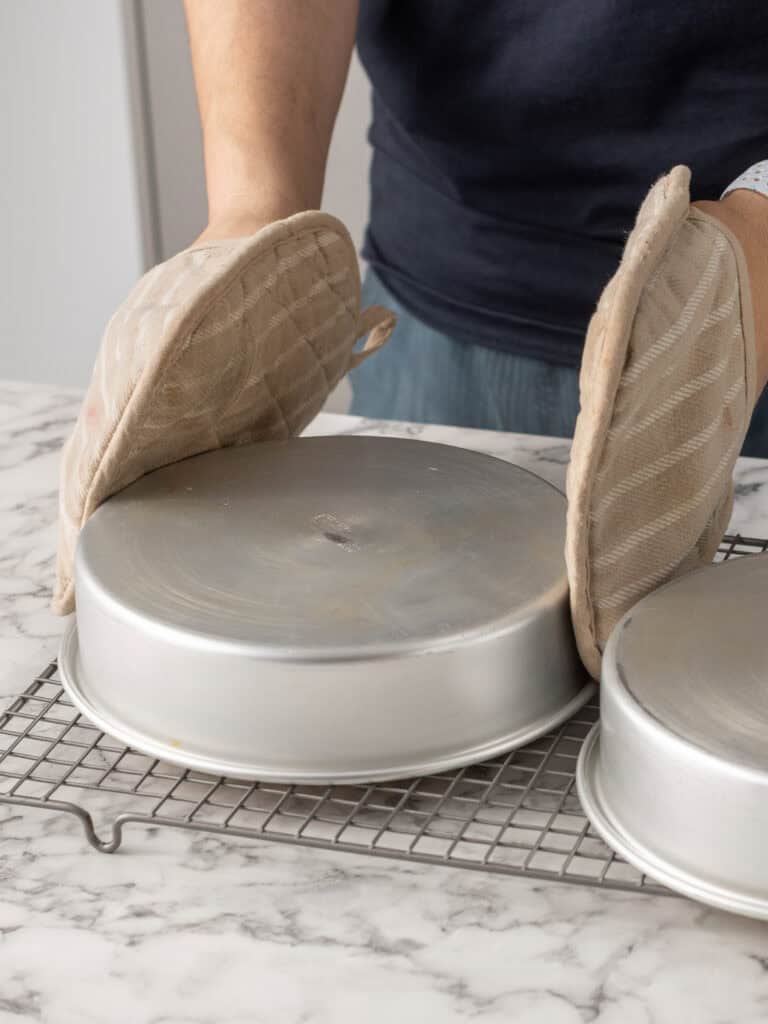
- To cool the cakes, turn the upside down on top of a cooling rack to cool to room temp. This will stop them collapsing as they cool and also stop them coming away from the sides.
If your cakes came away from the sides – In my testing, this only happened if the cakes were underbaked. It’s not a disaster the cake will still come out ok, it just wont look as uniform when you slice into it.

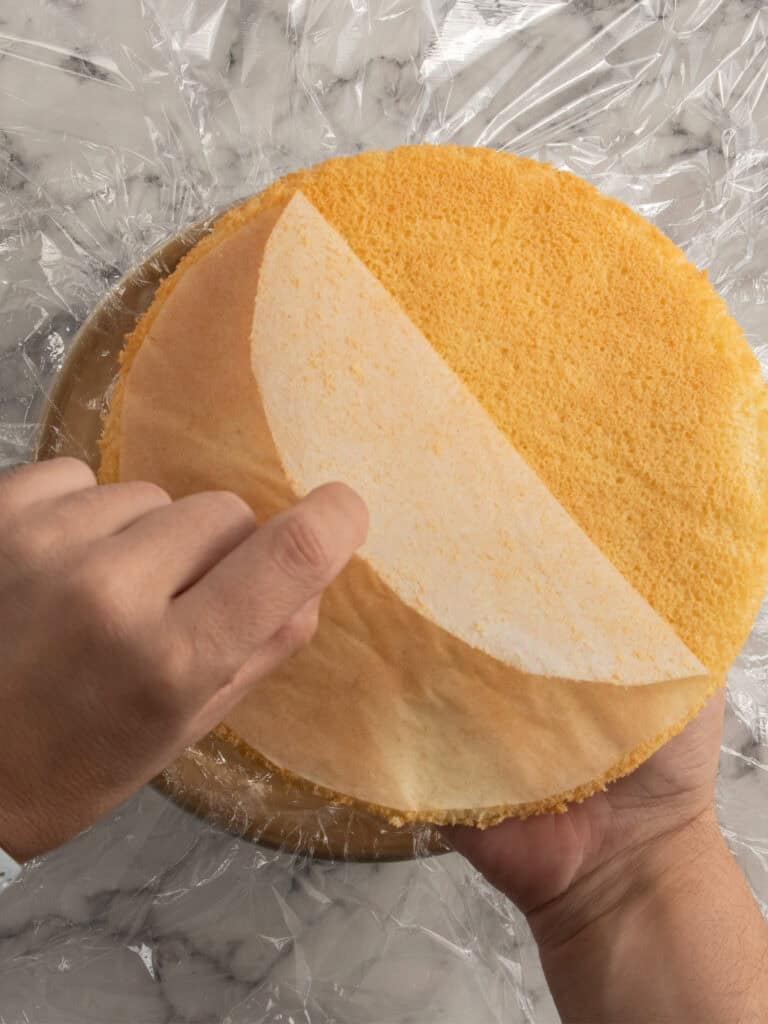
- Release the cakes from the tins by running a knife around the edge, turning them onto your hand, and placing them onto a cooling rack to stack.
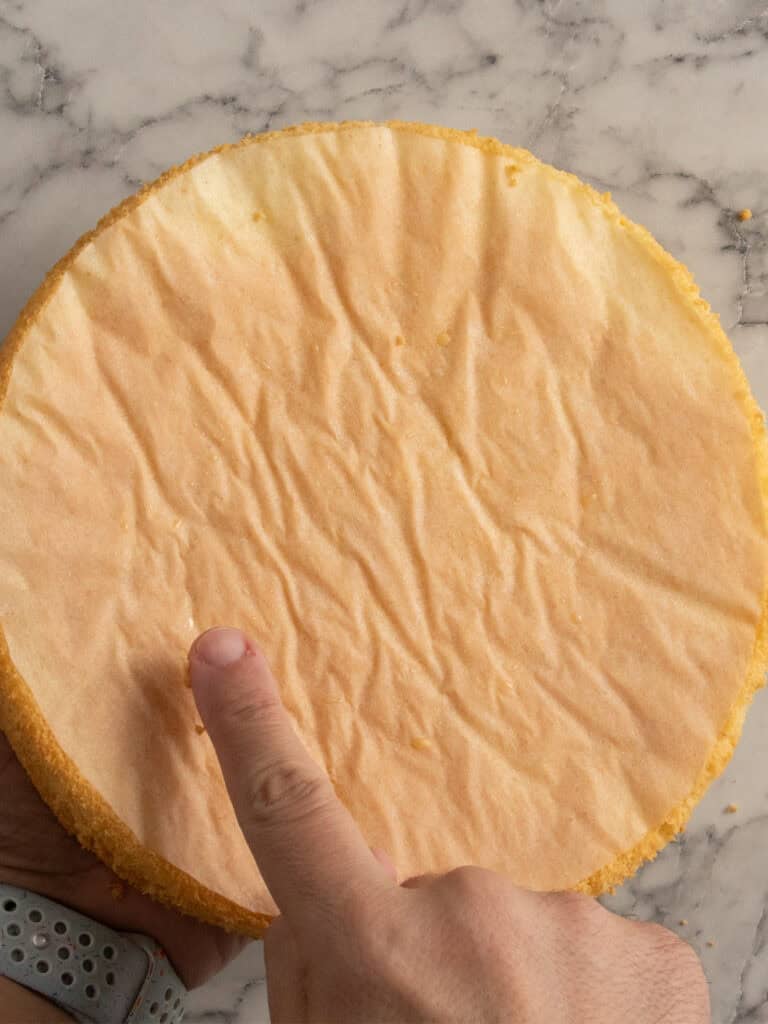
- The base may be slightly concave, I found this happened in some tests and not others. Gently press the centre so it sits flat on the bench before trimming for even layers.
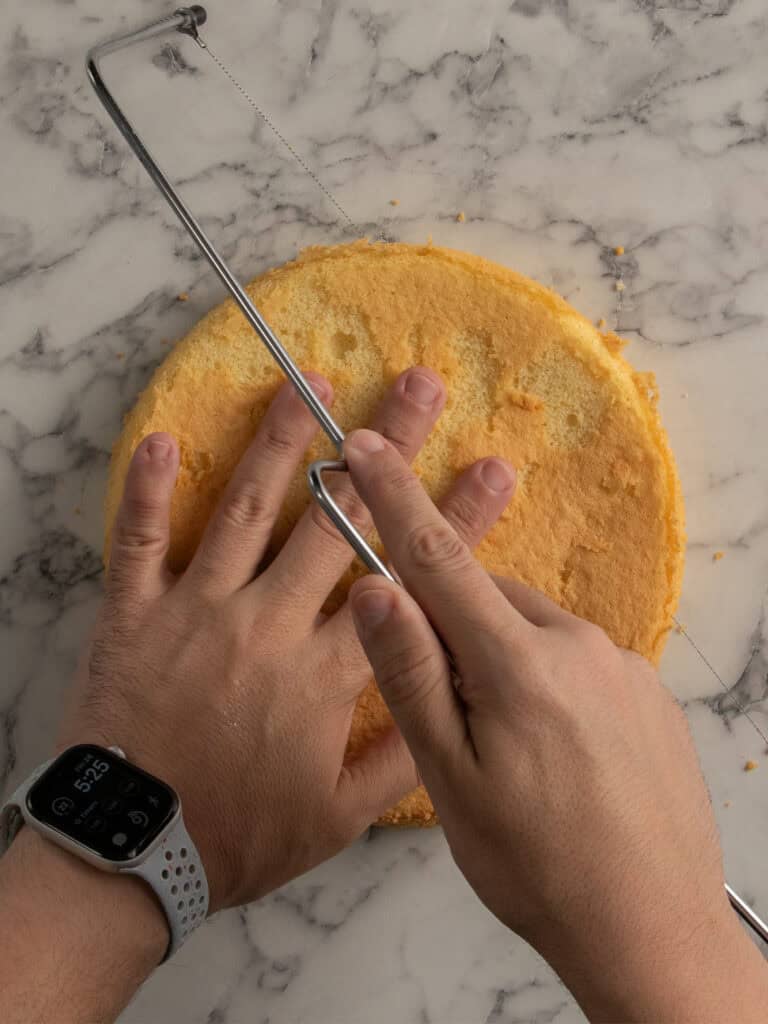
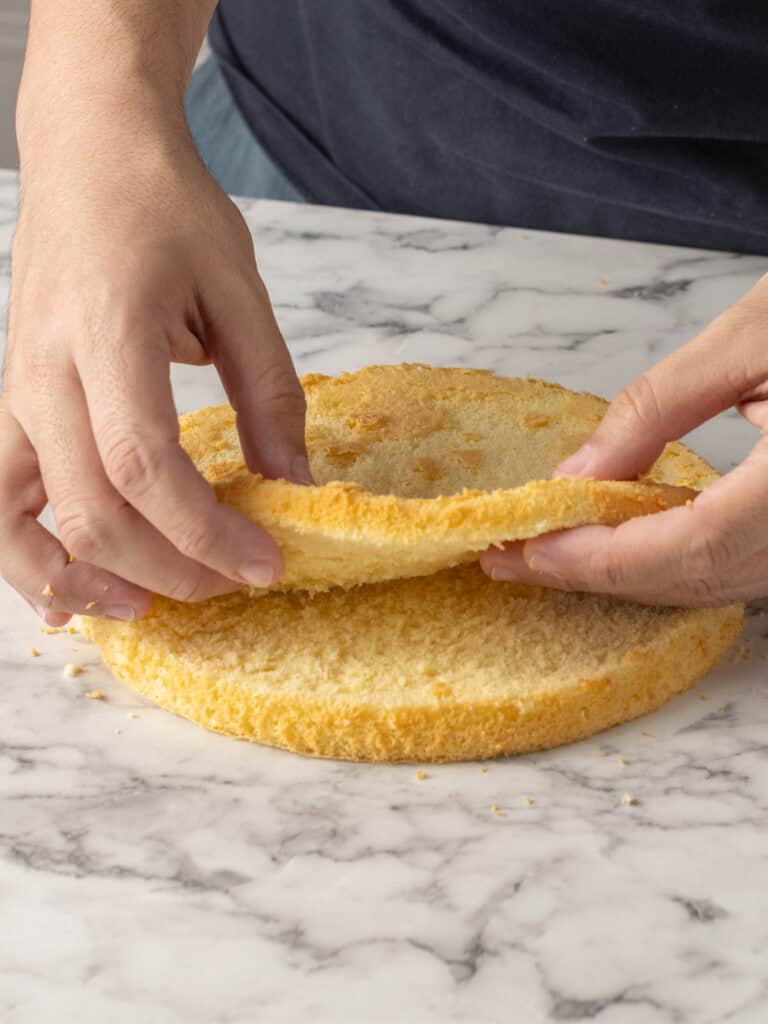
- Trim the cakes using a large serrated knife or cake leveler to 1 1/2cm in height. Any taller and the cake to pastry cream ratio feels off.
- Don’t worry about the offcuts. In my testing, reducing the batter meant the sponge didn’t have enough structure to grip the sides of the tin, so this amount gives you the right texture and rise.
Toasting the almonds
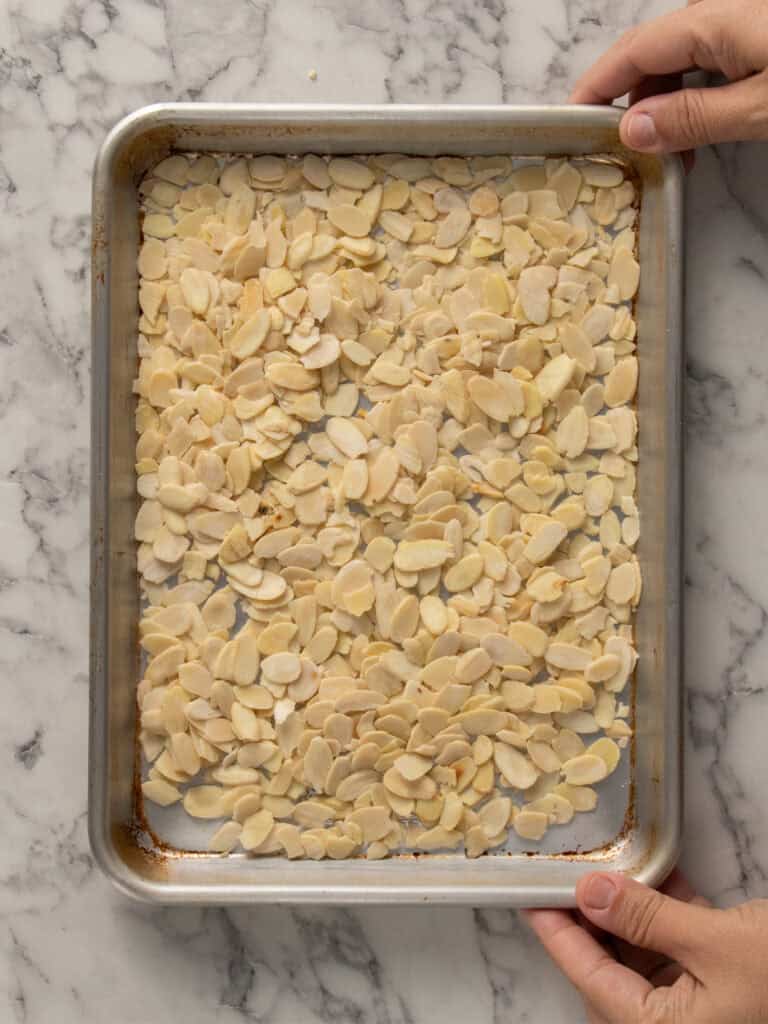
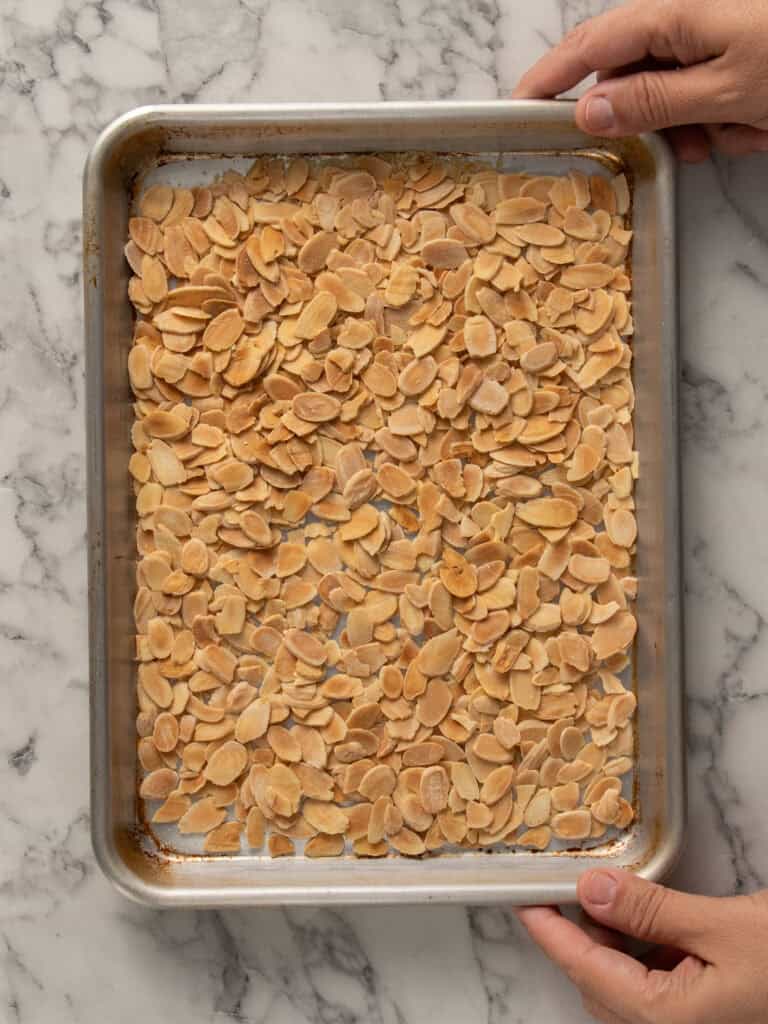
Some continental cakes use crushed peanuts, but I prefer flaked almonds for a cleaner look and better flavor. If you toast them it brings out a deeper nutty taste and makes them crisp. Bake at 180C / 340F (fan off), 150C / 300F (fan on) for 6 to 8 minutes until lightly golden, then cool them before using.
Turning this into a bespoke cake (optional)
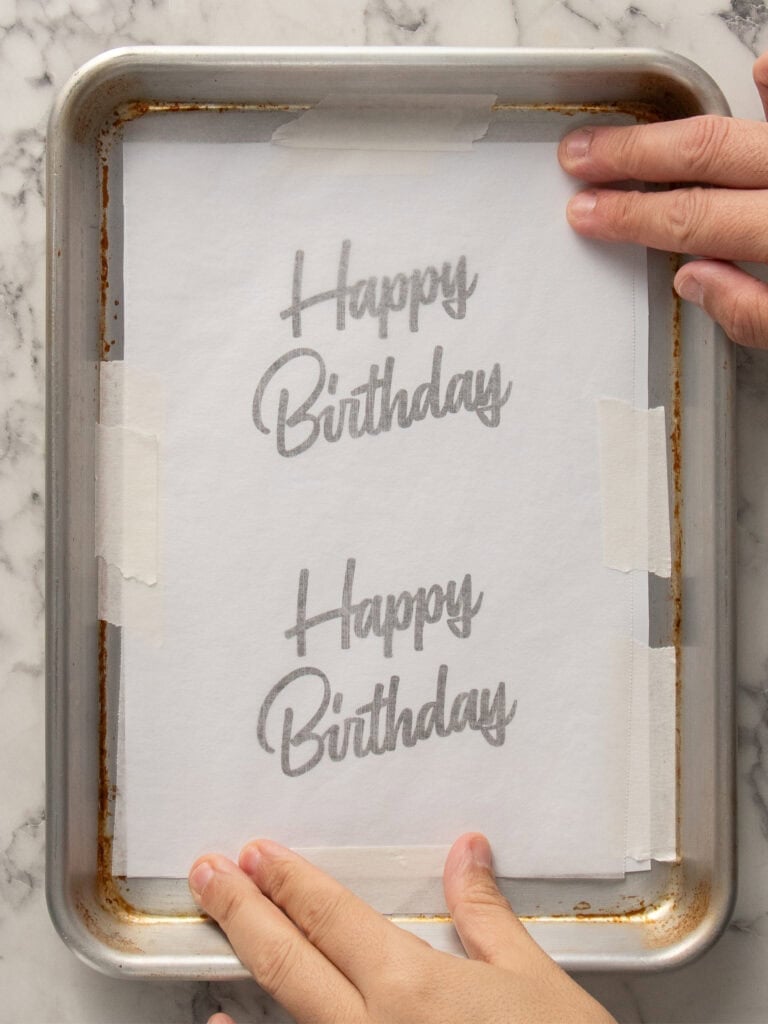
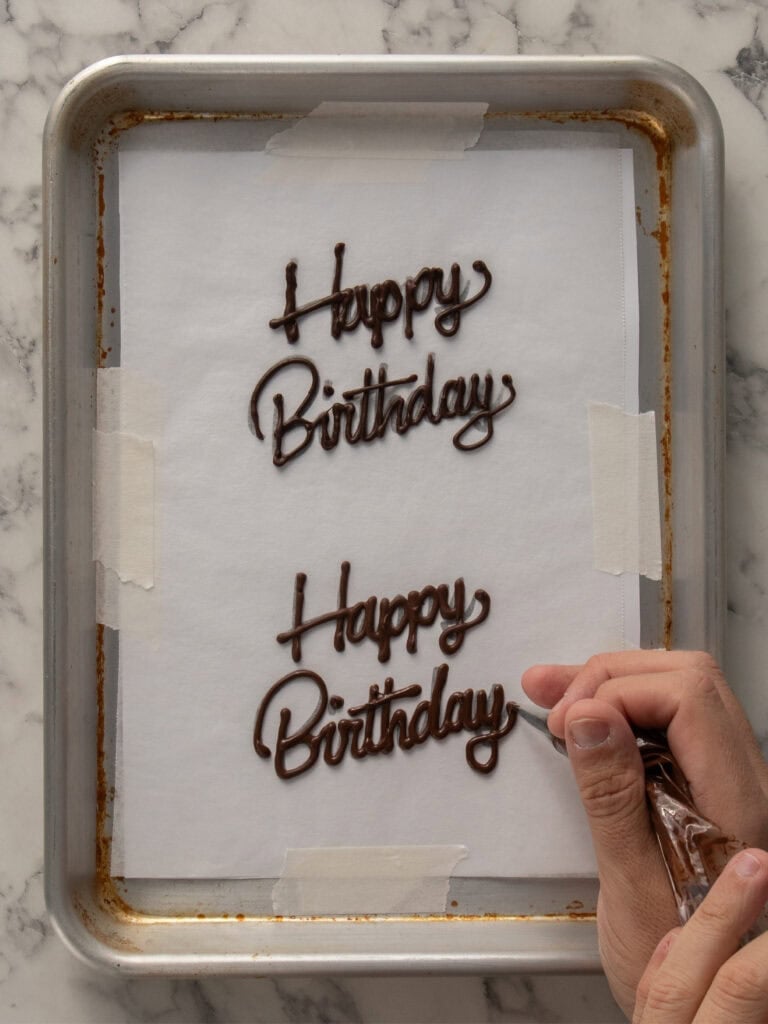
This is mostly a celebration cake, but you can make it your own. I see it a lot at birthdays, but it works just as well for weddings and anniversaries. Bakeries usually pipe messages with gel, but I went with melted chocolate piped onto baking paper. Let it cool slightly so it’s not too hot, then use a small round tip.
Piping template – I’ve also created a printable template you can place under the baking paper to help guide a neater message.
A glossy strawberry glaze that lasts all day (optional)
Glazing your strawberries it totally optional but it takes this from being a home made cake to bakery worthy. Again, it’s all about impressing wogs. And this glaze is so easy to make.
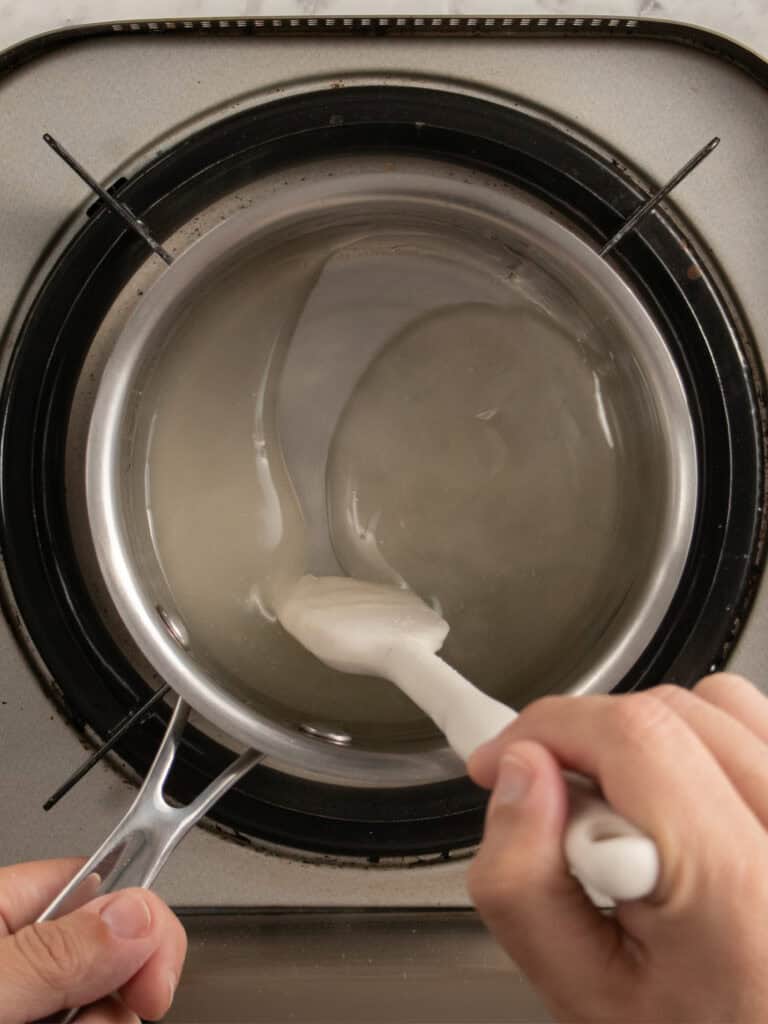
- Make the strawberry glaze by adding the sugar, water, and corn syrup to a small pot and bringing it to a boil.
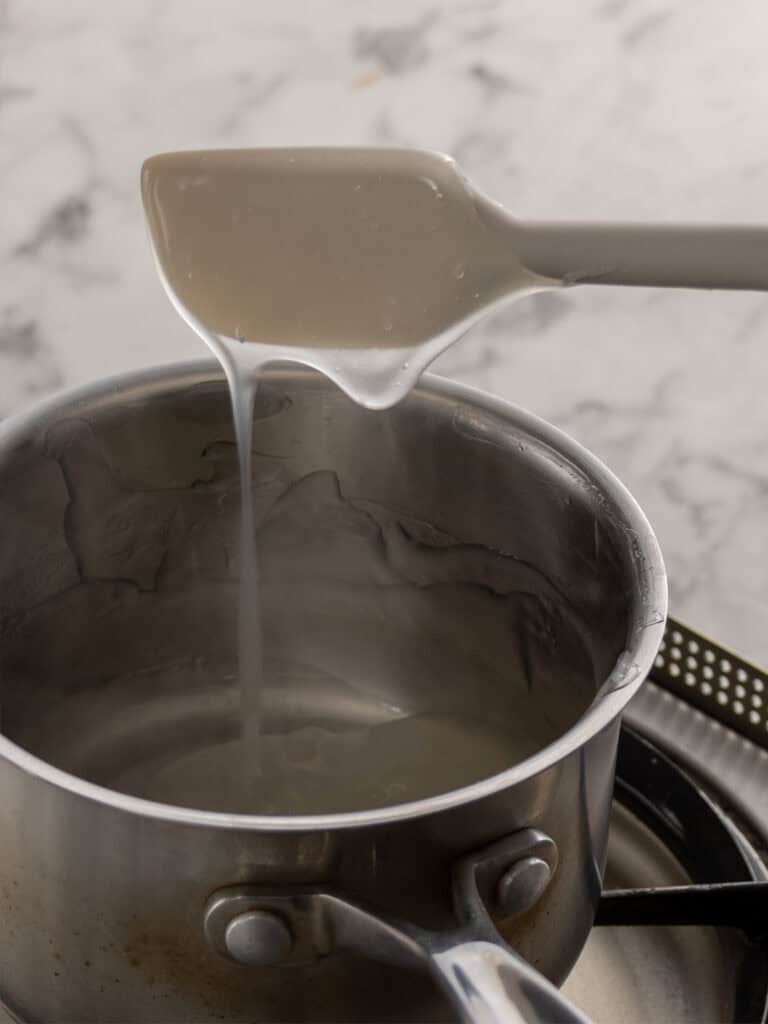
- Thicken it by whisking in the corn starch slurry (corn starch mixed with water), then continue whisking until it turns thick and translucent. Transfer to a bowl, cover the surface with plastic wrap, and let it cool.
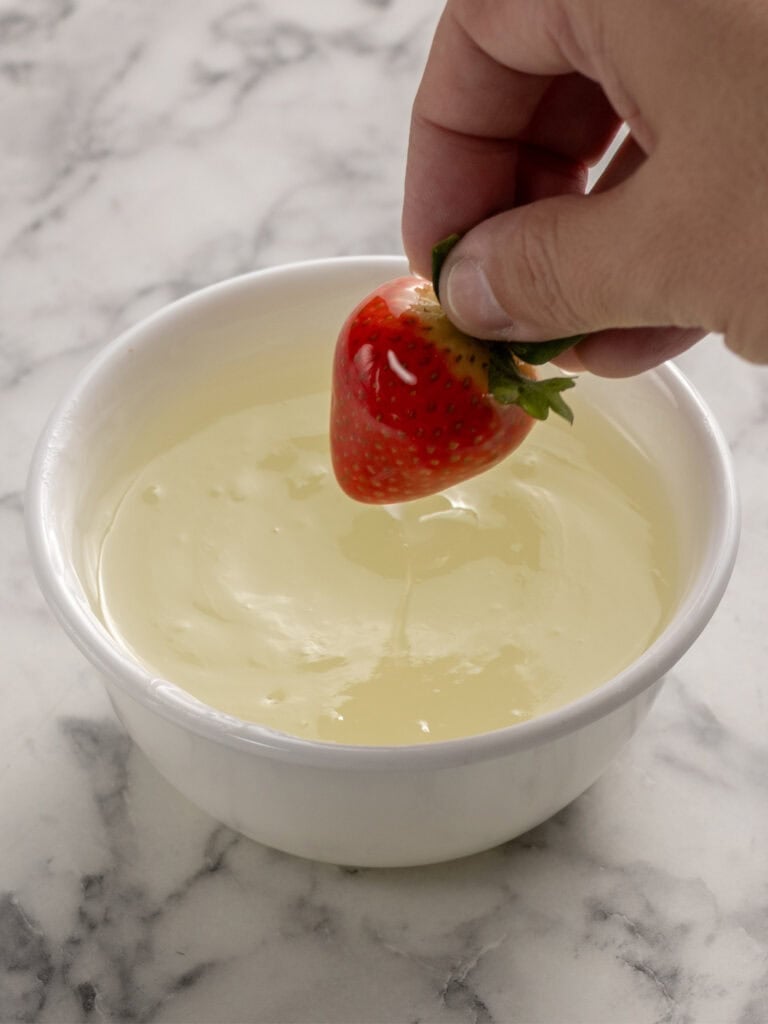
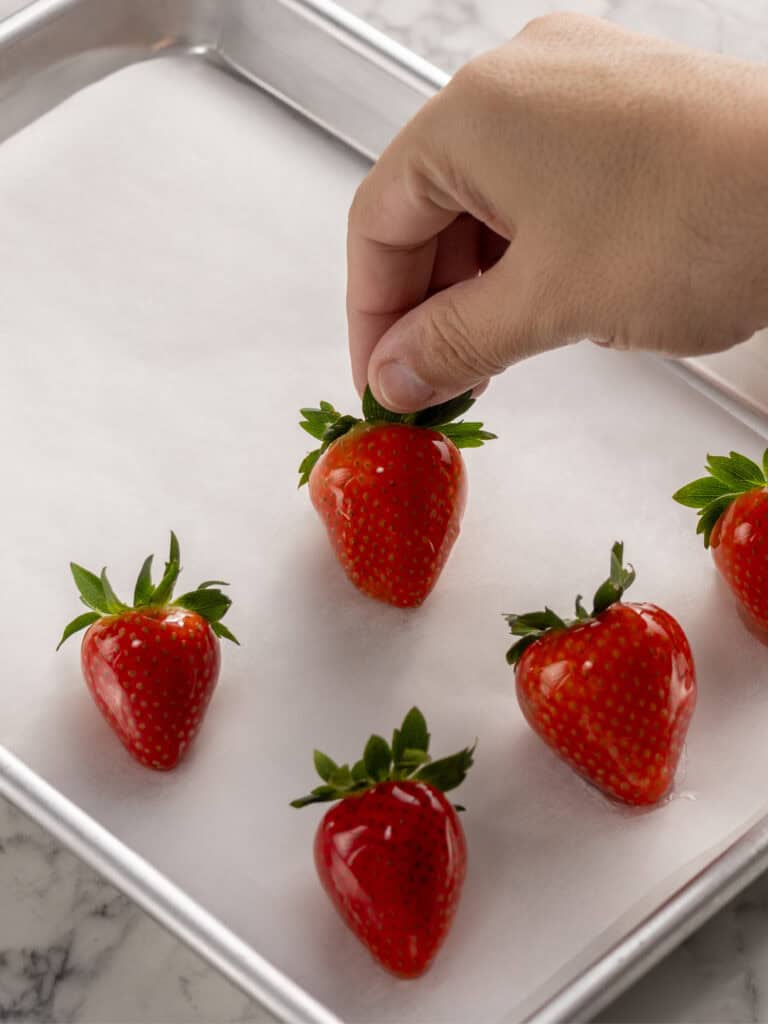
- Coat the strawberries by dipping the cleaned and dried strawberries into the glaze. You want to scrape the base on the edge of the bowl, then place on a baking tray lined with baking paper. Let them set for 10 to 15 minutes before adding to the cake.
Tip – You want to make the glaze when you’re ready to glaze the strawberries. If you make it too far in advance and it sets, you can’t thin it out to use it. I tried. It comes out lumpy.
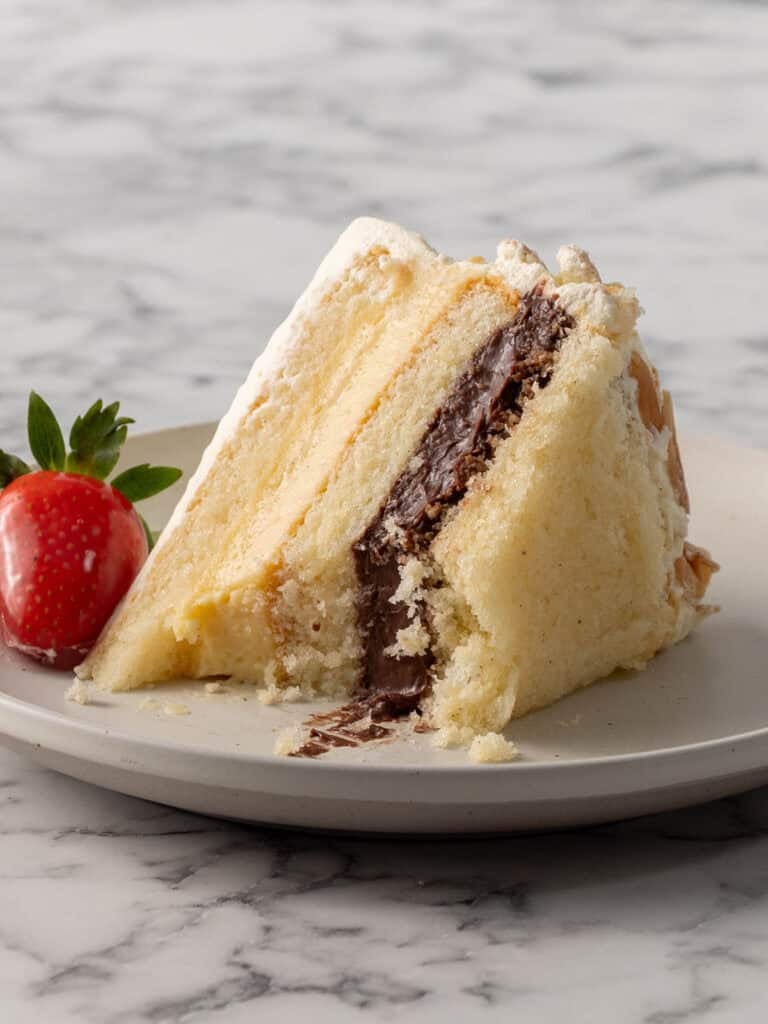
Layering the cake
Your cake is baked and trimmed, and the pastry cream is set and smooth. Let’s layer! Just a tip, you want to layer your cake at least 4 hours before decorating, or the day before for a proper overnight set.
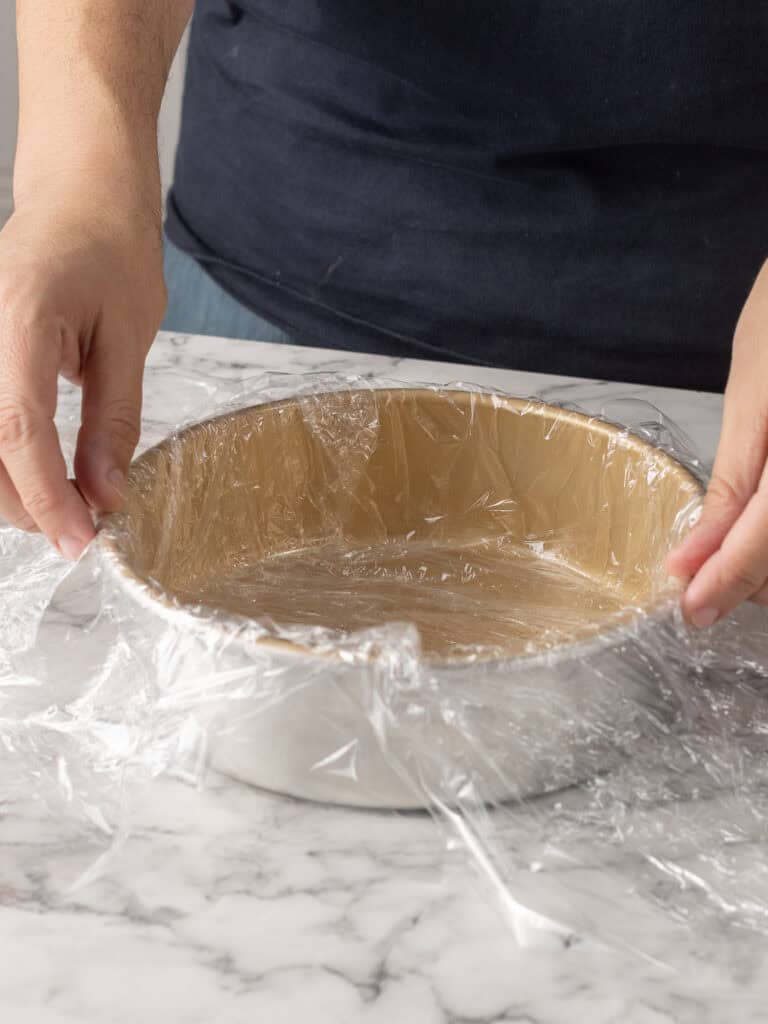
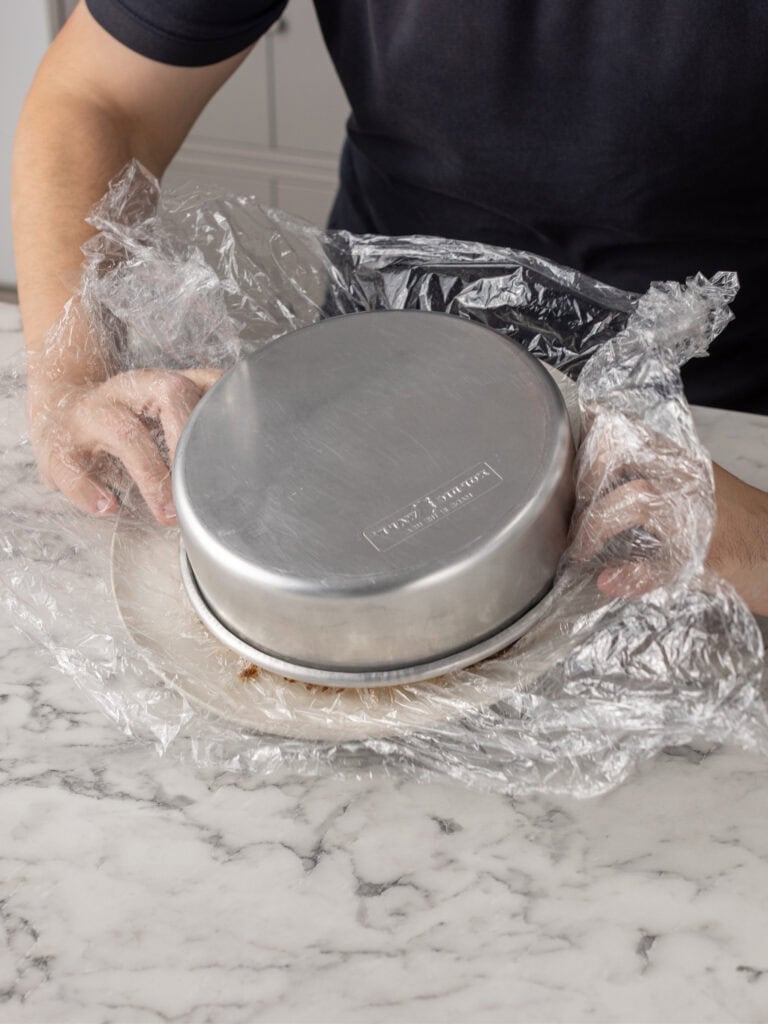
- Line the tin by laying three large pieces of plastic wrap on your bench, slightly overlapping, then press them into your cake tin. A tall tin works best, but you can use the same one you baked in.
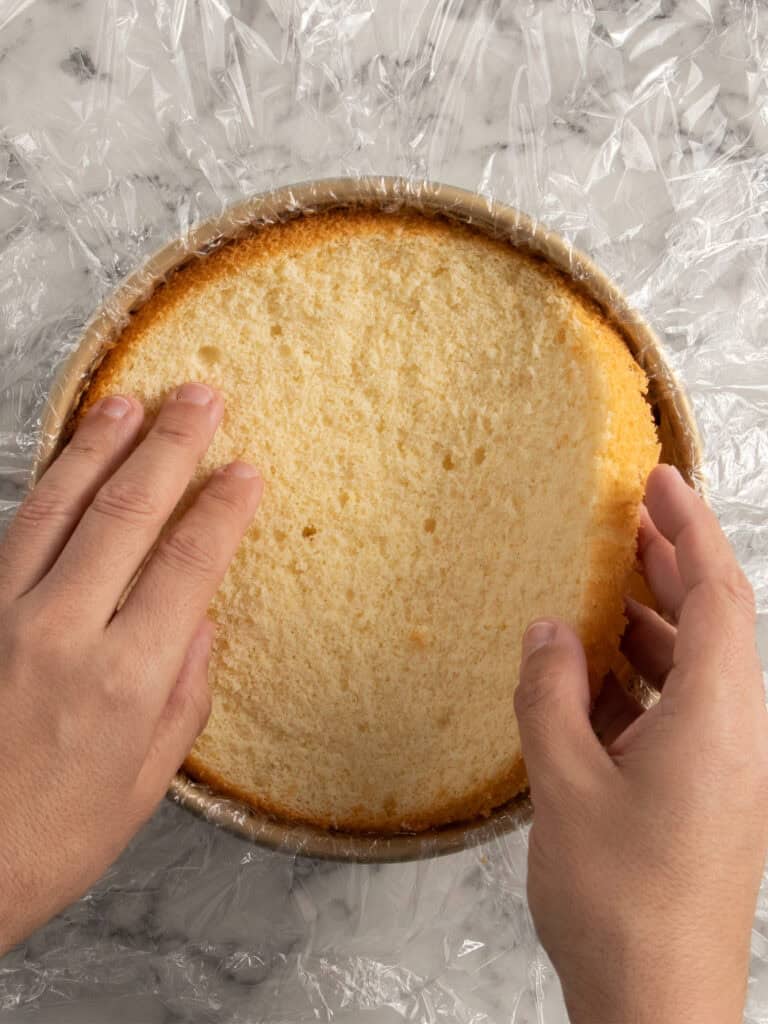
- Prep the first layer by peeling away the baking paper from the base before placing it into the lined tin.
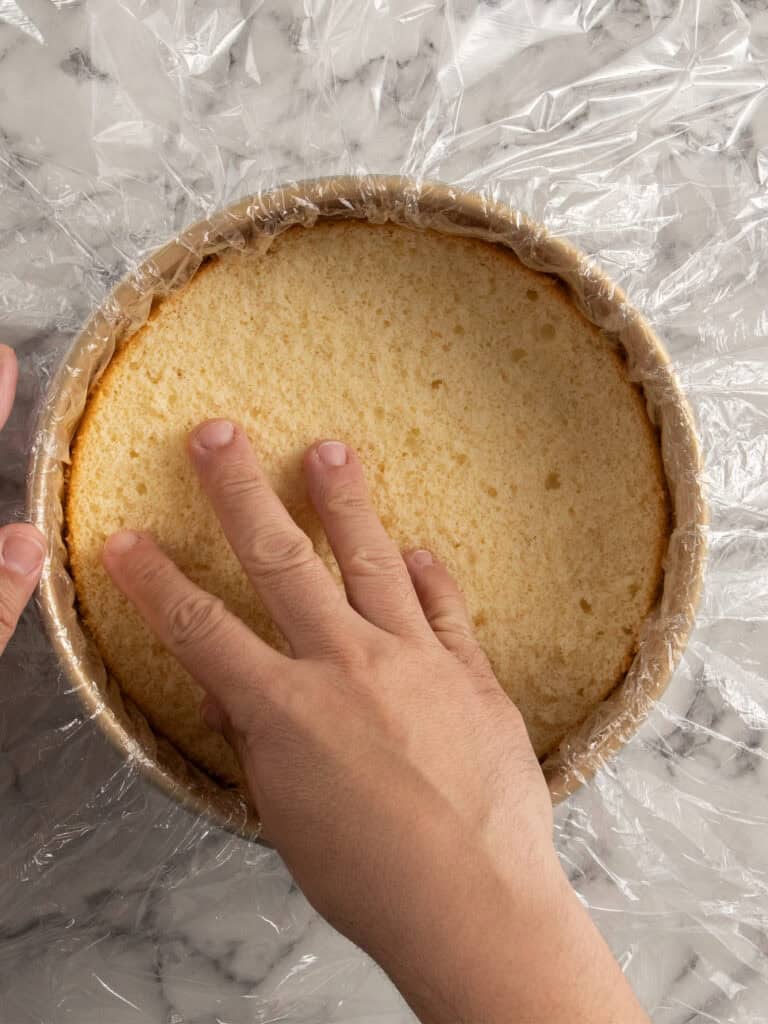

- Place the first layer into the tin and gently press it down, making sure the plastic wrap isn’t trapped underneath.
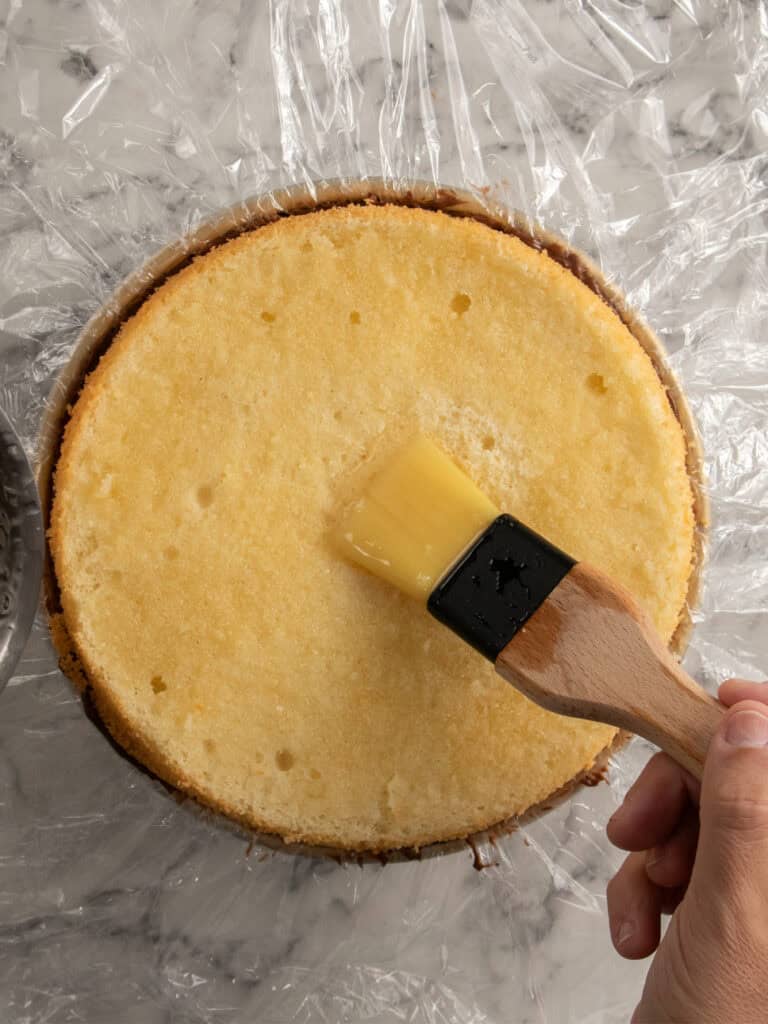
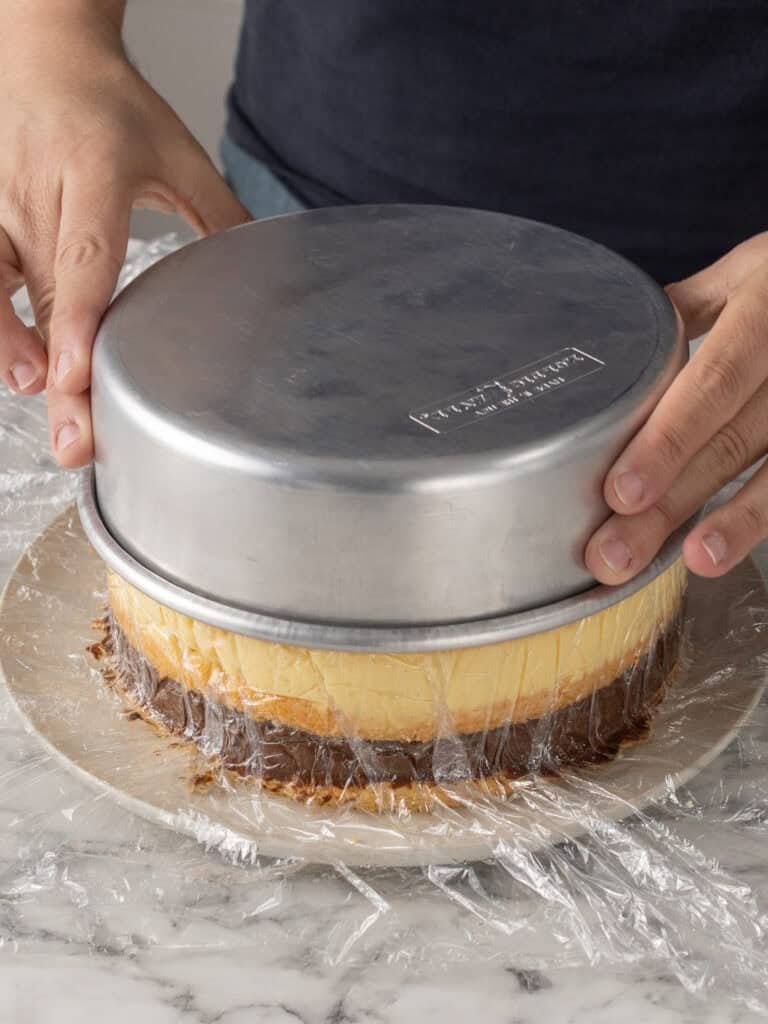
- Brush with syrup by lightly coating the surface using a pastry brush.
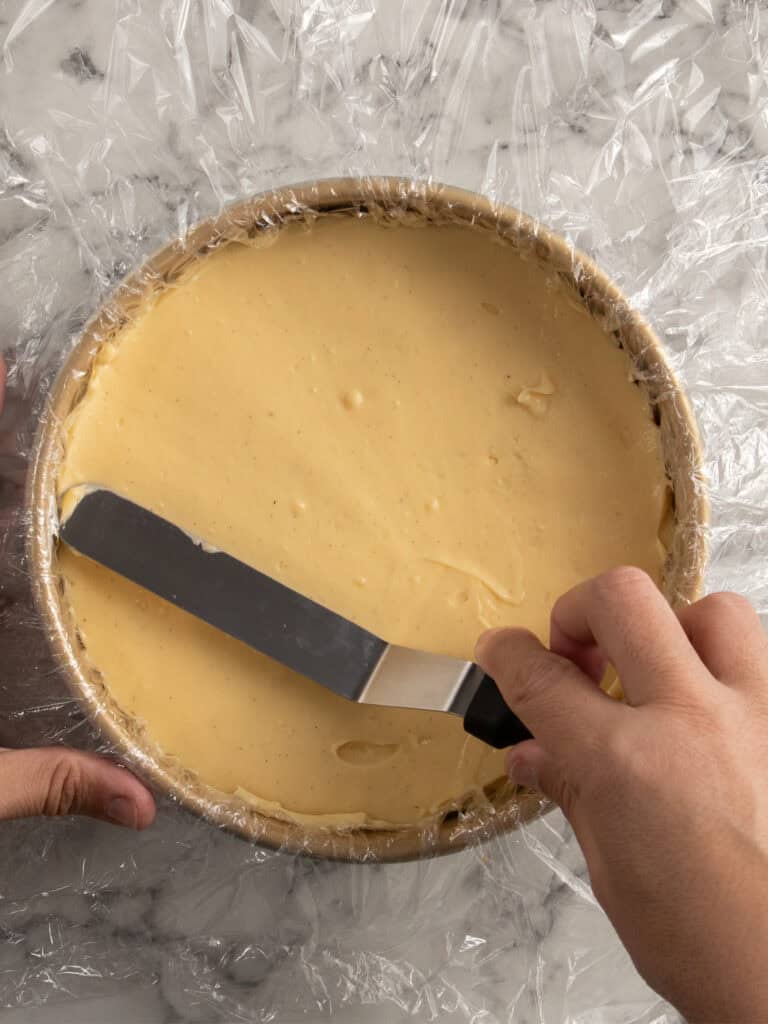
- Add the vanilla custard and spread it around as flat as you can get it. I like using an offset spatula for this.
- Add the next layer of cake and lightly brush with syrup.

- Add the chocolate custard and spread around evenly.
- Add the final layer of cake and brush with syrup.
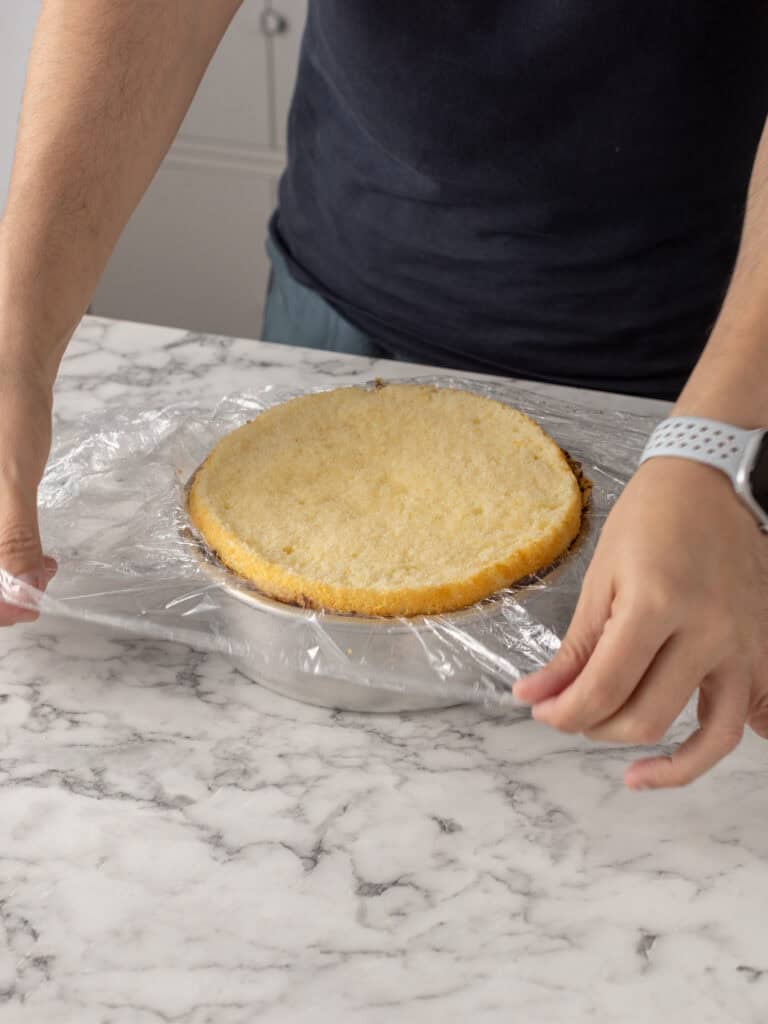
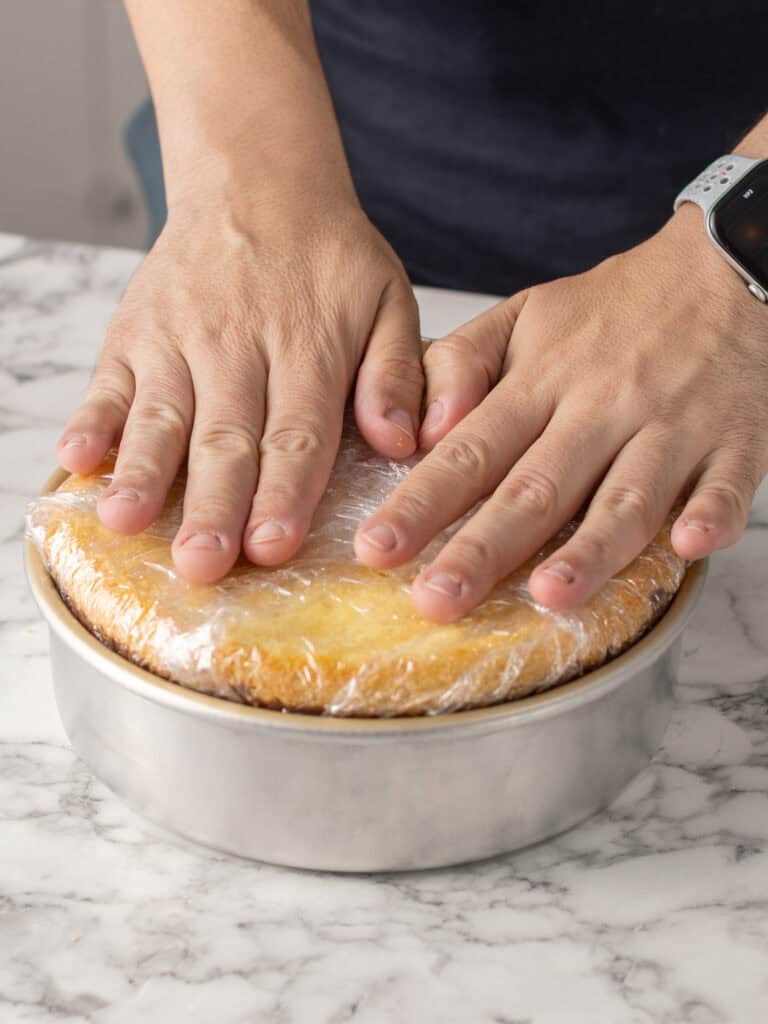
- Then cover the cake with the excess plastic wrap and pop it in the fridge to set for 4 hours. Overnight is best.
A Chantilly cream that won’t melt
I won’t bore you with how to make my famous Chantilly cream. It all goes into a bowl and gets whipped. You can make this the day before if you like.
Just some tips on how to use it to cover this cake:


- Whip the cream a little less than you think. You want it to hold its shape but stay ultra smooth so it spreads cleanly over the cake.
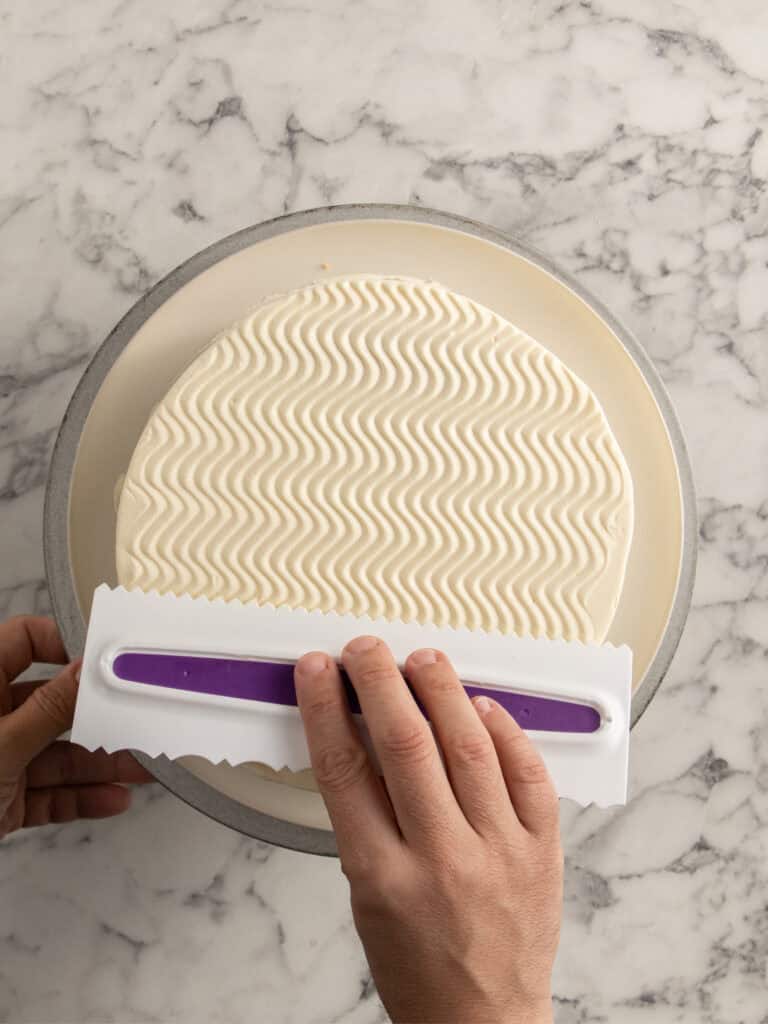
- For the top, I like thinning it slightly with a couple tablespoons of unwhipped cream. It makes it look much smoother, especially if you’re using a textured scraper like I did.
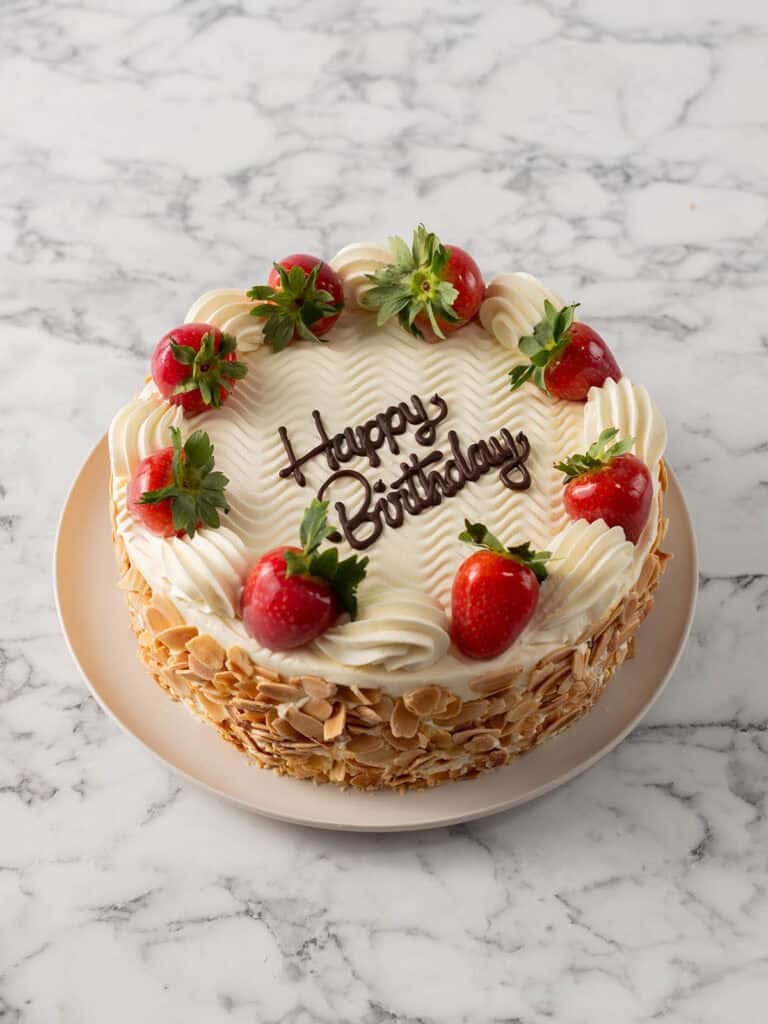
Decorating the cake
- Unwrap your chilled cake.
- Place your serving plate on top of the cake and flip it over.

- Lift the tin up and unwrap the cake from the plastic.
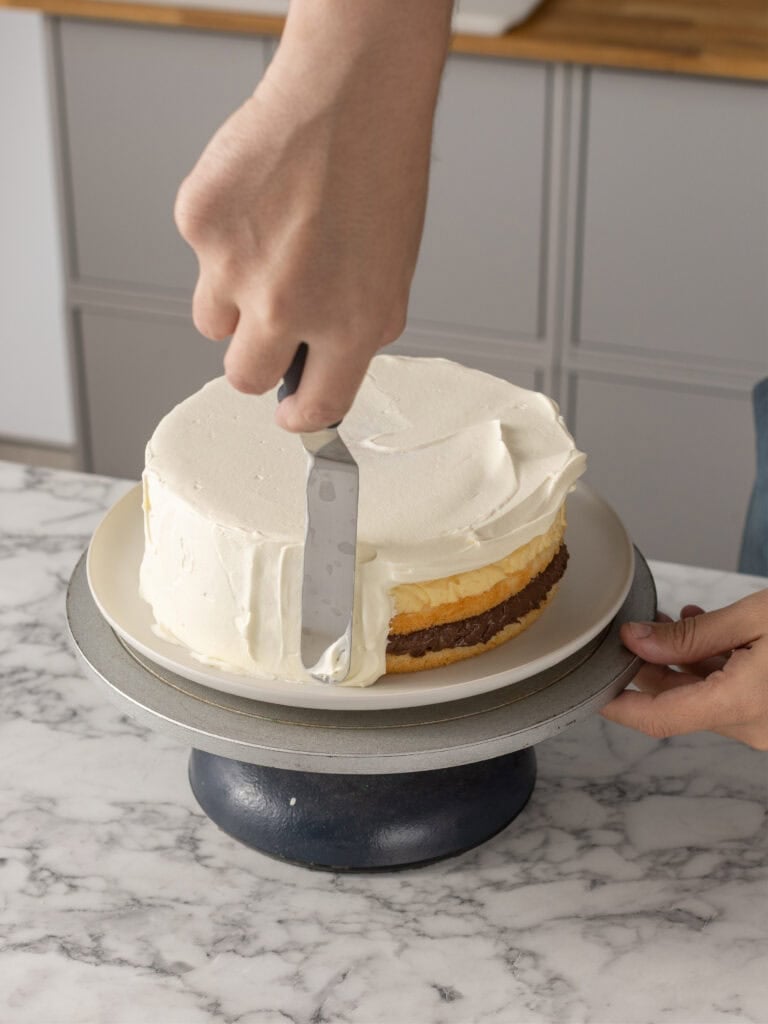
- Cover the cake by spreading chantilly cream over the top and sides. An offset spatula makes this much easier. Get it as neat as you can, the sides don’t need to be perfect as they’ll be covered in nuts.
Tip – Frosting is much easier with a cake turntable. It helps you get a much neater finish.
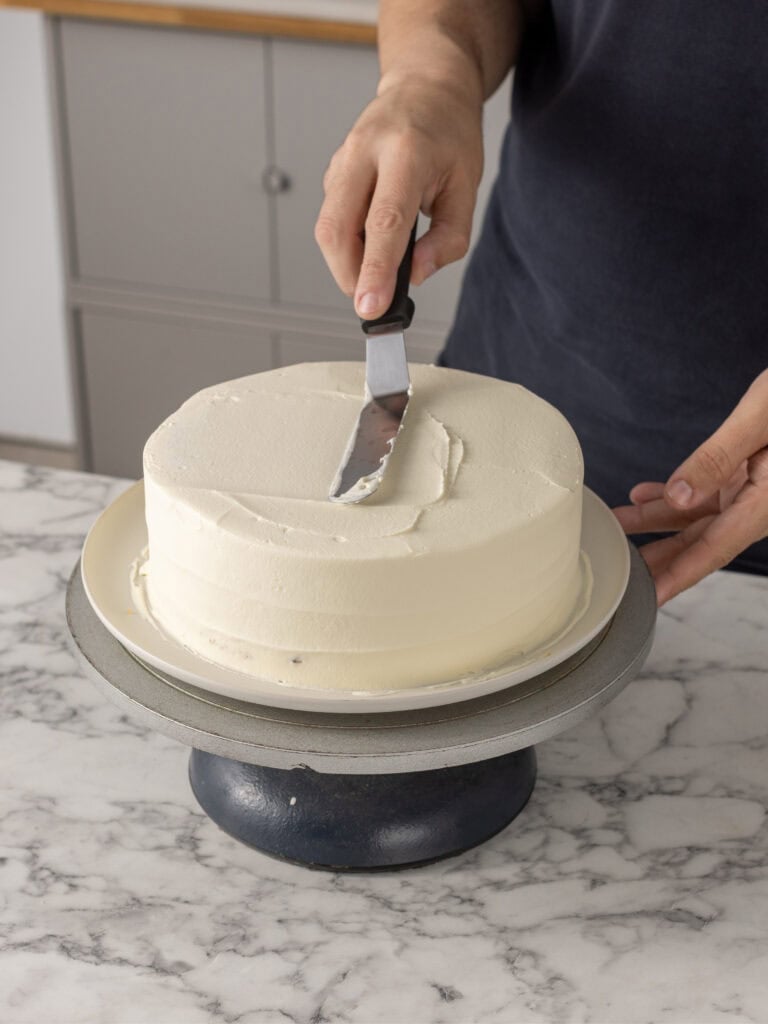
- Thin the cream out a little by using a spatula to mix in a small splash of unwhipped cream until smoother. Add some to the top, saving about 125g (about 1/2 cup) for the final swirls, then spread as evenly as you can.
- This is optional, but I like to use a textured cake scraper to give the top a nice wavy look. Make sure your holding the scraper straight at a slight angle so your fingers don’t touch the cream.
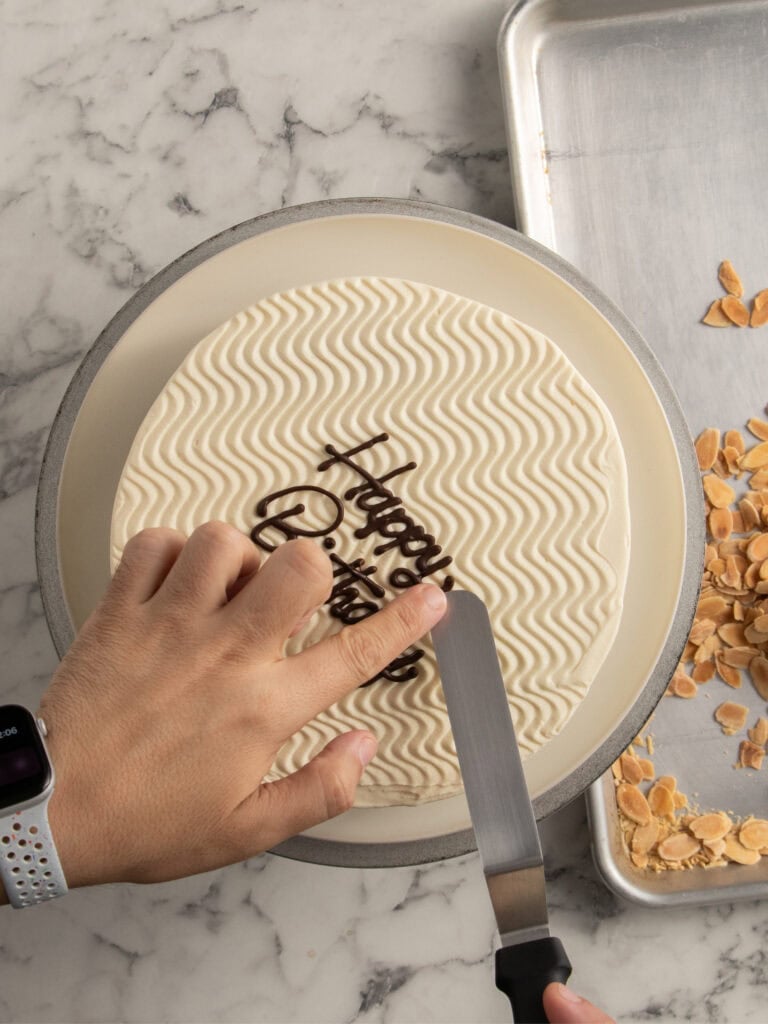
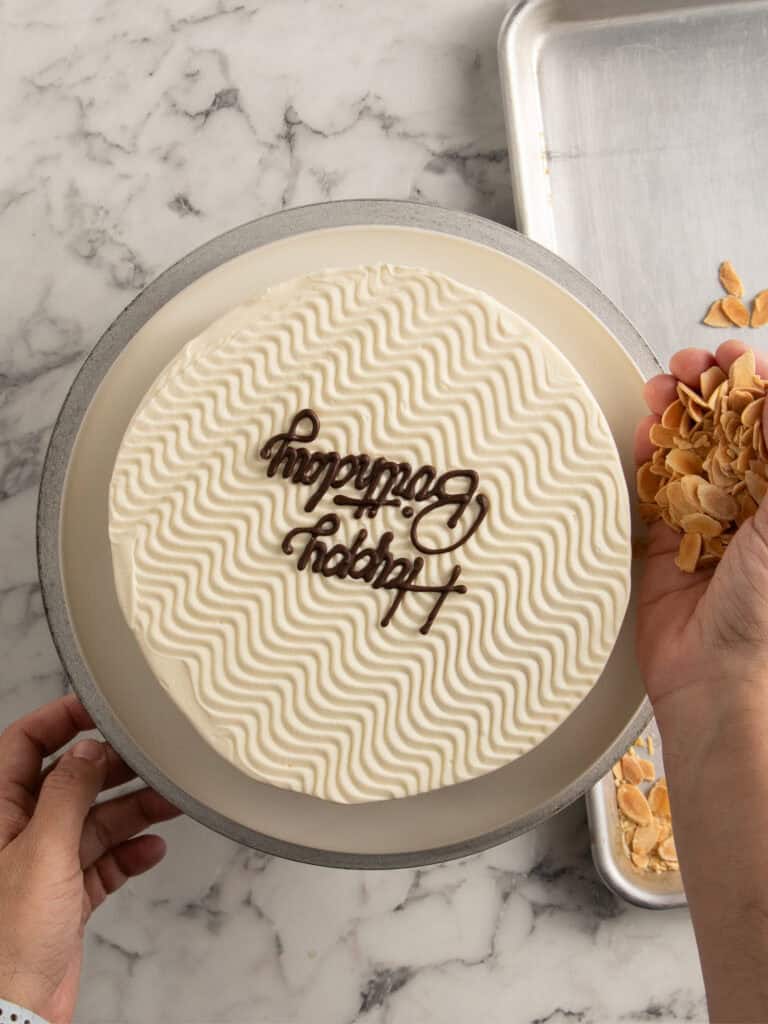
- Add the chocolate message. Use an offset spatula to very slowly and gently go under the set chocolate message you piped out. If it breaks it’s ok, it can still be used and it’ll look fine! Add it to the cake.
- Coat the sides with almonds by scooping them up and gently pressing onto the cake. I like starting at the top edge. The excess falls to the bottom of the plate, I just scrape them away into a tray that sits under the cake turntable and keep using them.
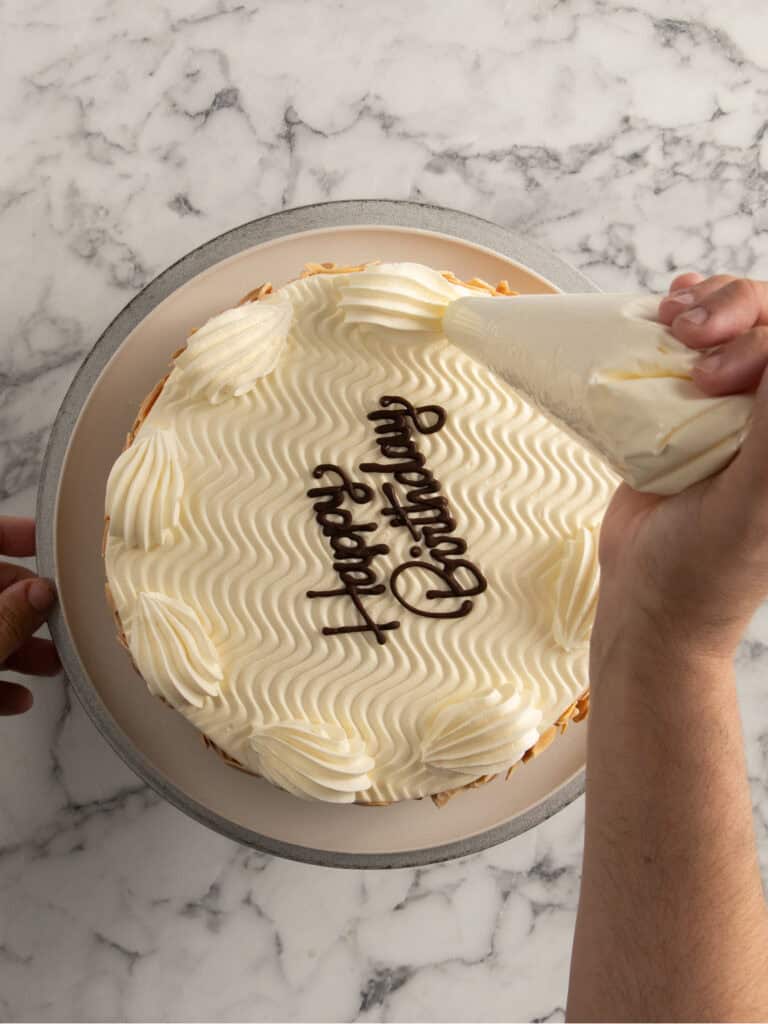
- Use an open star tip to frost swirls on top of the cake. You want to leave gaps big enough to add a strawberry in the gaps.
- Add the glazed strawberries to finish the cake.
Tip – You can finish decorating the cake up to 2 hours before serving. The biggest problem you’ll have is the strawberry glaze which will start to turn a milky white the longer you leave it on the cake.
A Quick Baking Guide
If you’re new to baking or just want to brush up on the basics, these guides are a great place to start!
Loved the recipe? Let me know!
If you enjoyed this recipe, leave a star rating and comment below. It helps others find the recipe and keeps the baking community growing. Tag me on Instagram so I can see your version too!

How To Make A Continental Cake (Italian Rum Cake)
This Continental Cake (Italian Rum Cake) features soft chiffon sponge soaked in rum syrup, layered with silky vanilla and chocolate pastry cream, finished with cream and strawberries, just like classic Italian and Greek bakery cakes in Australia
Serves 20
Ingredients
Cocoa Powder Slurry (for pastry cream)
- 20 g Dutch processed cocoa powder
- 50 g hot milk, not boiling!
Pastry Cream
- 80 g corn starch, corn flour
- 105 g caster sugar, superfine sugar
- 1/4 tsp fine salt
- 750 g whole milk, not skim
- 15 g pure vanilla extract
- 6 egg yolks
- 120 g unsalted butter, cubed and cold
- 4 g vanilla bean paste
- 60 g dark cooking chocolate, see notes
Chiffon Cake
- 160 g all-purpose flour, plain flour
- 40 g corn starch, corn flour, see notes
- 2 1/4 tsp baking powder
- 1/4 tsp fine salt
- 130 g cold water
- 55 g vegetable oil
- 5 large eggs, 50-55g each, separated
- 3/4 tsp cream of tartar
- 215 g caster sugar, superfine sugar (not granulated)
- 14 g pure vanilla extract
- 7 g teaspoons vanilla bean paste
Simple syrup
- 150 g granulated sugar
- 150 g water
- 20 g rum or liqueur of choice, OR
- 10 g pure vanilla extract
Strawberry glaze
- 180 g water, divided in half
- 55 g granulated sugar
- 12 g corn starch, corn flour
- 20 g corn syrup, glucose syrup
- 12 medium sized strawberries, washed and dried
Chantilly Cream
- 400 g heavy cream, cold (see notes)
- 14 g vanilla bean paste or vanilla extract, see notes
- 125 g mascarpone, cold (see notes)
- 20 g powdered sugar, sifted (optional)
Decorations
- 140 g almond flakes, lightly toasted until golden
- 50 g dark chocolate, melted (for happy birthday message)
Instructions
Make cocoa powder slurry
- Make cocoa powder slurry – Add the cocoa powder and hot milk into a small mixing bowl and whisk until smooth. Set aside. It will dissolve the cocoa powder, so you end up with a smooth pastry cream.
Pastry Cream
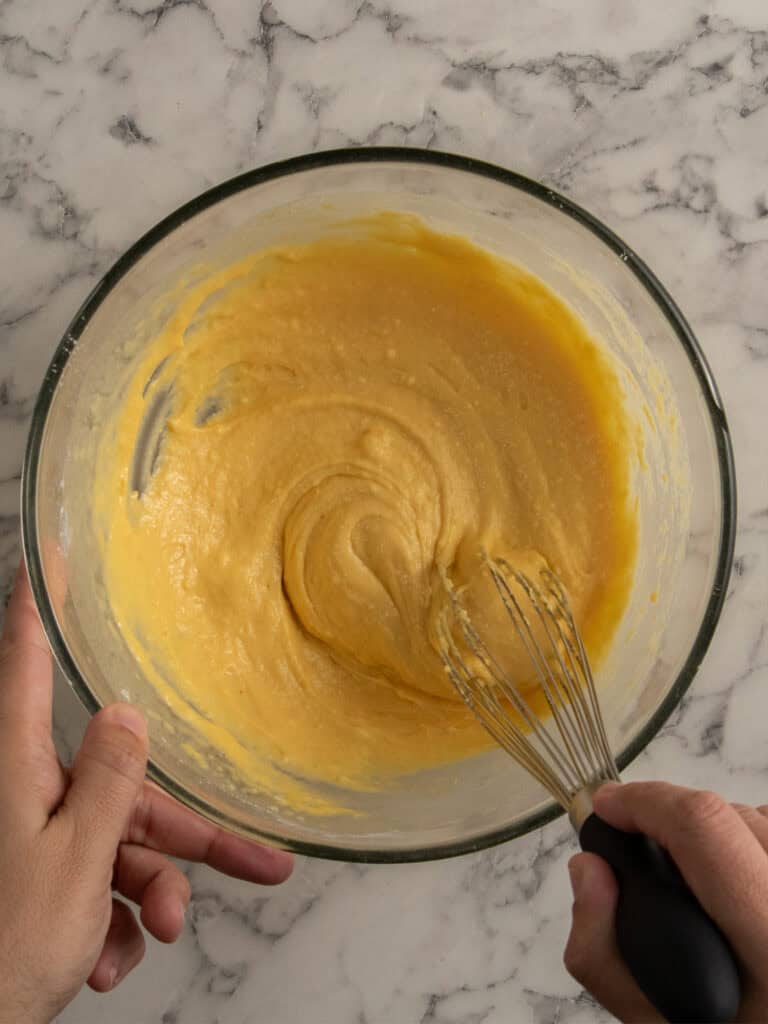
- Mix dry ingredients and eggs – To a medium sized, heavy bottomed stainless-steel pot (not non-stick), add the corn starch, sugar and salt and use a whisk to combine. Add the egg yolks and a little splash of the milk and whisk until smooth.
- Add the milk – Slowly add the milk, about 1/3 of it at a time, and whisk each time until all the milk has been added.
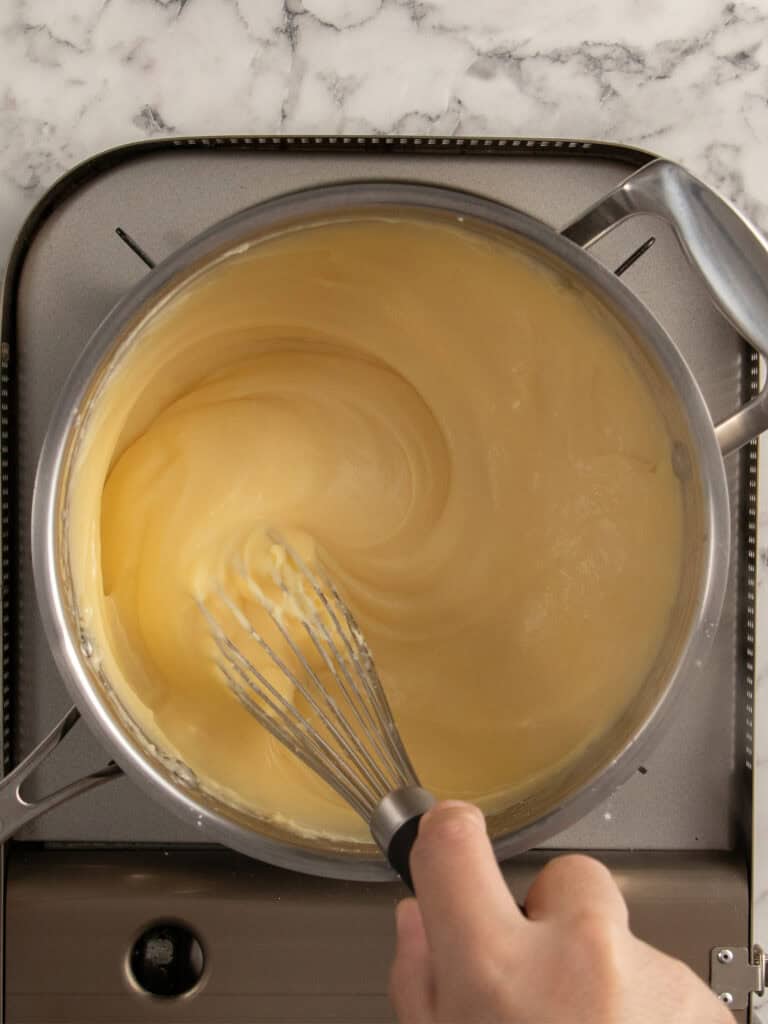
- Cook pastry cream – Place the pot on medium heat. Use a hand whisk to continuously whisk. Do not stop mixing or the pastry cream will become grainy. After about 3-4 minutes the mixture will begin to thicken. Continue whisking until the mixture begins to bubble. When it bubbles, whisk for 30 seconds, then take off the heat. If the mixture becomes lumpy, run it through a fine mesh sieve before cooling.
- Add butter – Add 1/4 of the butter and both vanillas and whisk until the butter is melted and well combined. Repeat until all the butter has been added. You want to do this slowly, so the pastry cream doesn’t split.
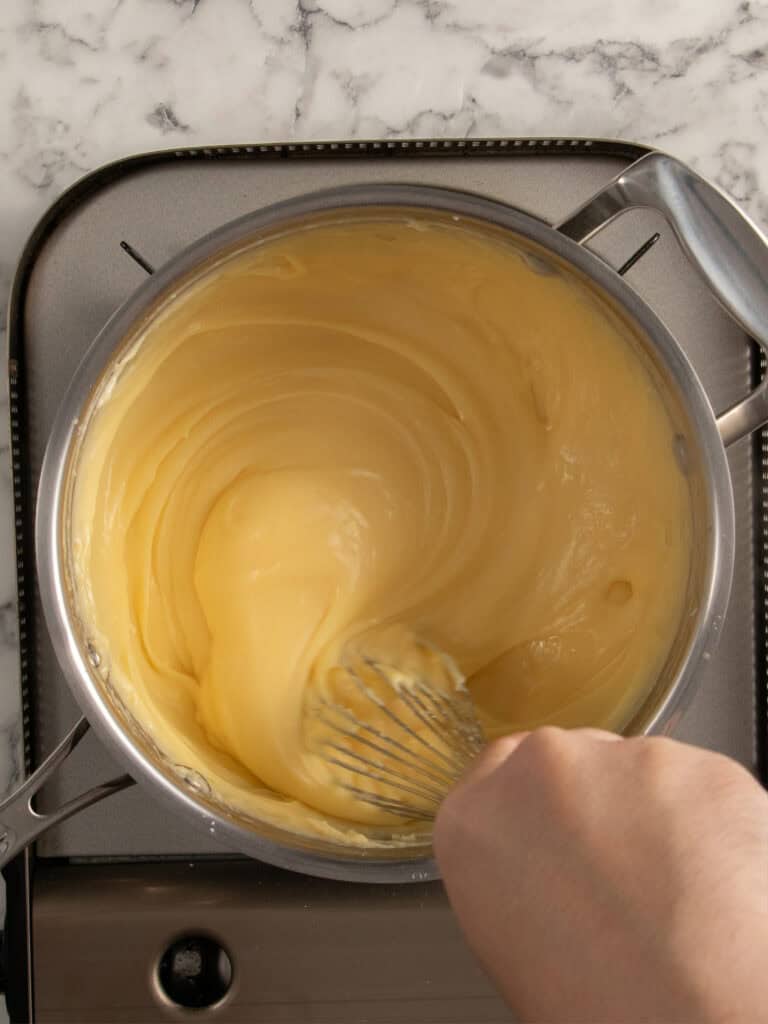
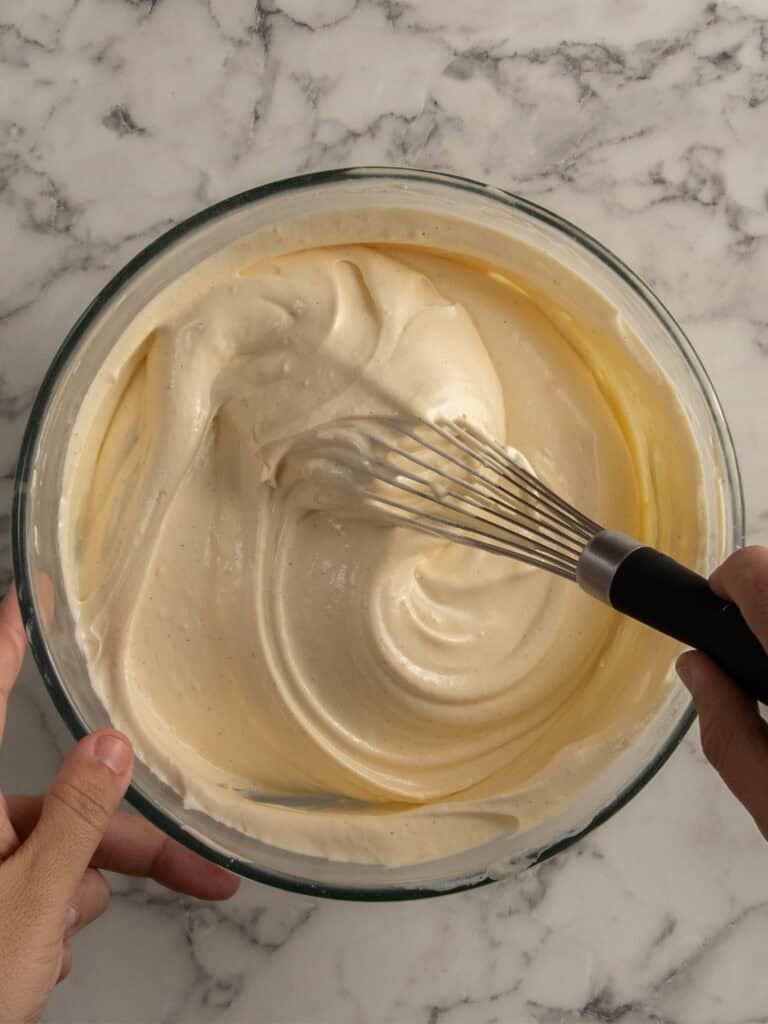
- Divide the pastry cream – Add 600g of the vanilla pastry cream into a medium sized heatproof bowl and cover the surface with plastic wrap. Allow to cool at room temp and then place in the fridge for 4 hours to set.
- To make the chocolate pastry cream and set – Add the cocoa powder slurry and dark cooking chocolate to the pot and whisk until the chocolate is completely melted. Transfer to a separate mixing bowl. Cover the surface with plastic wrap. Allow to cool at room temp for 30 minutes. Then transfer to the fridge to set for 4-5 hours or overnight.
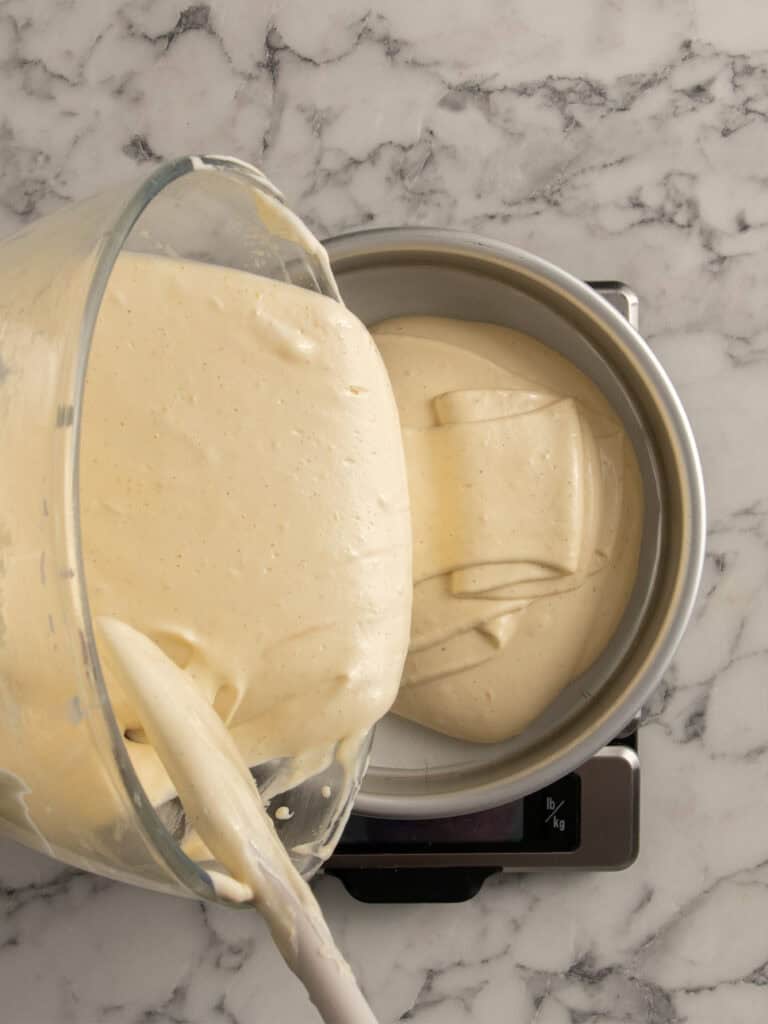
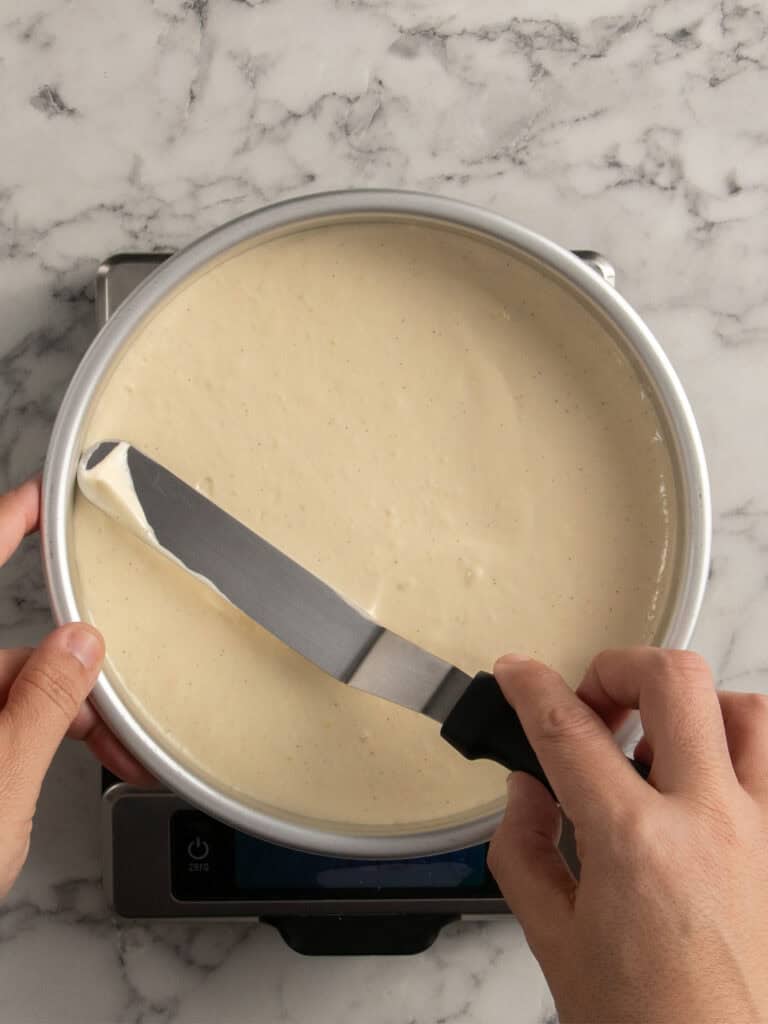
- Whisk to smoothen – Give the pastry cream a whisk to smoothen it out again. I actually like to transfer it to a larger mixing bowl and use my electric hand mixer to whisk it until smooth. This will break down the gelatin formation in the pastry cream and cause it to thin out a little, but it will still be thick enough to hold it’s shape in the cake layers.
Chiffon cake
- Preparing your oven – Preheat your oven to 165C / 330F (fan off), 145C / 300F (fan on). I like baking with the fan off for an even rise. Position your rack in the middle of the oven.
- Preparing your cake tin – Rub cold butter on the bottom (not sides) of three 20cm / 8-inch cake tins and line the bottom (not sides) with baking paper. You don’t want any butter on the sides of your tins because you want the sponge to stick so it holds its shape as it cools instead of shrinking away.
- Combine dry ingredients – Run the flour, corn flour, baking powder and salt through a sieve into a large mixing bowl. Use a whisk to combine and create a little well in the center. Set aside.
- To clean your bowl – Just to be on the safe side, add 1/2 tsp of lemon juice or white vinegar around a large glass or metal mixing bowl and use a paper towel to wipe dry. This removes any grease in your bowl so your egg whites whip properly. Avoid plastic bowls as they hold onto grease.
- Make the meringue – Add the egg whites and cream of tartare to your mixing bowl. Use an electric hand mixer or a stand mixer fitted with a whisk attachment to whisk on medium high speed for 1 minute until frothy. Then, while the mixer is still running, slowly add the sugar 1 tbsp at a time. This will allow the sugar to dissolve properly and should take about 3 minutes for all of it to be added. Continue whisking until the meringue reaches stiff peaks, about 8-10 minutes. The meringue should hold it’s shape completely when the whisk is lifted up.
- Add water, egg yolks and oil to dry ingredients – Add the water, vegetable oil and egg yolks to the bowl with the dry ingredients and use the whisk to combine until smooth and no lumps are showing. You want to do this when the meringue is almost done whipping.
- Fold meringue into batter – Add 1/3 of the meringue into the egg yolk mixture and use a balloon whisk or spatula to fold through until the batter is uniform. No meringue streaks are showing. Then repeat until all the meringue has been added. You will have a thick, fluffy batter.
- Bake – Carefully distribute the cake batter into the three cake tins. It works to be about 290g of batter per tin. Use a spatula or spoon to spread evenly. Bake them in the middle rack of your oven for 25 minutes or until lightly golden. Once baked, allow them to completely cool in the tin until they reach room temperature.
- To cool – Once baked, take the cakes out of the oven and flip over onto a cooling rack. You want to cool these upside down so they don’t deflate too much.
- Taking out of the tin – Once cooled, run a knife around the inside of the cake tins to loosen and turn the tins upside down to let the cakes gently come out of the tin onto your work bench. Peel the baking paper away and turn over so the bottom is facing down.
- Trimming the cake – Use a serrated edge cake leveler or serrated knife to trim the top of each cake off so that each cake layer is about 1 1/2 cm in height. Discard or eat (the latter is perfectly acceptable). It’ll give you nice uniform looking cake layers. It might seem like a lot of excess cake going to waste, but trust me, this amount of batter distributed amongst three cake tins is what works. Less cake batter doesn’t work as well, and this cake needs three sponge layers.
Simple syrup
- While the cakes are cooling, make the syrup – Add the granulated sugar and water into a medium sized pot. Place on high heat and bring to a boil. As soon as it starts boiling let it continue for 1 minute. Then turn the heat off and add the rum or vanilla extract. Stir and let it cool to room temp.
Layering the cake
- Prepare your cake tin again – To encourage an easy release of your layered cake, line the bottom and sides with two layers of plastic wrap. I like to lay the plastic wrap out on my workbench first. Two large pieces side by side, overlapping by 10cm, then crisscross that with another layer of plastic wrap. Again, slightly overlapping each other in the middle.
- Cake, simple syrup and vanilla pastry cream – Place your first layer of cake into your lined cake tin and brush lightly with simple syrup. Then add the vanilla pastry cream and spread evenly. Nice and flat as you can get it.
- Chocolate pastry cream – Repeat this process with the next cake layer and add all the chocolate pastry cream. Spread evenly. Add the final layer of cake and brush with simple syrup.
- Chill the cake (very important!) – Cover the top of the cake with plastic wrap and let it set in the fridge for 4 hours. Overnight is best. This will give the cake and pastry cream time to get to know each other in the fridge and settle their differences, so everything is super chill and copesetic.
Toast almonds
- Spread the almonds on a large baking tray and bake at 180C / 340F (fan off), 150C / 300F (fan on) for 6-8 minutes until lightly golden. Allow to cool completely and store in a zip lock bag until ready to use.
Strawberry Glaze
- Make slurry – To a small bowl, add the corn starch to half the water (90g) and stir until well combined. I like using a whisk for this, it helps get rid of the lumps!
- Make syrup – Add the sugar, remaining water (90g) and glucose syrup into a small pot. Bring to a boil then turn the heat down to low.
- Finish glaze – Add the slurry to the syrup and mix using a spatula (not whisk it’ll add too much air). Mix until everything is combined and the mixture thickens and becomes translucent. Pour into a small bowl. Cover the surface with plastic wrap and let it cool completely at room temperature. Give it a little mix before dipping the strawberries.
- To coat strawberries (right before topping) – Dip your cleaned and well dried whole strawberries into the cooled glaze and allow as much excess to drip off as you can. I like scraping the bottom of the strawberry on the bowl to get rid of excess. Place on the cake or on a baking tray lined with baking paper
Chantilly Cream
- Prepare mascarpone cheese – Add the mascarpone to a large mixing bowl (glass or metal) and use a spatula to stir and break up as some brands can be firmer than others. This helps break it up a little to prevent lumps in your whipped cream.
- Whip remaining ingredients – Add the cold heavy cream, powdered sugar and vanilla to the mascarpone. You can use an electric hand mixer or a stand mixer with a whisk attachment to whip to stiff peaks. I find it easier to get the right texture with a hand whisk. You’re aiming for a smooth, stiff whipped cream that holds its shape but still looks silky and smooth. If it looks split or grainy, it’s been overwhipped.
Tip – I like adding a textured look on top using a textured cake scraper. To get it looking nice and smooth add a couple tbsp to some of the cream to the whipped cream before using.
To Decorate the cake
- Transfer cake to serving plate – Unwrap the top of the cake while its still in the cake tin. Place a serving plate on top and flip them both over. Slowly lift the cake tin away and then the plastic the cake was in.
- Cover in cream – I like to add the Chantilly to a piping bag and pipe it on the sides and top to get a nice even cover. Then use an offset spatula or cake scraper to even and flatten it out on the top first, then the sides. Use the offset spatula to scrape from the top edge inward to the center of the cake to neaten up the edges as much as you can. I went a little fancy and use a texture cake scraper that I bought online.
- Add chocolate message – Add the chocolate message on top of the cake now to make things easier.
- Add toasted almonds – scoop up some of the toasted almonds in your hand and encourage them to gently stick to the sides of the cake. Most of the almonds will fall, just pick them up and keep sticking until you’ve gone all the way around the sides of the cake.
- Swirl more cream and add strawberries – Add the remaining cream to a piping bag fitted with an open star tip and pipe swirls on top of the cake. Then add the coated strawberries on top to finish.
Tip – I like adding just a little drop of red food dye (liquid not gel) to brighten up the glaze and make the red on the strawberries pop!
Notes
Corn flour – Also known as corn starch is what’s going to give you a super soft sponge. I also use it to thicken the custard and strawberry glaze.
Caster sugar – Also known as superfine sugar is best for this recipe when making the meringue. It dissolves into the meringue much quicker which means you lessen the risk of overwhipping. Granulated sugar will not work for the meringue but can be used for the pastry cream and syrup.
Dutch processed cocoa powder – Is an unsweetened cocoa powder which has been treated with alkaline and potassium carbonate to neutralize the acidity that is naturally found in cocoa powder. It’s darker in color and strong in chocolate flavor and its perfect for the custard because it gives it a strong chocolate flavor without making it overly sweet.
Dark cooking chocolate – I used dark cooking chocolate for the custard. Specifically, the Nestle cooking buttons which are designed to easily melt. You can use pretty much any dark chocolate you like just make sure its good quality.
Cream – Make sure you use cream labelled heavy cream for this recipe. Whipping cream will work but won’t be as stiff as heavy cream. Low fat cream will not work.
Mascarpone – Is an Italian cheese that is similar in flavor to sour cream, but more creamy and less sour. Adding it to your Chantilly cream helps stabilize it so that it doesn’t melt as quickly and holds its shape on top of desserts. It even helps hold the air in the whipped cream until the next day! Opt in for a better brand one as they tend to be thicker and make sure it’s cold straight out of the fridge! Make sure you give your mascarpone cheese a mix before using. Some brands are soft, some are firm and can cause your Chantilly cream to go lumpy.
Powdered sugar – I don’t like my cream too sweet, but if you like yours on the sweeter side you can use up to 50g. Make sure you sift it!
Vanilla – I have a great recipe for Vanilla extract here on the blog which is alcohol based. It can be used for most recipes. However, I would advise against using it for whipped creams (yes, even stabilized ones like this one) or meringues as it can muck around with the air whipped in the mixtures. Instead use a syrup based vanilla extract. I find vanilla bean paste is best.
Strawberries – I find the easiest way to clean my strawberries is to run them under some cold water then place them on top of a tray lined with paper towels. Give them a jiggle to let them gently rub on the paper towel and dry themselves.
Strawberry glaze – This is optional, but it helps give your strawberries a gorgeous gloss. You want to add the strawberries no more than a couple hours before you serve your cake. It can mess around with the cream and start dripping which makes it look messy.
Storage – This cake can be layered and then wrapped tightly in plastic wrap 1-2 days before you decorate it. It can only be decorated up to 1 day before you serve it. Ideally the night before. Store it in an airtight container, in the fridge for up to three days.
Nutrition – is an approximate and is based on per slice. This serves 20.
A note on measurements – This recipe uses weight measurements for the most accurate results. Cup measurements can vary depending on where you are, which affects the precision needed for a recipe like this. Here is where you can learn more about how to measure ingredients using digital kitchen scales.
Nutrition
Calories : 430kcal
Carbonhydrates: 35g
Protein: 8g
Fat: 25g
Saturated Fat: 13g
Polyunsaturated Fat: 2g
Monounsaturated Fat : 7g
Trans Fat : 0.2g
Cholesterol: 152mg
Sodium: 154mg
Potassium : 241mg
Fiber: 2g
Sugar : 19g
Vitamin A: 740IU
Vitamin C: 0.1mg
Calcium: 138mg
Iron: 1mg
Nutrition Disclosure
Gave this recipe a go?Mention @thescranline or tag #thescranline!
previous post
20 comments
Nick, roughly how much time do you set aside to make this gorgeous creation🏆
Hi Linda! Hmm, realistically, I’d set aside 2-3 days. I’ve got a workflow section in the post that outlines how I make this cake in terms of time and which things on which day. Hope that helps! N x
Lovely recipe and a joy to read the instructions
hanks so much Becky! Hope you get to try it soon! N x
Hi Nick,
I made this for my husband’s birthday, and it was absolutely brilliant! I followed your instructions exactly, and the result was fantastic. I loved the texture, the sweetness was just right, and I was really happy with the custard filling as well.
Just one small suggestion: when describing the chocolate cream filling, it wasn’t entirely clear to me that the chocolate slurry needed to be added to the remaining custard. It may seem obvious to experienced bakers, but as a novice, I found myself wondering about it for quite a while because I really wanted to get it right.
That said, the recipe turned out beautifully, and I’ll definitely be making it again. Thank you for sharing it!
Hi Lanka! This is so amazing to hear. I love hearing how much people love this cake because it’s one I worked hard on. With the slurry, I think it’s right at the beginning of step 6. If you can suggest a clearer way or easier to understand way for people to add it in there, let me know! 🙂 Glad you loved the recipe enough to want to make it again! N x
I made this in a day the first time I tried it and even then it turned out impressive. This week, I will spread it over two days and looking forward to the result. Thank you.
Thanks so much Oz! N x
love this recipe and the detailed instructions
Hanks so much Mariela! N x
OMG Nick this is my favourite cake – absolutely love it. I think I ate half of it on my own. Super soft sponge, delicious custard – I could go on and on. I have been making this cake for years but have switched over to making your sponge. I absolutely love your recipes. Do you have a recipe for Greek Kok (yo-yos). Love them too..
Hi Niki, this is amazing news! I worked so bloody hard on this recipe so when people tell me how much they love it, I mean it’s day made. I dont have a yoyo recipe but it’s on my list! N x
Hi Nick,
Thank you so much for sharing your recipe. Brings back childhood memories of birthday parties. My question is can I replace the rum syrup with a simple sugar syrup?
Thanks
Maria
Hi Maria! That’s honestly the best compliment I can get. Yep, that’s totally fine. The recipe has a simple syrup as part of it. Just increase it by 10%. N x
Just made this for my birthday and the steps and instructions you gave ,made this a joy to make!
I made it over 2 days , the only hiccup I had was I wasn’t sure when to add the vanilla to the cake batter . I added it to the meringue mixture like a pavlova. I Also only had 2 cake pans 22 cm in diameter,so I cooked 2 and waited until they were cooked then did the third which is not ideal and I wouldn’t do that again…but it worked. The measurements you gave to fill each cake pan was sooo helpful! The cake was light and the rum syrup was amazing. Will be definitely making this again, just need to buy another cake pan 🤣
Thankyou again for sharing this recipe and testing so thoroughly.
Hi Susie! SO glad you loved the recipe. Yep the vanilla can go in with the meringue portion. That works. I’m glad to hear the cake pans thing worked too. I generally steer clear of doing that too. And yes, I’ve started using the measurements in weight for cake pans because I feel like that just makes things so much easier. Thanks for taking the time to come back and let me know how it went! N x
Oh wow this looks beyond incredible! Well done! Wondering if I pull this off as my daughter’s birthday cake ..any ideas on roughly how many this would serve? Thanks!
Hi Jen! Depends on the clientele haha. If we’re talking europeans over the age of 55 who say ‘just cut me a tiny slice’, about 25-30, but normal people who like a decent slice of cake, about 20. N x
Please tell me that is not actually what you call Greeks and Italians in Australia… Actually no I hope it is and it’s okay there because it certainly isn’t here! Great cake, would make again my children devoured it without waiting for me to cut it! Love from the UK – Marge
Wog? It was mainly used by anglo people as a way to describe europeans in an offensive way. The word isn’t used often anymore unless it’s by europeans in and amongst themselves. So glad you loved the cake Marge! It’s a special one to me. N x