Home Made Flaky Butter Pie Crust
Making your own Butter Pie Crust at home that’s flaky, buttery, and tender is so easy! My delicious recipe will have you baking a light, strong but perfectly delicious pie crust that you can use for both savory and sweet pies.

In this recipe, I’ll walk you through all the steps in a simple and easy to understand masterclass. Things like how to make the dough, roll it, shape it, blind bake it. Once you try making your own butter pie crust and realise how delicious it is, you’ll never buy store bought again!


Use this recipe to make large pies, with or without those fancy lattice lids or to make mini pies!
Contents
Looking for great pie recipes?
If you’re looking for yummy pies to make with this recipe, give my Chocolate Pudding Pie recipe a go, perfect for chocolate lovers. Or my delightfully citrusy Lemon Meringue Pie!
Why You Should Make Butter Pie Crust At Home
There are so many things to love about this Butter Pie Crust recipe. I think the biggest thing is the flavor!
- Flavor – It’s buttery like puff pastry. And that’s because one of the main ingredients is butter. It adds flavor but also helps make this an incredibly light, flaky and delicious pie crust that elevates any filling you decide to put inside it!
- Versatility – this recipe can be used in so many ways. It yields two 22cm / 9-inch pie bases or one pie base with a lid. It can also be used to make mini pies!
The Two Baking Stages
There are two baking stages in this recipe and each do two very different yet equally important things. Let’s break it down.
- Bake #1: Bind Baking – This is the first time you bake your pie. Blind baking your pie involves placing a sheet of baking paper in your pie followed by a sheet of aluminum foil which you then fill with baking beads or dried beans. This helps weight down your pie dough so that it doesn’t puff up in odd bubble shapes as you bake it. Once baked, you carefully take out the baking beads by lifting from the baking paper and foil. At this stage your pie is ready for wet fillings, or fillings that need additional baking.
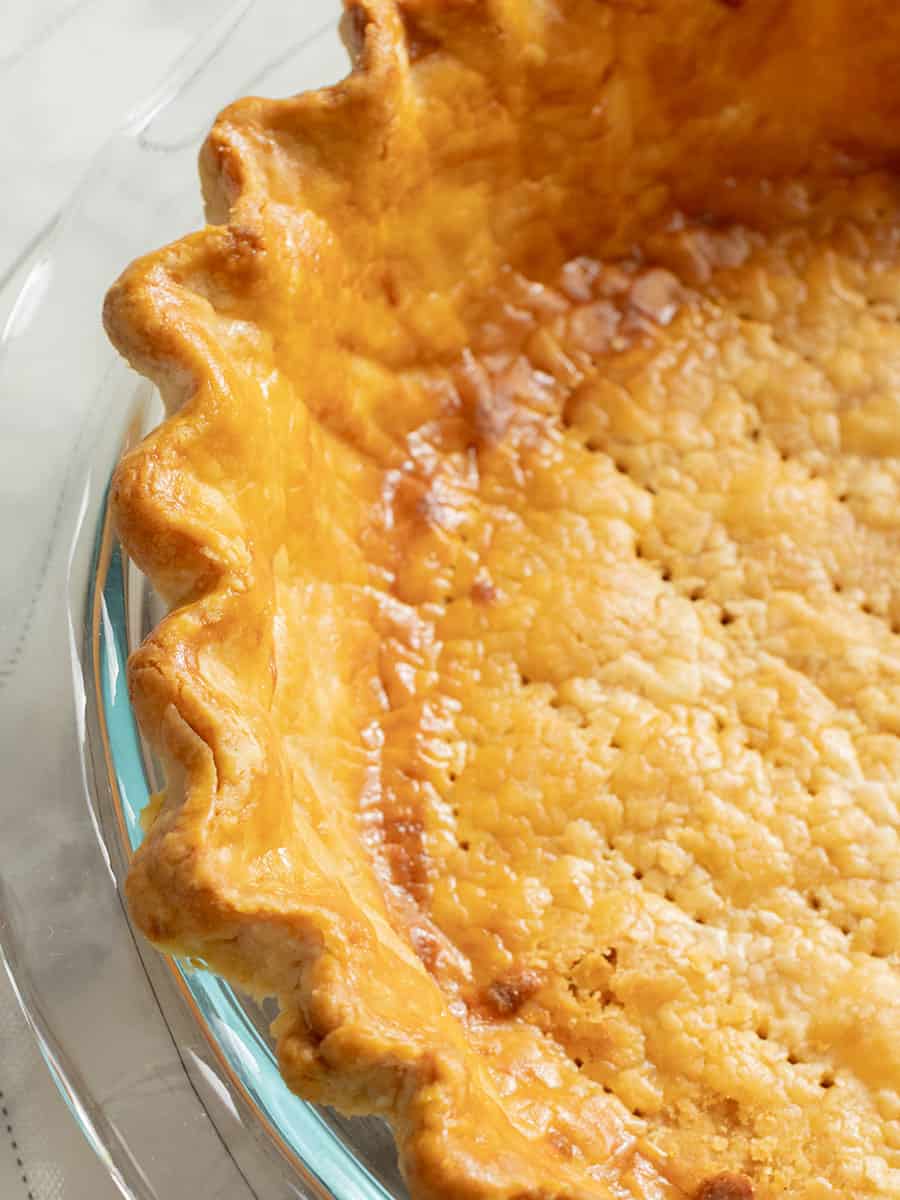
- Bake #2: Fully Baked – Baking your pie a second time until it’s fully baked is ideal for filling that don’t need additional baking. At this stage, I would recommend wrapping the rim of your pie with foil to stop it from burning as it bakes. You’ll be left with a perfectly golden pie crust.
Ingredients You Need To Make Butter Pie Crust
This recipe has just 5 ingredients!
- All-purpose flour – also known as plain flour.
- Sugar – I used caster sugar, also known as superfine sugar. But you can use granulated sugar instead. The sugar in this recipe is completely optional. If you’re making something like a savory quiche, you can leave the sugar out if you wish.
- Salt – I used fine salt
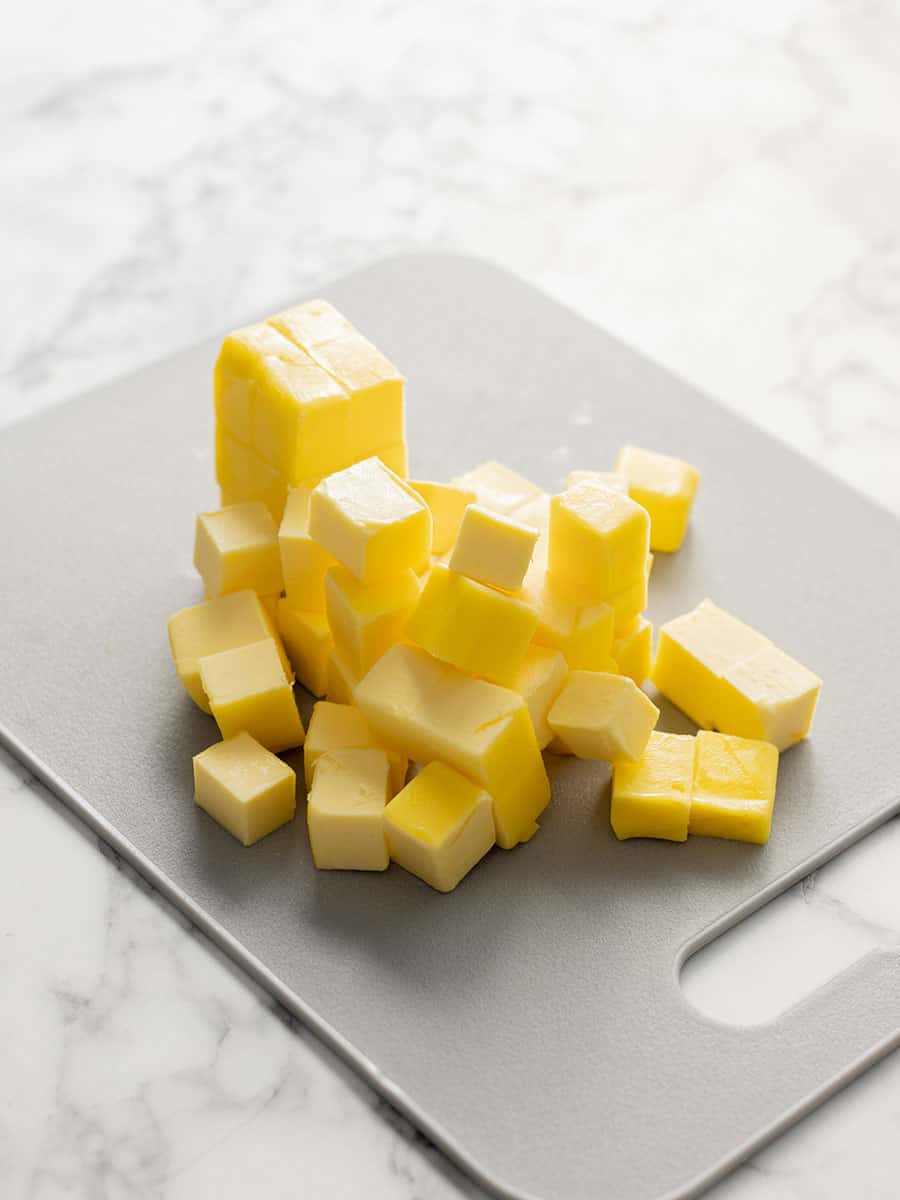
- Butter – I used unsalted butter. If using salted butter, leave the salt in the recipe out. Make sure your salt is cold! Straight out of the fridge. Cut it into cubes and place it in the fridge before using.
- Iced water – make sure your water is iced. How much water you end up using in this recipe depends on the texture. The pie crust will look crumbly, but will form a rollable dough texture after resting in the fridge. Before it rests in the fridge, squeeze some in your hands and if comes together without crumbling it’s good to go. If it’s really crumbly add another 1 – 2 tbsp of iced water.
How To Make Butter Pie Crust!
Making by hand

- Combine dry ingredients in a bowl
- Add butter


- Rub into the dough
- Until you reach flaky butter pieces

- Add water and mix
- If it comes together in your hands and forms a dough it’s done.

- Bunch together and form two discs – this recipe makes two pie bases.
- Wrap in plastic wrap and rest in the fridge for 2 hours.
Making with machine

- Add dry ingredients to bowl of a food processor and pulse to combine.
- Add half the butter
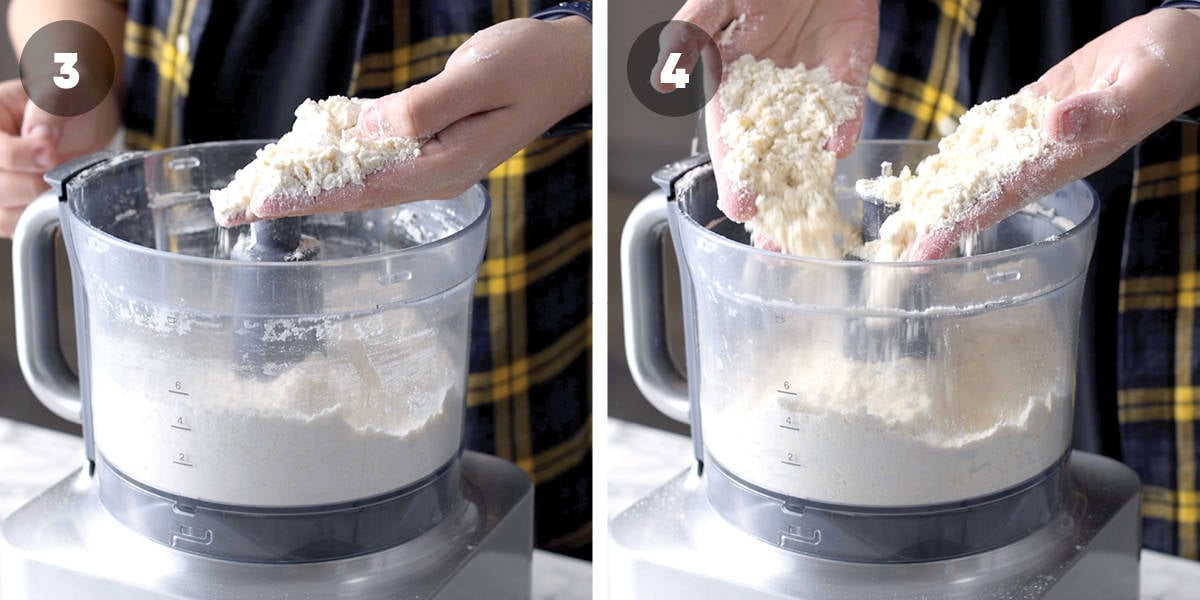
- Pulse until you reach fine crumbs
- Add remaining butter and pulse until you have pea sized pieces of butter.

- Add water and pulse a couple times
- Bunch together on workbench. Form two discs, wrap and chill for 2 hours.
Rolling out the dough

- Dust workbench with flour. Roll out dough
- Pinch together any cracks that form

- Roll out to a disc shap
- Roll around rolling pin

- Unroll over 9-inch pie dish
- Lift to get to bottom of dish – DO NOT STRETCH!

- Cut away excess dough
- Fold under itself at the top
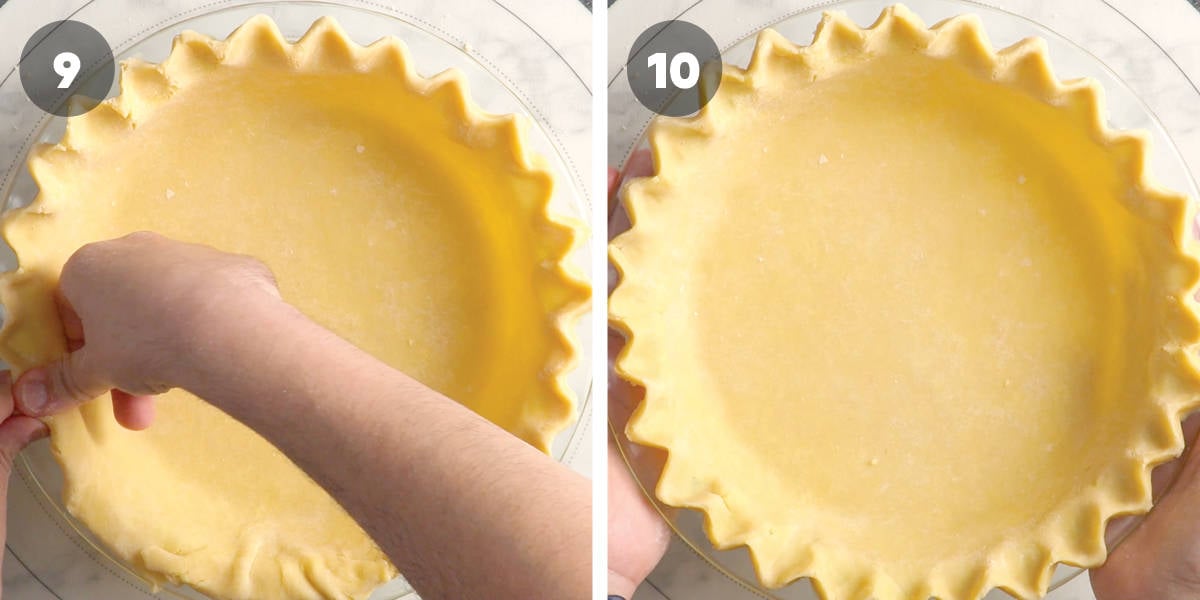
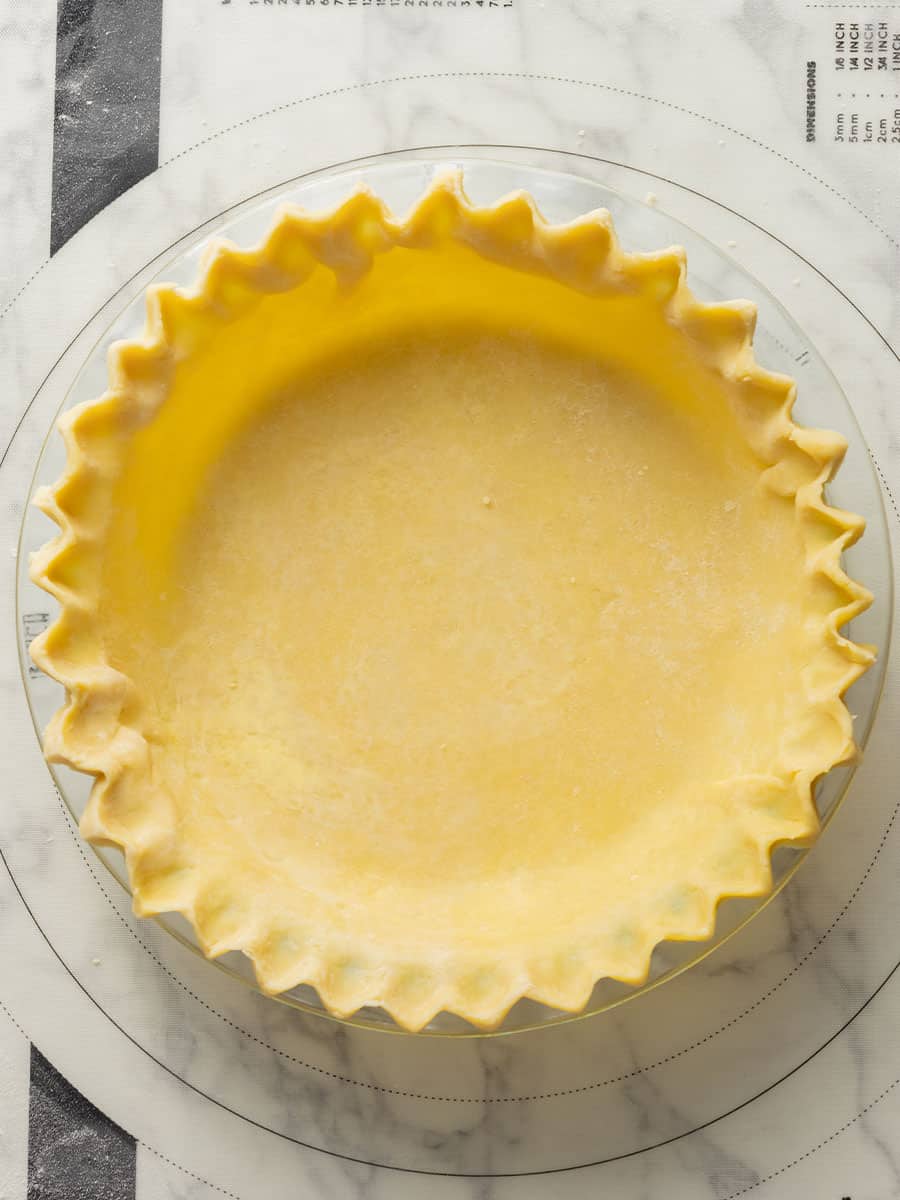
- Pinch decoration using three finger method
- Freeze 10-15 minutes.
BAKE #1 – Blind baking

- Line frozen pie with baking paper
- And aluminum foil
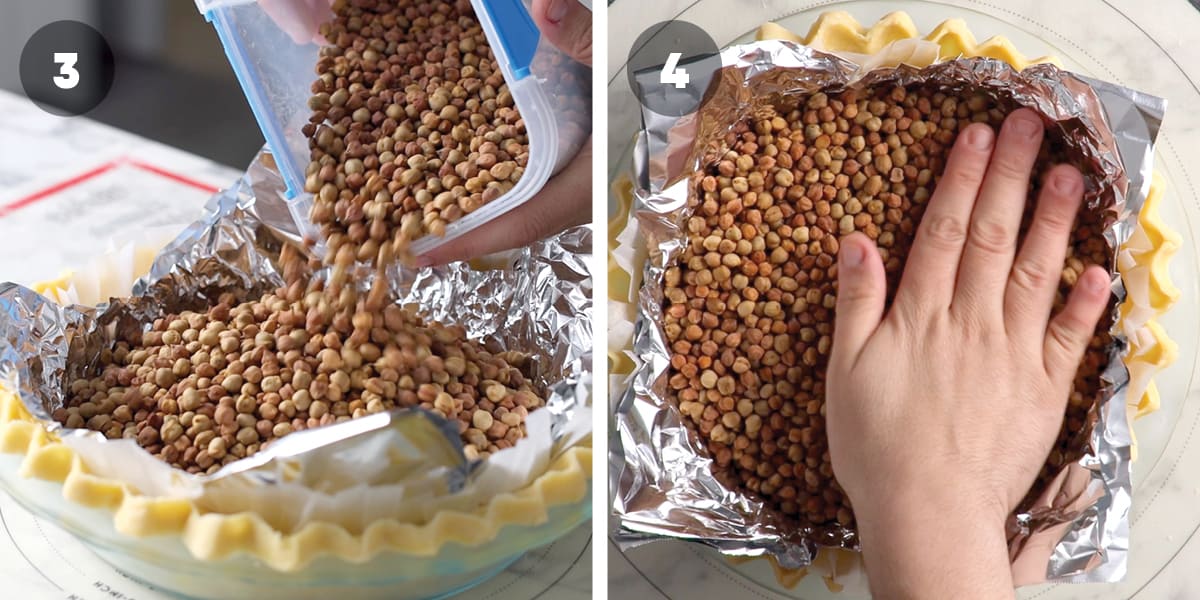
- Fill with baking beads or dried legumes.
- Bake for 15 minutes on 170C / 325F.
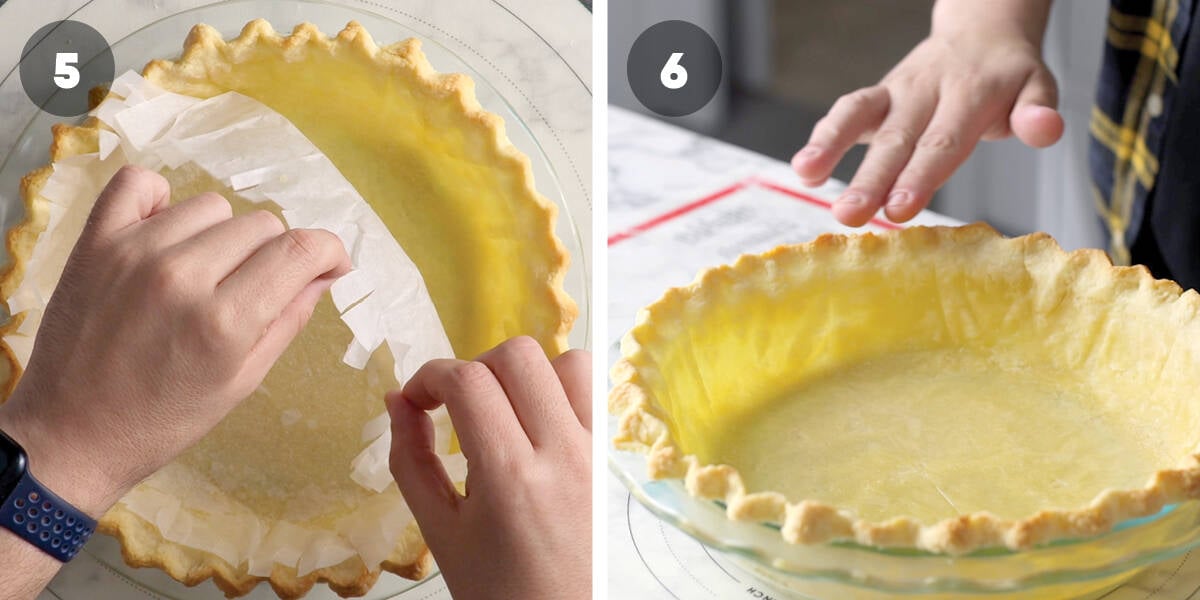
- Take beads out
- Bake for further 5 minutes until golden. Allow to cool before filling.
BAKE #2 – Fully baking your pie

- Brush with egg wash
- Prick with fork

- Cover top rim with foil
- Bake for 15 minutes.
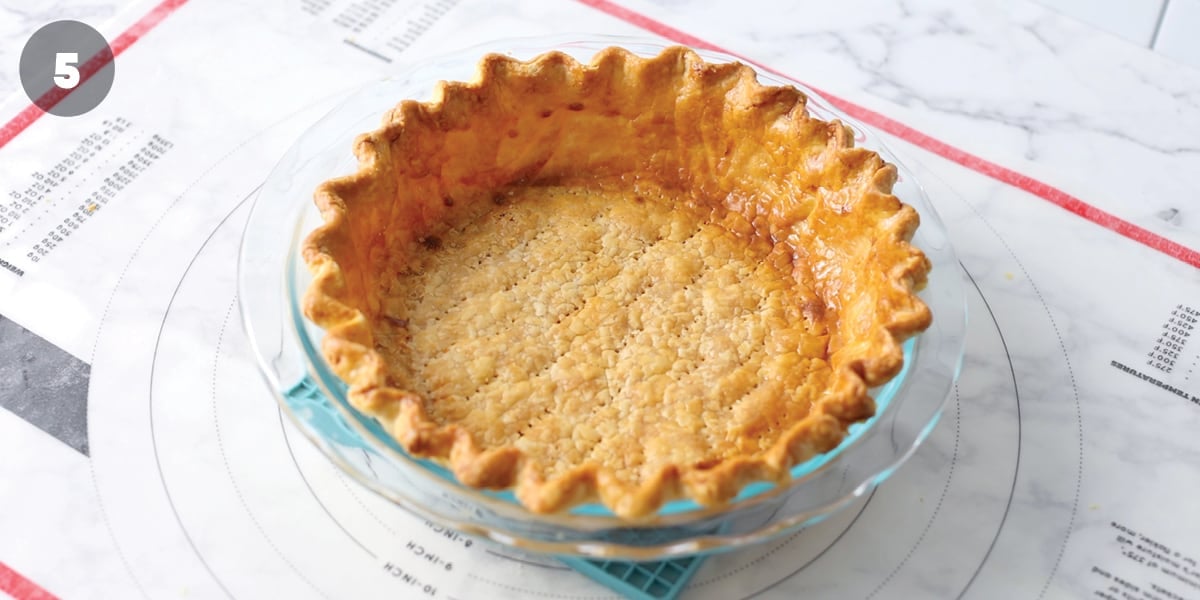
- Take out of the oven and use for no-bake pie recipes.
All My Tips And Tricks
Ok, I have loads of tips and tricks for making the perfect Butter Pie Crust. Have a read through and keep them in mind when making your own pie!
- Use a scale to measure out the ingredients – This is something I recommend for all of my baking recipes on the blog, but for some recipes it is especially important to achieve the very best results because weight measurements are way more accurate and yield consistent results than using cup measurements.
- Keep your butter and water ice cold – Using cold butter is important because it let’s your butter stay in larger chunks and not completely disintegrate into the flour. Larger chunks of butter in your dough means they will melt away as the pir crust bakes leaving your pockets of air which means light and flaky pie crust! The cold water helps keep the butter cold.
- Don’t overwork your dough – This can cause so many problems, mainly the dough shrinking as it bakes making your pie look really messy. It will also result in a tough crust.. The best way to avoid this is to have a no-knead rule. Instead bunch your crumbly and freshly made dough together to form two discs. Wrap in plastic wrap and let the resting period work its magic!
- Give your pie crust enough time to rest – Once you’ve made your pie dough, it’s going to be really crumbly. Impossible to roll right? Well giving it enough time to roll does a couple things. It helps the wet and dry ingredients get to know each other as they chill, making your dough easier to roll out. It also cools the dough down again, making it easier to roll out and keep the butter in it’s chunk state rather than mushing and mixing in with the dough. Those butter flakes are important to getting flaky pie crust!
- Chill your Pie in the pan before baking or filling your pie – This will insure that the butter melts slowly as the pie bakes, giving you little pockets of air = flaky pie crust
- Make sure your rolling surface is well floured – This will stop your pie dough from sticking to your work bench. While you’re at it, flour your rolling pin!
- Use a pie shield to prevent your pie from burning. – If you’re fully baking your pie, I would highly recommend using a long piece of foil to gently wrap around the top rim of your pie crust. This will help prevent your pie crust from burning when adding wet fillings that need a long time to bake in your pie crust.
Frequently Asked Questions About Making Pie Crust
What does it taste like?
This pie crust is buttery, light and delicious! Think puff pastry!
How do I store this?
- Pie dough – wrap it tightly in plastic wrap. Store in the fridge for up to 3 days or in the freezer for up to two weeks!
- Pre-baked pie – cover in plastic wrap and store in the fridge for up to 3 days before baking.
- Baked pie – can be covered in plastic wrap and stored in the fridge for up to 3 days.
Can I use this for small pies?
Yes! Roll out to the same size and use a round cookie cutter to cut out slightly larger pie discs than your baking dish or muffin tray. You blind bake and fully bake the same time as if you were baking a large pie.
Can I halve this recipe?
Yep, but making this full recipe and storing the second dough discs in the freezer is such a time saver. Especially during the holiday period when pie baking is a high priority!

Can I use vegetable shortening?
Yep, you can replace the butter with the same amount of shortening, but I would highly recommend using butter instead of shortening as it tastes better.
Why don’t you use vodka in your pie crust?
I did originally, and it does serve a purpose. But to me, and this is my personal opinion, it doesn’t make a huge difference to the end result of how flaky your pie crust is when baked.
Can I make this a chocolate pie crust?
Yep! Simple add two tablespoons of sifted cocoa powder in with the dry ingredients. I would also recommend adding an extra tbsp. of sugar.

Looking For More Pie Recipes?
Perfect Lemon Meringue Pie
Chocolate Pudding Pie
No-Bake Picnic Pie
No-Bake Chocolate Peanut Butter Pie
A Quick Baking Guide
If you’re new to baking or just want to brush up on the basics, these guides are a great place to start!
Loved the recipe? Let me know!
If you enjoyed this recipe, leave a star rating and comment below. It helps others find the recipe and keeps the baking community growing. Tag me on Instagram so I can see your version too!
Home Made Flaky Butter Pie Crust
This flaky Butter Pie Crust recipe is everything you need to know for making the very best pies at home!
Serves 2
Ingredients
Pastry
- 380 g all-purpose flour, plain flour
- 20 g granulated sugar, optional
- 1 tsp salt
- 250 g unsalted butter, chilled and cubed
- 60-80 g iced water, start with 60g first
Egg wash
- 1 large egg, 55g
- 15 g milk
Learn How To Make it! [VIDEO]
Instructions
Making pie dough using a food processor
- Combine dry ingredients – Place the flour, optional sugar, and salt in a food processor. Pulse a few times to combine.
- Add butter – Add the cold, cubed butter to the food processor. Pulse until the butter forms pea-sized pieces, about 20 pulses.
- Add water to form dough – Gradually add 60g (4 tbsp) of iced water while pulsing the food processor. The dough should start to clump. Test it by squeezing a small amount in your hand. if it holds together without crumbling, it’s ready. If it’s still crumbly, add more iced water, 1 tablespoon at a time, until it holds together.
Making pie dough by hand
- Combine dry ingredients – In a large bowl, whisk together the flour, optional sugar, and salt until evenly combined.
- Add butter – Add the chilled, cubed butter to the flour mixture. Use your hands to rub it in until the butter is coated and flattened. Work quickly to prevent the butter from melting and avoid overworking the dough to keep it tender and prevent shrinking during baking.
- Add water to form dough – Gradually add the iced water to the flour mixture, mixing until the dough starts to come together. Test by squeezing a small amount in your hand. If it holds without crumbling, it’s ready. If it’s too crumbly, add more water, 1 tablespoon at a time, until it holds together.
Chilling your dough
- Form a dough ball – Transfer the dough mixture onto your work surface. Gather it into two discs, wrap each in plastic wrap, and refrigerate for 1 hour. Can store in the fridge overnight.
Rolling out your dough
- Which pie tin to use – Use a 9-inch deep glass or metal pie plate, or a 9-inch deep tart tin with a removable bottom. If using a tart tin, place it on a baking tray for support during baking.
- Rolling out the dough – Remove the dough from the fridge, unwrap, and let it rest at room temperature for 10 minutes. Lightly flour your work surface and rolling pin, then roll the dough slowly, turning it regularly to maintain an even thickness of 0.5cm / 1/4 inch. Pinch together any cracks at the edges as needed. If the dough becomes uneven, trim excess and press scraps onto areas that need more dough to form a round shape.
Shaping the pie
- Transferring to your pie dish – Lightly flour your rolling pin, then drape the pastry over it to lift and transfer it into your pie or tart tin.
- Shaping into your pie dish – Gently lift the edges of the dough and let it fall naturally into the edges and bottom of the tin without stretching. Trim or fold the excess dough, leaving a small overhang. To create a wavy edge, pinch the dough with your thumb and index finger while pressing with your other index finger. For a crinkled look, press a fork around the top. If using the other half of the dough for a lattice or flat lid, trim the excess with a knife and skip the crimping.
Freezing Your Pie Before Baking
- Freeze pie – Place your pie in the freezer for 10-15 minutes. This will allow it to bake even flakier!
BAKE 1 – Blind baking your pie
- Preheat your oven to 180C / 355F (200C / 390F for no fan).
- Blind baking – Remove the frozen pie crust from the freezer. To prevent bubbling and ensure an even base, blind bake the crust by adding weights before partially baking it. This step helps stabilize the crust before finishing without weights.
- To blind bake your pie – Place two large pieces of baking paper inside the frozen pie crust, overlapping them to cover the base and sides. Add a layer of foil tightly over the baking paper. Fill with baking beads or dried beans, ensuring they cover the base and sides evenly. Bake for 15-20 minutes, or until the edges are lightly golden.
BAKE 2 – Baking your pie a second time
- Prepare the pie crust after baking – Remove the pie crust from the oven and carefully lift out the baking paper and weights using the corners. Let the weights cool completely before storing them for reuse. Brush the bottom and sides of the crust with egg wash (a mix of egg and milk) to seal it and prevent soggy fillings. This will also give the crust a golden, glossy finish when baked.
- To dock your pie crust – Use a fork to prick holes in the bottom of your pie crust. Docking helps steam escape, preventing air pockets during baking. Bake for a further 5 minutes or until golden.
BAKE 3 – To fully bake your pie (for no-bake fillings)
- Cover the top rim of the pie with foil to prevent it from burning. Bake for 15 minutes, or until the crust is a deep golden color. Let the pie cool completely before adding your no-bake fillings.
Notes
Storage – Pie crust can be made up to two days in advance and stored in the fridge until ready to use.
Dough – this recipe will make one pie with a base and lid or two pies with just a base.
Iced water – the amount of water you’ll need to use depends on a couple things but what you’re mostly looking for is for your dough to come together when squeezed without being crumbly. The dough mixture will still be a little crumbly but will stay together when squeezed in your hand.
Nutrition – is based on each pie crust
A note on measurements – all ingredients in this recipe are offered in Australian cup measurements and weight measurements. Weight measurements are created by me, in my kitchen here in Melbourne Australia. The best way to get recipe success is to measure ingredients by weight, using kitchen scales. To access weight measurements, click on the ‘metric’ button in the recipe card located under the list of ingredients.
Nutrition
Calories : 1385kcal
Carbonhydrates: 114g
Protein: 19g
Fat: 96g
Saturated Fat: 59g
Polyunsaturated Fat: 4g
Monounsaturated Fat : 25g
Trans Fat : 4g
Cholesterol: 327mg
Sodium: 1214mg
Potassium : 220mg
Fiber: 4g
Sugar : 7g
Vitamin A: 2967IU
Calcium: 72mg
Iron: 7mg
Nutrition Disclosure
Gave this recipe a go?Mention @thescranline or tag #thescranline!
previous post
2 comments
So excited for you guys to try out this recipe! I’ve got so many yummy pies planned for the blog so sty tuned for an updated list of recipe at the end of this article! N x
So excited to share this recipe!