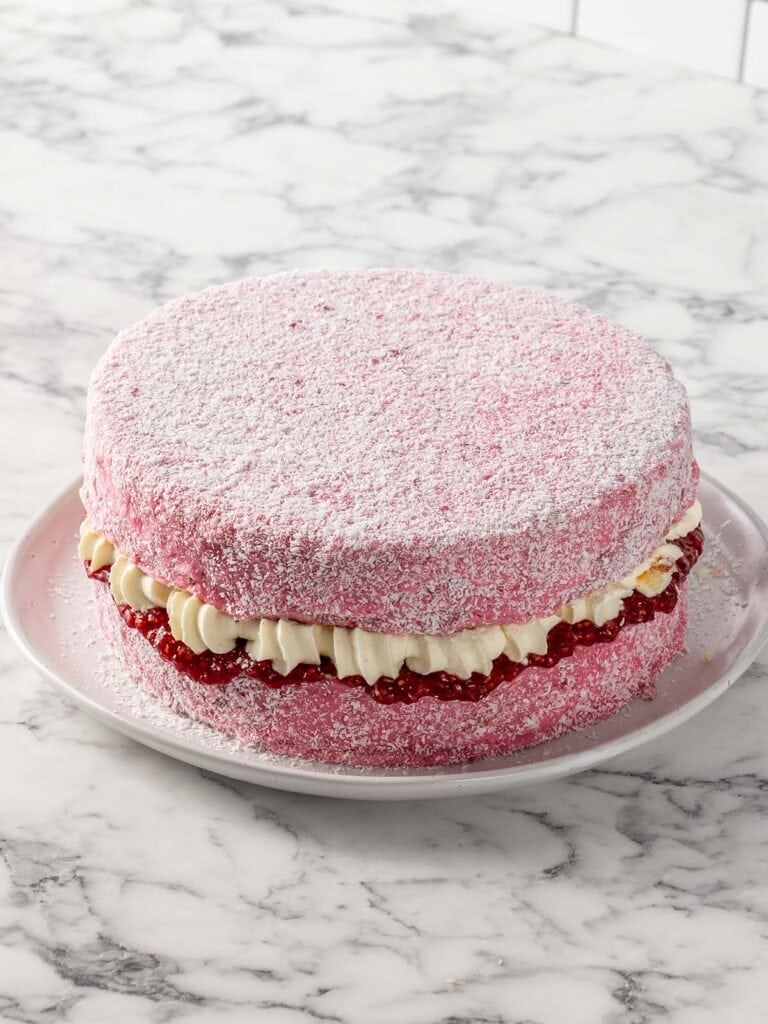
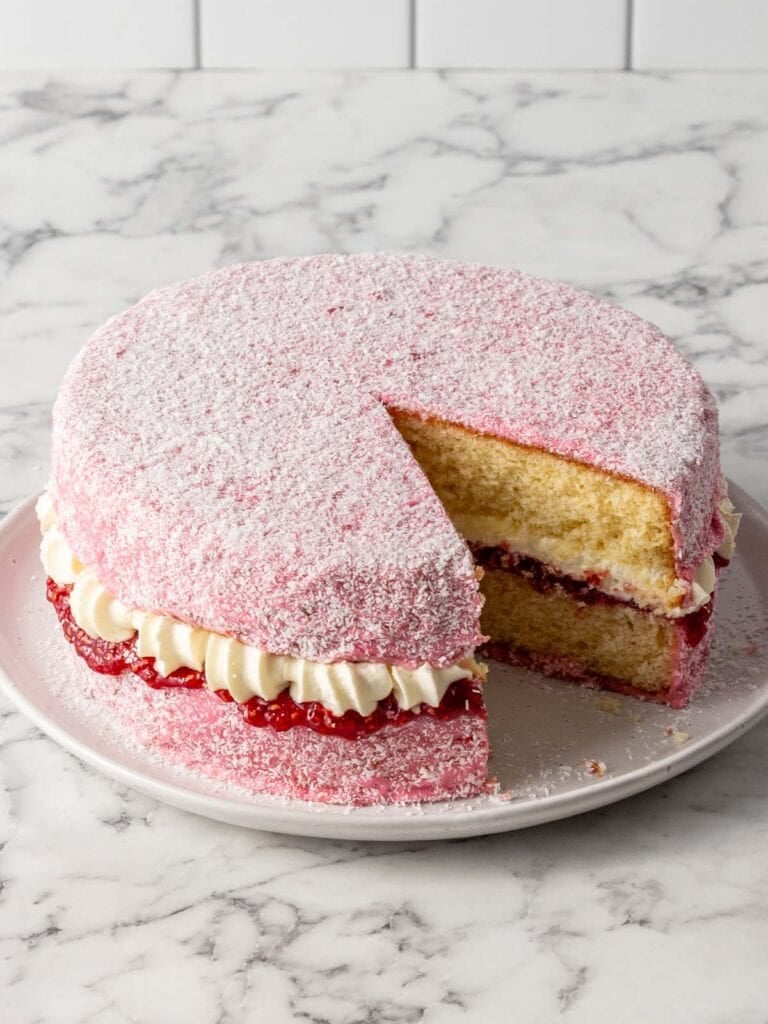
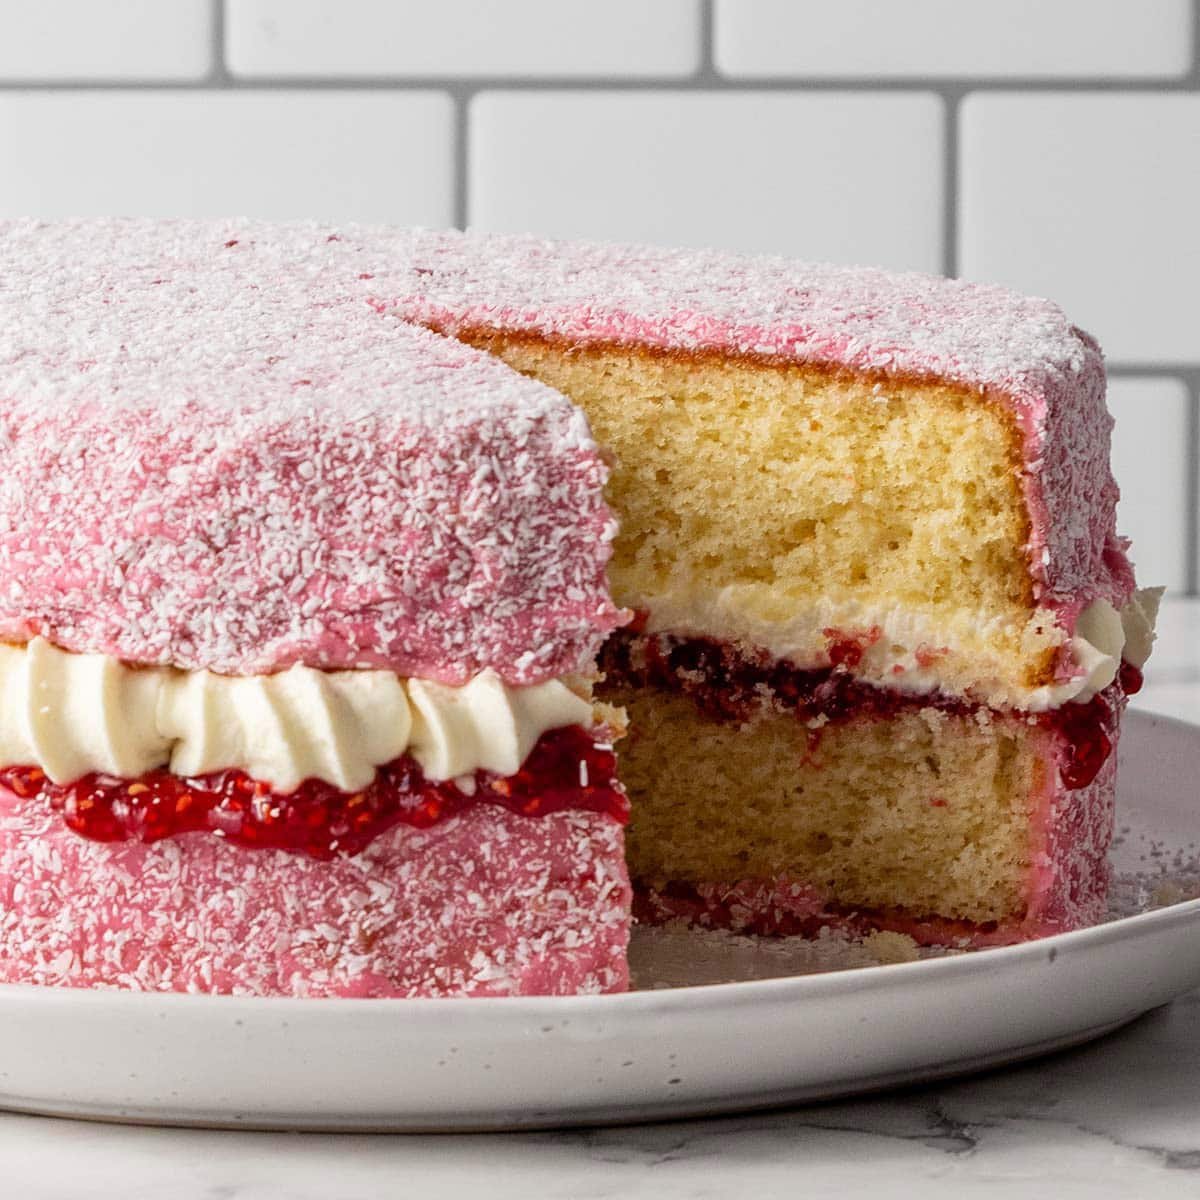
Raspberry Lamington Cake
My raspberry Lamington Cake is made with my soft and fluffy vanilla sponge and sandwiched with a layer of Chantilly cream and my thick home made raspberry jam. But what really grabs your eye is the raspberry glaze and the coconut coating which delivers everything you love about this classic aussie treat!
Hey team, Nick here! Lamingtons are up there with my top 5 nostalgic childhood treats. My mums Sponge Kisses are also on that list. This raspberry version is a re-imagined version of the classic little square sponge Aussies love so much!


The vanilla sponge is made using the hot milk method. I swear by this sponge method because it results in a soft and moist vanilla sponge. I don’t sweeten my Chantilly cream because I think the raspberry glaze adds enough sweetness. I think the coconut just finishes it off because it isn’t a lamo (lamington) without it!
If you’ve made my other lamington recipes, you’ll love this one. It leans into the raspberry side a little more with that cute raspberry glaze, which I’m fully on board with. I’m just saying, jam should always be part of a lamington. It’s lamo law ok?
I’ve got a nice little collection of lamington desserts on the blog. My Lamington Swiss Roll is bloody good and it doesn’t crack! I’ve also got a lamington layer cake which is covered in my chocolate sauce instead and of course, I have my actual lamingtons recipe which are better than anything you’ll buy.
Making the jam is super easy
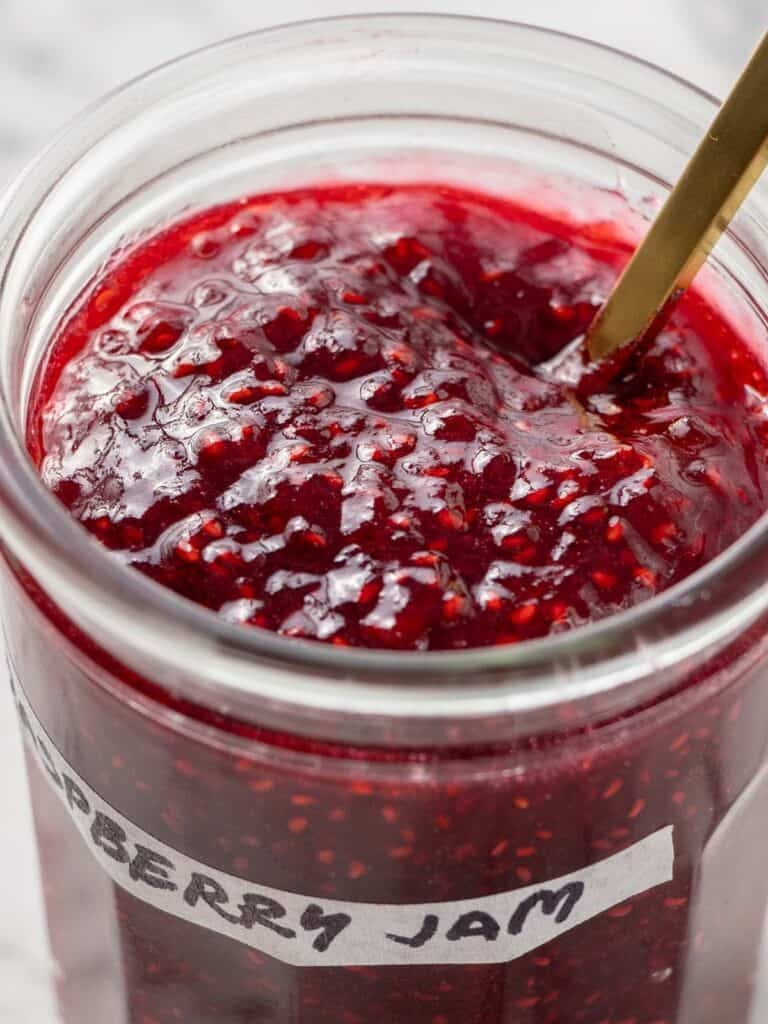
I love using my homemade raspberry jam in this cake. It is thicker than store-bought, so it stays in place when sliced. Mine has seeds, but you can strain them out for a smoother jam. Keep it mind it will be thinner without seeds. Store-bought jam works with this recipe, but I love the brighter color and flavor of home made jam and it doesn’t take that long to make!
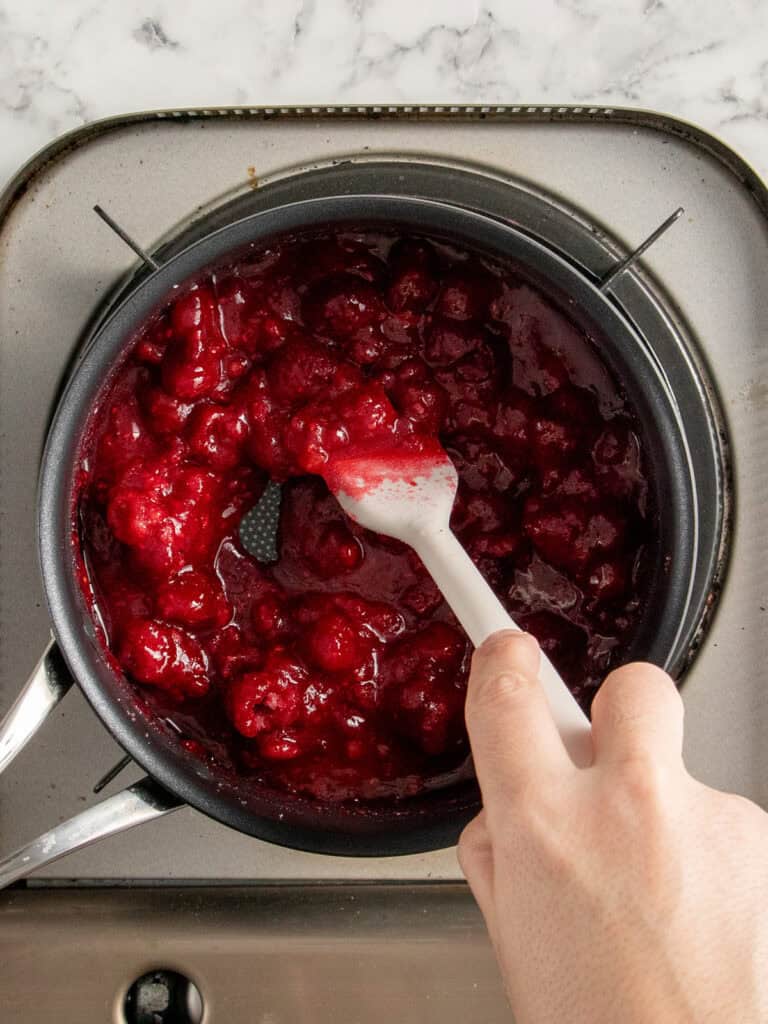
- Add the raspberries, sugar and lime juice to a pot and bring to a boil.
- Simmer until slightly thickened
- Test it on a chilled plate to see how set it is
- Pour into a clean jar or bowl until ready to us!
Tip – Make your jam the day before to give it plenty of time to set. Cold jam is easier to work with for this cake!
My soft and moist the vanilla sponge
This is my soft and moist Vanilla Cake Recipe. I’m super proud of it because it stays moist for days because of a method called the hot milk method. You heat butter and milk together as the last step as add it to the batter. It gently cooks the flour which expand the gelatin in the flour and helps lock moisture into the cake. It honestly works like magic! To make it:


- Whip eggs and sugar until thick
- Fold in dry ingredients


- Mix in warm milk, butter, oil and vanilla
- Bake until golden and springy, then trim the tops if needed for even layers
Tip – You can make the cakes up to two days ahead. Just wrap them tightly once cooled and keep at room temperature until you’re ready to put the cake together.
My controversially good Chantilly cream
My controversial Chantilly is a little different to classic Chantilly cream. I add mascarpone, which makes it silky, helps prevent over whipping and keeps it fluffy for longer so you can make it ahead of time! Controversial right? I swear by it. I think once you make it you’ll be converted!


- Add the mascarpone to a bowl and use a spatula to mix until smooth. Whisk in the cream and vanilla using a hand whisk until you get stiff peaks.
- Transfer to a piping bag fitted with an open star tip when you’re ready to pipe onto the cream.
Tip – I find using a hand whisk gives you better control over making sure everything is mixed evenly, and you get a much smoother result!
How to make the raspberry glaze
This cake gets its pink color from the glaze. I mix in a little raspberry jam for flavor and texture, and honestly, my favorite part is drizzling it over the top. It’s quick, easy and ridiculously satisfying.

Making it is really easy. Just add all the ingredients to a large mixing bowl and use a whisk to combine until smooth.
One thing I will add is that this glaze is very sweet. It won’t work if you use less sugar. If you’re looking for a version that isn’t as sweet, try my lamington cake with my chocolate glaze!
Tip – If you’re making your glaze ahead of time, cover it with plastic wrap so it doesn’t form a skin.
Covering the cake with the raspberry glaze
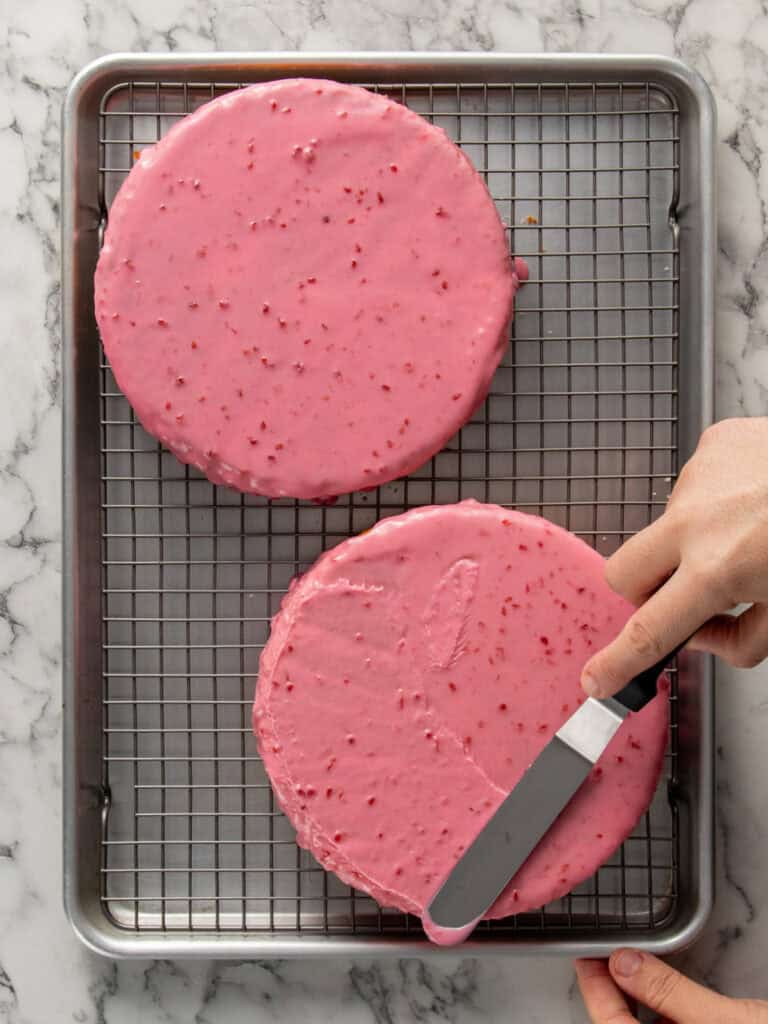
- Place your trimmed cakes onto a cooling rack and place a large baking tray underneath. This’ll collect all the excess glaze and coconut. Drizzle the glaze on top and use a spatula to spread around the top and sides of the cake.
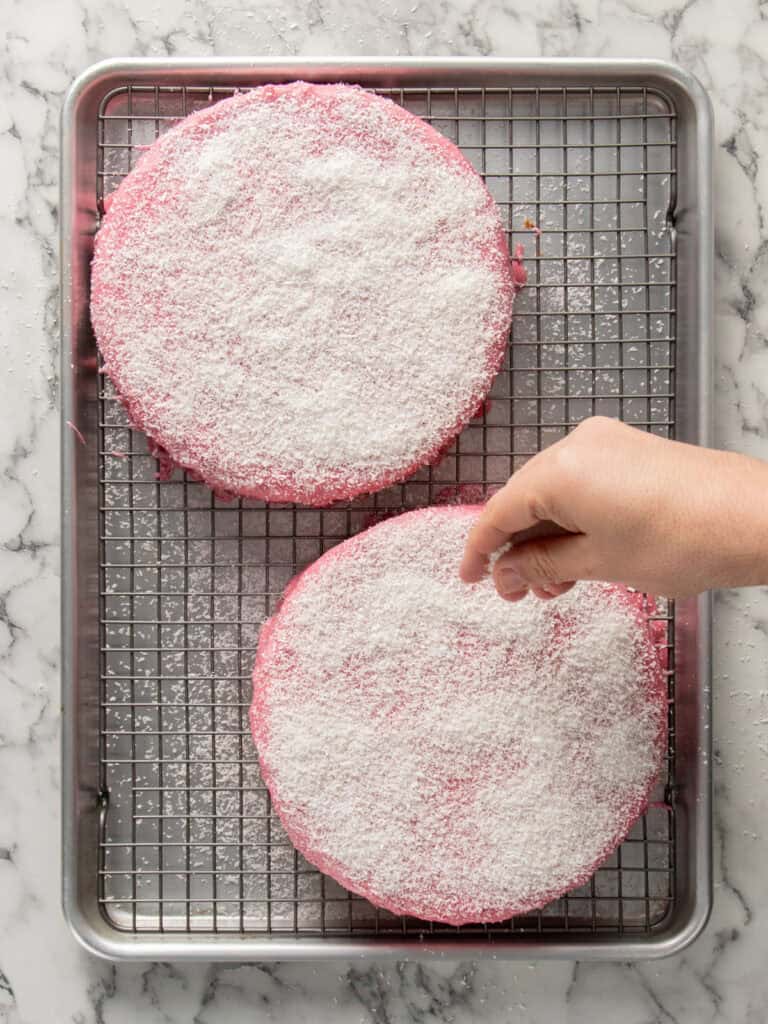

- Sprinkle the top with coconut. Get it as evenly coated as you can.
- Use a clean spatula to get rid of any excess mounds of coconut on the cake. Let the glaze set for about 10-15 minutes.
Let’s layer the cake
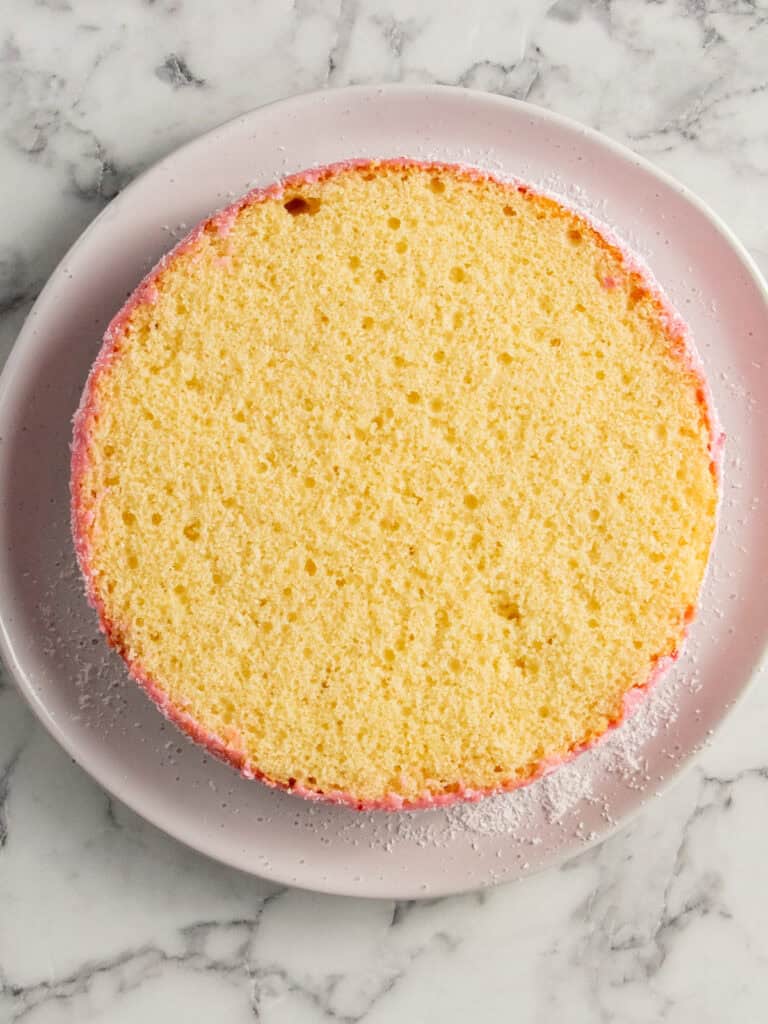
- Place the first layer of cake on your serving plate with the glaze facing down
- Spread the raspberry jam on top
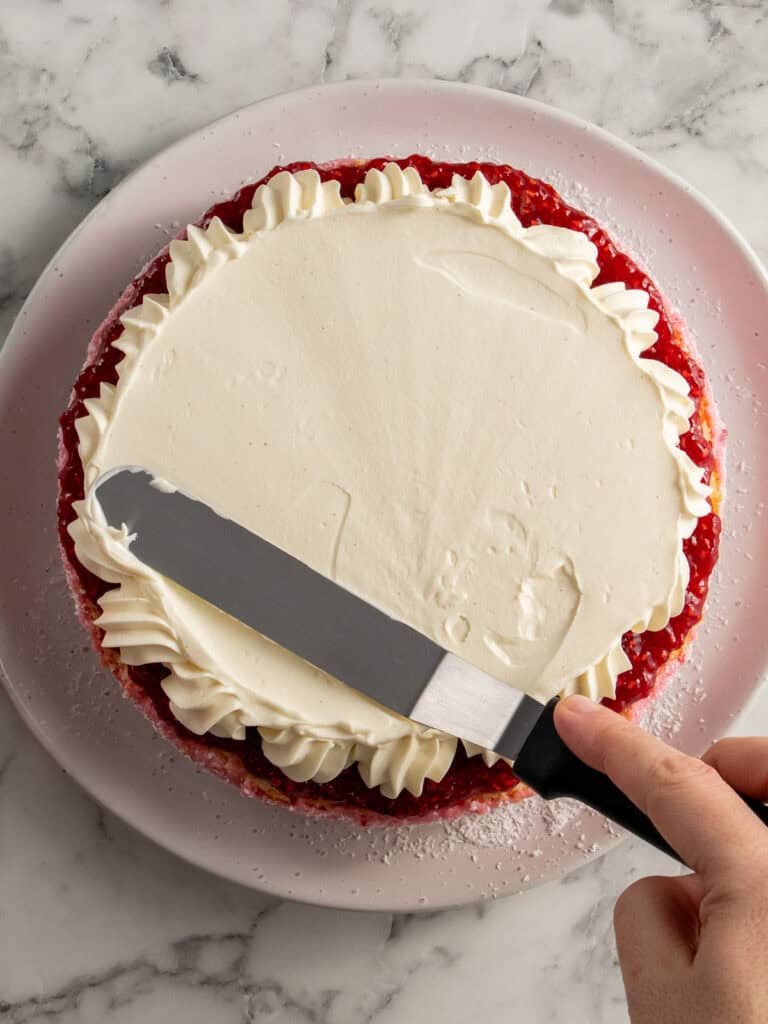

- Use your piping bag to pipe a perimeter of cream on top of the jam.
- Add the final layer of cake on top with the glaze facing up.
Tip – when piping the cream on top of the jam, don’t pipe all the way to the edge to allow some of it to spread when the final layer is added.
How to store the cake
Once you’ve put the cake together, keep it in an airtight container in the fridge. It’ll stay good for 3 days. I like letting it sit out for about 30 minutes to thaw before slicing and serving.
Hope you guys love this cake! If you give it a go, let me know what you thought in the comments! N x
A Quick Baking Guide
If you’re new to baking or just want to brush up on the basics, these guides are a great place to start!
Loved the recipe? Let me know!
If you enjoyed this recipe, leave a star rating and comment below. It helps others find the recipe and keeps the baking community growing. Tag me on Instagram so I can see your version too!
Fluffy Raspberry Lamington Cake
My Raspberry Lamington Cake is soft and fluffy with silky Chantilly cream, raspberry jam and a raspberry coconut glaze that sets perfectly for slicing.
Serves 8
Ingredients
Soft Vanilla Cake
- 330 g all-purpose flour, plain flour
- 3 tsp baking powder
- 3/4 tsp salt
- 4 large eggs, 55g each, room temperature
- 310 g caster sugar / superfine sugar, see notes
- 245 g milk, full fat
- 90 g unsalted butter, cubed
- 50 g vegetable oil, can use canola oil
- 14 g vanilla extract
- 200 g desiccated coconut to decorate cake
Raspberry Glaze
- 80 g warm milk
- 30 g unsalted butter, melted
- 40 g raspberry jam
- 465 g powdered sugar
- 1-2 drops pink food gel, optional
Raspberry Jam
- 1 batch of my raspberry jam, or 200g of raspberry jam
Chantilly Cream
- 300 g heavy cream, cold (see notes)
- 1 tbsp vanilla bean paste or vanilla extract, see notes
- 250 g mascarpone, cold (see notes)
- 40 g powdered sugar, sifted (see notes)
Instructions
Soft Vanilla Cake
- Preparing your oven – Preheat your oven to 170C / 340F (fan off), 150C / 300F (fan on). I like baking with the fan on for an even rise. Position your rack in the middle of the oven.
- Preparing your cake tins – Spray the bottom (not sides) of two 20cm / 8-inch cake tins with oil spray and line the bottom with baking paper. I prefer just rubbing cold butter on the cake tins for better flavor.
- Combine dry ingredients – In a medium sized bowl, whisk together the flour, baking powder and salt. Set aside.
- Beat the eggs and sugar – Add the eggs to a large mixing bowl (glass or metal), and use an electric hand mixer to beat until frothy, about 1 minute. A stand mixer with a whisk attachment also works. With the mixer on medium-high speed, add the sugar a spoonful at a time. It’ll take about a minute. Once all the sugar is added, keep beating on medium-high speed for 6 minutes until the mixture is pale, thickened, and tripled in size.
- Add dry ingredients to egg mixture – Add half the dry ingredients to the egg mixture and mix on low speed until just combined. Repeat with the rest. The batter will be thick. Avoid overmixing the batter, small lumps are fine, they’ll disappear in the next step.
- Heat milk and butter – Heat the milk and butter in a saucepan over medium heat, stirring continuously, until it reaches about 60C/140F or small bubbles form around the edges. Do not let it boil. Alternatively, you can also do this in a heatproof jug in the microwave. Mine takes about 90 seconds for the butter to melt.
- Add hot milk – Add half the hot milk mixture, along with the oil and vanilla. Mix on low speed until combined. Add the rest of the milk mixture and mix again until smooth. The batter will be thin and pour in a steady ribbon.
- Divide the batter – Divide the batter evenly between the two cake tins. It works out to about 600g in each tin. Tap each tin on the counter a couple times to release any air bubbles.
- Bake – Bake on the middle rack for 30–32 minutes, or until a toothpick inserted in the center comes out clean. The cakes should be deep golden and spring back when lightly touched. If they sink and don’t spring back, bake for a couple more minutes.
- Cool the cakes – Let them cool in the tins for 10 minutes, then run a knife around the edges to loosen. Transfer to a cooling rack, placing them baking paper side down, and let them cool completely.
- To level off the cake (optional) – Use a large, serrated knife or cake leveler to very top of each cake to level it off. This is completely optional. The cake bakes pretty flat anyway.
Raspberry glaze
- Add all ingredients to a mixing bowl and whisk until well combined.
Chantilly Cream
- Prepare mascarpone cheese – Add the mascarpone to a large mixing bowl (glass or metal) and use a spatula to stir and break up as some brands can be firmer than others. This helps break it up a little to prevent lumps in your whipped cream.
- Whip remaining ingredients – Add the cold heavy cream, powdered sugar and vanilla to the mascarpone. You can use an electric hand mixer or a stand mixer with a whisk attachment to whip to stiff peaks. I find it easier to get the right texture with a hand whisk. You’re aiming for a smooth, stiff whipped cream that holds its shape but still looks silky. If it looks split or grainy, it’s been overwhipped.
To Assemble
- Cover the sponges – Set a cooling rack over a baking tray to catch the excess glaze. Place both cake layers on the rack. Pour the glaze over each one, then use a spatula to spread it over the top and sides. While the glaze is still wet, sprinkle the top and sides with coconut. Let the cakes sit for 20 minutes so the glaze can set.
- To layer the cake – Place one cake layer on a cake board or serving plate. Spoon raspberry jam on top and spread it out, leaving a small border. Add about three quarters of the Chantilly cream and gently spread it over the jam. The cream might slip around a bit, so take your time. Once the jam settles into the sponge, it will hold better. Place the second cake layer on top with the coconut-covered side facing up.
Notes
Caster sugar – also known as superfine sugar is ideal for this cake as it dissolves into the eggs quickly which will prevent overmixing. Alternatively, you can use granulated sugar or even pulse granulated sugar in a food processor until it’s finer.
Cream – make sure you use cream labelled heavy cream for this recipe. Whipping cream will work but won’t be as stiff as heavy cream. Low fat cream will not work.
Powdered sugar – I don’t like my cream too sweet, but if you like yours on the sweeter side you can use up to 1/2 cup. Make sure you sift it!
Mascarpone – is an Italian cheese that is similar in flavor to sour cream, but more creamy and less sour. Adding it to your Chantilly cream helps stabilize it so that it doesn’t melt as quickly and holds its shape on top of desserts. It even helps hold the air in the whipped cream until the next day! Opt in for a better brand one as they tend to be thicker and make sure it’s cold straight out of the fridge! Make sure you give your mascarpone cheese a mix before using. Some brands are soft, some are firm and can cause your Chantilly cream to go lumpy.
Vanilla – I have a great recipe for Vanilla extract here on the blog which is alcohol based. It can be used for most recipes. However, I would advise against using it for whipped creams (yes, even stabilized ones like this one) or meringues as it can muck around with the air whipped in the mixtures. Instead use a syrup based vanilla extract. I find vanilla bean paste is best.
Storage – This cake can be stored in an airtight container, in the fridge for up to three days.
Nutrition – is an approximate and is based on per slice
A note on measurements – This recipe uses weight measurements for the most accurate results. Cup measurements can vary depending on where you are, which affects the precision needed for a recipe like this. Here is where you can learn more about how to measure ingredients using digital kitchen scales.
Nutrition
Calories : 895kcal
Carbonhydrates: 106g
Protein: 11g
Fat: 41g
Saturated Fat: 26g
Polyunsaturated Fat: 2g
Monounsaturated Fat : 6g
Trans Fat : 0.3g
Cholesterol: 204mg
Sodium: 374mg
Potassium : 248mg
Fiber: 4g
Sugar : 83g
Vitamin A: 1242IU
Vitamin C: 8mg
Calcium: 102mg
Iron: 1mg
Nutrition Disclosure
Gave this recipe a go?Mention @thescranline or tag #thescranline!
previous post
21 comments
Do you strain the raspberry jam when you’re making the glaze? Your glaze looks really smooth and not like there are any seeds in it!
Hi Eileen, I don’t strain it so the glaze does have seeds in it. That said, the jam gets mixed in well enough that it looks pretty smooth once it’s whisked through. N x
Just about to make the jam and wanted to let you know you say you didn’t sieve the jam for seeds and I can see that from the photos BUT you must have sieved it to make the glaze? Just thought it might be worth updating the recipe for that.
Hi David! Hope you enjoyed the recipe. I didn’t seive it for the very top if that’s what you’re referring to, although you can certainly do that if you like! Nick x
Hi is it necessary to use 3 cups of sugar instead of say 1 cup for the glaze? It seems alot for a glaze thanks
Thanks Joe, yep it is necessary. That amount helps make the glaze thick enough to coat the cake and stick the coconut on properly. It also stops it from turning out too see-through. That’s how I tested it and got the result you see in the photos. N x
Hi Nick,
Can this cake be made into a Gluten Free version
Hi Angie, I haven’t tested this recipe as gluten free so I can’t say for sure how it would turn out. If you do give it a go with a 1 to 1 gluten free flour blend, let me know how it goes. N x
Another great cake Nick, can’t go wrong with the vanilla cake recipe and loved the twist on the chantilly cream, definitely a game changer
Thanks Jan! So glad you loved it! Yes! I love adding mascarpne to the chantilly. It makes it so much more stable! N x
Hi Nick! I’m new to your blog and I’m so happy I’ve found it! I absolutely love how detailed you are and you clearly explain how some things can’t be modified and some can’t! Everything looks delicious!! Thank you! 🙂
Hi Carol, welcome! I’m so glad you found the blog. I really try to make each recipe as clear and helpful as possible, so it’s great to hear that’s coming through. Thank you for the kind words, and I hope you find something delicious to try soon. – N x
This cake was AMAZING! Such a well written recipe, with quantities, temp and times all bang on. The marscapone helped balance the richness of the cream and is oh so pipeable. I made the jam and would recommend this, as it has more acidity than commercial jam, which the cake needs to balance it out. Next time round I’m sticking freeze dried raspberry powder in the glaze for some extra tang.
Hi Jess, this made me smile. So glad the recipe worked out and I love that you picked up on the mascarpone balancing the cream. It makes it so easy to pipe too. Totally agree on the jam, the acidity really lifts the cake. Freeze-dried raspberry powder in the glaze sounds genius. Let me know how it goes. N x
Hi! I just love your recipes! We are truly blessed that you share your gift with all of us! May I ask if the glaze hardens? Thank you again!
Hi Samantha, thank you for the lovely message. The glaze does set, but I wouldn’t say it hardens completely. It holds its shape but stays soft when touched. Hope you enjoy the recipe. N x
Hi. Is the desiccated coconut sweetened or plain? Thanks for your help.
Hi Maddy! Unsweetened 🙂 N x
Hi Nick, made this cake for my partners birthday and she loved it. I am no baker so really appreciated how easy you made it for me. I liked how I could just weigh the liquids, sped everything up! Clear and consice instructions and a tasty recipe. Much appreciated you are the man. Now id attach a photo but it won’t let me just know it was well good.
That’s so amazing to hear Toni! I’m all about measuring with kitchen scales. I agree. It makes things so much easier and faster! Glad you loved the recipe too! You can always tag me on instagram if you like! N x
🙌🏽🙌🏽🙌🏽🙌🏽 top top